

enswm24e
.pdfQuick Start with ICCAVR
shown on the left to open the trunk, deselect any GCC entry and select
ImageCraft for AVR.
Finally we are ready to build the configured Nut/OS. Select Build Nut/OS from the Build item of the main menu. After confirming two message boxes, the configuration tool prepares a new build directory or modifies an already existing one, using the build path specified in the settings notebook. It creates a set of files including some C language header files in a subdirectory named cfg. These files are added to the Nut/OS source code to tailor the system to a specific hardware.
The Configurator will then run an external utility to clean any previous build (make clean), create new libraries (make all) and finally copy them to the install directory (make install).
As a result, we get the following ICCAVR libraries:
libnutarch.a (Architecture dependent library)
libnutcrt.a (C runtime support library)
libnutdev.a (Device driver library)
libnutfs.a (File system library)
libnutnet.a (Network library)
libnutos.a (RTOS library)
libnutpro.a (Protocol library)
crtenutram.o (Runtime initialization for Ethernut 1.3 Rev-G)
crtnutram.o (Runtime initialization for all other boards)
nutinit.o (Nut/OS initialization)
If this step fails, check your settings again. If you can't determine the problem and if you’re using a licensed version, try the command line to fix this or at least find out more about what went wrong. The compiler demo will not run on the command line.
Open a DOS window, change to the build directory directory and enter
PATH=c:\ethernut-3.9.9\nut\tools\win32;c:\icc7avr\bin;%PATH%
to add the directories containing all required tools to your PATH environment. The directories given above are an example. You may have installed ImageCraft and Nut/OS in different directories.
Enter
make clean
followed by
make install
At the end you should see some kind of error message. If this is all Greek to you, best check the Ethernut FAQ before asking the Ethernut mailing list for further assistance.
7

Ethernut Software Manual
If everything went fine, we will set up a sample directory. Although possible, we will not touch the source directory, which contains the application samples. Instead we will use the Configurator to create a copy of the sample directory for us.
Select Create Sample Directory from the Build entry of the main menu. After confirming the message box, the Configurator will create a new or update an existing directory for application development and fill in a copy of the Nut/OS sample applications.
Configuring ImageCraft
Everything is ready to try our first Ethernut project. Go back to the ImageCraft IDE. If it has been started for the first time, the IDE will appear without any opened project.
Select Open... from the project menu, navigate to the Nut/OS sample directory and load the project file httpd.prj, which is located in the subdirectory httpd.
The prepared webserver project contains most required settings. Later on, you will create your own projects and refer to the following steps to configure it.
If the project files in your Nut/OS distribution had been created for a different version of the ImageCraft compiler, you will see a warning message, reminding you to select the
correct target. You can ignore this for now, we will get to this step anyway.
8

Quick Start with ICCAVR
Select Options... from the project menu and click on the tab named Paths. Two additional paths had been added to the Include Paths, c:\ethernut-3.9.9\nutbld\include and c:\ethernut-3.9.9\nut\include. This way ICCAVR will search C header files in the Nut/OS build directory first, then in the original Nut/OS source directory and finally in its own include directory, which doesn’t need to be specified.
In other words, the files located in the build tree will override the original header files in the source tree, which in turn will override the original ICC header files.
The entry marked Library Path points to the directory, which contains our readily build Nut/OS libraries.
Click on the Compiler tab and verify, that all options are correctly set. Code size reduction is optional and only available in the professional version of the ImageCraft compiler.
Add __MCU_enhanced to the macro definitions only, if you are compiling for the ATmega128 CPU.
Add ETHERNUT2 to the macro definitions only, if you are compiling for the Ethernut 2.0 or 2.1 board.
In any case you need to add
__HARVARD_ARCH__. All Macro Defines should be separated by spaces.
The robi command entered for the
Execute Command After Successful Build at the bottom can be used to convert a hex file to a raw binary and is not required. You may use raw binary files later, when replacing the JTAG or ISP adapter by the Ethernet
bootloader. Loading programs into the Ethernut via a bootloader is much faster than any other method of in-system-programming.
Click on the Target tab. Again make sure, that the right options are set. Specifically check the device for ATmega103 or ATmega128.
9
Ethernut Software Manual
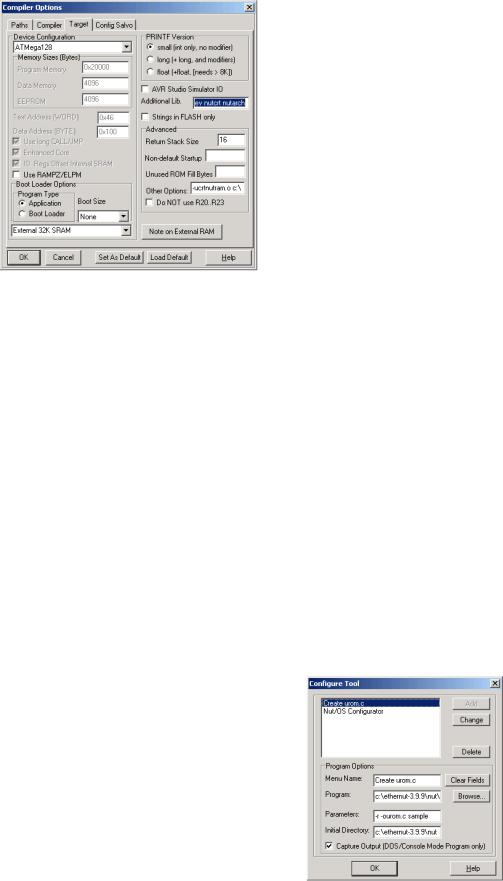
The following Additional Libs are required for the webserver project:
nutpro nutfs nutnet nutos nutdev nutcrt nutarch
If your application requires floating point operations, replace nutcrt by nutcrtf. This will, however, produce larger code.
For Other Options enter
-ucrtnutram.o c:\ethernut-3.9.9\nutbld\lib\nutinit.o
or for Ethernut 1.3 Rev-G
-ucrtenutram.o c:\ethernut-3.9.9\nutbld\lib\nutinit.o
This will instruct the compiler to use a Nut/OS specific runtime initialization routine. The main difference to the standard routine is, that NutInit is called before main, so any RTOS specific initialization is hidden from your application code. You can simply start coding main, while the idle thread and the Nut/OS timer is already running in the background. In fact, main is started as a Nut/OS thread. This feature makes Nut/OS applications look like normal C programs and preserves portability.
Most Nut/OS applications will need more than the 4 kBytes of RAM provided internally by the ATmega CPU. Thus, the compiler is intentionally set to External 32k SRAM. You can find more information about this topic in a separate document named Nut/OS Memory Considerations.
We ignore the last page for Salvo settings. Salvo is another RTOS similar to Nut/OS. Press OK to close the Compiler Option Window.
Specially for our HTTP Server project, another entry in Tools Menu will be helpful. Select Configure Tool and add the following entries in the Edit Tool Menu Dialog.
Menu Name: Create urom.c Program: c:\ethernut-
3.9.9\nut\tools\win32\crurom.exe Parameters: -r -ourom.c sample
Initial Directory: c:\ethernut-
3.9.9\nutapp\httpd
Activate Capture Output
The crurom utility converts all files in a directory to a C source file. This is used to include HTML files, images, Java Applets or other stuff into the
10

Quick Start with ICCAVR
Webserver's simple file system. The C source will be compiled and linked to the Nut/OS code.
Creating the First Nut/OS Application
By default Nut/OS uses DHCP to automatically setup its TCP/IP configuration. Even without DHCP, typical applications will store these settings in the on-chip EEPROM. In order not to overload this tutorial, we will use hard coded addresses.
Open the file httpserv.c in the integrated editor. Consult your ICCAVR manual on how to do this and how to use the editor. You probably have to change the IP address and may also modify the IP mask to fit your network environment. Otherwise your web browser won't be able to talk to your Ethernut Board later on. If unsure what to do, better ask someone with IP network experience.
You can change the MAC Address to the one, which you received with your Ethernut Board. For self build boards or other boards without MAC address, you need at least to make sure, that the address is unique in your local network.
When selecting Make Project from the project menu, ICCAVR will compile and link the webserver code. Check, that no errors occurred during this process. Refer to the ICCAVR manual for further details.
11

Ethernut Software Manual
As a result of the this step, ICCAVR created several files in the project directory. One is named httpserv.hex and contains the binary code in Intel Hex Format. The second file, httpserv.cof, can be loaded into the AVR Studio Debugger and contains the binary code plus additional debugging information.
Unless debugging is required, you can directly use the ICCAVR IDE to program the ATmega flash memory with an ISP Adapter like the one you received with your Ethernut Starter Kit. For debugging you need a JTAG Adapter with debugging capabilities, for example the ATJTAGICE from Atmel. The JTAG interface of the SP Duo doesn’t support debugging.
If not already done, connect the ISP Adapter to the Ethernut Board and the PC. While doing this, you must have switched off the Ethernut's power supply.
Switch the Ethernut power supply back on and select In System Programmer from the Tools menu. Then select the file httpserv.hex for the FLASH by clicking on the Browse button. We do not need to program the EEPROM. Now press the
12
Quick Start with ICCAVR
button labeled Program FLASH/EEPROM to start in-system programming. This takes some seconds. Some version of ICCAVR display an error message on empty EEPROM entries. You can ignore this.
Finally press the OK button to close the In System Programming window. Your Ethernut Board will immediately start the webserver application, waiting for a web browser to connect.
Skip the next two chapters, which are related to GCC.
13
Ethernut Software Manual
Quick Start with AVR-GCC on Linux
Using free tools on a free platform.
Installing AVR-GCC on Linux
The Windows version of the compiler will be presented in the next chapter.
The following packages are required to build and install an AVR development environment on Linux:
GNU Binutils 2.14
GNU Compiler Collection GCC 3.3.
AVR Libc
avrdude 5.0
Detailed information is available at
www.nongnu.org/avr-libc/user-manual/install_tools.html
Installing Nut/OS
The installation for Linux is as a compressed tar file. Execute
bzip2 -d ethernut-X.Y.Z.src.tar.bz2 tar -xvf ethernut-X.Y.Z.src.tar
where XYZ has to be replaced by the version number. Change to the newly created directory ethernut-X.Y.Z and run ./configure. However, make sure to have the following source packages installed:
wxGTK-2.6.0.tar.bz2
lua-5.0.2.tar.gz
doxygen 1.4.2
graphviz 2.2.1
There may be binary packages for your specific Linux variant available too. Make sure that they were build from exactly these sources.
Configuring Nut/OS
It is assumed, that you are running a GTK based window manager. Change to the parent of the installation directory and enter
nutconf
This will execute the Nut/OS Configurator. In this chapter we will not explain the details of this tool, but concentrate on the AVR-GCC specific settings.
14

Quick Start with AVR-GCC on Linux
When started, a file selection dialog is presented. If not already displayed, navigate to the ethernut-X.Y.Z/nut/conf directory, where the hardware configuration files are located.
Select the configuration file for your board:
ethernut13f.conf for board versions 1.3 Rev-F or previous.
ethernut13g.conf for board versions 1.3 Rev-G.
ethernut21b.conf for board versions 2.0 Rev-A or Ethernut 2.1 Rev-B.
After pressing OK, the selected file will be loaded and the hardware related configuration for this board will be automatically set by the Configurator. The main configuration window will receive the focus. If the component tree is empty, don’t worry. It’s simply because the Configurator couldn’t find the repository file. We will fix this soon.
From the Edit entry of the main menu select Settings. The settings notebook with four pages named Repository, Build, Tools and Samples will appear.
15

Ethernut Software Manual
The first page defines the path the the so called repository file. You may want change the relative path to an absolute one.
In case the main window didn’t show the component tree, that’s because the path to the repository had been incorrect.
On the second page enter the correct top source directory, /opt/ethernut/nut by default. The Configurator will scan the conf subdirectory in the specified path for predefined platform settings and add them to the Platform drop down list.
Select avr-gcc as the platform.
The entries for First and Last include directories can be ignored when using GCC. For special configurations they allow to set include directories, which will be searched before (First) or after (Last) the standard directories in the source tree.
When building Nut/OS, the Configurator will automatically add all Nut/OS include directories.
It is important to note, that we distinguish
between the source directory and the build directory. The big advantage is, that we are able to create several system builds for different configurations from a single source tree, e.g. building Nut/OS for different Ethernut board revisions.
The build directory can be located anywhere, but it is recommended to use a sibling of the source directory and choose a meaningful name. Using the Browse button offers to create new directories.
Finally enter an Install Directory. It is a good idea to choose a directory within the build tree, e.g. ~/ethernut-3.9.9-bld/lib. After system build, the Configurator will copy the libraries to this destination.
16