

Dench P.Welcome to the turtle world of Logo
.pdfLinking more 'shapes'
Ask your Mentor for these 'extra shapes' consisting of various types of triangles, left and right parallelograms and a trapezium. Try them out!
Playing 'turtle'
Work with a partner on the following pairs of shapes and pretend to be a turtle and do exactly what your partner says except when the request is not a legal Lego command then you may reply "I don't know how to ....<whatever>".
Write down each step that seems correct and then test them.
Note: it may help to rotate the 'drawing' as you 'talk' your way along the path.
RECT :HT :WID |
;Shape 1 |
|
|
|
|
turtle talk ................................... |
;Link |
|
|
|
|
TRAP :WID :WID/4 |
;Shape 2 |
|
|
|
|
RECT :HT :WID |
;Shape 1 |
|
|
|
|
|
|
|
|
||
|
|
|
|
||
turtle talk .................................. |
;Link |
|
|
|
|
TRI45 :HT |
;Shape 2 |
|
|
|
|
|
|
|
|
||
CIR :SIZE |
;Shape 1 |
|
|
|
|
|
|
|
|
||
turtle talk ................................... |
;Link |
|
|
|
|
TRI :SIZE |
;Shape 2 |
|
|
|
|
11
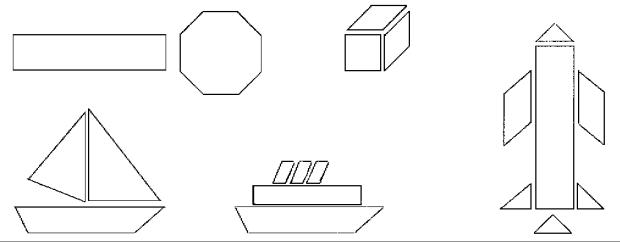
Now try linking each of these five groups of shapes.
Proceed as follows:
•First mark the turtle starting point on each shape in a group and number them in the order you will draw them.
•Then 'turtle talk' your way around the group to move the turtle from the first starting point to the second and subsequent starting points.
•Finally test your 'turtle talk' remembering to 'talk' your way back to the first point: the Reverse-path Principle.
Now create some groups of your own using the available shapes. 'Turtle talk' your way around them and then test by writing procedures.
12
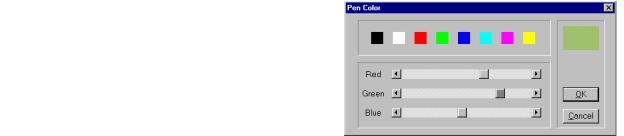
Choosing colours (colors)
You can choose pen, flood-fill, and screen colours by using the MSWLogo Screen Menu Bar e.g. Set>PenColor etc. and select one of the 'index' colours displayed there or use the Red, Green, Blue scroll-bars to create your own colour.
Mostly you will need to control colours with procedure commands: SETPC pencolor,
SETFC floodcolor, and SETSCREENCOLOR screencolor.
For that you will need the colour values given in the Colour Table below, or if you have created your own colour then type SHOW PENCOLOR, or whatever, in the 'Input Box' and record the colour values displayed for future use.
Create a library of colour procedures if you have difficulty in remembering the colour values for each colour you use.
The one for 'red' follows: TO red
OP 4 ; or OP [255 0 0] END
then you will be able to type SETPC red rather than have to recall the colour values.
Color Table
Name |
Index |
RGB values |
Name |
Index |
RGB values |
|||
Black |
0 |
[ 0 0 0 ] |
|
Brown |
8 |
[155 96 59] |
||
Blue |
1 |
[ 0 0 255] |
|
Light brown |
9 |
[197 136 18] |
||
Green |
2 |
[ 0 255 |
0 |
] |
Mid-green |
10 |
[100 162 64] |
|
Cyan |
3 |
[ 0 255 |
255] |
Blue-green |
11 |
[120 187 187] |
||
Red |
4 |
[255 0 |
0 ] |
|
Salmon |
12 |
[255 149 |
119] |
Magenta |
5 |
[255 0 |
255] |
Blue-ish |
13 |
[144 113 |
208] |
|
Yellow |
6 |
[255 255 |
0 ] |
Orange |
14 |
[255 163 |
0 ] |
|
White |
7 |
[255 255 |
255] |
Silver |
15 |
[183 183 |
183] |
|
Drawing coloured lines
When all lines you draw are black there is no need to lift the pen between shapes that touch and you only need PU and PD to jump to new locations without drawing a line.
When each shape is a different colour you must lift the pen between shapes to avoid over-writing the different colour already drawn.
Alter your HOUSE procedure and put the pencolor required before each shape then put PU at the beginning, and PD at the end, of each link, as follows:
TO HOUSE :SIZE |
|
SETPC 6 SQU :SIZE |
; draw yellow walls |
PU FD :SIZE RT 30 PD |
; link to roof |
SETPC 4 TRI :SIZE |
; draw red roof |
PU LT 30 BK :SIZE PD |
; link to ground (R.P.P) |
END |
|
Note that the PU and PD are not components of the Reverse-path Principle.
You can also use pencolor to colour text and characters that you LABEL on the screen. Ask your Mentor about Supplementary Topic: Using 'Characters' as graphics.
13
Filling an enclosed space with colour
The following basic sequence of events is essential:
1.choose the colours,
2.draw the shape,
3.lift the pen and move into the shape,
4.fill with colour,
5.return to the edge of the space and put the pen down,
as follows, each line separately entered in the Input Box:
• SETPC 6 SETFC 6 |
; set pen and flood colours to yellow |
|
• |
SQUARE 80 |
; draw shape |
• PU RT 45 FD 20 |
; move part-way inside shape |
|
• |
FILL |
; fill with flood colour |
• BK 20 LT 45 PD |
; move back to edge (Reverse-path P.) |
|
Note the need for PU in the third step to avoid drawing a line, reversed by PD in the fifth step to resume line drawing.
Now create a COLOR.WALLS procedure from the above lines and then clone COLOR.ROOF from COLOR.WALLS but due to the 'sharper' shape of the triangle you will need to reduce the 45° angle for the move inside the triangle.
Finally replace the SETPC 6 SQUARE :SIZE and the SETPC 4 TRIANGLE :SIZE lines in Step 2 above with your two new procedures to get a 'painted' house.
Your Mentor can offer a clever alternative method, e.g. PAINT "SQU :SIZE yellow, which doesn't need a new procedure for each coloured shape but before you use it you should have mastered the steps above.
Filling with colour when shapes overlap
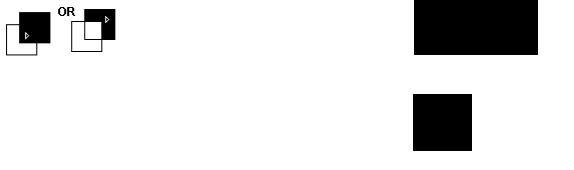
FILL has two modes of operation, which you need to understand if you are trying to flood a shape with colour when it overlaps another shape flooded with a different colour.
FILL, the default mode, or (FILL "false) will flood to the boundary of the colour currently under the pen.
Depending on how far the pen goes inside the last-drawn shape it could give either of the two adjacent results.
(FILL "true) will flood to the boundary of the shape just drawn (as shown to the immediate right) provided that the pencolor is a different colour than the shape overlapped.
There is potential here for creating some exiting patterns in flood-filled rotated shapes using combinations of (FILL "true) and (FILL "false).
14
Designing Your Project
You now have a set of regular polygons:
TRIANGLE, SQUARE, ... CIRCLE, RECTANGLE and ARC (and maybe LARC and RARC) and 'Extra Shapes' which has given you some more simple shapes.
All of these shapes can be drawn in different sizes by the use of variables.
Now your task is to combine these simple shapes to build more complex units, then to combine these units to build an even more complex units and ultimately an elaborate design all over the screen.
Your project...
must use several 'simple' shapes (level 1) must use variables for size control
must have good structure
-shapes make sub-units (level 2)
-sub-units make units (level 3)
-units make super-units (level 4)
-super-units make picture (level 5)
-must repeat the higher levels
must have good style
- procedures properly organized
e.g. proc/cement/proc/cement etc.
- use 'reverse path principle' (to allow for later elaboration and use of RANDOM and IF)
may use RANDOM variables (ask your Mentor) may use IF controls (ask your Mentor)
may use colour.
Here are several project ideas:
a city with buildings and vehicles; a forest with different trees and bushes;
a seascape with boats, birds and fishes; a robot army; a garden; and a castle.
Ask your Mentor for a 'Screen Map' and proceed as follows:
1.Sketch what you want your final screen to look like.
2.Convert your design to simple shapes
3.Alter your design so that some assemblies of simple shapes are repeated in different places for different purposes.
4.Name and sketch the level 2, level 3, level 4, level 5, etc. units and decide where each unit starts.
5.Teach procedures, test and debug each unit starting at the lowest levels before assembling higher level units and before final assembly.
6.Assemble the units to produce your final design.
15