

Andreasson O.Iptables tutorial V1.1.9.2001
.pdfIptables Tutorial 1.1.9 |
Página 181 |
pretty much. There is no currently available TCP/IP implementation that supports opening a TCP connection with something else than a SYN packet to my knowledge, hence, DROP the crap since it's 99% sure to be a portscan.
The ICMP chain
This is where we decide what ICMP types to allow. If a packet of ICMP type comes in on eth0 on the INPUT chain, we then redirect it to the icmp_packets chain as explained before. Here we check what kind of ICMP types to allow. As it is now, I only allow incoming ICMP Echo Replies, Destination unreachable, Redirect and Time Exceeded.
The reason that I allow these ICMP packets are as follows, Echo Replies is what you get for example when you ping another host, if we don't allow this, we will be unable to ping other hosts.
Destination Unreachable is used if a certain host is unreachable, so for example if we send a HTTP request, and the host is unreachable, the last gateway that was unable to find the route to the host replies with a Destination Unreachable telling us that it was unable to find it. This way we won't have to wait until the browser's timeouts kicks in after some 60 seconds or more.
Time Exceeded, is allowed in the case where we might want to traceroute some host or if a packet gets its Time To Live set to 0, we will get a reply about this. For example, when you traceroute someone, you start out with TTL = 1, and it gets down to 0 at the first hop on the way out, and a Time Exceeded is sent back from the first gateway en route to the host we're trying to traceroute, then TTL = 2 and the second gateway sends Time Exceeded, and so on until we get an actual reply from the host we finally want to get to.
For a complete listing of all ICMP types, see the appendix ICMP types. For more information on ICMP types and their usage, i suggest reading the following documents and reports :
 The Internet Control Message Protocol ICMP
 RFC 792 - Internet Control Message Protocol by J. Postel.
As a side-note, I might be wrong in blocking some of these ICMP types for you, but in my case, everything works perfectly while blocking all the other ICMP types that I don't allow.
The TCP chain
So now we reach TCP connections. This specifies what ports that are allowed to use on the firewall from the Internet. Though, there is still more checks to do, hence we send each and one of them on to allowed chain, which we described previously.
-A tcp_packets tells iptables in which chain to add the new rule, the rule will be added to the end of the chain. -p TCP tells it to match TCP packets and -s 0/0 matches all source addresses from 0.0.0.0 with netmask 0.0.0.0, in other words all sources addresses, this is actually the default behaviour but I'm using it for brevity in here. --dport 21 means destination port 21, in other words if the packet is destined for port 21 they also match. If all the criteria are matched, then the packet will be targeted for the allowed
http://people.unix-fu.org/andreasson/iptables-tutorial/iptables-tutorial.html |
21:25:51 10/06/2002 |

Iptables Tutorial 1.1.9 |
Página 182 |
chain. If it doesn't match any of the rules, they will be passed back to the original chain that sent the packet to the tcp_packets chain.
As it is now, I allow TCP port 21, or FTP control port, which is used to control FTP connections and later on I also allow all RELATED connections, and that way we allow PASSIVE and PORT connections since the ip_conntrack_ftp module is, hopefully, loaded. If we don't want to allow FTP at all, we can unload the ip_conntrack_ftp module and delete the $IPTABLES -A tcp_packets -p TCP -s 0/ 0 --dport 21 -j allowed line from the rc.firewall.txt file.
Port 22 is SSH, much better than allowing telnet on port 23, if you want to allow anyone from the outside to use a shell on your box at all. Note that you are dealing with a firewall. It is always a bad idea to give others than yourself any kind of access to these kind of boxes. Firewalls should always be kept to a bare minimum and not more.
Port 80 is HTTP, in other words your web server, delete it if you don't want to run a web server on your site.
And finally we allow port 113, which is IDENTD and might be necessary for some protocols like IRC, etc to work properly.
If you feel like adding more open ports with this script, well, its quite self explanatory how to do that by now=).
The UDP chain
If we do get a UDP packet on the INPUT chain, we send them on to udpincoming_packets where we once again do a match for the UDP protocol with -p UDP and then match everything with a source address of 0.0.0.0 and netmask 0.0.0.0, in other words everything again. If they have a source port of 53 also, we ACCEPT them directly.
As it is now, I ACCEPT incoming UDP packets from port 53, which is what we use to do DNS lookups, without this we wouldn't be able to do domain name lookups and we would be reversed to only use IP's. We don't want this behaviour, hence we allow DNS, of course.
I personally also allow port 123, which is NTP or network time protocol. This protocol is used to set your computer clock to the same time as certain other time servers which have very accurate clocks. Though, most of you probably don't use this protocol, I'm allowing it per default since I know there are some who actually do.
We currently also allow port 2074, which is used for certain real-time `multimedia' applications like speak freely which you can use to talk to other people in real-time by using speakers and a microphone, or even better, a headset.
Port 4000 is the ICQ protocol. This should be an extremely well known protocol that is used by the Mirabilis application named ICQ. There is at least 5 different ICQ clones for Linux and it's one of the most widely used chat programs in the world. I doubt there is any further need to explain what it is.
http://people.unix-fu.org/andreasson/iptables-tutorial/iptables-tutorial.html |
21:25:51 10/06/2002 |

Iptables Tutorial 1.1.9 |
Página 183 |
OUTPUT chain
Since i know that there's pretty much no one but me using this box which is partially used as a Firewall and a workstation currently, I allow pretty much everything that goes out from it that has a source address $LOCALHOST_IP, $LAN_IP or $STATIC_IP. Everything else might be spoofed in some fashion, even though I doubt anyone that I know would do it on my box. Last of all we log everything that gets dropped. If it does get dropped, we'll sure as hell want to know about it for some reason or another. Either it's a nasty error, or it's a weird packet that's spoofed. Finally we DROP the packet in the default policy.
FORWARD chain
Even though I haven't actually set up a certain section in the rc.firewall.txt example file, I would like to comment on the few lines in there anyways. As it is now, we first of all ACCEPT all packets coming from our LAN with the following line:
/usr/local/sbin/iptables -A FORWARD -i $LAN_IFACE -j ACCEPT
So everything from our Localnet's interface gets ACCEPT'ed whatever the circumstances. After this we allow everything in a state ESTABLISHED or RELATED from everywhere, in other words, if we open a connection from our LAN to something on the Internet, we allow the packets coming back from that site that's either ESTABLISHED or RELATED but nothing else. And after this we log everything and drop it. We log maximally 3 log entries per minute as to not flood our own logs, and prefix them with a short line that is possible to grep for in the logfiles. Also we log them with debug level. We finally hit the default policy of the FORWARD chain that says to DROP everything.
PREROUTING chain of the nat table
The PREROUTING chain is pretty much what it says, it does network adress translation on packets before they actually hit the routing tables that sends them onwards to the INPUT or FORWARD chains in the filter table. Note that this chain should not be used for any filtering or such, it should be used for network adress translation, among other things since this chain is only traversed by the first packet in a stream.
First of all we check for obviously spoofed IP addresses, such as in case we get packets from the Internet interface that claim to have a source IP of 192.168.x.x, 10.x.x.x or 172.16.x.x, in such case, we drop them quicker than hell since these IP's are reserved especially for local intranets and definitely shouldn't be used on the Internet. This might be used in the opposite direction, too, if we get an packet from $LAN_IFACE that claims to not come from an IP address in the range which we know that our LAN is on, we might drop that too. As it looks now, we don't do that though.
Starting the Network Address Translation
http://people.unix-fu.org/andreasson/iptables-tutorial/iptables-tutorial.html |
21:25:51 10/06/2002 |

Iptables Tutorial 1.1.9 |
Página 184 |
So, our final mission would be to get the MASQUERADEing up, correct? At least to me. First of all we add a rule to the nat table, in the POSTROUTING chain that will masquerade all packets going out on our interface connected to the Internet. For me this would be eth0. However, there are specific variables added to these example scripts that may be used to automatically configure these settings. These settings are widely used within the example scripts, mainly to make them easier to configure, but also to improve the readability a bit. The -t option tells us which table to use, in this case nat while the -A command tells us that we want to Add a new rule to an existing chain named POSTROUTING and -o $INET_IFACE tells us to match all outgoing packets on INET_IFACE (or eth0, per default settings in this script) and finally we target the packet for MASQUERADE'ing. So all packets that match this rule will be masqueraded to look as it came from your Internet interface. Simple, isn't it?
The next step we take is to ACCEPT all packets traversing the FORWARD chain in the default table filter that come from the input interface eth1 which is my interface connecting to the internal network. All packets that are being forwarded on our box traverse the FORWARD chain in the filter table.
The next thing we do is to ACCEPT all packets from anywhere that are ESTABLISHED and/or RELATED to some connection. In other words, we first send a packet from our local box behind eth1, and since it comes from eth1 we ACCEPT it, then when the Internet box replies, it gets caught by this rule since the connection has seen packets in both directions.
The last thing we do is to log all traffic that gets dropped over the border, and hits the default policy. In some cases these might be packets that should have gotten through but didn't, in other cases it might be packets that definitely shouldn't get through and you want to be notified about this. We allow this rule to be matched a maximum of 3 times per minute with a burst limit of 3. This means we get maximally 3 log entries per minute from this specific line, and the burst is also set to 3 so if we get 3 log entries in 2 seconds, it'll have to wait for another 1 minute for the next log entry. This is good if someone starts to flood you with crap stuff that otherwise would generate many megabytes of logs. We also set a prefix to the log with the --log-prefix and set the log level with the --log-level. Log level tells the syslogd, or logging facility what kind of importance this log entry has.
Example scripts
The objective of this chapter is to give a fairly brief and short explanation of each script available with this tutorial, and to provide an overlook of the scripts and what services they provide. These scripts are not in any way perfect, and they may not fit your exact intentions perfectly. It is in other words up to you to make these scripts suitable for your needs. The rest of this tutorial should most probably be helpful in making this feat. The first section of this tutorial deals with the actual structure that I have established in each script so we may find our way within the script a bit easier.
rc.firewall.txt script structure
All scripts written for this tutorial has been written after a specific structure. The reason for this is that they should be fairly conformative to each other and to make it easier to find the differences between the scripts. This structure should be fairly well documented in this brief chapter. This chapter should hopefully
http://people.unix-fu.org/andreasson/iptables-tutorial/iptables-tutorial.html |
21:25:51 10/06/2002 |

Iptables Tutorial 1.1.9 |
Página 185 |
give a short understanding to why all the scripts has been written as they have, and why I have chosen to maintain this structure.
Even though this is the structure I have chosen, do note that this may not be the best structure for your scripts. It is only a structure that I have chosen to use since it fits the need of being easy to read and follow the best according to my logic.
The structure
This is the structure that all scripts in this tutorial should follow. If they differ in some way it is probably an error on my part, unless it is specifically explained why I have broken this structure.
1.Configuration - First of all we have the configuration options which the rest of the script should use. Configuration options should pretty much always be the first thing in any shell-script.
1.Internet - This is the configuration section which pertains to the Internet connection. This could be skipped if we do not have any Internet connection. Note that there may be more subsections than those listed here, but only such that pertains to our Internet connection.
1.DHCP - If there are possibly any special DHCP requirements with this specific script, we will add the DHCP specific configuration options here.
2.PPPoE - If there are a possibility that the user that wants to use this specific script, and if there are any special circumstances that raises the chances that he is using a PPPoE connection, we will add specific options for those here.
2.LAN - If there is any LAN available behind the firewall, we will add options pertaining to that in this section. This is most likely, hence this section will almost always be available.
3.DMZ - If there is any reason to it, we will add a DMZ zone configuration at this point. Most scripts lacks this section, mainly because any normal home network, or small corporate network, will not have one.
4.Localhost - These options pertain to our localhost. These variables are highly unlikely to change, but we have put most of it into variables anyway. Hopefully, there should be no reason to change these variables.
5.iptables - This section contains iptables specific configuration. In most scripts and situations this should only require one variable which tells us where the iptables binary is located.
6.Other - If there are any other specific options and variables, they should first of all be fitted into the correct subsection (If it pertains to the Internet connection, it should be subsectioned there, etcetera). If it does not fit in anywhere, it should be subsectioned directly to the configuration options somewhere.
http://people.unix-fu.org/andreasson/iptables-tutorial/iptables-tutorial.html |
21:25:51 10/06/2002 |

Iptables Tutorial 1.1.9 |
Página 186 |
2.Module loading - This section of the scripts should maintain a list of modules. The first part should contain the required modules, while the second part should contain the non-required modules.
Note that some modules that may raise security, or add certain services or possibilities, may have been added even though they are not required. This should normally be noted in such cases within the example scripts.
1.Required modules - This section should contain the required modules, and possibly special modules that adds to the security or adds special services to the administrator or clients.
2.Non-required modules - This section contains modules that are not required for normal operations. All of these modules should be commented out per default, and if you want to add the service it provides, it is up to you.
3.proc configuration - This section should take care of any special configuration needed in the proc filesystem. If some of these options are required, they will be listed as such, if not, they should be commented out per default, and listed under the non-required proc configurations. Most of the useful proc configurations will be listed here, but far from all of them.
1.Required proc configuration - This section should contain all of the required proc configurations for the script in question to work. It could possibly also contain configurations that raises security, and possibly which adds special services or possibilities for the administrator or clients.
2.Non-required proc configuration - This section should contain non-required proc configurations that may prove useful. All of them should be commented out, since they are not actually necessary to get the script to work. This list will contain far from all of the proc configurations or nodes.
4.rules set up - By now the scripts should most probably be ready to insert the ruleset. I have chosen to split all the rules down after table and then chain names. All user specified chains are created before we do anything to the system builtin chains. I have also chosen to set the chains and their rulespecifications in the same order as they are output by the iptables -L command.
1.Filter table - First of all we go through the filter table and its content. First of all we should set up all the policies in the table.
1.Set policies - Set up all the default policies for the systemchains. Normally I will set DROP policies on the chains in the filter table, and specifically ACCEPT services and streams that I want to allow inside. This way we will get rid of all ports that we do not want to let people use.
2.Create user specified chains - At this point we create all the user specified chains that we want to use later on within this table. We will not be able to use these chains in the systemchains anyways if they are not already created so we could as well get to it as soon as possible.
http://people.unix-fu.org/andreasson/iptables-tutorial/iptables-tutorial.html |
21:25:51 10/06/2002 |

Iptables Tutorial 1.1.9 |
Página 187 |
3.Create content in user specified chains - After creating the user specified chains we may as well enter all the rules within these chains. The only reason I have to enter this data at this point already is that may as well put it close to the creation of the user specified chains. You may as well put this later on in your script, it is totally up to you.
4.INPUT chain - When we have come this far, we do not have a lot of things left to do within the filter table so we get onto the INPUT chain. At this point we should add all rules within the INPUT chain.
At this point we start following the output from the iptables -L command as you may see. There is no reason for you to stay with this structure, however, do try to avoid mixing up data from different tables and chains since it will become much harder to read such rulesets and to fix possible problems.
5.FORWARD chain - At this point we go on to add the rules within the FORWARD chain. Nothing special about this decision.
6.OUTPUT chain - Last of all in the filter table, we add the rules dealing with the OUTPUT chain. There should hopefully not be too much to do at this point.
3.nat table - After the filter table we take care of the nat table. This is done after the filter table because of a number of reasons within these scripts. First of all we do not want to turn the whole forwarding mechanism and NAT function on at a too early stage, which could possibly lead to packets getting through the firewall at just the wrong timepoint (ie, when the NAT has been turned on, but none of the filter rules has been run). Also, I look upon the nat table as a sort of layer that lies just outside the filter table and kind of surrounds it. The filter table would hence be the core, while the nat table acts as a layer lying around the filter table, and finally the mangle table lies around the nat table as a second layer. This may be wrong in some perspectives, but not too far from reality.
1.Set policies - First of all we set up all the default policies within the nat table. Normally, I will be satisfied with the default policy set from the beginning, namely the ACCEPT policy. This table should not be used for filtering anyways, and we should not let packets be dropped here since there are some really nasty things that may happen in such cases due to our own presumptions. I let these chains be set to ACCEPT since there is no reason not to do so.
2.Create user specified chains - At this point we create any user specified chains that we want within the nat table. Normally I do not have any of these, but I have added this section anyways, just in case. Note that the user specified chains must be created before they can actually be used within the systemchains.
3.Create content in user specified chains - By now it should be time to add all the rules to the user specified chains in the nat table. The same thing goes here as for the user specified chains in the filter table. We add this material here since I do not see any reason not to.
http://people.unix-fu.org/andreasson/iptables-tutorial/iptables-tutorial.html |
21:25:51 10/06/2002 |
Iptables Tutorial 1.1.9 |
Página 188 |
4.PREROUTING chain - The PREROUTING chain is used to do DNAT on packets in case we have any need for it. In most scripts this feature is not used, or at the very least commented out, reason being that we do not want to open up big holes to our local network without knowing about it. Within some scripts we have this turned on by default since the sole purpose of those scripts are to provide such services.
5.POSTROUTING chain - The POSTROUTING chain should be fairly well used by the scripts I have written since most of them depend upon the fact that you have one or more local networks that we want to firewall against the Internet. Mainly we will try to use the SNAT target, but in certain cases we are forced to use the MASQUERADE target instead.
6.OUTPUT chain - The OUTPUT chain is barely used at all in any of the scripts. As it looks now, it is not broken, but I have been unable to find any good reasons to use this chain so far. If anyone has a reason to use this chain, send me a line and I will add it to the tutorial.
5.mangle table - The last table to do anything about is the mangle table. Normally I will not use this table at all, since it should normally not be used for anyone, unless they have specific needs, such as masking all boxes to use the exact same TTL or to change TOS fields etcetera. I have in other words chosen to leave these parts of the scripts more or less blank, with a few exceptions where I have added a few examples of what it may be used for.
1.Set policies - Set the default policies within the chain. The same thing goes here as for the nat table pretty much. The table was not made for filtering, and hence you should avoid it all together. I have not set any policies in any of the scripts in the mangle table one way or the other, and you are encouraged not to do so either.
2.Create user specified chains - Create all the user specified chains. Since I have barely used the mangle table at all in the scripts, I have neither created any chains here since it is fairly unusable without any data to use within it. However, this section was added just in case someone, or I, would have the need for it in the future.
3.Create content in userspecified chains - If you have any user specified chains within this table, you may att this point add the rules that you want within them here.
4.PREROUTING - At this point there is barely any information in any of the scripts in this tutorial that contains any rules here.
5.INPUT chain - At this point there is barely any information in any of the scripts in this tutorial that contains any rules here.
6.FORWARD chain - At this point there is barely any information in any of the scripts in this tutorial that contains any rules here.
7.OUTPUT chain - At this point there is barely any information in any of the scripts in this tutorial that contains any rules here.
http://people.unix-fu.org/andreasson/iptables-tutorial/iptables-tutorial.html |
21:25:51 10/06/2002 |
Iptables Tutorial 1.1.9 |
Página 189 |
8.POSTROUTING chain - At this point there is barely any information in any of the scripts in this tutorial that contains any rules here.
Hopefully this should explain more in detail how each script is structured and why they are structured in such a way.
Do note that these descriptions are extremely brief, and should mainly just be seen as a brief explanation to what and why the scripts has been split down as they have. There is nothing that says that this is the only and best way to go.
rc.firewall.txt
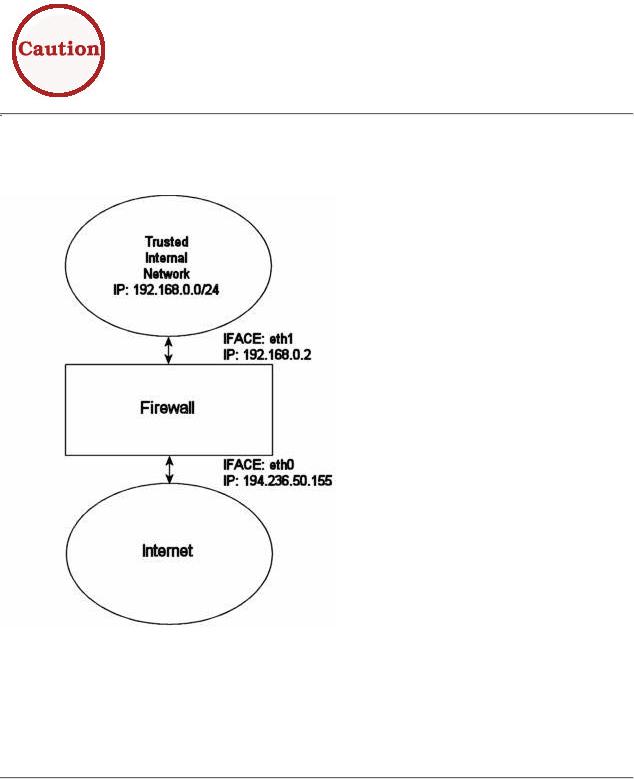
The rc.firewall.txt script is the main core on which the rest of the scripts are based upon. The rc.firewall filechapter should explain every detail in the script most thoroughly. Mainly it was written for a dual homed network. For example, where you have one LAN and one Internet Connection. This script also makes the assumption that you have a static IP to the Internet, and hence don't use DHCP, PPP, SLIPor some other protocol that assigns you an IP automatically. If you are looking for a script that will work with those setups, please take a closer look at the rc.DHCP.firewall.txt script.
http://people.unix-fu.org/andreasson/iptables-tutorial/iptables-tutorial.html |
21:25:51 10/06/2002 |

Iptables Tutorial 1.1.9 |
Página 190 |
rc.DMZ.firewall.txt
The rc.DMZ.firewall.txt script was written for those people out there that has one Trusted Internal Network, one De-Militarized Zone and one Internet Connection. The De-Militarized Zone is in this case 1-to-1 NAT'ed and requires you to do some IP aliasing on your firewall, ie, you must make the box recognise packets for more than one IP. There are several ways to get this to work, one is to set 1-to-1 NAT, another one if you have a whole subnet is to create a subnetwork, giving the firewall one IP both internally and externally. You could then set the IP's to the DMZ'ed boxes as you wish. Do note that this will "steal" two IP's for you, one for the broadcast address and one for the network address. This is pretty much up to you to decide and to implement, this tutorial will give you the tools to actually accomplish the firewalling and NAT'ing part, but it will not tell you exactly what you need to do since it is out of the scope of the tutorial.
You need to have two internal networks with this script as you can see from the picture. One uses IP range 192.168.0.0/24 and consists of a Trusted Internal Network. The other one uses IP range 192.168.1.0/24 and consists of the De-Militarized Zone which we will do 1-to-1 NAT to. For example, if someone from the internet sends a packet to our DNS_IP, then we use DNAT, which stands for Destination Network Adress Translation, to send the packet on to our DNS on the DMZ network. When the DNS sees our packet, the packet will be destined for the actual DNS internal network IP, and not to our external DNS IP. If the packet would not have been translated, the DNS wouldn't have answered the packet. We will show a short example of how the DNAT code looks:
http://people.unix-fu.org/andreasson/iptables-tutorial/iptables-tutorial.html |
21:25:51 10/06/2002 |