

Beginning Ubuntu Linux - From Novice To Professional (2006)
.pdf418 |
C H A P T E R 2 9 ■ I N S T A L L I N G S O F T W A R E |
you’ve downloaded or otherwise got onto your hard disk, the APT tools automatically grab and install packages from repositories. Software repositories can exist on a hard disk or a CD/DVD (the Ubuntu installation CD is a relatively small APT repository), but APT is most frequently used to access online software repositories.
Back in Chapter 8, you set up online software repositories when you configured the Synaptic Package Manager, as shown in Figure 29-2. This enabled you to install software later, as you’ve done throughout this book. What you actually did was to configure APT’s sources.list file, found at /etc/apt/sources.list. This file contains details of where APT can find the repositories, whether they are online or anywhere else, such as the installation CD.
Figure 29-2. Synaptic needs to know where the software repositories are located, regardless of whether they are on CD or online.
Categories of Repositories
Regardless of whether they’re online or on a CD, Ubuntu repositories are strictly categorized according to the type of software they contain:
Main Distribution: This repository contains the packages that are used to install Ubuntu. It’s a little like the installation CD’s repository, but online and containing additional packages that wouldn’t fit on the CD.
Updates: This repository contains newer versions of the packages in the Main Distribution repository. It’s the server that’s used whenever you attempt to update your system.

C H A P T E R 2 9 ■ I N S T A L L I N G S O F T W A R E |
419 |
Backports: A Backports server allows access to software that’s intended to go into the next version of Ubuntu but which has been packaged for the current version. This software might not have been tested thoroughly and so is suitable for neophiliacs or those who absolutely need the latest version (perhaps because of a vital new feature it offers).
Security Updates: Although the Updates server supplies newer versions of the main Ubuntu packages, sometimes security flaws need to be fixed almost immediately. If so, the packages concerned will be placed on this server. The Security Updates server isn’t about new versions or functionality. It’s about fixing security holes.
■Note Sometimes, you might choose to add an additional repository. For example, in Chapter 28, you added the official Wine repository so you could install the latest version of the software that lets you run Windows programs.
Repository Sections
In addition to the categories listed in the previous sections, the Ubuntu repositories are split into sections according to how essential the software is to a basic Ubuntu installation, or the license that the software uses.
Here are the sections under which software is filed within a repository:
Main: This section contains nearly all the software that’s featured in a basic Ubuntu installation. As such, it’s all Free Software, and every package is supported by the Ubuntu project. That means that updates are frequently provided to fix security holes, or simply to keep up with latest releases.
■Note Free Software refers to software that’s licensed under the GNU Public License (GPL). It doesn’t mean that the software is free of charge, although that’s nearly always the case.
Restricted: Although Ubuntu is mostly Free Software, it must include some components that have license agreements that are not compatible with the goals of Free Software. That’s what you’ll find in this section. Many Ubuntu installations simply won’t work fully without software from the Restricted section. The chief examples are hardware drivers that are released only in binary form (that is, closed source).
Universe: This section might be referred to as “the rest,” because it contains the majority of Free Software available at the present time. Much of it is raided from the massive Debian software library, although the packages are sometimes tweaked to work correctly under Ubuntu before being made available. Unlike Main and Restricted, the Universe section is not officially supported by the Ubuntu project, which means there’s no guarantee that security flaws will be fixed. Nor is there any guarantee of updates.

420 |
C H A P T E R 2 9 ■ I N S T A L L I N G S O F T W A R E |
Multiverse: As with the Restricted section, here you’ll find software that’s released under a software license incompatible with either the word or spirit of Free Software. However, unlike the software in the Restricted section, none of the software in Multiverse is considered essential to a default Ubuntu installation.
■Note When you configured the Synaptic Package Manager back in Chapter 8, all the sections on all the repository servers were activated (with the exception of Backports). This means that you have access to the widest possible range of software, but it also means that some of that software might not be Free Software, or compatible with the goals of the Ubuntu project. In particular, some software in the Multiverse section is considered beyond the pale by some Linux enthusiasts. You should check any software in the Multiverse section to be sure that you’re happy with its licensing terms.
Not all repositories contain all the sections listed here. For example, the Updates and Security Updates repositories contain only Main and Restricted sections, because the Ubuntu project doesn’t update software in the Universe and Multiverse subcategories.
All of this might sound a little confusing at first. The best policy is to take a look at the Synaptic Package Manager’s Software Preferences dialog box. Open the program (System Administration Synaptic Package Manager), click Settings Repositories on the menu, and then take a look at what appears. The headings in the list are the repositories that you can access. Any with a check alongside them are those that APT, and therefore the Synaptic Package Manager, use. Those without a check are ignored.
Underneath each repository heading are the sections on that server that you can access. For example, the first repository in the list on my test PC is CD Ubuntu 5.10 “Breezy Badger” (Binary). This refers to the repository contained on the installation CD. Beneath that are the sections Officially Supported (Main) and Restricted Copyright (Restricted).
■Note At the time of writing, the Synaptic Package Manager isn’t clever enough to probe a repository to find out what sections are available. As you’ll see if you select an online repository within the Software Preferences dialog box and click the Edit button, each section must be manually entered into the Sections field.
The Synaptic Package Manager in Depth
The Synaptic Package Manager is effectively a graphical front-end for the APT system. Later on in this chapter, we’ll look at the command-line APT tools. Here, we’ll take a closer look at using the Synaptic Package Manager.
Searching for Software
Before searching for software, it’s nearly always a good idea to refresh the package databases. Just click the Reload button on the Synaptic Package Manager toolbar to grab the latest package lists from the various repositories that are in your sources.list file. Reloading can take a few
C H A P T E R 2 9 ■ I N S T A L L I N G S O F T W A R E |
421 |
minutes on a slow connection, but it ensures that you have access to the latest software within the repositories.
To search for software, you can click any entry in the list of packages and simply start typing. This will match what you type against the package names in the list. Alternatively, you can click the Search button the toolbar. By default, this searches through both package names and the descriptions, for a higher chance of a match. You can either type the specific program name or a keyword that may be within the description. For example, if you were looking for graphics drivers for your ATI Radeon card, but you didn’t know the name of the package that contains them, you could type radeon.
■Tip You don’t need to type whole words in the search field. You can type part of a word or, more commonly, the word in a shortened or alternate form. For example, if you’re looking for an e-mail client, it might be more fruitful to simply type “mail client,” or even just “mail.” This will then return results containing e-mail, mail, mailing, and so on.
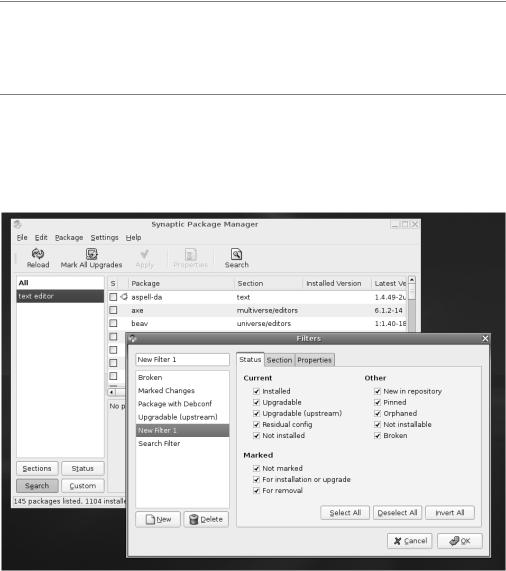
By clicking the Settings Filters button, you can enhance your search by filtering out any packages that don’t meet your requirements. It’s advisable to click the New button to create your own filter before starting, as shown in Figure 29-3, rather than editing one that’s already there. To apply a filter to search results, click the Custom button at the bottom left and then click the name of your filter in the list.
Figure 29-3. Filters can be used to trim the list of search results according to certain criteria.

422 |
C H A P T E R 2 9 ■ I N S T A L L I N G S O F T W A R E |
One use of filtering is to remove the check alongside Installed so that you can remove from the search list any packages that might be already on your system. By clicking the Section tab, you can opt to search for only certain types of programs, such as those that are categorized as graphics programs or those that are categorized as communications packages (hold down the Ctrl key to search more than one package at once).
■Note Filtering can help reduce the number of search results if you use a generic search term, but don’t forget to deactivate it when you’ve finished. Click All at the top of the filters list, or simply click the Search button at the bottom left, to deactivate the filters.
Installing Software
When you click the check box next to a piece of software in the search results and select Mark for Installation, you’ll be informed of any uninstalled dependencies that the program needs and asked to confirm their addition to the list of packages to be installed. If you right-click the file and selecting Mark Suggested for Installation or Mark Recommended for Installation, you’ll see a list of programs that, although not essential to the running of the program in question, will enhance its features to some degree.
For example, if you choose to install the mutt e-mail program, it’s also recommended that you install locales and mime-support, so Mutt will have multiple language support and will be able to better handle file attachments. You don’t have to install these recommended programs; the software will run fine without them. But it can often be rewarding if you do so.
■Note If the software in the recommended and suggested lists is grayed out, that means it’s already installed. This happens frequently because recommended or suggested software is often required by other packages.
After you’ve made your selection of software (bear in mind that you can install more than one piece of software at once), click the Apply button on the toolbar. You’ll see the Summary dialog box, as shown in Figure 29-4.
Here, you’re once again asked to confirm what needs to be installed. If any software needs to be removed in order to meet dependency issues, you’ll be told about this, too. Additionally, you’ll be shown the total size of the files that will be downloaded, as well as the anticipated impact on your hard disk in terms of size after the programs are installed. At the very bottom of the Summary dialog box, you’ll see a check box marked Download Package Files Only. As it suggests, this will download but not install the packages. If you then select the package for installation again in the future, you won’t need to download it, and installation will be instantaneous (unless a newer version of the package has been released; in which case, the newer version will be downloaded and installed).

C H A P T E R 2 9 ■ I N S T A L L I N G S O F T W A R E |
423 |
Figure 29-4. Before any software is installed by the Synaptic Package Manager, you’ll be told what it is and asked to confirm the choice.
METAPACKAGES
Software such as the GNOME desktop actually consists of a number of programs and system libraries, rather than one single piece of software. Therefore, you might be wondering how, as just one example, you might install the KDE desktop under Ubuntu 5.10. Is it necessary to install each component’s package manually?
In theory, dependency management should be able to help, and you should be able to select one key part of the KDE desktop system, such as the Konqueror file browser, and have the Synaptic Package Manager take care of the rest. After all, Konqueror will be dependent on other KDE packages.
Alas, this rarely works in reality. Installing Konqueror in this way will indeed install much of the KDE desktop suite, but not everything. Konqueror isn’t reliant on Kate, for example, which is the default text editor under KDE. Perhaps more important, although the packages will be installed, there’s no guarantee that they’ll be configured to work correctly as a desktop environment.
Metapackages provide the solution. These are packages that contain configuration files to ensure the full range of software is installed and configured correctly, and they also have extensive lists of dependencies that include the complete set of packages for the software in question. (For what it’s worth, the metapackage for KDE is kdebase.)
Alongside desktop suites, other examples of Ubuntu metapackages include the OpenOffice.org office suite, where the metapackage ensures all the components of the suite can be easily installed, and the X.org graphical subsystem. To see what metapackages are available, simply search for metapackage using the Synaptic Package Manager.

424 |
C H A P T E R 2 9 ■ I N S T A L L I N G S O F T W A R E |
Removing Software
To remove a piece of software, search for it by name, then click the check box alongside it, and then select Mark for Removal. This will remove the software but leave behind any configuration files it created. This means you can install it again in the future, and it will function as it did before removal. However, you can also select Mark for Complete Removal, which will remove the configuration files.
As with installing software, the Synaptic Package Manager will attempt to manage dependencies when you remove software, but in this case, it will enforce the removal of any software that explicitly relies on that software.
This isn’t an issue most of the time, but unfortunately, some packages have major reverse dependencies. For example, if you decide that you’ve had enough of the Base database program and want to remove it, you’ll find that you’ll also need to remove the entire OpenOffice.org suite, as well as the ubuntu-desktop metapackage.
Sometimes, packages have what seem like weird dependencies. For example, if you try to remove the Firefox web browser, you’ll see that you need to remove the seemingly unrelated gnome-app-install package, as well as yelp, the GNOME online help system. The reason for this is that both these packages use a component of Firefox in some way and simply can’t function without it. There isn’t a hard-and-fast solution for situations like this. However, in many cases, you might simply choose to not remove the software and leave it on your system.
Package Management from the Command Prompt
Synaptic is one of the best examples of package-management programs around, and there’s little reason to shun it and choose to install packages from the command line. However, you may find occasions to use dpkg or the APT tools. For example, if you’re already working at the command line, then this method is quicker than starting up the Synaptic Package Manager.
Using dpkg
The most basic package-manipulation command is dpkg. dpkg allows you to perform a lot of package-related tasks, such as build packages from scratch. Here, we’ll look at just simple package installation, removal, and query functions.
■Note dpkg requires superuser powers to install or remove software, so must be preceded with sudo. But it can be run without superuser powers if you simply wish to query the package database. The same is true of the APT tools discussed later.
Installing Packages
dpkg is useful when you’ve already downloaded a specific .deb package and would like to install it. Here is the command:
sudo dpkg -i packagename.i386.deb

C H A P T E R 2 9 ■ I N S T A L L I N G S O F T W A R E |
425 |
You must specify the entire filename, rather than just the name of the program.
dpkg is quick and dirty, and although it will warn you about any dependency issues, it will still go ahead and install the package. After installation, it will run the package’s configuration scripts. But if there are missing dependencies, it won’t be able to configure the program to work on your system, because it probably won’t be in a usable state, as shown in the example in Figure 29-5.
Figure 29-5. dpkg will warn about missing dependencies but will still install the package.
If this situation arises, it’s up to you to install the dependencies that dpkg lists. Of course, some of these will have their own dependencies, which will also need to be installed. This cascade situation is informally known as dependency hell and is the main reason why the APT system was invented. As you’ll see in the next section, APT effortlessly handles dependency issues like this.
If the dependencies aren’t met after a dpkg installation, whenever you run the Synaptic Package Manager or attempt to use the APT tools, you’ll be told of “broken” packages or unmet dependencies. APT will refuse to install any other software until the problem is fixed.
■Tip Within the Synaptic Package Manager, you can click the Custom button at the bottom left and then click the Broken entry in the filter list in order to see any packages that have unmet dependencies. To repair the damage, click the check box of the package in question and then click Mark of Reinstallation. At the console, you can type sudo apt-get -f install. This will install all of the missing dependencies on the system.

426 |
C H A P T E R 2 9 ■ I N S T A L L I N G S O F T W A R E |
Uninstalling Packages
To remove a package, type the following:
sudo dpkg -r packagename
Note that you simply need to type the name of the program, without its version number or the .i386.deb file extensions.
In this case, dpkg is slightly better behaved than when installing software. If there any reverse dependencies (other packages that depend on the one you’re trying to remove), you’ll be stopped in your tracks with a couple of error messages. You’ll need to resolve the reverse dependencies first but, of course, they might also have their own reverse dependencies . . .
Welcome back to dependency hell!
■Note The dpkg -r command will remove the package but leave behind its configuration files. This is handy if you install the software again in future. In order to remove the configuration files in addition to the software, type sudo dpkg -P packagename.
Querying Packages
dpkg includes a couple of query facilities that display details about packages. You can find out if a package is installed by typing this:
dpkg -l packagename
If you want to find out every bit of information about an installed package, including what dependencies it has, use the following command:
dpkg -s packagename |less
This example pipes the output of dpkg into less so you can read it more easily, because it’s likely to fill several terminal window screens.
You can also use dpkg to query an installation file you’ve just downloaded:
dpkg -I packagename.i386.deb |less
All said, dpkg is an often undervalued tool that’s capable of some handy low-level packagemanagement tasks. Take a look at its man page to learn more.
Using the APT Tools
dpkg is the only option if you want to install a package file you’ve just downloaded. However, if you wish to use software repositories, you’ll need to use the APT tools. These still use dpkg in the background to install and remove packages, but they also feature intelligence to handle dependency management.

C H A P T E R 2 9 ■ I N S T A L L I N G S O F T W A R E |
427 |
■Note If while using dpkg or APT you get an error message along the lines of, “Can’t get a lock,” make sure that the Synaptic Package Manager program isn’t open. Only one piece of software can access the package database at any one time.
Installing and Removing Packages
The most basic APT command is apt-get. You can use this command to install or remove packages contained within the repositories as follows:
sudo apt-get install packagename sudo apt-get remove packagename
You should specify the program name without the version number. To install the links web browser, for example, you just need to type the following command:
sudo apt-get install links
Figure 29-6 shows the results. As you can see, apt-get will check dependencies, download the software, and then install it. It’s a much better way of working compared with dpkg.
Figure 29-6. You can use apt-get to install, remove, and update packages at the command line.