

Beginning Ubuntu Linux - From Novice To Professional (2006)
.pdf368 |
C H A P T E R 2 5 ■ I N D E P T H : I M P R E S S |
When you click the Fontwork icon, the Fontwork Gallery dialog box appears, offering a choice of predefined font effects. Don’t worry if they’re not quite what you want, because after you make a choice, you’ll be invited to fine-tune it.
Once you’ve made the selection, the dummy text “Fontwork” will appear on screen. Editing the text is simple: just double-click the “Fontwork” text and type your own words. When you’ve finished, click outside the Fontwork selection.
Whenever the new Fontwork item is selected, a floating toolbar will appear, as shown in Figure 25-4. You can use this toolbar to alter various options. For example, you can select a completely different Fontwork selection from the gallery or, by clicking the second icon on the left, select your own path that you want the Fontwork item to follow.
Figure 25-4. The Fontwork tool can add some special effects to your presentations.
You’ll also see that the Formatting toolbar changes to allow you to alter the formatting of the Fontwork element. You can alter the thickness of the letter outlines, for example, or the color of the letters. Once again, the best way to learn how the tool works is to play around with the options and see what you can achieve.
To remove a Fontwork item, just select its border and press the Delete key on your keyboard.

C H A P T E R 2 5 ■ I N D E P T H : I M P R E S S |
369 |
Using 3D Effects
In addition to Fontwork effects, Impress includes a powerful 3D tool, which can give just about any on-screen element a 3D flourish (this tool is also available in some other OpenOffice.org applications). To use it, create a text box or shape using the Drawing toolbar at the bottom of the screen. Then right-click the text box or shape and select Convert 3D Object.
■Note The 3D Object option is designed simply to give your object depth. If you want to create a genuine 3D object that you can rotate in 3D space, select the 3D Rotation Object.
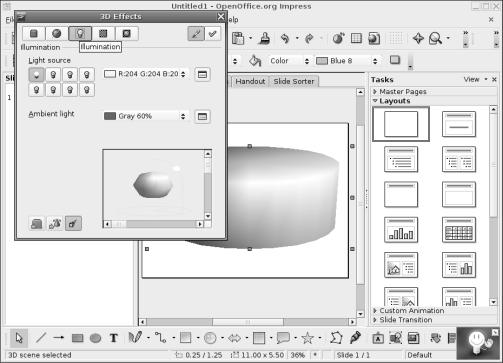
You can gain much more control over the 3D effect by right-clicking it and selecting 3D Effects. This will open a floating palette window with five configuration panels, as shown in Figure 25-5. Click the icons at the top of the palette to adjust the type of 3D effect and its lighting, as follows:
Geometry: This defines how the 3D effect will look when it’s applied to on-screen selections. For example, you can increase or decrease the rounded-edges value, and this will make any sharp objects on the screen appear softer when the 3D effect is applied.
Shading: This affects not the actual texture of the 3D object, but instead alters its color gradient. This is best demonstrated in action, so select the various shading modes from the drop-down list to see the effect. In addition, you can choose whether a shadow is applied to the effect, as well as the position of the virtual camera (the position of the hypothetical viewer looking at the 3D object).
Illumination: This lets you set the lighting effect. All 3D graphics usually need a light source because this helps illustrate the 3D effect; without a light source, the object will appear flat. Various predefined light sources are available. You can click and drag the light source in the preview window.
Textures: This affects how the textures will be applied to the 3D object. A texture is effectively a picture that is “wrapped around” the 3D object. Clever use of textures can add realism to a 3D object. A map of the world applied to a sphere can make it look like a globe, for example, or you could add wood or brickwork textures to make objects appear as tabletops or walls.
Material: This lets you apply various color overlays on the texture. This can radically alter the texture’s look and feel, so it is quite a powerful option. To change the texture itself, right-click the object and select Area. This will present a list of predefined textures. Alternatively, you can select to use a color or pattern.
To apply any changes you make, click the check button at the top right of the palette. As with the other presentation effects, the best policy is simply to experiment until you’re happy with the results.
370 |
C H A P T E R 2 5 ■ I N D E P T H : I M P R E S S |
Figure 25-5. You can fine-tune 3D objects to quite a high degree using the 3D Effects palette.
Exporting a Presentation As a Flash File
If you plan to put your presentation online, or you want to send it to a colleague who doesn’t have Impress or PowerPoint installed, outputting your presentation as a Flash animation could be a good idea. The process is simple. Just select File Export, and then select Macromedia Flash (SWF) in the File Format drop-down list (SWF is the Flash file type, which stands for Shockwave Flash). No further configuration is necessary.
In order to play the file, it needs to be opened within a web browser that has the Flash Player installed. This can be done by selecting File Open on most browsers, although you can also drag-and-drop the SWF file onto the browser window under Microsoft Windows. There shouldn’t be much of a problem with compatibility, since the Flash Player is ubiquitous these days. If the web browser doesn’t already have Flash installed, it’s easy to download and install it (see www.macromedia.com/go/getflashplayer).
When the Flash file is opened in a web browser, the presentation starts, as shown in Figure 25-6. You can progress through it by clicking anywhere on the screen.

C H A P T E R 2 5 ■ I N D E P T H : I M P R E S S |
371 |
Figure 25-6. You can save any presentation as a Flash animation, which can be played back in a suitably equipped web browser.
Summary
In this chapter, we examined Impress, which is the presentations component within OpenOffice.org. We started by looking at how you can use the Presentation Wizard function to automate production of a basic Impress document. Then you saw how various effects can be added to the presentation, including 3D effects. Finally, we looked at how the presentation can be exported as a Shockwave Flash file for playback on virtually any web browser.
In the next chapter, we will explore the database component within OpenOffice.org: Base.

C H A P T E R 2 6
■ ■ ■
In Depth: Base
OpenOffice.org includes a number of tools to both interface with database servers and perform tasks such as enter and edit data. However, for most day-to-day users who have humble needs, creating such a setup is rather complicated. It requires some knowledge of how databases work on a technical level. For this reason, a new component was added to OpenOffice.org 2.0: Base.
Base is a relational database along the lines of Microsoft Access and is perfect for database applications of all sizes, including more modest efforts. For example, you could use it to create an inventory database to produce a report showing all products added for a certain geographical region on a certain date, or you could use it to catalog items in your personal stamp collection.
Relational databases such as those created by Base are ideal for quickly creating catalogs of information, such as inventory lists. In addition to making database creation simple and quick, relational databases let you easily query data to produce reports tailored to individual needs.
Base works on a number of levels depending on the knowledge of the user, but in its most basic form, it offers a design-based approach to the creation of tables and forms. Anyone who has previously created a database under Access will feel right at home.
In this chapter, we’ll work through an example of using Base to create a simple database cataloging a collection of music. You can use the same techniques to create any kind of relational database.
Getting Started with Base
You’ll find Base under the Applications Office menu. When the program first starts, the Database Wizard guides you through either creating a new database or opening an existing one, as shown in Figure 26-1.
The first step in creating a new database is to register it within OpenOffice.org. This means that it will be made available in other OpenOffice.org programs, such as Calc or Writer. Although the knowledge needed to use a database in this way is quite advanced, there’s no harm in agreeing to this option. It might prove useful in the future as you learn more about OpenOffice.org.
Following this, you can choose to open the database for editing and/or start the Table Wizard. Once you click the Finish button, you’ll be invited to give the database a name and save it immediately.
373

374 |
C H A P T E R 2 6 ■ I N D E P T H : B A S E |
Figure 26-1. Base starts with the Database Wizard to facilitate the quick and easy creation of new databases.
■Note Databases aren’t like other office files in that they automatically save and update themselves. When using the finished database, you can simply enter data and then quit the program, without needing to deliberately opt to save the file.
Assuming that you did not opt to go directly to the Table Wizard, you’ll now see the main Base program window. The right of the Base program window contains the Tasks and Data panes. The Tasks pane allows you to create new database elements, depending on what’s selected in the Database pane. The Data pane shows any elements you’ve already created. The Database pane contains the four elements of the database that you can create and manipulate:
Tables: A table is what holds the actual data you’ll eventually input. Therefore, a table is the first thing that needs to be created within a new database. Creating a table involves defining the types of data that you want to store and giving the individual data fields easy- to-understand names.
Forms: Although it’s possible to enter data directly into a table, it isn’t particularly intuitive or easy. Because of this, forms are used to make the data fields presentable. As the name suggests, in terms of layout these are not unlike the paper forms that you fill in to facilitate the collection of data by businesses. As with tables, forms must be created from scratch in a new database. Forms have controls, which are used to facilitate data entry, or to allow users to navigate the database or otherwise manipulate it. The most common type of control is a text-entry field, which is then tied to a data field within the table, but you can also have controls that perform certain functions, such as deleting a record in the database.

C H A P T E R 2 6 ■ I N D E P T H : B A S E |
375 |
Queries: A query is a way of filtering the database so that you see only a subset of it. For example, in a database detailing sales figures from across the country, you might create a query to show only the data from a particular state.
Reports: A report is a way of presenting data for human consumption, usually in a printed format. For example, you could create a report that details sales figures in the form of a letter, or you might make a report to produce address labels using addresses stored in the database.
■Note The usefulness of both queries and reports are that they can be saved and used over and over again, so you could use the same query each month to examine just a small section of the data. Base offers wizards to automate the creation of both queries and reports.
Double-clicking an item in the Database pane displays or activates that item. Right-clicking a Database pane item displays a variety of options related to editing the file.
Now, let’s work through an example of using Base. First, you’ll create a table, and then you’ll create a form.
Creating a Database
As an example of using Base, you’ll build a database, ready for data entry. The first step in the creation of a database is to make a table. This will hold the data that you will eventually enter using a form.
Adding a Table
As with all components within Base, you can use a wizard to create the table. The Table Wizard offers a number of predefined data fields corresponding to typical databases. It is fine for general use, but if you have a specific and unusual database in mind, you will need to create the table manually.
Here, you’ll create a database to catalog CDs. This is easily accomplished with the Table Wizard, as follows:
1.Click the Tables icon in the Database pane, and then click the Use Wizard to Create Table icon. The Table Wizard starts.
2.You’re given a choice between creating a business or personal database. As you would expect, business databases are likely to contain fields relating to business matters, such as accounting, and the fields in the personal section relate more to domestic matters. Choose Personal for this example.
3.Choose an entry from the Sample Tables drop-down list. For this example, select CD Collection.

376 |
C H A P T E R 2 6 ■ I N D E P T H : B A S E |
4.In the Available Fields box, you now see a number of data fields that would prove handy for a CD collection. You don’t need to use all of these. Instead, select only those you want in your table, and then click the single right-facing arrow button to transfer them to the Selected Fields box. For this example, select AlbumTitle, Artist, ReleaseYear, and Review, as shown in Figure 26-2. Then click the Next button. (Don’t worry if you find the fields lacking or if you want to add your own—you’ll see how to do just that in step 6).
Figure 26-2. The Table Wizard contains ready-made data fields for a wide-variety of uses.
5.Check to make sure the fields you selected are of the correct type. Click each to see the information in the right area of the dialog box. Fields can take various forms depending on what kind of data they’re supposed to hold. For example, one field might be designed to contain text, while another might need to contain numbers. Yet another might need to contain dates, and some can even contain pictures. As you might expect, the wizard has automatically selected the correct data types for the predefined fields.
6.For this example, you want to add a check box that shows whether the CD is scratched. If the CD in question is scratched, the user can click in a check box. If the CD isn’t scratched, the box can be left blank. To create a check box, you need a special kind of data field called a Boolean. This means that the data field can be either true or false or, to put it a simpler way, it can hold either yes or no. To create a yes/no data field, click the plus button at the bottom of the Selected Fields box. This allows you to add another field. In the Field Name box, type Scratched. For the Field Type, click the drop-down list and locate the entry marked Yes/No [BOOLEAN]. The other options can remain as they are. Click Next to continue.
C H A P T E R 2 6 ■ I N D E P T H : B A S E |
377 |
7.You’re asked if you want to create a primary key. This is the unique numeric field that the database uses to keep track of each entry in the database. It’s a must in a database like this one. The default choices are correct, so you can click Next again.
8.You’ve completed the Table Wizard. The next step is to create a form, so select Create a Form Based on This Table, and then click the Finish button.
Creating a Form
Forms are present in databases for the benefit of users to facilitate the quick-and-easy entry of data. They present data fields that you’ve just created within the table in an easy-to-under- stand form.
Base is able to walk you through the creation of forms via the Form Wizard. If you didn’t select to run the Form Wizard previously, you can start it by clicking Forms in the Database pane, and then clicking Use Wizard to Create Form. Then follow these steps:
1.In the Form Wizard’s first step, select which fields you want to appear on the form. As with the Table Wizard, this is simply a matter of selecting the fields, and then clicking the right-arrow button so that they appear under the Fields on the Form heading. Alternatively, by clicking the double-arrow button, you can select all of them in one fell swoop, which is what you want for this example.
2.You’re asked if you want to create a subform. As its name suggests, this is effectively a form within your main form. A subform is useful with more complicated databases,
where it might be necessary to view other data while filling in the form. For this simple example, leave the Add Subform box unchecked and click Next.
3.Choose a general layout for the data fields. The default is the table view, which many find ugly, so you might choose one of the first two options (in my database I chose the second option, as can be see in Figures 26-3 and 26-4). These arrange the data fields in a spacious manner and make the form much more usable. If you look behind the wizard dialog box, you’ll see a preview of how the form will look.
4.You’re asked whether or not you want existing data to be displayed on the form. You can choose to treat the form as one created only for entering new data, so that you can’t use it to navigate through the database and see existing data you’ve already entered. This might be useful in applications where you don’t want users to see the other data in the database. However, for a database for your own personal use, being able to see the existing data is very handy, which is why The Form Is to Display All Data option is selected by default. For this example, simply click the Next button to accept the default.
5.Choose a look and feel for your form from the variety of color schemes available, as shown in Figure 26-3. Again, you can see them previewed behind the wizard dialog box. Feel free to experiment with the options under the Field Border heading. I prefer the 3D Look option, which gives the form elements a slight interior shadow, a common feature on most modern user interfaces. The Flat option simply adds a black border to the boxes, and the No Border option removes the border completely.