

Beginning Ubuntu Linux - From Novice To Professional (2006)
.pdf188 |
C H A P T E R 1 2 ■ M A N A G I N G Y O U R F I L E S |
Places pane: The Places pane on the left lists the most popular locations within the file system. Double-clicking each icon takes you to that location instantly. Clicking the File System entry takes you to the root of the file system (/).
As under Windows, you can right-click each file in the file browser window to see a context menu with options to rename the file, delete it, open it with particular applications, and so on. The Properties option on the context menu lets you view information about the file and alter certain aspects of it, such as its access permissions (discussed in Chapter 15). You can even add some text notes about the file if you wish!
■Caution You should never delete your /home folder. Doing so will most likely destroy your personal Ubuntu setup and prevent you from logging in.
File and Folder Icons
You can change the icon for any file or folder to whatever you want. Right-click the file or folder, and then click the Select Custom Icon option. You can choose from a wide range of supplied icons or click the Browse button and locate your own graphic. Virtually any image can be used, regardless of format or even size, so you can use digital camera snapshots if you wish.
Files and folders can also have emblems applied to them. These are smaller icons that are “tagged on” to the larger icons in both list view and icon view. Emblems are designed to give you quick clues about the nature of the file. To apply an emblem, right-click the file or folder, select Properties, and then click the Emblems tab. As shown in Figure 12-5, a range of icons is available; in fact, any file or folder can have several emblems applied at once. Simply put a check in the box beside the icons you wish to apply.
■Note Nautilus makes use of a handful of emblem icons for its own needs, too. For example, a file with a lock emblem attached to it indicates that you don’t have the necessary file permissions to edit or delete that file. An X emblem means you don’t have permissions to access that file or folder at all, not even to view it. In most cases, the emblems are self-explanatory.

C H A P T E R 1 2 ■ M A N A G I N G Y O U R F I L E S |
189 |
Figure 12-5. A variety of miniature emblems can be applied to an icon to aid recognition of the file.
Special Nautilus Windows
As well as letting you view your files, Nautilus has a number of object modes. This is a complicated way of saying that Nautilus lets you view things other than files.
The most obvious example of this is the computer view of your file system, which presents an eagle’s eye view of your storage devices. To access this view, click Places Computer. If you have a card reader attached, it will appear here, as will any Windows partitions that may be on your hard disk. Double-clicking each item opens a standard Nautilus file browser window (for this to work with Windows partitions, they must be set up correctly, as described in the “Accessing Windows Files” section later in this chapter).
Another Nautilus object mode is the fonts view, which lets you see at a glance any fonts installed on your computer. To access fonts view, click Go Location in any open Nautilus window, and then type fonts://.
Object mode come into its own when viewing network locations. Clicking Places Network Servers brings up the browsing network object view, for example. You can also browse to FTP sites by clicking Go Location in a file browser window and entering an FTP address (prefacing it with ftp://).

190 |
C H A P T E R 1 2 ■ M A N A G I N G Y O U R F I L E S |
■Note You might be used to dragging-and-dropping files onto program windows or taskbar buttons within Windows in order to open the file. This works with only some programs within Ubuntu. Generally, the best policy is to try it and see what happens. If the program starts but your file isn’t opened, it obviously didn’t work.
HIDDEN FILES AND DIRECTORIES
When you view your /home directory via Nautilus, you’re not seeing every file that’s there. Several hidden files and directories relating to your system configuration also exist. You can take a look at them by clicking ViewHidden Files in the Nautilus menu. Clicking this option again will hide the files and directories.
You might notice something curious about the hidden items: they all have a period before their filenames. In fact, this is all that’s needed to hide any file or directory: simply place a period at the front of the filename. There’s no magic involved above and beyond this.
For example, to hide the file partypicture.jpg, you could simply right-click it and rename it
.partypicture.jpg. You’ll need to click the Reload button on the toolbar for the file view to be updated and for the file to disappear. As you might expect, removing the period will unhide the file.
Files are usually hidden for a reason, and it’s no coincidence that most of the hidden files are system files. In addition, every program that you install, or is installed by default, will usually create its own hidden folder for its system configuration data. Deleting such files by accident can be catastrophic.
Launching Files and Running Programs
As with Windows, most of the programs on your Ubuntu system automatically associate themselves with various file types that they understand. For example, double-clicking a picture will automatically open the Eye of GNOME viewer application, and double-clicking a .doc file will start OpenOffice.org Writer.
Ubuntu is automatically set up to view common file types. However, you might find Table 12-1 useful. It shows which programs are required for viewing certain types of documents.
■Note Whenever you install new software from the installation CD or the official software repositories, it should add an entry to the Applications menu. If for some reason this doesn’t happen, you can create a shortcut using the techniques explained in Chapter 10.
C H A P T E R 1 2 ■ M A N A G I N G Y O U R F I L E S |
191 |
Table 12-1. Common File Types
File Type |
File Extension |
Viewer |
Location on Applications Menu |
Word processor |
.doc, .rtf |
OpenOffice.org |
Office OpenOffice.org2 Writer |
document |
|
Writer |
|
Spreadsheet |
.xls |
OpenOffice.org |
Office OpenOffice.org2 Calc |
|
|
Calc |
|
Presentation |
.ppt |
OpenOffice.org |
Office OpenOffice.org2 |
|
|
Impress |
Impress |
PDF file |
Evince |
Not on Applications menu1 |
|
Compressed file |
.zip, .tar, .gz, |
File Roller |
Accessories Archive Manager |
|
.bz2, and others |
|
|
Image file |
.jpg, .gif, .tif, |
Eye of GNOME |
Graphics Image Viewer |
|
.bmp, and others |
|
|
HTML file |
.htm, .html |
Firefox |
Internet Firefox Web Browser |
Text file |
.txt, .log |
Gedit |
Accessories Text Editor |
Audio file |
.wav |
Rhythmbox |
Sound & Video Rhythmbox |
|
|
|
Music Player |
Video file |
.mpg, .mpeg, .avi |
Totem |
Sound & Video Totem |
|
|
|
Movie Player |
1For some reason, Evince is not present on the Applications menu, although it is installed by default and associated with PDF files. If you wish, you can add your own shortcut following the instructions in Chapter 10.
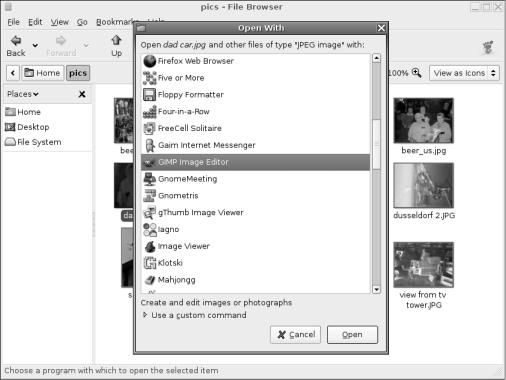
If you want to change the program associated with a file type, right-click the file, select Open with Other Application, and choose the other program, as shown in Figure 12-6. From that point on, every time you right-click, you’ll be offered the choice of the program to open the file.
■Note Under Windows, you can use Windows Explorer to launch program executables by just browsing to their location within Program Files and double-clicking their .exe file. It’s technically possible to run programs by browsing to their location using Nautilus, but this is discouraged. One reason is that Ubuntu doesn’t store all of its programs in one central folder, as does Windows. However, most programs that are used on a daily basis can be found in /usr/bin. If the program itself isn’t stored in /usr/bin, it will contain a symbolic link (effectively, a shortcut) to the program’s genuine location on the hard disk.
192 |
C H A P T E R 1 2 ■ M A N A G I N G Y O U R F I L E S |
Figure 12-6. You can select which program to use to open a file by right-clicking and selecting Open with Other Application.
Accessing Windows Files
Running Ubuntu on your PC makes you a relative stranger in a world of Windows users. It’s likely that you’ll need to access Windows files on a regular basis. If you’ve chosen to dual-boot with Windows, you might want to grab files from the Windows partition on your own hard disk. If your PC is part of a network, you might want to access files on a Windows-based server or workstation on which a shared folder has been created.
Working with Files in Windows Partitions
Ubuntu may or may not make your Windows partitions available automatically. It depends on whether your Windows partition is FAT32, as used with Windows 95, 98, and Me, or NTFS, as used with Windows NT, 2000, and XP. FAT32 partitions will be instantly accessible, but making NTFS partitions accessible requires some work.

C H A P T E R 1 2 ■ M A N A G I N G Y O U R F I L E S |
193 |
■Note It’s possible for an installation of Windows 2000 or XP to use FAT32 instead of NTFS, but this requires the user to make a deliberate choice during setup. Unless you know your Windows 2000 or XP system has been formatted with FAT32, it’s very likely that it is NTFS.
If the drive is available, an icon for it should appear on the desktop. Unfortunately, with Ubuntu 5.10, NTFS drives appear on the desktop, but when you try to use them, they aren’t accessible because of incorrect permissions. You can get around this bug in a couple ways. The easiest is to use the Disks Manager program, as follows:
1.Start the Disks Manager by selecting System Administration Disks.
2.Select Hard Disk in the list on the left and click the Partitions tab on the right. Then click the partition relating to your Windows installation.
3.You need to mount the partition. I discuss mounting in detail in Chapter 15, but for the moment, it’s enough to know that this can be done within the Disks Manager program. You need to provide an empty folder via which the partition will be made available.
Usually, under Linux, the /mnt directory is used for temporary mounts such as this, so click the Change button and browse to this directory. Alternatively, you can simply type /mnt into the Access Path field.
4.Click the Enable button, and then click the Browse button next to it to access your Windows file contents, as shown in Figure 12-7.
■Note You should be able to read and write to FAT32 partitions, but you cannot write to or edit files in an NTFS partition. Although it is technically possible, it’s not advisable because of various technical limitations. Therefore, the NTFS partition is made read-only. If you have a desperate need to write files to your Windows NTFS partition from within Ubuntu, you might consider converting it to FAT32. This can be done using a variety of commercial partitioning programs, such as PartitionMagic (www.symantec.com).

194 |
C H A P T E R 1 2 ■ M A N A G I N G Y O U R F I L E S |
Figure 12-7. You can mount any partition, including those belonging to Windows, using the Disks Manager tool.
The Disks Manager program works for temporary access to your Windows files. If you want to make the mount of your NTFS partition permanent so it appears automatically every time you boot up, you must create a permanent mount point and also edit the /etc/fstab file. (The fstab file contains details of all your regular mounts and is discussed in Chapter 15.) However, before editing it, you’ll need to create a folder that will act as the mount point for your Windows directory. Here are the steps:
1.Select Applications Accessories Terminal to open a GNOME Terminal window, and then type the following:
sudo mkdir /media/windows_ntfs
2.To open the fstab file in the Gedit text editor, type the following in the GNOME Terminal window:
sudo gedit /etc/fstab

C H A P T E R 1 2 ■ M A N A G I N G Y O U R F I L E S |
195 |
3.You’ll be asked to type your password, so do so.
4.In the Gedit window, scroll to the bottom of the file and add the following line (on a completely new line of its own):
/dev/hda1 /media/windows_ntfs ntfs nls=utf8,umask=0222 0 0
Type this exactly as it is written. You need to put two spaces between each element on the line. This step assumes that the Windows partition is the first on your hard disk. If you know it to be the second partition, change /dev/hda1 to read /dev/hda2. But for most users who installed Ubuntu onto a hard disk that already contained Windows, the Windows partition will be /dev/hda1.
Following this, whenever you reboot your computer, the Windows partition should be available via an icon on the desktop and by clicking Places Computer.
Any files you copy from the NTFS partition will be read-only. To change this, right-click the file after you’ve copied it across, select Properties, click the Permissions tab, and put a check in the Write box on the Owner line.
Accessing Networked Files
The easiest way to access servers or shared folders on Windows workstations or servers over a network is to click Places Network Servers. This will start Nautilus and attempt to search for Windows machines on your local network, just like Network Neighborhood and My Network Places on the various versions of Windows. However, if you’ve ever used either of these services under Windows, you might also know how unreliable they can be—some computers simply don’t appear in the list, others appear eventually after a wait, and others appear but then prove to be mysteriously inaccessible.
A far quicker and reliable method of accessing a Windows machine is to open a Nautilus file browser window (Places Home), and then click Go Location. In the box, type the following:
smb://Windows computer's IP address/
As you can see, you’ll need to know the IP address of the Windows computer. Ask your system administrator or the person in charge of that machine for this address. You may also be prompted to enter a username and/or password to access the shared folder, as shown in Figure 12-8.
■Note If you’re accessing a Windows 95, 98, or Me shared folder, only password protection will have been set (these versions of Windows are unable to specify a username). However, when prompted by Nautilus, you still need to type something into the Username box to gain access—anything will do, as long as the password is correct. You cannot leave the Username box blank.

196 |
C H A P T E R 1 2 ■ M A N A G I N G Y O U R F I L E S |
Figure 12-8. If the share requires a username and/or password, you’ll be invited to enter these.
Accessing Removable Storage Devices
Ubuntu automatically makes available any CDs or DVDs you insert into your computer, and they’ll appear instantly as icons on the desktop. The same is true of any card readers or USB memory devices that you use.
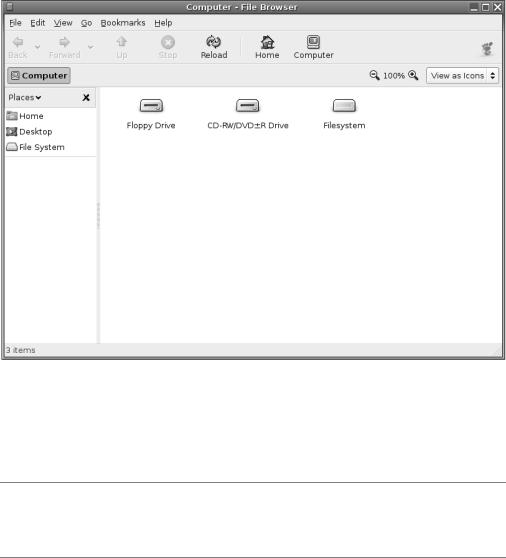
Alternatively, you can access the storage devices by clicking Places Computer. Here, you’ll find icons for all of the storage devices attached to your computer, including the floppy disk drive, as shown in Figure 12-9. However, because of the way floppy disk drives work, Ubuntu isn’t able to automatically detect if a floppy has been inserted. Instead, you’ll need to double-click the icon, as with Windows.
■Note In days of old, special tools were used to access MS-DOS floppies under Linux, and you might hear some Linux old hands talking about them. Nowadays, you can simply use Nautilus without needing to take any special steps.
C H A P T E R 1 2 ■ M A N A G I N G Y O U R F I L E S |
197 |
Figure 12-9. Select Places Computer to access your removable storage drives.
Whenever you double-click any entry in the Computer window, it will open a Nautilus file browser window. You can copy files by clicking and dragging, and right-clicking files offers virtually all the options you could need.
■Tip You don’t need to use Places Computer each time to access your floppy, CD, or DVD drive. These drives are mounted in the /media folder on your hard disk. Just browse to /media/floppy, and /media/ cdrom.
Ejecting Media from Drives
Ubuntu isn’t quite like Windows when it comes to ejecting or unplugging removable storage devices. In some cases, devices must be unmounted, which is to say that you need to tell Ubuntu that you’re finished with the device in question and that you’re about to unplug it.
In the case of CD or DVD discs, you can simply hit the Eject button on the drive itself. Ubuntu is clever enough to realize that the disc is being ejected, so it will automatically unmount the drive.