

Beginning Ubuntu Linux - From Novice To Professional (2006)
.pdf68 |
C H A P T E R 7 ■ B O O T I N G U B U N T U F O R T H E F I R S T T I M E |
Desktop Elements
The Ubuntu desktop is similar to that of Windows. It has the following elements:
•Menus: The three menus at the top left of the screen provide access to all of Ubuntu’s functionality. As noted earlier, the Applications menu provides access to programs, the Places menu provides access to the file system, and the System menu provides access to configuration settings (as well as the Log Out option). You can click and drag practically every menu entry onto the desktop in order to create a quick-and-easy shortcut.
•Icons: Although the Ubuntu desktop is clean, some icons are tucked away at the top and bottom of the screen. Those at the top are located to the right of the menus and allow you to start the browser, e-mail client, and help system (and are arranged in that order). At the top right is a speaker icon that lets you alter the sound volume, while at the bottom left is the Hide Windows button that instantly minimizes all open windows to give access to the desktop underneath. At the bottom right are the four virtual desktop buttons, which I’ll discuss in the “Working with Virtual Desktops” section later in this chapter, and also the Wastebasket icon.
■Note If you’re dual-booting with Windows, you might see an icon at the top left that will let you access your Windows files. Similarly, if you have a memory card reader or digital camera plugged into your PC, you might see desktop icons for them, too.
•Panel: The bar at the bottom of the screen, called the Panel, shows which programs are currently running (if any). As with Windows, you can simply click the button for any program to bring that window “to the top.” Alternatively, you can right-click each entry to instantly minimize or maximize that particular window.
•Clock: The clock is located in the top right of the screen. Clicking it brings up a handy monthly calendar. Right-clicking it brings up a context menu. On this menu, the Preferences option lets you alter the way the date and time are displayed. The Adjust Date & Time option lets you change the time and/or date if they’re incorrect.
•Notification area: The speaker icon and clock are located in the notification area, which is similar to the Windows system tray. Programs that like to hang around in memory, such as the Rhythmbox media player, will add an icon in this top-right area, to allow quick access to their functions. Usually, you simply need to click (or right-click) their icons to access the program features.
■Tip The small bar marks the leftmost boundary of the notification area. To resize the notification area, right-click this bar and remove the tick from the Lock to Panel menu entry. Then you can click and drag the bar to a different size. This might be handy if the notification area starts to fill up with icons!
C H A P T E R 7 ■ B O O T I N G U B U N T U F O R T H E F I R S T T I M E |
69 |
BEHIND THE DESKTOP: GNOME
Although I refer to the Ubuntu desktop, the fundamental software behind it is created by GNOME: The Free Software Desktop Project. This is one of the most well-established organizations currently producing desktop interfaces for Linux, as well as for other versions of Unix. Its home page is www.gnome.org.
Although it’s based on GNOME, Ubuntu’s desktop has its own set of individual features and programs, as well as a unique look and feel. That said, it works in an almost identical way to versions of GNOME that are used in other Linux distributions, such as Red Hat Fedora.
The nature of open-source software—whereby anyone can take the source code and create his or her own version of a program—makes Ubuntu’s remodeling of the GNOME desktop possible. Unlike with Windows software, more than one current version of a particular program or software suite can exist, and each is usually tailored to the particular needs of one of the various Linux distributions.
Quick Desktop Guides
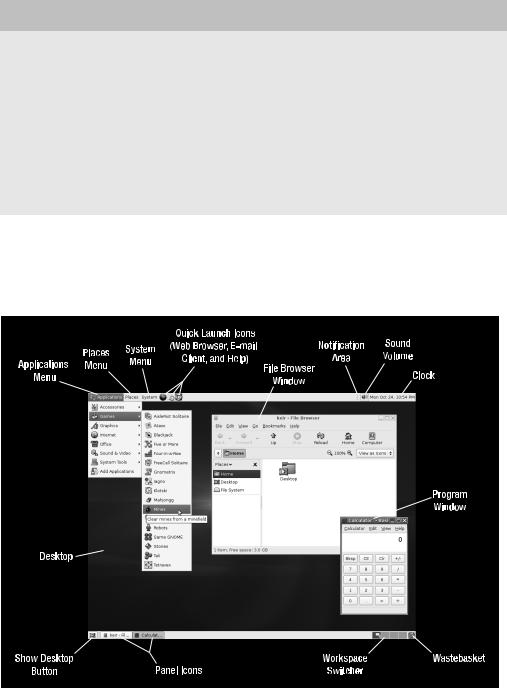
Refer to Figure 7-4 for an annotated diagram of the desktop. The figure includes an open menu, browser window, and program window, so you can get an idea of working from the desktop.
Figure 7-4. The Ubuntu desktop is broadly similar to the Windows desktop, with a few minor differences.

70 |
C H A P T E R 7 ■ B O O T I N G U B U N T U F O R T H E F I R S T T I M E |
As another handy reference, Table 7-1 lists standard Windows desktop features and where similar functionality can be found on the Ubuntu desktop.
Table 7-1. Windows Desktop Features Equivalents Under Ubuntu
Windows Function |
Description |
Ubuntu Equivalent |
My Computer |
Double-clicking the My |
|
Computer icon gives you |
|
access to the PC system. In |
|
particular, it lets you browse |
|
the file system. |
Recycle Bin |
The Recycle Bin is the |
|
repository of deleted files. |
Start menu |
The Start menu provides |
|
access to many computer |
|
functions, as well as a list of |
|
the programs installed on |
|
the system. |
Click Places Computer to see all the drives attached to the computer in the file browser window. If you wish to browse the file system, doubleclick File System in the list on the left side of the file browser window.
Click the small Wastebasket icon, located at the bottom-right corner of the Ubuntu desktop.
This function is split between the Applications and System menu. The
Applications menu provides access to every piece of software installed under Ubuntu. The System menu lets you configure and administer the system, rather like the Windows
Control Panel.
Quick Launch toolbar |
Located just to the right of |
|
the Start button, these small |
|
icons let you launch popular |
|
programs with a single click. |
My Network Places/ |
This icon is used to access |
Network Neighborhood |
network services, usually |
|
within a business environ- |
|
ment (on newer versions of |
|
Windows, this icon is often |
|
hidden by default). |
Similar icons are located to the right of the main menus at the top of the Ubuntu desktop. You can add you own entries here by clicking and dragging program icons from the Applications menu.
To browse the local network, click
Places Network Servers.
My Documents |
The My Documents folder, |
|
accessed via its icon on the |
|
Windows desktop, is a storage |
|
space set aside for a user’s |
|
documents. |
The user’s Home folder serves this purpose and can be accessed by clicking Places Home Folder.
Control Panel |
The Windows Control Panel, |
|
located off the Start menu, |
|
allows the user to change |
|
system settings and |
|
preferences. |
Find Files |
Located on the Start menu, |
|
the Find Files function lets a |
|
user search the file system for |
|
missing items. |
Similar functionality can be found under the System Administration and System Preferences menu options.
To find files, click Places Search for Files.
|
C H A P T E R 7 ■ B O O T I N G U B U N T U F O R T H E F I R S T T I M E |
71 |
||
Table 7-1. Windows Desktop Features Equivalents Under Ubuntu |
|
|||
|
|
|
|
|
Windows Function |
Description |
Ubuntu Equivalent |
|
|
|
|
|
|
|
Shutdown/Reboot |
At the bottom of the Start |
Clicking System Log Out brings up |
|
|
|
menu within Windows is the |
a dialog box that is almost identical to |
|
|
|
Shutdown button. |
the one displayed in Windows. It gives |
|
|
|
|
you the option of rebooting, shutting |
|
|
|
|
down, logging out (returning to the |
|
|
|
|
initial username/password prompt), |
|
|
|
|
or hibernating the system (suspending |
|
|
|
|
the RAM to disk and then shutting |
|
|
|
|
down the computer). |
|
|
|
|
|
|
|
It will take some time to get used to the look and feel of Ubuntu; everything will initially seem odd. You’ll find that the on-screen fonts look a little different from those in Windows, for example. The icons also won’t be the same as you’re used to in Windows. This can be a little disconcerting, but that feeling will quickly pass, and everything will become second nature. We’ll look at how you can personalize the desktop in Chapter 10.
Running Programs
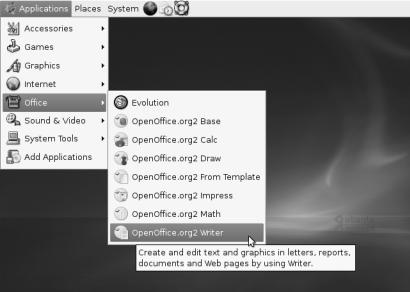
Starting a new program is easy. Just click the Applications menu and then choose a program from the list, as you would in Windows using the Start menu. The menu, shown in Figure 7-5, is split into various subcategories of programs, such as office tools, graphics programs, and even games!
Figure 7-5. The programs on the Applications menu are split into various categories.

72 |
C H A P T E R 7 ■ B O O T I N G U B U N T U F O R T H E F I R S T T I M E |
If you want to start the web browser or e-mail client (arguably two of the most popular programs offered by Ubuntu), you can click their icons on the desktop, just to the right of the menus at the top of the screen (see Figure 7-4).
At the top right of every program window under Ubuntu, you’ll see the familiar Close, Minimize, and Maximize buttons, albeit with a slightly different look and feel than you’re used to. Clicking Close will end each program, as in Windows.
Working with Virtual Desktops
Windows works on the premise of everything taking place on top of a “desktop.” When you start a new program, it runs on top of the desktop, effectively covering up the desktop. In fact, all programs are run on this desktop, so it can get a bit confusing when you have more than a couple of programs running at the same time. Which Microsoft Word window contains the document you’re working on, rather than the one you’ve opened to take notes from? Where is that My Computer window you were using to copy files?
Ubuntu overcomes this problem by having more than one desktop area. By using the Workspace Switcher tool, located at the bottom right of the desktop, you can switch between four virtual desktops. This is best explained by a demonstration.
1.Make sure that you’re currently on the first virtual desktop (click the leftmost square on the Workspace Switcher) and start up the web browser by clicking its icon at the top of the screen (the globe icon located to the right of the menus).
2.Click the second square on the Workspace Switcher. This will switch you to a clean desktop, where no programs are running—desktop number two.
3.Start up the file browser by selecting the Places Home menu option. A file browser window appears.
4.Click the first square in the Workspace Switcher again. You should switch back to the desktop that is running the web browser.
5.Click the second square, and you’ll switch back to the other desktop, which is running the file browser.
■Tip Right-clicking any of the program entries in the Panel will bring up a menu where you can move a program from one virtual desktop to another. Just select Move to Another Workspace.
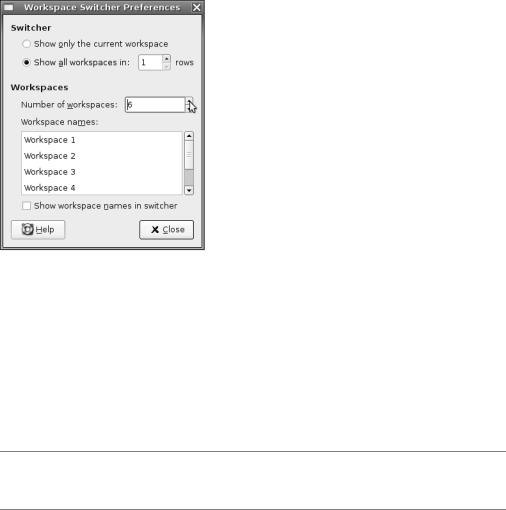
See how it works? You can create more than a couple virtual desktops—as many as 36! To set the number of workspaces, right-click the Workspace Switcher and select Preferences. In the window that appears, click the up arrow next to the Number of Workspaces entry, as shown in Figure 7-6. You might choose to have fewer than four virtual desktops. For example, some people use only two: one main desktop and one “spare,” to take the excess when the main desktop gets full.
C H A P T E R 7 ■ B O O T I N G U B U N T U F O R T H E F I R S T T I M E |
73 |
Figure 7-6. Four virtual desktops are set up by default, but you can have as many as 36.
You can also rename each virtual desktop by double-clicking its entry in the list in the Preferences window. This allows you to be even more organized. For example, you might reserve desktop 1 for running Internet programs and give it a name that indicates this, such as Net Programs. You might then use desktop 2 to run office programs, giving it an appropriate title; use desktop 3 for file browsing; and so on. This name will then appear whenever you right-click a program’s entry on the Panel and attempt to move it to a different desktop. Additionally, these titles will appear whenever you right-click and choose to send each program window to a different desktop.
■Tip Putting your mouse over the Workspace Switcher and scrolling the mouse wheel switches between the various virtual desktops instantly.
The Workspace Switcher provides a way of organizing your programs and also reducing the clutter. You can experiment with virtual desktops to see if you want to organize your work this way. Some people swear by them. Experienced Ubuntu users may have in excess of ten virtual desktops, although clearly this will appeal only to organizational geniuses! Other users think multiple desktops are a waste of time. They’re certainly worth trying out to see if they suit the way you work.
Using the Mouse
As noted earlier, the mouse works mostly the same under Ubuntu as it does under Windows: a left-click selects things, and a right-click usually brings up a context menu. Try right-clicking various items, such as icons on the desktop or even the desktop itself.

74 |
C H A P T E R 7 ■ B O O T I N G U B U N T U F O R T H E F I R S T T I M E |
■Tip Right-clicking a blank spot on the desktop and selecting Create Launcher lets you create shortcuts to applications. Clicking Create Folder lets you create new empty folders.
You can use the mouse to drag icons on top of other icons. For example, you can drag a file onto a program icon in order to run it. You can also click and drag in certain areas to create an elastic band and, as in Windows, this lets you select more than one icon at once.
You can resize windows using the mouse in much the same way as in Windows. Just click and drag the edges and corner of the windows. In addition, you can double-click the title bar to maximize and subsequently restore windows.
Ubuntu also makes use of the third mouse button for middle-clicking. You might not think your mouse has one of these but, actually, if it’s relatively modern, it probably does. Such mice have a scroll wheel between the buttons, and this can act as a third button when pressed.
In Ubuntu, the main use of the middle mouse button is in copying and pasting, as described in the next section. Middle-clicking also has a handful of other functions; for example, middleclicking the title bar of any open window will switch to the window underneath.
■Tip If your mouse doesn’t have a scroll wheel, or if it has one that doesn’t click, you can still middle-click. Simply press the left and right mouse buttons at the same time. This emulates a middle-click, although it takes a little skill to get right. Generally speaking, you need to press one button a fraction of a second before you press the other button.
Cutting and Pasting Text
Ubuntu offers two separate methods of cutting and pasting text. The first method is identical to that under Windows. In a word processor or another application that deals with text, you can click and drag the mouse to highlight text, right-click anywhere on it, and then select to copy or cut the text. In many programs, you can also use the keyboard shortcuts of Ctrl+X to cut, Ctrl+C to copy, and Ctrl+V to paste.
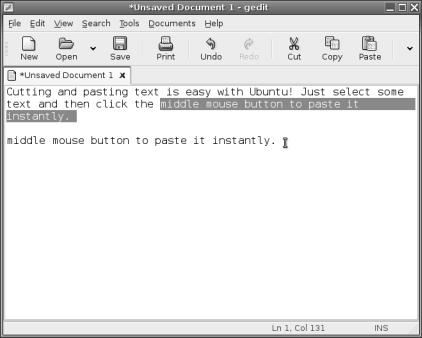
However, there’s a quicker method of copying and pasting. Simply click and drag to highlight some text, and then immediately click the middle mouse button where you want the text to appear. This will copy and paste the highlighted text automatically, as shown in Figure 7-7.
This special method of cutting and pasting bypasses the usual clipboard, so you should find that any text you’ve copied or cut previously should still be there. The downside is that it doesn’t work across all applications within Ubuntu, although it does work with the majority of them.
C H A P T E R 7 ■ B O O T I N G U B U N T U F O R T H E F I R S T T I M E |
75 |
Figure 7-7. Highlight the text, and then middle-click to paste it instantly.
Summary
This chapter covered booting into Ubuntu for the first time and discovering the desktop. We’ve looked at starting programs, working with virtual desktops, using the mouse on the Ubuntu desktop, and much more. You should have become confident in some basic Ubuntu skills and now be ready to learn more!
In the next chapter, we’ll look at getting your system up and running, focusing in particular on items of hardware that experience day-to-day use.

C H A P T E R 8
■ ■ ■
Getting Everything Up
and Running
This chapter guides you through setting up all the essential components of your Ubuntu installation. This includes hardware configuration, as well as setting up e-mail and online software repositories. It covers the post-installation steps necessary for getting your system up and running efficiently.
Like all modern Linux distributions, Ubuntu is practically automated when it comes to setting up key hardware and software components. Key software will work from the start, and hardware will be automatically configured. However, you might need to tweak a few settings to make everything work correctly. Read on to learn more.
Ubuntu Hardware Support
The age-old criticism that the Linux operating system lags behind Windows in terms of hardware support is long dead. The majority of add-ins, such as digital cameras and printers, will all work with Ubuntu immediately, with little, if any, configuration.
In fact, most underlying PC hardware is preconfigured during installation without your knowledge and without further work required. Both your graphics card and sound card should work without a hitch, for example. In addition, nearly all USB and FireWire devices you plug in after installation will be supported.
Ubuntu doesn’t support a few hardware items. Generally, it’s a black or white situation; Ubuntu either works with a piece of hardware or it doesn’t.
The types of hardware that Ubuntu doesn’t support tend to be esoteric devices that rely on custom software provided by the hardware manufacturer. It’s also sometimes the case that brand-new models of hardware won’t work with Ubuntu because support has yet to be added. However, as soon as a new piece of hardware comes out, work is usually undertaken to ensure that Linux is made compatible with it. This work is carried out by the people who produce the Linux kernel, although sometimes the companies behind the hardware will supply their own code. This means that you can get the latest hardware drivers by grabbing the latest kernel files. This is one more reason why you should regularly update your system online, as explained in Chapter 9.
77