
Beginning REALbasic - From Novice To Professional (2006)
.pdf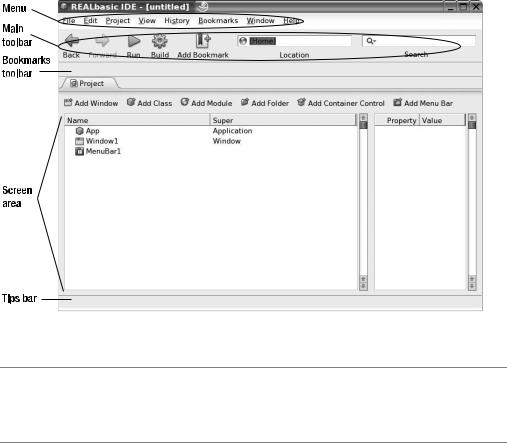
36 |
C H A P T E R 2 ■ N A V I G A T I N G T H E R E A L B A S I C I N T E G R A T E D D E V E L O P M E N T E N V I R O N M E N T |
Like most modern programming language’s development environments, REALbasic’s IDE is involved, consisting of an assortment of menus, toolbars, and screens. In short, this IDE is packed with features and functionality. As a result, when you first begin working with REALbasic’s IDE, you can easily get lost or overwhelmed.
To help alleviate stress and to get you up and running as quickly as possible, a solid familiarity with the IDE is essential for any REALbasic programmer. The primary focus of this chapter is to help provide you with a thorough overview of the REALbasic IDE and to give you all the information you need.
Each time you start REALbasic, its main IDE appears, as Figure 2-1 shows. As you learned in Chapter 1, REALbasic’s IDE looks and operates almost exactly the same, regardless of whether you are running it on Macintosh, Windows, or Linux. The IDE also looks and works almost exactly the same way for both the Standard and Professional editions of REALbasic.
Figure 2-1. REALbasic’s IDE running on Linux
■Note One difference between the REALbasic IDE on Macintosh, and the REALbasic IDE on Windows and Linux is the location of the main menu. As is the case for most Macintosh OS X applications, REALbasic’s main application menu is not displayed on the application but is, instead, displayed at the top of the Mac OS X desktop.
C H A P T E R 2 ■ N A V I G A T I N G T H E R E A L B A S I C I N T E G R A T E D D E V E L O P M E N T E N V I R O N M E N T |
37 |
The REALbasic Menu
REALbasic’s menu is loaded with essential commands that provide convenient access to key REALbasic functionality. REALbasic’s menu is organized into the following menus.
•File. Provides access to commands for opening, creating, and saving REALbasic projects.
•Edit. Provides access to commands for performing standard editing functions (copy, paste, and so forth), as well as to REALbasic specific commands that interact with the Window Editor and the Code Editor.
•Project. Provides access to commands for adding items to REALbasic projects, as well as for testing, debugging, and creating REALbasic applications.
•View. Provides access to commands that control the look and functionality of the REALbasic IDE.
•History. Provides access to commands that enable you to revisit REALbasic screens that you have already worked with when developing a project.
•Bookmarks. Provides access to commands for bookmarking REALbasic items and screens, as well as for accessing bookmarked items and screens.
•Window. Provides access to commands for minimizing and maximizing the REALbasic IDE, and for moving forward and backward between REALbasic screens.
•Help. Provides access to commands that access REALbasic documentation and online content.
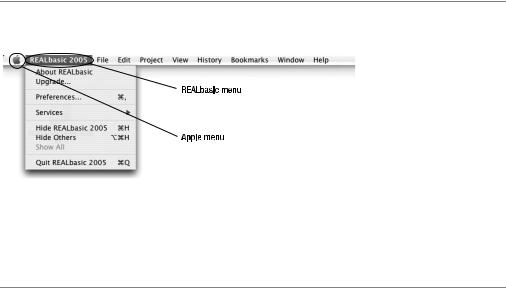
■Note On the Macintosh, REALbasic also provides an Apple menu and a REALbasic menu, as Figure 2-2 shows.
Figure 2-2. On Macintosh, REALbasic also includes an Apple and a REALbasic menu.
The Apple menu is a standard menu item for Macintosh applications. However, it does not contain any REALbasic specific commands. The REALbasic menu contains menu commands found on other menus in Windows and Linux, as Figure 2-2 shows.

38 |
C H A P T E R 2 ■ N A V I G A T I N G T H E R E A L B A S I C I N T E G R A T E D D E V E L O P M E N T E N V I R O N M E N T |
The sheer number of available REALbasic menu commands makes it impossible to fully explore and review them all in this chapter. You learn more about many of these commands as you work your way through the rest of this book.
REALbasic’s Main Toolbar
REALbasic’s Main toolbar, shown in Figure 2-3, holds a collection of icons and edit fields that enable you to navigate between REALbasic screens, to test and build REALbasic applications, and to locate and search your program code.
Figure 2-3. The default view of the REALbasic Main toolbar (Windows version)
Default Main Toolbar Resources
Like many REALbasic toolbars and IDE features, the REALbasic Main toolbar is configurable. In its default configuration, this toolbar provides a number of key features. The major features found on the default REALbasic Main toolbar are outlined in the following list.
•Forward. Provides the capability to move forward to previously viewed screens.
•Backward. Provides the capability to move backward to previously viewed screens.
•Run. Provides the capability to compile and run a test version of your application from within the IDE. If an error is detected during compilation, REALbasic stops the build process and displays an error message.
•Build. Provides the capability to create a stand-alone version of your application based on the currently defined build settings that will run natively on target operating systems (OSs).
•Add Bookmark. Creates either a local or a global bookmark for the currently selected item or screen.
•Location. Provides the capability to locate project items by specifying an item name and pressing Enter.
•Search. Provides the capability to search for items within your program code.
Configuring REALbasic’s Main Toolbar
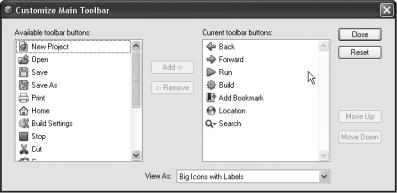
The REALbasic Main toolbar is highly configurable. You can add and remove icons to control key functionality. You can change the order in which these icons are displayed. You can also define the size and appearance of the toolbar’s icons. To configure the Main toolbar, click View Main Toolbar Customize. This opens the Customize Main Toolbar dialog, as Figure 2-4 shows.
C H A P T E R 2 ■ N A V I G A T I N G T H E R E A L B A S I C I N T E G R A T E D D E V E L O P M E N T E N V I R O N M E N T |
39 |
Figure 2-4. The Customize Main Toolbar dialog when viewed from Microsoft Windows
A list of optional icons is displayed on the left side of the Customize Main Toolbar dialog. On the right side of the dialog, a list of icons already defined on the toolbar is displayed. You can add new icons to the toolbar by selecting an icon from the available list and clicking the Add button. Similarly, you can remove an icon from the toolbar by selecting it in the list of currently defined icons, and then clicking the Remove button.
You can change the order in which icons are displayed on the Main toolbar by selecting an icon, and then clicking either the Move Up or Move Down button. You can also specify how REALbasic displays these icons by selecting one of the following options from the View As drop-down list:
•Big icons with labels
•Small icons with labels
•Big icons (no labels)
•Small icons (no labels)
•Labels only
Finally, if you want to restore REALbasic’s default icon selection for the Main toolbar to its default configuration, you can do so by clicking the Reset button (or Reset Defaults on Macintosh).
REALbasic’s Bookmarks Toolbar
Bookmarks are shortcuts to REALbasic items. By setting bookmarks, you provide yourself with shortcuts to items such as controls or REALbasic editors that you work with frequently. REALbasic supports two types of bookmarks: local and global. A local bookmark is one that is available only in the project in which it is set, whereas a global bookmark is available in all your REALbasic projects. Local bookmarks are displayed on the Bookmarks toolbar. Global bookmarks are accessed by opening the Bookmarks menu.
40 |
C H A P T E R 2 ■ N A V I G A T I N G T H E R E A L B A S I C I N T E G R A T E D D E V E L O P M E N T E N V I R O N M E N T |
Adding New Bookmarks
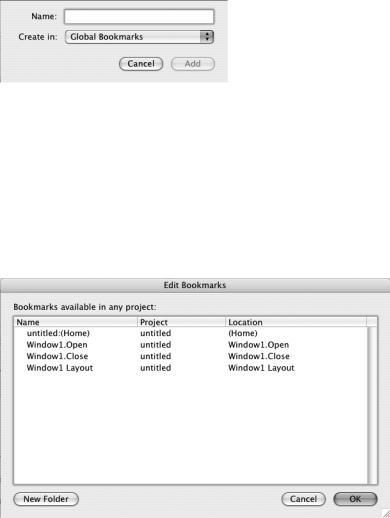
You can add a new bookmark for the currently selected item by clicking the Add Bookmark icon located on the REALbasic Main toolbar. Or, you can add a new bookmark by selecting the Add Bookmark command located on the Bookmarks menu. Either option displays the Add Bookmark dialog, as Figure 2-5 shows.
Figure 2-5. Adding a new bookmark when running REALbasic on the Mac OS X
You can supply a custom name for your bookmark by replacing the default text shown in the Add Bookmark dialog’s Name field. You can then specify whether the bookmark should be local or global.
Editing Your Bookmarks
REALbasic enables you to edit your bookmarks at any time from the Edit Bookmarks dialog, as Figure 2-6 shows.
Figure 2-6. Editing your bookmarks when running REALbasic on the Mac OS X
To open the Edit Bookmarks dialog on Windows or Linux, right-click the Bookmarks toolbar and choose the Customize option. On Macintosh, Control-click the Bookmarks toolbar to access the Customize option. Once opened, you can retype the name assigned to any bookmark by double-clicking it and overtyping its name.
C H A P T E R 2 ■ N A V I G A T I N G T H E R E A L B A S I C I N T E G R A T E D D E V E L O P M E N T E N V I R O N M E N T |
41 |
REALbasic’s Screen Area
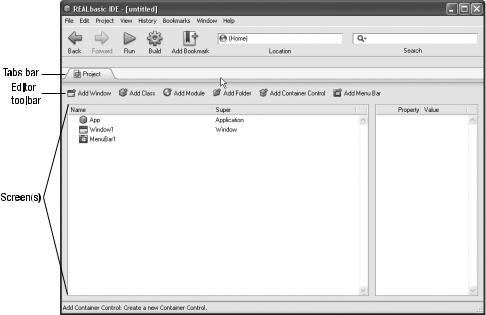
The Screen area takes up the bulk of REALbasic’s IDE workspace and is made up of multiple parts, as Figure 2-7 shows. These parts include
•Tabs bar
•Editor toolbar
•Screen(s)
Figure 2-7. The Screen area, shown here running on Windows, is the work area in the REALbasic IDE.
The Screen area is used to organize the different parts of your REALbasic application into screens. This is where you create your application’s interface, menu system, and program code. Each screen is identified by its tab, which is displayed in the Tabs bar, located at the top of the Screen area.
Tabs Bar
The Tabs bar displays a tab for each screen opened in the Screen area. A tab for the Project Editor screen is always present, as this screen cannot be closed. All other screens have a Close box displayed on their tab. By clicking the Close box on a screen tab, you close it, but this has no effect on content you created on the screen (the user interface, application menu, or program code is simply removed from view).

42 |
C H A P T E R 2 ■ N A V I G A T I N G T H E R E A L B A S I C I N T E G R A T E D D E V E L O P M E N T E N V I R O N M E N T |
The Tabs bar provides a convenient mechanism for quickly moving between major applications components, each of which is created and managed on its own screen.
Editor Toolbar
Each REALbasic screen provides access to an editor or viewer. Each editor has its own custom toolbar, which is referred to as the Editor toolbar. For example, the Code Editor has a different toolbar than the Menu Editor. Figure 2-7 shows the contents of the Project Editor screen, which provides access to icons you can use to add various components to your projects.
Most of the functionality found on the Editor toolbar is replicated on the Project menu’s Add submenu. However, the Editor toolbar provides a much easier and more intuitive tool.
Screens
Each major component of your REALbasic projects is created and managed on its own screen. For example, each of the following IDE editors has a unique screen.
•Project Editor. Manages the items that make up your REALbasic projects.
•Windows Editor. Used to design Windows dialogs that make up your applications.
•Menu Editor. Used to develop menus for your application Window dialogs.
•Code Editor. Used to write and edit the code statements that make your applications work.
Each screen is organized into two or more panes. For example, the Project Editor screen is divided into two panes, as you saw in Figure 2-7. The left pane contains all the items that make up your REALbasic projects. On the right side of the screen is the Properties pane. Each pane is separated by a divider, which you can click and drag to the left or right to increase or decrease the amount of space provided to each pane on the screen.
■Note The REALbasic Properties pane looks and operates in almost exactly the same manner as the Visual Basic Properties Window. If you have a Visual Basic programming background, you probably only need to take a cursory look at the REALbasic Properties pane. Then, you can focus your attention on other IDE features in this chapter.
Because working space is limited within the IDE, REALbasic provides you with the capability to increase the amount of available space by temporarily hiding the display of toolbars. This is achieved by clicking the View menu and selecting the Editor Only menu item. This temporarily hides the following toolbars.
•Main toolbar
•Bookmarks bar
•Editor toolbar
C H A P T E R 2 ■ N A V I G A T I N G T H E R E A L B A S I C I N T E G R A T E D D E V E L O P M E N T E N V I R O N M E N T |
43 |
The Project Editor
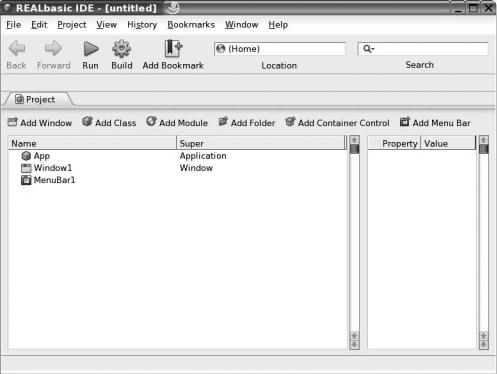
The Project Editor is your focal point for managing all the different items that make up your REALbasic projects. As Figure 2-8 shows, the Project Editor consists of two panes. The left pane displays a listing of all the items that make up your project. The right pane displays the properties associated with the currently selected item. If no item is selected, the Properties pane appears blank.
Figure 2-8. The Project Editor, as seen here on Linux, is used to manage all the items that make up a REALbasic project.
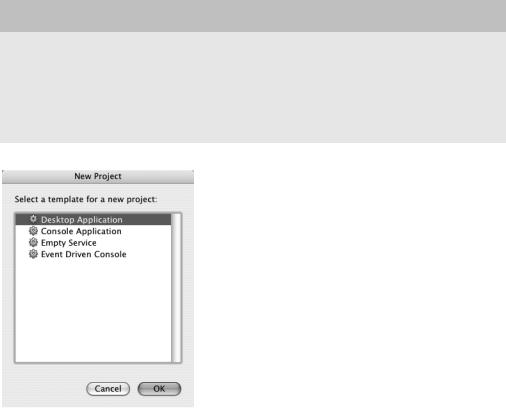
Each time you start REALbasic, it creates a new empty project. This project contains three items (App, Window1, and MenuBar1) and is your starting point for developing new desktop applications. However, REALbasic also supports the development of other types of applications. For example, if you click File and select the new Project menu item, REALbasic responds by displaying the New Project dialog, as Figure 2-9 shows.
44 |
C H A P T E R 2 ■ N A V I G A T I N G T H E R E A L B A S I C I N T E G R A T E D D E V E L O P M E N T E N V I R O N M E N T |
CREATING CUSTOM PROJECT TEMPLATES
If you want, you can create custom templates and add them to REALbasic to facilitate the creation of certain types of applications. This can be a handy way to facilitate application development in situations where you create multiple projects that share common features and functionality. In this scenario, you’d create a base application that contains all the features commonly shared, and then use it as a template for the creation of new applications. To do so, all you must do is copy the project you want to use as templates into REALbasic’s Project Templates folder, which you can find in the directory where you installed REALbasic.
Figure 2-9. Selecting the type of application you want to create using REALbasic, as shown on Mac OS X
As shown in Figure 2-9, you can also use REALbasic to create console applications. A console application is one that does not usually require user interaction and, instead, is run as a background program. Console applications do not have a graphical user interface (GUI). Therefore, the only item you find listed for a new Console application project is the App item.
Both the Desktop and Console applications entries displayed in the New Project dialog represent templates that REALbasic uses when creating a new project. When selected, REALbasic starts the project creation process by loading a copy of the selected template.
You can add new items to your project by clicking one of the Add icons located in the Editor toolbar or by opening the Project menu, selecting Add, and then clicking an item from the list of choices. You can also add items to your projects by dragging them from the desktop and dropping them onto the Project Editor. Deleting an item is even easier: simply select the item you want to remove from your project, and then press Delete.

C H A P T E R 2 ■ N A V I G A T I N G T H E R E A L B A S I C I N T E G R A T E D D E V E L O P M E N T E N V I R O N M E N T |
45 |
■Note You can add and remove functionality from the Editor toolbar by opening the View menu, clicking Editor Toolbar, and then selecting Customize. This opens the Customize Project Toolbar dialog where you can Add and Remove toolbar buttons, as well as configure the look and feel of the toolbar.
■Tip As your projects grow in size, they may end up containing numerous items. If you choose, you can reorder your project’s items by dragging them to a new location in the project list, as indicated by a vertical line that appears during the move process. In addition, you can further organize your project items by creating Folder items into which you can then move other project items. To do so, open the Project menu, click Add, and then select Folder. A new folder is added to the list of items in your project. The Folder item has a single property: its Name. Select the folder and change its name to something appropriate, and then drag-and-drop any project items you want into it.
The Project Editor also provides easy access to project items. Simply double-click an item and REALbasic responds by opening the appropriate editor and displaying the item in it. Or, if an item does not have an editor, REALbasic displays the item in a viewer.
As you learned when building the Hello World! application in Chapter 1, when you work in the Project Editor, you can assign a name to your application by selecting the App item and modifying the MacAppName, WindowsAppName, or LinuxAppName properties. You can also set properties belonging to menu bar items or any other item that is part of your project from the Properties pane.
■Note Some properties can be modified only during application development. Other properties can be modified during both application development and programmatically during application execution. In addition, some properties can only be set at run-time, so you will be unable to modify them via the REALbasic IDE.
The Window Editor
The Window Editor provides you with the tools needed to build your application’s GUI and is organized into three panes. The left-hand pane provides access to a collection of predefined controls you can use to customize your application’s GUI, as Figure 2-10 shows. The center pane provides a Windows editing area, where the windows you are working with are displayed. The right-hand pane displayed properties associated with the currently selected window or control.
