

Beginning Python (2005)
.pdfClasses and Objects
print “Mixing %d %s for the %s omelet” % (self.from_fridge[ingredient], ingredient, self.kind)
self.mixed = True
def make(self):
if self.mixed == True:
print “Cooking the %s omelet!” % self.kind self.cooked = True
Now you have an Omelet class that can create Omelet objects. The Omelet class has the same features as the process for making omelets in Chapters 4 and 5, but using it is much easier because everything is combined and the presentation of the Omelet is confined to a few purposefully simpler interfaces.
Now that you have your two classes, you can make an omelet after loading everything with python -i or the Run with Interpreter command.
>>>o = Omelet(“cheese”)
>>>f = Fridge({“cheese”:5, “milk”:4, “eggs”:12})
>>>o.get_ingredients(f)
>>>o.mix()
Mixing 1 cheese for the cheese omelet Mixing 2 eggs for the cheese omelet Mixing 1 milk for the cheese omelet
>>> o.make()
Cooking the cheese omelet!
This isn’t any easier or harder to use than making a single omelet in Chapter 5 was. However, the benefit of using objects becomes obvious when you have many things to work with at the same time — for instance, many omelets being made at the same time:
>>>f = Fridge({“cheese”:5, “milk”:4, “eggs”:12, “mushroom”:6, “onion”:6})
>>>o = Omelet(“cheese”)
>>>m = Omelet(“mushroom”)
>>>c = Omelet(“onion”)
>>>o.get_ingredients(f)
>>>o.mix()
Mixing 1 cheese for the cheese omelet
Mixing 2 eggs for the cheese omelet
Mixing 1 milk for the cheese omelet
>>>m.get_ingredients(f)
>>>m.mix()
Mixing 1 cheese for the mushroom omelet
Mixing 2 eggs for the mushroom omelet
Mixing 1 milk for the mushroom omelet
Mixing 2 mushroom for the mushroom omelet
>>>c.get_ingredients(f)
>>>c.mix()
Mixing 1 cheese for the onion omelet Mixing 2 eggs for the onion omelet Mixing 1 milk for the onion omelet Mixing 1 onion for the onion omelet
>>> o.make()
Cooking the cheese omelet!
91
TEAM LinG

Chapter 6
>>> m.make()
Cooking the mushroom omelet!
>>> c.make()
Cooking the onion omelet!
Take a moment to compare this to how you’d do the same thing using the functions from Chapter 5, and you’ll realize why so much programming is done in this style — and why this kind of programming, called object-oriented programming, is used to make larger systems.
As long as the Fridge has the ingredients needed, making different kinds of omelets is very, very easy now — it involves only invoking the class to create a new object and then just calling three methods for each Omelet object. Of course, you could reduce it to one. That will be an exercise question.
Summar y
In this chapter, you’ve been introduced to how Python provides you with the tools to program with classes and objects. These are the basic concepts behind what is called object-oriented programming.
When they are used inside a class, functions are referred to as methods because now every one has a special name called self that, when that method is invoked as part of an object, contains all of the data and methods of the object.
A class is invoked to create an object by using the class’s name followed by parentheses, (). Initial parameters can be given at this time and whether or not parameters are given, the newly created object will invoke the method __init__. Like normal functions, methods in classes (including __init__) can accept parameters, including optional and default parameters.
The process of creating a class includes deciding what methods should be created to provide all of the functionality that you want in your class. Two general kinds of methods were described: public interfaces that should be invoked on the outside of the objects and private methods that should be called only by methods inside of the object. The interfaces should be made to change as little as possible, whereas the internal methods may change without affecting how the class can be used. This is especially important to remember when using a class written by someone else. Python expects any name within the scope of an object beginning with two underscores to be private, so this convention should be used by you as well. Other names are generally considered public.
To specify how you expect the class to be used you should create a docstring for the class by entering a string on the first line after the class’s definition. In that docstring, it is best to always provide the names of the methods that you expect to be used, and their purpose. It’s not a bad idea to include an explanation of the class as a whole, too.
All of the names that are defined in a class (both data and methods) are distinct in each object that is created. When a method is invoked in one object and that changes data in that object, other types of the same object are not affected. Examples of this that are built in to Python are strings, which are objects that include special methods that help with common tasks when you are using text.
To make objects easier to use, it’s common to provide multiple interfaces that behave similarly. This can save you a lot of work, by finding ways for these interfaces to call a single internal method that is more
92 |
TEAM LinG |
Classes and Objects
complex or accepts more parameters than the interfaces. This gives you two distinct advantages. First, it makes the code that calls on these methods easier to read because the names of the parameters don’t need to be remembered by the programmer — the name of the method provides needed information to the programmer. Second, if you need to change the internal method that its related interfaces call on, you can change how all of them behave by just changing the internal method. This is especially useful when fixing problems because a single fix will correct how all of the interfaces work as well. In addition, the method that provides this support to other methods can itself be a public interface. There’s no strict rule about whether a hard-working method like this should be private and internal or not. It’s really up to you.
One goal of writing objects is to duplicate as little code as possible, while providing as many features as possible. Creating a class that can use objects can save a lot of code writing because they are usually manipulated more conveniently than when functions and data are kept separated because methods within the same class can count on the methods and data that they use being present. Groups of classes can be written so that they have interdependent behaviors, enabling you to model groups of things that work together. You will learn how to structure these interdependent and cooperative classes in Chapter 7.
Last, you’ve seen how codeEditor’s Python shell helps you explore your objects by showing you all
of the interface names once you type a period. This is much easier than typing dir to get the same information because of the more convenient and easier to use manner in which codeEditor displays the information.
Exercises
Each of the following exercises builds on the exercises that preceded it:
1.Add an option to the Omelet class’s mix method to turn off the creation messages by adding a parameter that defaults to True, indicating that the “mixing ...” messages should be printed.
2.Create a method in class Omelet that uses the new mix method from exercise 1. Called quick_cook, it should take three parameters: the kind of omelet, the quantity wanted, and the Fridge that they’ll come from. The quick_cook method should do everything required instead of requiring three method calls, but it should use all of the existing methods to accomplish this, including the modified mix method with the mix messages turned off.
3.For each of the methods in the Omelet class that do not have a docstring, create one. In each docstring, make sure you include the name of the method, the parameters that the method takes, what the method does, and what value or values it returns upon success, and what it returns when it encounters an error (or what exceptions it raises, if any).
4.View the docstrings that you’ve created by creating an Omelet object.
5.Create a Recipe class that can be called by the Omelet class to get ingredients. The Recipe class should have the ingredient lists of the same omelets that are already included in the Omelet class. You can include other foods if you like. The Recipe class should include methods to retrieve a recipe, get(recipe_name), a method to add a recipe as well as name it, and create (recipe_name, ingredients), where the ingredients are a dictionary with the same format as the one already used in the Fridge and Omelet classes.
93
TEAM LinG
Chapter 6
6.Alter the __init__ method of Omelet so that it accepts a Recipe class. To do this, you can do the following:
a.Create a name, self.recipe, that each Omelet object will have.
b.The only part of the Omelet class that stores recipes is the internal method __known_kinds. Alter __known_kinds to use the recipes by calling self.recipe.get() with the kind of omelet that’s desired.
c.Alter the set_new_kind method so that it places the new recipe into self.recipe and then calls set_kind to set the current omelet to the kind just added to the recipe.
d.In addition, modify __known_kinds to use the recipe method’s get method to find out the ingredients of an omelet.
7.Try using all of the new classes and methods to determine whether you understand them.
94 |
TEAM LinG |
7
Organizing Programs
In Chapter 6, you began using Python’s features to create separate classes that can be used to create entirely self-contained objects. Classes and the objects that are created from them are tools that enable you to gather data and functions into a contained space so that they can be viewed as part of a larger entity.
So far, the definitions of classes have all been in a single file and were not run in the way you normally think of programs being run. Instead, they were invoked interactively so that you could use them as you would from within another program. However, if you wanted to use the classes you’ve written with what you know so far, you would make the same file that defined the classes the program. That means putting all of the classes at the beginning of the file, and the important decision making code at the end. The end is where it takes the most time to find the code that you’re going to want to find the most often.
Another cautionary note needs to be sounded. Classes are very useful, but not all problems should be solved by creating a class. Sometimes the work of designing them is overkill, and other times what you really need are functions that don’t require the long life span that data and methods can have in objects.
To make Python more useful, therefore, it offers you the great feature of enabling you to create modules that create a named scope for functions and data, but which are simpler than classes and objects. Modules give you a tool to separate your program into distinctly named pieces, without using classes to do it. In fact, classes can be defined within a module.
As an extension of this, you can also divide these modules into different files; Python calls this feature a package. Packages enable you to divide your programs among several files and even into separate directories to help you organize your programs.
So far, you have only been introduced to intrinsic pieces of the Python language — things that deal with how Python itself works. Python is also very flexible, and though it comes with a small core set of features, these are expanded in a variety of modules. To extend Python to use features provided by the operating system, there is a module called os. To extend Python to have networking features, Python provides modules that offer both low-level networking (such as sockets) and
TEAM LinG

Chapter 7
higher-level protocols (such as http, ftp, and so on). Many modules come with Python, but because it is very easy to write modules, a variety of additional modules are available from third parties, both commercial and free.
By the end of this chapter, you will have learned how to write simple modules for your own use or to share. You’ll also be introduced to some of the bundled Python modules. You will be familiar with the concept of importing modules, and you will be able to use packages to contain useful functions and names, separately from the global scope. You will also find out more about how scope can be used to your advantage for tasks such as testing your packages.
Modules
Modules present a whole group of functions, methods, or data that should relate to a common theme. Such a theme might be networking components (see Chapter 16), performing more complicated work with strings and text (see Chapter 12), dealing with graphical user interfaces (see Chapter 13), and other services.
After you’ve learned how to program in a language, you often find that you need to work with components that the language doesn’t initially bundle. Python, by itself, is no different. At its core, it is a very small and simple language that doesn’t offer many special features. However, because of its simplicity, it is easy to use as a platform that can be extended with additional functions and objects that can be used by anyone.
Importing a Module So That You Can Use It
To make a module usable, two things need to be available. First, the module itself has to be installed on the system. For the most part, you’ll find that a lot of the basic things you want to do, such as reading and writing files (more on this in Chapter 8) and other fundamental important things that differ between platforms, are available as bundled modules with Python — that is, they are free and universally available with the language.
The simplest way to begin using a module is with the import keyword:
import sys
This will import the module named sys that contains services Python offers that mostly involve system-specific items. This means that it relates to things that involve how the system works, how a particular installation of Python is installed, or how the program you’ve written was invoked from the command line.
To start looking at modules, you’re also going to begin to write in a style that facilitates running the file you’re working on by itself, as a standalone program. To that end, create a file called ch7.py and type the following:
#!/usr/bin/env python2.4
# Chapter 7 module demonstration import sys
96 |
TEAM LinG |
Organizing Programs
The first line is for users of Linux and other Unix systems (or Python under a Unix based environment like Cygwin). This is a way to get the python2.4 binary run in case other Python interpreters are on the system. See the web site for this book for more information on running Python. For Window and Macintosh systems, the file extension should provide information that the operating system needs to launch the Python interpreter, whether it’s python, python2.4, or some other name when it’s installed on your system (although some configuration may be needed). See the web site for more information on this, too.
Making a Module from Pre-existing Code
To create a module, all you need to do is choose a name for your module and open a file with that name and the extension .py in your editor. For example, to create a Foods module, you only have to create a file called Foods.py. When that’s finished, you can import it using the name “Foods” without the .py at the end. That’s it! You’ve imported a simple module.
Try It Out Creating a Module
Take your file with all of the source code from Chapter 6 and copy it to a file called Foods.py. When you’ve done this, open the Python shell so you can import the Foods module:
>>>import Foods
>>>dir(Foods)
[‘Fridge’, ‘Omelet’, ‘Recipe’, ‘__builtins__’, ‘__doc__’, ‘__file__’, ‘__name__’]
>>>
How It Works
You now have access to the Fridge class, the Omelet class and, from the previous exercises, the Recipe class. Together, you have a file that is a module that contains all of these classes, and they’ll be able to work together. However, you’ll now access them through the name Foods.Fridge, Foods.Omelet, and Foods.Recipe, and they remain fully usable, albeit with some new rules.
Be aware that this is the first time you’re getting the examples in the book to be run directly with your computer! By default, Python keeps a list of directories in which it will look for modules to load. This list contains several directories, though the exact locations of all of them will depend on how your running Python interpreter was installed. Therefore, if you’re trying to import the Foods module but the shell has started itself in a directory other than the one in which you’ve saved the Foods.py file, you’re going to receive an error (but you can fix this by changing to the right directory).
This path, or list of directories that Python should search through, is stored in the sys module, in a variable named path. To access this name, you will need to import the sys module. Until you do that, the sys.path won’t be available to you:
>>>import sys
>>>print sys.path
[‘’, ‘D:\\Python24\\Lib\\site-packages\\PythonCard\\tools\\codeEditor’, ‘C:\\WINNT\\system32\\python24.zip’, ‘C:\\Documents and Settings\\J Jones’, ‘D:\\Python24\\DLLs’, ‘D:\\Python24\\lib’, ‘D:\\Python24\\lib\\plat-win’, ‘D:\\Python24\\lib\\lib-tk’, ‘D:\\Python24’, ‘D:\\Python24\\lib\\site-packages’, ‘D:\\Python24\\lib\\site-packages\\wx-2.5.3-msw-ansi’]
97
TEAM LinG
Chapter 7
You can see that sys.path is a normal list, and if you want to add directories that will be checked for your modules, because you want them somewhere that isn’t already in sys.path, you can alter it by using the usual methods — either the append method to add one directory, or the extend method to add any number of directories.
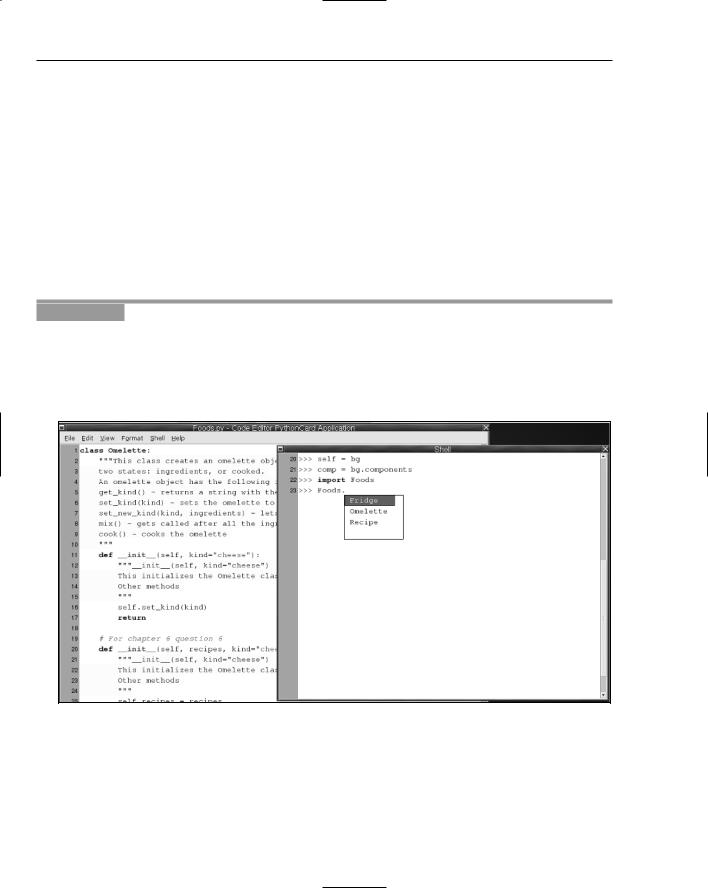
When you’ve imported the Foods module, as above, you can use codeEditor’s feature of interactively helping you by popping up a list of all of the names in the scope of the module while you’re typing in a name. Every time you come to a period, if the name you’ve just typed in has names associated with you, codeEditor will allow you to select from the interfaces that the name provides. This will help you explore the module you’ve just created but is even more useful with larger, more complex modules!
You can now run through examples from the prior chapters, but now you access your classes through the Foods module. For instance, you can invoke Foods.Fridge, but not just Fridge by itself. If you wanted to access Fridge alone, you’ll see how to do this soon.
Try It Out |
Exploring Your New Module |
codeEditor provides you with a special feature in the Python shell that will interact with you as you type. You may have noticed already that when you finish typing the name of something such as a class or a module, when you type a period at the end of the name, within the shell a menu of names that exist in the scope of the module or object is shown to you. Figure 7-1 shows what this looks like, so you can do the same for yourself.
Figure 7-1
How It Works
As you type in codeEditor’s Python shell, it evaluates what you are typing as you type When it notices that you’ve typed certain characters, it takes actions on them. You notice this when strings take on a
98 |
TEAM LinG |
Organizing Programs
different color once you type in any kind of quote, or when words that are special to Python are given colors. Whenever the shell sees that you’re typing a period, it knows that what you’re typing will be looking inside a module or an object, so it queries that object behind the scenes and shows you the results so you can work with it.
Using Modules — Starting With the Command Line
So far, you’ve started by using import with a module name by itself. When a module is imported this way, all of the names it contains are put into a scope that is named for the module — that is, the name that was used in the import statement.
For example, in the case of sys, everything available is referred to by using the name sys, followed by a period, and then the name inside of sys, such as sys.path or sys.copyright, which, as it suggests, specifies the copyright on Python (Programmers love to be clever like that). Now that you know how modules are structured, you can interactively explore the sys module with the codeEditor Python shell, or with the dir function, as you saw in Chapter 6. (dir will show you even more than the helpful dialog box in the codeEditor shell, as it shows private names that aren’t part of the interface of the module. These concepts, which you’ve seen in classes and objects, still apply to modules!) You can also explore the docstrings that are present in the module and in the functions and classes provided by it.
On Unix and Unix-like environments, it’s common to ask users to provide command-line parameters that will determine how a program as a whole will behave. This is conceptually very similar to how functions use parameters in Python. These command-line parameters show up in Python programs as a special name inside the sys module. That name is argv. This name may not make much sense at first, but it’s an important term to know because it is common across most languages and platforms.
argv is an abbreviation for the term argument vector. In computer programming lingo, argument is another word for what you’ve seen called a parameter. This term is used with functions and when you run a program with parameters on the command line (another word for parameters and arguments on the command line are flags). A vector is another word for a list of options. In some languages, it has a very specific and different meaning, but Python doesn’t make the same distinction, so you don’t have to worry about it.
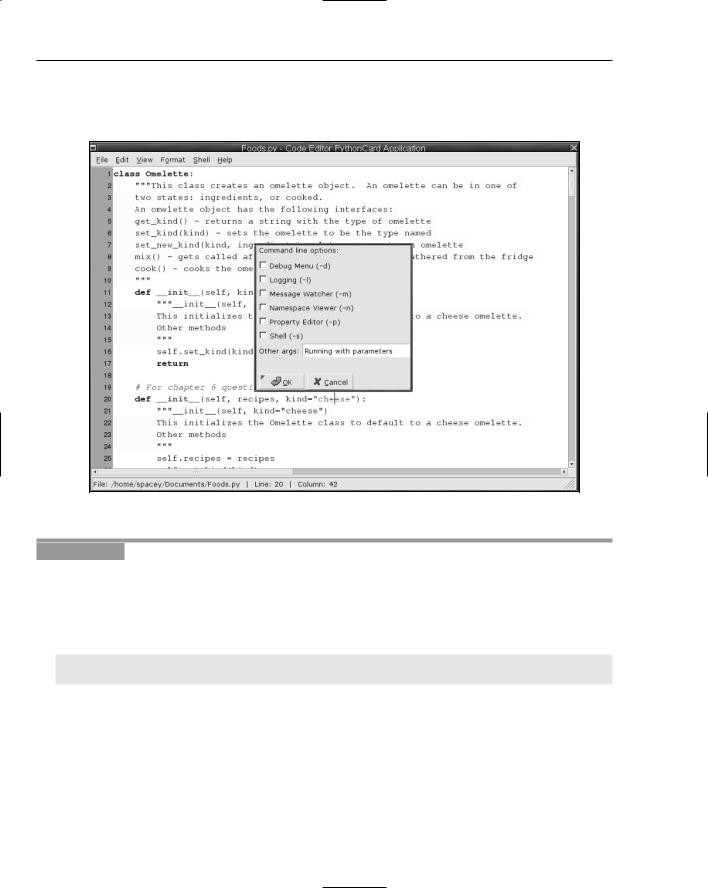
If you translate argv back through those definitions, you’ll see that it simply means the parameters that were on the command line, accessible as a list (see Figure 7-2)! It’s hard to convert that information into a short and comprehensible word that makes sense in English (or any other nonprogramming language that the author has heard of), so the term argv persists.
To print out the parameters from the command line, you just have to use sys.argv as you would with any other list:
print “This was given the command line parameters: %s” % sys.argv
To make running this the same procedure on any platform, you can launch this from codeEditor. Select File Run Options and then put anything you want in the Other argv field. You’ve used this facility before, starting in Chapter 5, but taking advantage of the Run Options dialog box’s capability to let you set the command line that your program will start with is something new.
99
TEAM LinG
Chapter 7
For testing programs that are changing and that aren’t meant to be used interactively, you are generally better off using python -i or Run with Interpreter; this way, you can try running your program repeatedly, starting it program from the beginning each time.
Figure 7-2
Try It Out |
Printing sys.argv |
Now, anytime you run this program using the Run with Interpreter option from your File menu, you will get a printed representation of the list that becomes the sys.argv. For example, if the commandline arguments provided in the Other args field were “test 123 test”, your program will print something like the following (which was run on Windows, while a Unix shell would have a very different looking sys.path):
This was given the command line parameters: [‘D:\\Documents\\Chapter7.py’, ‘test’,
‘123’, ‘test’]
How It Works
The first element of the sys.argv list will always be the name of the program, and anything else will become the elements of the sys.argv list, starting at the number one in the list.
Classes that live within a module are accessed in the same way as any other name. For modules that provide classes that you use, the invocation is what you’d expect — just the addition of the parentheses to the fully spelled out path, such as calling Foods.Recipe().
100 |
TEAM LinG |