

Beginning Python - From Novice To Professional (2005)
.pdf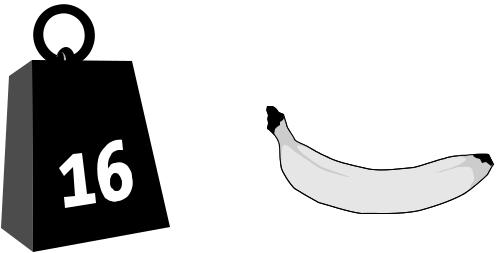
C H A P T E R 2 9 ■ P R O J E C T 1 0 : D O - I T - Y O U R S E L F A R C A D E G A M E |
531 |
you need to make before you can get the prototype up and running. First of all, you should make sure that you have Pygame installed, including the image and font modules. (You might want to import both of these in an interactive Python interpreter to make sure they are available.)
You also need a couple of images. If you want to stick to the theme of the game as presented in this chapter, you need one image depicting a 16-ton weight, and one depicting a banana, both of which are shown in Figure 29-1. Their exact sizes aren’t all that important, but you might want to keep them in the range 100×100 through 200×200 pixels. (You might also want a separate image for the splash screen, the first screen that greets the user of your game. In this project,
I simply use the weight symbol for that as well.) You should have these two images available in a common image file format such as GIF, PNG, or JPEG.
Figure 29-1. The weight and banana graphics used in my version of the game
First Implementation
When you use a new tool such as Pygame, it often pays off to keep the first prototype as simple as possible and to focus on learning the basics of the new tool, rather than the intricacies of the program itself. Let’s restrict the first version of Squish to an animation of 16-ton weights falling from above. The steps needed for this are as follows:
1.Initialize Pygame, using pygame.init, pygame.display.set_mode, and pygame.mouse.set_visible. Get the screen surface with pygame.display.get_surface. Fill the screen surface with a solid white color (with the fill method) and call pygame.display.flip to display this change.
2.Load the weight image.
3.Create an instance of a custom Weight class (a subclass of Sprite) using the image. Add this object to a RenderUpdates group called (for example) sprites. (This will be particularly useful when dealing with multiple sprites.)
532 |
C H A P T E R 2 9 ■ P R O J E C T 1 0 : D O - I T - Y O U R S E L F A R C A D E G A M E |
4.Get all recent events with pygame.event.get. Check all the events in turn—if an event of type QUIT is found, or if an event of type KEYDOWN representing the escape key (K_ESCAPE) is found, exit the program. (The event types and keys are kept in the attributes type and key in the event object. Constants such as QUIT, KEYDOWN, and K_ESCAPE can be imported from the module pygame.locals.)
5.Call the update method of the sprites group. This in turn calls the update method of the Weight instance. (You have to implement the latter method yourself.)
6.Call sprites.draw with the screen surface as the argument to draw the Weight sprite at its current position. (This position changes each time update is called.)
7.Call pygame.display.update with the rectangle list returned from sprites.draw to update the display only in the right places. (If you don’t need the performance, you can use pygame.display.flip here to update the entire display.)
8.Go to Step 4.
See Listing 29-1 for code that implements these steps. The QUIT event would occur if the user quit the game—for example, by closing the window.
Listing 29-1. A Simple “Falling Weights” Animation (weights.py)
import sys, pygame
from pygame.locals import * from random import randrange
class Weight(pygame.sprite.Sprite):
def __init__(self): pygame.sprite.Sprite.__init__(self)
# image and rect used when drawing sprite: self.image = weight_image
self.rect = self.image.get_rect() self.reset()
def reset(self):
"""
Move the weight to a random position at the top of the screen.
"""
self.rect.top = -self.rect.height self.rect.centerx = randrange(screen_size[0])
def update(self):
"""
Update the weight for display in the next frame.
"""
self.rect.top += 1

C H A P T E R 2 9 ■ P R O J E C T 1 0 : D O - I T - Y O U R S E L F A R C A D E G A M E |
533 |
if self.rect.top > screen_size[1]: self.reset()
#Initialize things pygame.init() screen_size = 800, 600
pygame.display.set_mode(screen_size, FULLSCREEN) pygame.mouse.set_visible(0)
#Load the weight image
weight_image = pygame.image.load('weight.png')
weight_image = weight_image.convert() # ...to match the display
#Create a sprite group and add a Weight sprites = pygame.sprite.RenderUpdates() sprites.add(Weight())
#Get the screen surface and fill it screen = pygame.display.get_surface() white = (255, 255, 255) screen.fill(white) pygame.display.flip()
while 1:
# Check for quit events:
for event in pygame.event.get(): if event.type == QUIT:
sys.exit()
if event.type == KEYDOWN and event.key == K_ESCAPE: sys.exit()
#Update all sprites: sprites.update()
#Draw all sprites:
updates = sprites.draw(screen)
# Update the necessary parts of the display: pygame.display.update(updates)
You can run this program with the following command:
$ python weights.py
You should make sure that both weights.py and weight.png (the weight image) are in the current directory when you execute this.
■Note I have used a PNG image with transparency here, but a GIF image might work just as well. JPEG images aren’t really well suited for transparency.
534 |
C H A P T E R 2 9 ■ P R O J E C T 1 0 : D O - I T - Y O U R S E L F A R C A D E G A M E |
Figure 29-2 shows a screenshot of the program created in Listing 29-1.
Figure 29-2. A simple animation of falling weights
Most of the code should speak for itself. There are, however, a few points that need explaining:
•All sprite objects should have two attributes called image and rect. The former should contain a surface object (an image), and the latter should contain a rectangle object (just use self.image.get_rect() to initialize it). These two attributes will be used when drawing the sprites. By modifying self.rect, you can move the sprite around.
•Surface objects have a method called convert, which can be used to create a copy with a different color model. You don’t have to worry about the details, but using convert without any arguments creates a surface that is tailored for the current display, and displaying it will be as fast as possible.
•Colors are specified through RGB triples (red-green-blue, with each value being 0–255), so the tuple (255, 255, 255) represents white.

C H A P T E R 2 9 ■ P R O J E C T 1 0 : D O - I T - Y O U R S E L F A R C A D E G A M E |
535 |
You modify a rectangle (such as self.rect in this case) by assigning to its attributes (top, bottom, left, right, topleft, topright, bottomleft, bottomright, size, width, height, center, centerx, centery, midleft, midright, midtop, midbottom) or calling methods such as inflate or move. (These are all described in the Pygame documentation at http://pygame.org/docs/ref/ Rect.html).
Now that the Pygame technicalities are in place, it’s time to extend and refactor your game logic a bit.
Second Implementation
In this section, instead of walking you through the design and implementation step by step, I have added copious comments and docstrings to the source code (shown in Listings 29-2 through 29-4 at the end of this section). You can examine the source (“use the source,” remember?) to see how it works, but here is a short rundown of the essentials (and some not-quite-intuitive particulars):
•The game consists of five files: config.py, which contains various configuration variables; objects.py, which contains the implementations of the game objects; squish.py, which contains the main Game class and the various game state classes; and weight.png and banana.png, the two images used in the game.
•The rectangle method clamp ensures that a rectangle is placed within another rectangle, moving it if necessary. This is used to ensure that the banana doesn’t move off-screen.
•The rectangle method inflate resizes (inflates) a rectangle by a given number of pixels in the horizontal and vertical direction. This is used to shrink the banana boundary, to allow some overlap between the banana and the weight before a hit (or “squish”) is registered.
•The game itself consists of a game object and various game states. The game object only has one state at a time, and the state is responsible for handling events and displaying itself on the screen. The states may also tell the game to switch to another state. (A Level state may, for example, tell the game to switch to a GameOver state.)
That’s it. You may run the game by executing the squish.py file, as follows:
$ python squish.py
You should make sure that the other files are in the same directory. In Windows, you can simply double-click the squish.py file.
■Tip If you rename squish.py to squish.pyw, double-clicking it in Windows won’t pop up a gratuitous terminal window. If you want to put the game on your desktop (or somewhere else) without moving all the modules and image files along with it, simply create a shortcut to the squish.pyw file. See also Chapter 18 for details on packaging your game.

C H A P T E R 2 9 ■ P R O J E C T 1 0 : D O - I T - Y O U R S E L F A R C A D E G A M E |
537 |
#Change these to affect the general appearance: screen_size = 800, 600
background_color = 255, 255, 255 margin = 30
full_screen = 1 font_size = 48
#These affect the behavior of the game:
drop_speed = 5 banana_speed = 10 speed_increase = 1 weights_per_level = 10 banana_pad_top = 40 banana_pad_side = 20
Listing 29-3. The Squish Game Objects (objects.py)
import pygame, config, os from random import randrange
"This module contains the game objects of the Squish game."
class SquishSprite(pygame.sprite.Sprite):
"""
Generic superclass for all sprites in Squish. The constructor takes care of loading an image, setting up the sprite rect, and the area within which it is allowed to move. That area is governed by the screen size and the margin.
"""
def __init__(self, image): pygame.sprite.Sprite.__init__(self)
self.image = pygame.image.load(image).convert() self.rect = self.image.get_rect()
screen = pygame.display.get_surface() shrink = -config.margin * 2
self.area = screen.get_rect().inflate(shrink, shrink)
class Weight(SquishSprite):
"""
A falling weight. It uses the SquishSprite constructor to set up its weight image, and will fall with a speed given as a parameter to its constructor.
"""
538 |
C H A P T E R 2 9 ■ P R O J E C T 1 0 : D O - I T - Y O U R S E L F A R C A D E G A M E |
def __init__(self, speed): SquishSprite.__init__(self, config.weight_image) self.speed = speed
self.reset()
def reset(self):
"""
Move the weight to the top of the screen (just out of sight) and place it at a random horizontal position.
"""
x = randrange(self.area.left, self.area.right) self.rect.midbottom = x, 0
def update(self):
"""
Move the weight vertically (downwards) a distance corresponding to its speed. Also set the landed attribute according to whether it has reached the bottom of the screen.
"""
self.rect.top += self.speed
self.landed = self.rect.top >= self.area.bottom
class Banana(SquishSprite):
"""
A desperate banana. It uses the SquishSprite constructor to set up its banana image, and will stay near the bottom of the screen, with its horizontal position governed by the current mouse position (within certain limits).
"""
def __init__(self):
SquishSprite.__init__(self, config.banana_image) self.rect.bottom = self.area.bottom
#These paddings represent parts of the image where there is
#no banana. If a weight moves into these areas, it doesn't
#constitute a hit (or, rather, a squish):
self.pad_top = config.banana_pad_top self.pad_side = config.banana_pad_side
def update(self):
"""
Set the Banana's center x-coordinate to the current mouse x-coordinate, and then use the rect method clamp to ensure that the Banana stays within its allowed range of motion.
C H A P T E R 2 9 ■ P R O J E C T 1 0 : D O - I T - Y O U R S E L F A R C A D E G A M E |
539 |
"""
self.rect.centerx = pygame.mouse.get_pos()[0] self.rect = self.rect.clamp(self.area)
def touches(self, other):
"""
Determines whether the banana touches another sprite (e.g., a Weight). Instead of just using the rect method colliderect, a new rectangle is first calculated (using the rect method inflate with the side and top paddings) that does not include the 'empty' areas on the top and sides of the banana.
"""
# Deflate the bounds with the proper padding:
bounds = self.rect.inflate(-self.pad_side, -self.pad_top)
#Move the bounds so they are placed at the bottom of the Banana: bounds.bottom = self.rect.bottom
#Check whether the bounds intersect with the other object's rect: return bounds.colliderect(other.rect)
Listing 29-4. The Main Game Module (squish.py)
import os, sys, pygame
from pygame.locals import * import objects, config
"This module contains the main game logic of the Squish game."
class State:
"""
A generic game state class that can handle events and display itself on a given surface.
"""
def handle(self, event):
"""
Default event handling only deals with quitting.
"""
if event.type == QUIT: sys.exit()
if event.type == KEYDOWN and event.key == K_ESCAPE: sys.exit()
def firstDisplay(self, screen):
"""
Used to display the State for the first time. Fills the screen with the background color.
"""