490 C H A P T E R 2 6 ■ P R O J E C T 7 : Y O U R O W N B U L L E T I N B O A R D
basic structure for the final version. Some measures will be added to check the supplied parameters (such as checking whether reply_to is really a number, and whether the required parameters are really supplied), but you should note that making a system like this robust and user-friendly is a tough task. If you intend to use the system (or, I hope, an improved version of your own), you should be prepared to work quite a bit on these issues.
But before you can even think of improving stability, you need something that works, right? So—where do you begin? How do you structure the system?
A simple way of structuring Web programs (using technologies such as CGI) is to have one script per action performed by the user. In the case of this system, that would mean the following scripts:
main.cgi: Displays the subjects of all messages (threaded) with links to the articles themselves.
view.cgi: Displays a single article, and contains a link that will let you reply to it.
edit.cgi: Displays a single article in editable form (with text fields and text areas, just like in Chapter 25). Its Submit button is linked to the save script.
save.cgi: Receives information about an article (from edit.cgi) and saves it by inserting a new row into the database table.
Let’s deal with these separately.
main.cgi
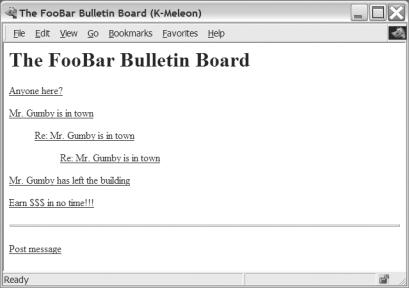
This script is very similar to the simple_main.cgi script from the first prototype. The main difference is the addition of links. Each subject will be a link to a given message (to view.cgi), and at the bottom of the page you’ll add a link that allows the user to post a new message (a link to edit.cgi).
Take a look at the code in Listing 26-4. The line containing the link to each article (part of the format function) looks like this:
Basically, it creates a link to view.cgi?id=someid where someid is the id of the given row. This syntax (the question mark and key=val) is simply a way of passing parameters to a CGI script—that means if someone clicks this link, they are taken to view.cgi with the id parameter properly set.
The “Post message” link is just a link to edit.cgi. So, let’s see how view.cgi handles the id parameter.
Listing 26-4.The Main Bulletin Board (main.cgi)
#!/usr/bin/python
print 'Content-type: text/html\n'
import cgitb; cgitb.enable()
import psycopg
conn = psycopg.connect('dbname=foo user=bar')
C H A P T E R 2 6 ■ P R O J E C T 7 : Y O U R O W N B U L L E T I N B O A R D
491
curs = conn.cursor()
print """
<html>
<head>
<title>The FooBar Bulletin Board</title> </head>
<body>
<h1>The FooBar Bulletin Board</h1>
"""
curs.execute('SELECT * FROM messages') rows = curs.dictfetchall()
492 C H A P T E R 2 6 ■ P R O J E C T 7 : Y O U R O W N B U L L E T I N B O A R D
view.cgi
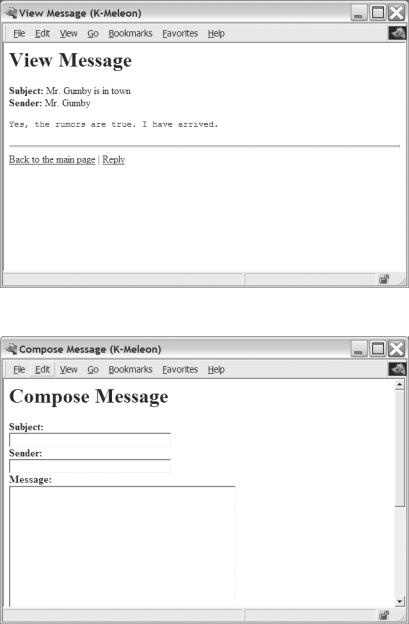
The view script uses the supplied CGI parameter id to retrieve a single message from the database. It then formats a simple HTML page with the resulting values. This page also contains a link back to the main page (main.cgi) and, perhaps more interestingly, to edit.cgi, but this time with the reply_to parameter set to id to ensure that the new message will be a reply to the current one. See Listing 26-5 for the code of view.cgi.
Listing 26-5.The Message Viewer (view.cgi)
#!/usr/bin/python
print 'Content-type: text/html\n'
import cgitb; cgitb.enable()
import psycopg
conn = psycopg.connect('dbname=foo user=bar') curs = conn.cursor()
import cgi, sys
form = cgi.FieldStorage() id = form.getvalue('id')
print """
<html>
<head>
<title>View Message</title> </head>
<body>
<h1>View Message</h1>
"""
try: id = int(id) except:
print 'Invalid message ID' sys.exit()
curs.execute('SELECT * FROM messages WHERE id = %i' % id) rows = curs.dictfetchall()
if not rows:
print 'Unknown message ID' sys.exit()
row = rows[0]
C H A P T E R 2 6 ■ P R O J E C T 7 : Y O U R O W N B U L L E T I N B O A R D
The edit script actually performs a dual function—it is used to edit new messages, but also to edit replies. The difference isn’t all that great: If a reply_to is supplied in the CGI request, it is kept in a hidden input in the edit form. Also, the subject is set to "Re: parentsubject" by default (unless the subject already begins with "Re:"—you don’t want to keep adding those). Here is the code snippet that takes care of these details:
subject = ''
if reply_to is not None:
print '<input type="hidden" name="reply_to" value="%s"/>' % reply_to curs.execute('SELECT subject FROM messages WHERE id = %s' % reply_to) subject = curs.fetchone()[0]
if not subject.startswith('Re: '): subject = 'Re: ' + subject
■Tip Hidden inputs are used to temporarily store information in a Web form. They don’t show up to the user as text areas and the like do, but their value is still passed to the CGI script that is the action of the form. That way the script that generates the form can pass information to the script that will eventually process the same form.
Listing 26-6 shows the source code for the edit script.
Listing 26-6.The Message Editor (edit.cgi)
#!/usr/bin/python
print 'Content-type: text/html\n'
import cgitb; cgitb.enable()
494 C H A P T E R 2 6 ■ P R O J E C T 7 : Y O U R O W N B U L L E T I N B O A R D
import
psycopg
conn =
psycopg.connect('dbname=foo user=bar')
curs
=
conn.cursor()
import
cgi, sys
form
=
cgi.FieldStorage()
reply_to = form.getvalue('reply_to')
print """
<html>
<head>
<title>Compose Message</title> </head>
<body>
<h1>Compose Message</h1>
<form action='save.cgi' method='POST'>
"""
subject = ''
if reply_to is not None:
print '<input type="hidden" name="reply_to" value="%s"/>' % reply_to curs.execute('SELECT subject FROM messages WHERE id = %s' % reply_to) subject = curs.fetchone()[0]
if not subject.startswith('Re: '): subject = 'Re: ' + subject
<a href='main.cgi'>Back to the main page</a>' </body>
</html>
""" % subject
save.cgi
Now on to the final script. The save script will receive information about a message (from the form generated by edit.cgi) and will store it in the database. That means using an SQL insert
C H A P T E R 2 6 ■ P R O J E C T 7 : Y O U R O W N B U L L E T I N B O A R D
495
command, and because the database has been modified, conn.commit must be called so the changes aren’t lost when the script terminates.
Listing 26-7 shows the source code for the save script.
496 C H A P T E R 2 6 ■ P R O J E C T 7 : Y O U R O W N B U L L E T I N B O A R D
print """
<html>
<head>
<title>Message Saved</title> </head>
<body>
<h1>Message Saved</h1> <hr />
<a href='main.cgi'>Back to the main page</a> </body>
</html>s
"""
Trying It Out
To test this system, start by opening main.cgi. From there, click the “Post message” link. That should take you to edit.cgi. Enter some values in all the fields and click the “Save” link. That should take you to save.cgi, which will display the message “Message Saved.” Click the “Back to the main page” link to get back to main.cgi. The listing should now include your new message.
To view your message, simply click its subject—that should take you to view.cgi with the correct ID. From there, try to click the “Reply” link, which should take you to edit.cgi once again, but this time with reply_to set (in a hidden input tag) and with a default subject. Once again, enter some text, click “Save,” and go back to the main page. It should now show your reply, displayed under the original subject. (If it’s not showing, try to reload the page.)
The main page is shown in Figure 26-1, the message viewer in Figure 26-2, and the message composer in Figure 26-3.
Figure 26-1. The main page
C H A P T E R 2 6 ■ P R O J E C T 7 : Y O U R O W N B U L L E T I N B O A R D
497
Figure 26-2.The message viewer
Figure 26-3.The message composer
498 C H A P T E R 2 6 ■ P R O J E C T 7 : Y O U R O W N B U L L E T I N B O A R D
Further Exploration
Now that you have the power to develop huge and powerful Web applications with reliable and efficient storage, there are lots of things you can sink your teeth into:
•How about making a Web front-end to a database of your favorite Monty Python sketches?
•If you’re interested in improving the system in this chapter, you should think about abstraction. How about creating a utility module with a function to print a standard header and another to print a standard footer? That way you wouldn’t have to write the same HTML stuff in each script. Also, it might be useful to add a user database with some password handling or abstract away the code for creating a connection.
•If you’d like a storage solution that doesn’t require a dedicated server, you could use SQLite (which is used in Chapter 13), or you might want to check out Metakit, a really neat little database package that also lets you store an entire database in a single file (http://equi4.com/metakit/python.html).
•Yet another alternative is the Berkeley DB (http://www.sleepycat.com), which is quite simple but can handle astonishing amounts of data very efficiently. (The Berkeley DB is accessible, when installed, through the standard library modules bsddb, dbhash, and anydbm.)
What Now?
If you think writing your own discussion forum software is cool, how about writing your own peer-to-peer file sharing program, like Napster or BitTorrent? Well, in the next project, that’s exactly what you’ll do—and the good news is that it will be easier than most of the network programming you’ve done so far, thanks to the wonder of remote procedure calls.
C H A P T E R 2 7
■ ■ ■
Project 8: File Sharing with XML-RPC
In this chapter, you write a simple file sharing application. You may be familiar with the concept of file sharing from such applications as Napster (no longer downloadable in its original form), Gnutella (available from http://www.gnutella.com), BitTorrent (available from http:// www.bittorrent.com), and many others—what you’ll be writing is in many ways similar to these, although quite a bit simpler.
The main technology you’ll use is XML-RPC. As discussed in Chapter 15, this is a protocol for calling procedures (functions) remotely, possibly across a network.
If you want, you can quite easily use plain socket programming (possibly using some of the techniques described in Chapter 14 and Chapter 24) to implement the functionality of this project. That might even give you better performance because the XML-RPC protocol does come with a certain overhead. However, XML-RPC is very easy to use, and will most likely simplify your code considerably.
What’s the Problem?
What you want to create is a peer-to-peer file sharing program. File sharing basically means exchanging files (everything from text files to sound clips) between programs running on different machines. Peer-to-peeris a buzzword that describes a type of interaction between computer programs, as opposed to the common client–serverinteraction, where a client may connect to a server but not vice versa. In a peer-to-peer interaction, any peer may connect to any other. In such a (virtual) network of peers, there is no central authority (as represented by the server in a client–server architecture), which makes the network more robust. It won’t collapse unless you shut down most of the peers.
■Tip If you’re interested in learning more about peer-to-peer systems, you should do a Web search on the phrase “peer-to-peer,” which ought to give you several interesting hits.