

200 Part III: Advanced Programming with Liberty BASIC
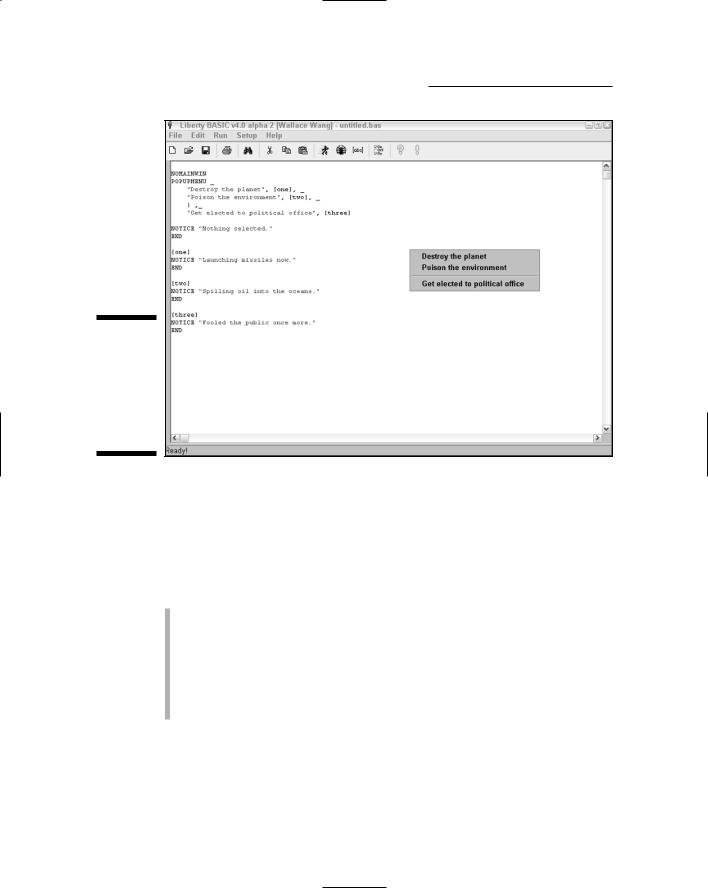
Figure 14-3:
Pop-up menus can provide additional options for users to choose.
Putting Controls in a Window
Although you commonly use pull-down menus to get commands from the user, you may also want to add command buttons, check boxes, radio buttons, and text boxes to a window. In placing such controls as command buttons on a window, you need to define the following:
A name to identify the control
Text to appear on the control
A label to identify instructions for the computer to follow after the user chooses that particular control
The width and height of the control
The position of the control
Creating a command button
A command button usually appears on-screen as a gray rectangle containing a label such as OK or Cancel. To create a command button, you need to use the BUTTON command, as follows:
Chapter 14: Creating a User Interface 201
BUTTON #Windowhandle.buttonname, “Button text”,
[branchLabel], UL, xpos, ypos, width, height
If you omit the width and height, the button automatically adjusts to the size of the text that you want to appear on the button.
Here’s how the following command works:
1.The BUTTON command tells the computer, “Create a command button inside the window that the nickname #Windowhandle identifies.”
2.The buttonname portion tells the computer, “Identify this button by this unique name.”
3.The Button text portion is the text that actually appears on the button.
4.The [branchLabel] portion identifies a label to which the computer jumps to find instructions to follow after the user clicks the button.
5.The UL portion tells the computer, “Position the command button by using the upper-left corner of the window.” Instead of using UL, you can also use UR (upper-right), LL (lower-left), or LR (lower-right).
6.The xpos and ypos portions represent the X and Y position of the button’s location, which you measure in pixels from the upper-left (UL), upper-right (UR), lower-left (LL), or lower-right (LR) edge of the window.
7.The width and height portions define the width and height of the button.
To see how this button works in a real-life example, run the following program, the results of which are shown in Figure 14-4:
NOMAINWIN WindowHeight = 200 WindowWidth = 250
BUTTON #main.mybutton, “E&xit”, [quit], LL, 10, 10, 45, 25 OPEN “Command button example” FOR WINDOW AS #main
PRINT #main, “trapclose [quit]” WAIT
[quit]
CONFIRM “Are you sure you want to quit?”; quit$ IF quit$ = “no” THEN WAIT
CLOSE #main END
As an alternative to creating a command button, Liberty BASIC also enables you to use a bitmap image as a button. To turn a bitmap image into a button, you need to use the BMPBUTTON command, as follows:
BMPBUTTON #Windowhandle.buttonname, “bitmap filename”,
[branchLabel], UL, xpos, ypos
202 Part III: Advanced Programming with Liberty BASIC
Figure 14-4:
If you create a command button, define its size and position.
Command button
Here’s what the preceding command does:
1.The BMPBUTTON command tells the computer, “Create a button out of a bitmap image and display this image inside the window that the nickname
#Windowhandle identifies.”
2.The buttonname portion tells the computer, “Identify this bitmap button by this unique name.”
3.The “bitmap filename” portion defines the directory and filename of the bitmap image that you want to use, such as C:\Liberty\face.bmp.
4.The [branchLabel] portion identifies a label to which the computer jumps to find instructions to follow after the user clicks the bitmap button.
5.The UL portion tells the computer, “Position the bitmap button by using the upper-left corner of the window.” Instead of using UL, you can also use UR (upper-right), LL (lower-left), or LR (lower-right).
6.The xpos and ypos portions represent the X and Y position of the bitmap button’s location, which you measure in pixels from the upper-left (UL), upper-right (UR), lower-left (LL), or lower-right (LR) edge of the window.
To see how this button works in a real-life example, try running the following program:
NOMAINWIN WindowWidth = 400
BMPBUTTON #main.picturebtn, “vwsignon.bmp”, [Exit], UL, 10, 40
OPEN “Bitmap Button Example” FOR WINDOW AS #main PRINT #main, “trapclose [quit]”
WAIT
[quit]
CONFIRM “Are you sure you want to quit?”; quit$ IF quit$ = “no” THEN WAIT
CLOSE #main END
Chapter 14: Creating a User Interface 203
Displaying text
Sometimes you may want to display text inside a window to display a message or give instructions to the user. In Liberty BASIC, text that the user can’t change is known as static text, which you can create by using the STATICTEXT command, as follows:
STATICTEXT #Windowhandle.staticname, “Static text”, xpos,
ypos, width, height
Here’s what the preceding command does:
1.The STATICTEXT command tells the computer, “Display text inside a window that the nickname #Windowhandle identifies. Identify the static text by the name staticname.”
2.The “Static text” portion tells the computer, “Display inside the window whatever text appears inside double quotes.”
3.The xpos and ypos portions represent the X and Y position of the static text’s location, which you measure in pixels from the upper-left edge of the window.
4.The width and height portions represent the width and height of the static text, which you also measure in pixels.
You can change text inside static text by using the PRINT command, as follows:
PRINT #Windowhandle.staticname, “New text”
To try out a real program, try the following example:
NOMAINWIN
STATICTEXT #main.static, “Old text”, 10, 10, 75, 25
BUTTON #main.mybutton, “Change”, [change], LL, 10, 10, 45, 25 OPEN “Real-life example” FOR Window AS #main
PRINT #main, “trapclose [quit]” WAIT
[change]
PRINT #main.static, “New text”
WAIT
[quit]
CONFIRM “Are you sure you want to quit?”; quit$ IF quit$ = “no” THEN WAIT
CLOSE #main END
This program displays static text in a window that reads Old text. After you click the Change command button, the static text changes and displays
New text.