D
VWD Database Explorer
When designing pages that work with data you frequently need to check the metadata, for example, to confirm the data type of a field. You also want to test your pages by quickly modifying the data in tables. Furthermore, in some cases you want to add a small and simple table to a database, such as a list of shippers. In the past these database tasks required leaving your web editor to open a second window with a database management tool. Visual Web Developer offers a built-in tool named the Database Explorer that can perform these tasks without the need for a separate management tool. Some functions are performed directly and others invoke a wizard to step you through the task.
This appendix covers the various techniques for working with the Database Explorer.
Open the Database Explorer
The Database Explorer can be viewed either by choosing Menu View or by pressing Ctrl+Alt+S. Once open, the Database Explorer by default stacks on top of the Solution Explorer on the right side of the screen. You can move it to a new dock location by dragging its title bar.
If you mess up the layout you can return to the default by choosing Menu Windows Reset Windows Layout.
Add an Existing Database to the
Database Explorer
The technique to connect the Database Explorer to a database depends on the type of database. The following three sections cover the Microsoft databases. Most other databases (such as Oracle or MySQL) will be the same as connecting to a SQL Server.
Appendix D
Access Files
1.On the Database Explorer toolbar, click Connect to Database, and from the first page of the wizard select Microsoft Access Database File, as shown in Figure D-1.
Figure D-1
2.Browse to the file, then add logon information if needed (see Figure D-2).
Figure D-2
3.You have the option to test the connection and then it is added to your list in the Database Explorer.
SQL Databases on a SQL Server (Including SQL Server Express)
1.On the Database Explorer toolbar, click Connect to Database, and in the first page of the wizard (shown in Figure D-3) select Microsoft SQL Server.
VWD Database Explorer
Figure D-3
2.In the next dialog box the Data Source section is locked — it actually means the kind of data source, not the name of the database.
3.Continuing on the Add Connections screen, for the Server Name text box there are two options. If you are using a full install of SQL Server, select the server name. If you are using SQL Server Express (as we do in this book), type the following syntax exactly: (local)\SQLExpress, as shown in Figure D-4.
Figure D-4

Appendix D
Note the potential confusion when using SQL Server Express. Your PC name will be listed in the drop-down box of servers, but that is not the server you want to specify. You must type into
the server name box the specific syntax to point to your local machine’s instance of SQL Server Express.
4.Keep the choice for logon information set to Windows (see Figure D-5) unless you have developed an authentication table in SQL Server.
Figure D-5
5.Once you have selected the server name, you can drop-down the list of databases. Test the connection and then click Finish to see your new data connection.
SQL Databases Saved as an MDF File
For highest performance, data is kept in SQL Server without an external file structure. But for portability, a database can be configured to save its data in a Windows file that can be copied to a new server. The file will have an extension of .mdf. We use an .mdf file to distribute data in this book. (The alternative would be to have you download a long SQL script that would build the entire database internally in your server and populate its data.) Connections to an .mdf file are very similar to connecting to Access Files, as explained here:
1.On the Database Explorer toolbar, click Connect to Database, and select Microsoft Access Database File, as shown in Figure D-6.
Figure D-6
VWD Database Explorer
2.Browse to the file and add logon information if needed (see Figure D-7).
Figure D-7
3.You have the option to test the connection and then it is added to your list in the Database Explorer.
Database Diagrams for an Overview
The VWD Database Explorer provides a visual presentation of your database’s objects along with the capability to drill down into each object’s properties. Follow these steps to walk through a diagram of your database:
1.Within the Database Explorer, expand your Data Connections and then expand your database. When you expand the Database Diagrams (see Figure D-8) the first time you may be asked to establish yourself as the dbo (database owner). Click Yes. Right-click the Database Diagram object and add a new diagram. If asked, accept the creation of elements needed to build the diagram.
Figure D-8
2.Add tables as desired and close the Add Table dialog (see Figure D-9).
Figure D-9
The diagram can be so large that it is easy to miss tables. Note the Windows-standard horizontal and vertical scroll bars to navigate the diagram. See Figure D-10.
VWD Database Explorer
Figure D-10
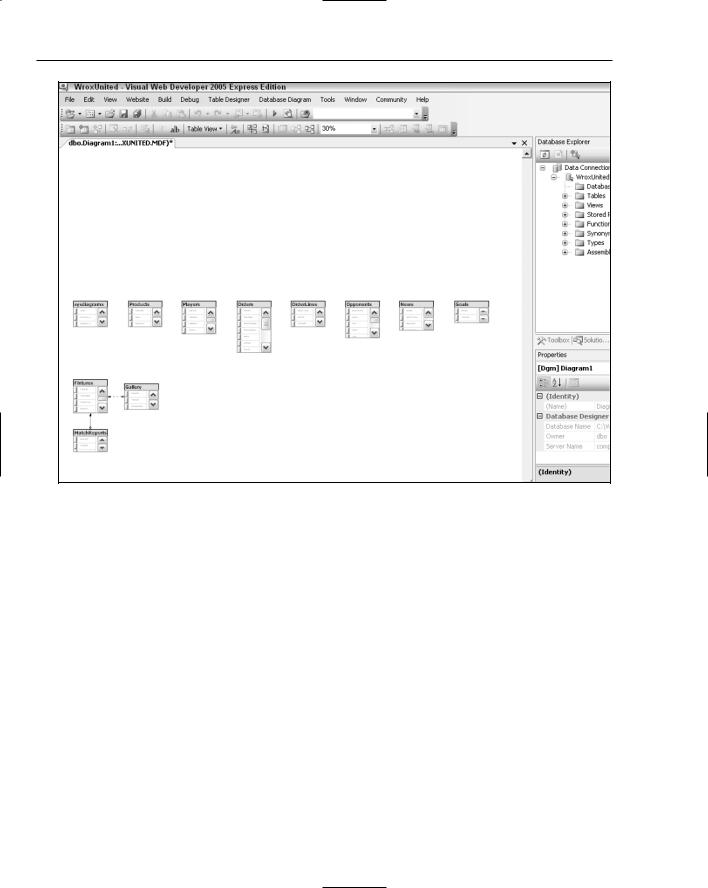
3.Once you see the tables, you can rearrange them (the relationship lines will automatically adjust). Start by changing the zoom size to 30% or so to be sure you see all of the tables and then do some rearranging. The zoom window can be found on the diagram toolbar, shown in Figure D-11 set to 30%.
Figure D-11
4.Next, increase the zoom size to be able to read the data. For example, after rearrangement, 70% shows all the tables for Wrox United, as shown in Figure D-12.
VWD Database Explorer
Figure D-12
5.Right-click the title bar of a table (for example Players) and select Properties from the menu. In the Properties box (lower right of the monitor), you can view parameters such as the Identity column. Right-click one field (see Figure D-13) of a table and select Properties to see how that column has been configured, including the data type and length.
Figure D-13
6.Last, carefully place the tip of the mouse arrow on a relationship line (for example between Fixtures and MatchReports) so that the mouse arrow changes to a horizontal double-ended arrow. Right-click this relationship and select Properties to view data on the relationship, including enforcement rules, as shown in Figure D-14.
Figure D-14
The Database Diagram can also be printed or saved to include in documentation for the site. Note that there are tools to position page breaks at specific axes of the diagram, as well as a tool that allows you to add a text box of notes.