Добавил:
Опубликованный материал нарушает ваши авторские права? Сообщите нам.
Вуз: Предмет: Файл:

Beginning ASP.NET 2

.0.pdf
Скачиваний:
23
Добавлен:
17.08.2013
Размер:
24.67 Mб
Скачать

Dealing with Errors

Here the highlighted line is the current line of code, and you can see that it is the Quantity property of the CartItem (get_Quantity is shown because this is actually how the underlying code works,

showing it is the Get part of the property). The second line shows the method that called this Quantity property, and this is Wizard1_FinishButtonClick.

There are other windows, but Locals, Watch, and Call Stack will be the most common, and to get the best from the debugger you really have to practice. It’s worth experimenting and playing around just to get a feel for how the debugger works, and the sort of things that are possible.

Summar y

It may seem odd that we’ve had a whole chapter on the negative aspects of building web sites, but ultimately this will make you a better developer. After all, possessing knowledge is all well and

good, but knowing how to cope with problems that arise is just as important. So this chapter looked at defensive coding, where you must take a pessimistic attitude. This takes the view that your code should be as robust as possible, not making assumptions about anything, such as parameters passed into methods. This is especially true when dealing with SQL statements that take data from the user, so you looked at how to replace the building of a SQL statement using concatenation with SqlParameter objects to prevent hacking attacks.

Another part of defensive coding is the use of validation controls, which provide a simple way to ensure that data entered by users is correct. Because these controls give both clientand server-side validation, users gets a great experience because the validation notifies them of problems before posting back to the server.

Additionally, this chapter discussed the following topics:

Exceptions, where you learned how to cope with the unexpected (cue the inquisition leaping in from off frame — ”Nobody expects the exception” — apologies to the Monty Python team). Dealing with exceptions is a tricky business, and should be limited to those situations where you can gracefully recover from the problem. One of the key tenets is that you should always leave the application in a stable state when recovering from exceptions.

Handling exceptions globally or at least how to manage their details globally, by use of the global.asax file. Here you saw that for both trapped and untrapped exceptions the details can be centrally logged, ensuring that you always know of errors wherever they happen with the application.

Tracing and debugging, and how you can track down problems within code. Tracing gives the capability to write the status of the running code, with the capability to switch the trace output on and off without affecting the trace statements themselves. Debugging delves into the code in more detail, allowing you to step through the code as it runs. These are the key techniques of learning how to find errors.

You’re very nearly at the end of the book, and a lot of material has been covered. The final chapter looks at topics that will lead you from the book content to further learning and at topics of how to move forward with the knowledge you have. It also covers how to deploy your application so that it can be hosted by an ISP, allowing your great code to be seen by the whole world.

599

Chapter 15

Exercises

1.Add defensive coding to the GenerateThumbnail method of the ImageHandling class stored in the App_Code directory.

2.Add validation controls to the Checkout page, the part that accepts the delivery address. There is a checkbox to copy the address from the membership details of the user, but there is nothing to ensure that all of the fields are filled in.

3.Use the debugger. No really, use it.

600

16

Deployment, Builds, and

Finishing Up

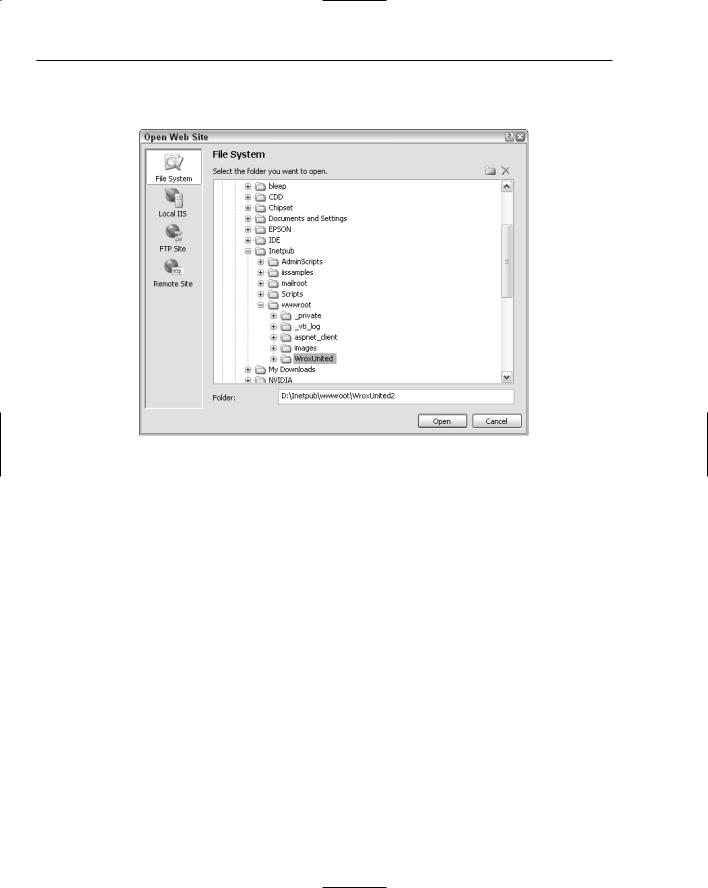
It’s been a long journey since you started this book by building a quick example web site, before starting to build your fully fledged Wrox United application. You now have a web site that uses e-commerce to take customer details and credit card numbers, displays up-to-the-minute content, allows users to view (and listen to) multimedia, and references a multitude of data sources, all within the course of 15 chapters. This is the kind of thing that could have taken six months in the past and a whole team of developers. However, it doesn’t end here. I’m often tempted at the end of a project to put my feet up and say, well I’ve done all the hard work, it’s all smooth sailing now. However, I have been painfully disabused of this notion on more than one occasion. Even if you’re confident of the extremely unlikely scenario of your application having no bugs, being simple to maintain, and your client never having any further questions to ask or features to add, you still have to deploy your site. Visual Web Developer has a feature that allows you to copy your web site from a local folder to a remote location, and you’ll make use of that in this chapter.

After you’ve deployed your site, well, what next? If you succeed in becoming a professional developer you will undoubtedly talk to plenty of companies who will set the final deadline as the day you deliver the working code to them. If you pencil in another project the day after this deadline you might end up getting into trouble, when you find yourself required back on site at your old project when something breaks down or doesn’t work in the way it was intended. Testing is often completely overlooked by both companies and developers. Chapters 14 and 15 talked about various ways for testing your code as you create it, but testing your code after you’ve deployed the site should also feature in your timeline. If possible you should also test it alongside your proposed user base. Even if everything goes fine, you should be prepared to maintain this site, making adjustments, making sure that the site owners can run it in your absence.

And lastly, what should you do next after reading this book? Do you run out and apply for a set of developer jobs? Or do you have to go out and buy another book? You’ll get a thorough grounding in what you should be looking to do next.

Chapter 16

This chapter discusses the following topics:

Deploying your site

Testing and maintaining your site

Where to now?

Site Deployment

Site deployment is the process of installing your site on the customer’s machine and making your site available and accessible to the outside world; in other words, broadcasting it to the masses. In the very first versions of ASP, and indeed with any pure HTML site, the idea of deployment went little beyond “parcel up all your files in a zip file, and unzip them to the correct folder on the site.” For simple sites this approach still works, but for more complex ones, you’re asking for trouble if you follow this method and expect no problems.

One of the weaknesses of Visual Web Developer is that, unlike Visual Studio.NET, there isn’t a special deployment wizard that can wrap up all the different bits and pieces into a single installation file. However, there is an option in VWD that allows you to take your existing web site and publish the web site on a remote machine. There is also a second method that can be used if you so prefer, which you learn about later in the chapter.

Before you do that, you should make sure you have everything necessary to ensure your site will work on another machine by compiling a checklist.

Checklist

Here’s a simple checklist of common things you would normally expect to feature in a typical deployment.

HTML and CSS files: Your design and structure.

ASPX files: Your main pages.

ASPX.VB or ASPX.CS files: The code-behind files.

ASCX and ASCX.VB/.CS files: The user controls.

Database files (.MDB or .MDF): The back end of the site.

Image files (.JPG, .GIF, .PNG): Easily forgotten but vital to the sites working.

Multimedia files: Includes both video and audio files.

XML files: .XML and .XSD files.

Third-party components or controls: ActiveX controls, Java applets or such like.

License files: Required to make your components work.

602

Deployment, Builds, and Finishing Up

Quite often you will find that despite your best intentions files can become spread out across folders all over your machine. It’s a great idea to centralize them first and even try to deploy them on another local machine of your own if you have one.

Compiling and Running Your Application

The next step is to make sure that your site actually compiles and runs. In Chapter 15 you looked at simple reasons why a site might not compile, and there is no point in deploying a site that doesn’t compile. Also be aware that even if your site happily compiles on your machine, it might not compile or run on your host’s or client’s machine. You must make sure that things like local references are changed so that file references are specific to the new machine and that the requisite components are installed. This is the most likely reason for your code failing on your host’s machine. The best way to do this is to place any machine-specific information within the Web.config file and then reference it from inside the appSettings, as discussed in Chapter 2. Then you can change any information in the Web.config file without affecting your application.

Say, for example, you put a reference to a folder in the <appSettings> section of Web.config and add a key and a value attribute as follows:

<appSettings>

...

<add key=”WroxUnited” value=”C:\Program Files\Wrox United” />

...

</appSettings>

You can then access these values from your code as follows:

Dim WroxULocation As String = _

System.ConfigurationManager.Configuration.AppSettings(“WroxUnited”)

Of course you will probably be faced with a scenario where you want to have a reference to a local file and also a reference to that same file in a location on your remote server. In this case you can place a reference to both locations in Web.config. Here LOCALHOST is the active file location:

<appSettings>

<!-- LOCALHOST -->

<add key=”WroxUnited” value=”C:\Program Files\Wrox United” />

...

<!-- REMOTE

603

Chapter 16

<add key=”WroxUnited” value=”D:\Websites\Wrox United” /> -->

</appSettings>

All you need to do then is uncomment the REMOTE settings and comment out the LOCALHOST settings instead. In this way no code needs to change. Make sure you comment which of the locations is local and which is remote, because it might not be entirely obvious to anyone else who uses the code. If you have reason to change the location of the file, you only have to change it once in Web.config and not every time it is mentioned within your code.

This doesn’t just stop with remote file locations, but also with connection strings too. If you are using a local database to test your code, you will have to change the connection settings as well. Your local database might use SQL Express, but your main server might be SQL Server 2005; once again, no extra code is needed, it can just be worked by commenting the line out:

<ConnectionStrings> <!-- LOCALHOST -->

<add key=”WroxUnitedConnectionString” value=”Data Source=.\SQLEXPRESS;AttachDbFileName=|Data Directory|\WroxUnited.mdf;Integrated Security=True;User Instance=True;” providername=”System.Data.SqlDataClient”/>

...

<!-- REMOTE

<add key=”WroxUnitedConnectionString” value=” Data Source=MainSQLServer;AttachDbFileName=|Data Directory|\WroxUnited.mdf;Integrated Security=True;User Instance=True;User ID=auser;Password=56gTR4£s “ providername=”System.Data.SqlDataClient” />

-->

</ConnectionStrings >

Once again LOCALHOST in this example is the active string. If you tweaked the provider name you could pass connection strings to other databases such as Access or MySQL or even Oracle.

Publishing the Site

Once you’re sure everything is ready and that everything compiles, you can use Visual Web Developer to publish your web site for you. There isn’t much more to say on the subject, it’s literally easier to go ahead and do it!

604

Deployment, Builds, and Finishing Up

Try It Out

Publishing the Wrox United Web Site

1.Open the chapter copy of WroxUnited (C:\BegASPNET2\Chapters\Begin\Chapter16\ WroxUnited) and select the Web Site Copy Web Site option (see Figure 16-1).

Figure 16-1

605

Chapter 16

2.Click the Connections: Connect to box and enter WroxUnited2 into the text box, as shown in Figure 16-2.

Figure 16-2

Notice that to actually deploy to a remote site, you need to select the Remote Site icon on the left-hand menu and then supply the URL or IP address of the location of the site, possibly entering relevant user ID and password details in along the way. It is unfortunately not possible to supply test web space for readers to deploy their sites to.

3.Click Open and click Yes when asked whether you would like to create a new folder.

4.Next select all the files, as shown in Figure 16-3.

606

Deployment, Builds, and Finishing Up

Figure 16-3

5.Then click the blue single right-arrow button to copy them across (see Figure 16-4).

Figure 16-4

607

Chapter 16

6.

7.

8.

Close the web site down, by selecting Close Project from the File menu.

Select Open Web Site and select WroxUnited2.

Run the new web site; it should look just like the old one (see Figure 16-5).

Figure 16-5

How It Works

In this Try It Out you have used the Copy Web Site option of Visual Web Developer to produce a complete, identical copy of the Wrox United site on your local machine. This mirrors the way in which you would go about deploying a web site to a remote location. In fact, if you have a remote machine that is also running ASP.NET 2.0, we would recommend that you try deploying the Wrox United site on it yourself.

There really is very little to the physical act of deployment; it should work out of the hat. The problems you may encounter are either caused by elements in your application that are locked in to your current setup (such as referencing files on a C:\ drive, when the host uses E:\ instead) or if you attempt to copy files into a folder or location where some files already exist. In this case, a blue question mark will appear next to the offending file in the left-hand dialog, and you will get a dialog (see Figure 16-6) asking you whether you want to copy over the existing file.

608