

Beginning ASP.NET 2
.0.pdfStyling with Themes
acts1995/95050--c.htm) in the UK. Prosecution for inaccessibility is quite rare, but because it’s entirely possible to design accessible web sites, it’s worth adding accessible web design to your skill set for both those with disabilities, and for your own professional reputation.
Summar y
This chapter discussed all of the different ways of styling a page and its elements, and demonstrated numerous methods for controlling look and feel. The new skinning and themeing capabilities of ASP.NET 2.0 provide you with a great way to combine all available techniques into one easily applied package.
This chapter discussed the following:
How to apply style attributes to elements.
How to move style attribute information into <style> sections in a page, then into a separate CSS file.
Creating ASP.NET themes and applying them to pages.
The differences between Customization themes and Stylesheet themes.
Integrating themes and CSS.
Applying a consistent style to all pages in a site.
The issues of usability and accessibility and why they are so important in today’s Internet world.
The next chapter moves on to discuss something quite different; the issues of raising and handling events in code, as you are introduced to the concept of a postback-driven architecture.
Exercises
1.You have an ASP.NET Label control on a page. The label has a font-italic=”true” attribute, and a CssClass=”maintext” attribute:
<asp:label id=”myLabel” CssClass=”maintext” font-italic=”true”
text=”This is a label”></asp:label>
The page has an associated CSS style sheet (not associated with a theme) that defines a .maintext style class. This style class has the following attributes:
.maintext
{
color: Navy; font-family: Verdana; font-weight: Bold; font-style: normal;
}
How will the label appear when it is rendered?
179

Chapter 5
2.You now add a Theme=”ExerciseTheme” to the preceding page. You place the CSS style sheet from the previous exercise within the ExerciseTheme theme folder. How will the label control appear now?
3.You define a skin for all labels within the ExerciseTheme theme folder and specify the following attributes:
<asp:Label CssClass=”maintext” runat=”server” font-italic=”false”></asp:Label>
How will the label appear now?
180

6
Events and Code
We’ve managed to avoid lots of code so far, but you can’t get away from it completely, so now it’s time to get your hands dirty. You’re not only going to look at code, but also the event architecture of ASP.NET and how web servers work. The reason for this is simply because knowing how web servers process pages enables you to understand how the architecture of ASP.NET works. In turn this leads to understanding how and why the ASP.NET events work.
In particular, this chapter looks at the following:
A high-level overview of the Internet HTTP protocol
The problems brought by web servers and how the ASP.NET event architecture solves those problems
How server-side code works, and how it is created and used
How events relate to the controls placed on a page, and the various types of events that you can use
The chapter starts by looking at web servers and the HTTP protocol.
Web Server Architecture
HTTP stands for HyperText Transfer Protocol, and it’s the method of communicating with web servers. The protocol defines the commands that web servers can accept, and how browsers interact with them. The key point is that a web browser requests a page from the server. The server processes that page and sends the results back to the browser. The browser only understands HTML or JavaScript. HTML is the language that describes the layout of text and images on the page, and JavaScript enables programming on the client, within the browser. It’s the web server’s job to ensure that only the required content is sent back to the client browser.

Chapter 6
Chapter 3 briefly discussed the difference between static and active content, and went on to look at the HTML and server controls, so you’ve seen that server controls need to be processed on the server, and that they emit HTML for the browser. What you need to do now is look at how this process actually works: what happens when you fire up your browser and type a URL into the address box, what happens when you press a button on a page, how the web server keeps track of the pages, and so on.
HTTP works by having a set of commands that browsers send to a web server. The two most common of these commands are GET and POST. The GET command is what a browser sends when a web page is to be fetched — it’s what happens when you type a URL into the browser’s address bar and press Return; it simply means “get me this web page.” The POST command is for when something is to be sent back to the web server — for example, when you fill in a form and press a button. In reality the POST command actually fetches a page, but it also sends the form data back to the web server.
You don’t need to know the rest of the HTTP commands or how any of them work in detail, but it’s useful to know the terms and to understand that HTTP is very simple.
HTTP Is Stateless
One of the things you have to understand about HTTP is that it is stateless, meaning that it retains no knowledge from one request to the next. So when you request a page from a web server, the page is sent to you, and the server immediately forgets everything about you; each request stands alone. HTML doesn’t help much either, because it’s simple a language for the representation of the contents of the page; like HTTP, HTML doesn’t retain content. For example, consider a simple web page that has a text box and a button. In your browser you enter some text and press the button. The data you entered is sent back to the web server, the web server process the page (making changes as necessary), and the page is sent back to the browser to be redisplayed. However, because there is no retention of data, the text box comes back empty — it’s as though the web server has forgotten your text.
Why is this a problem? Well, it poses some real issues when writing applications, because very often you want some form of data retention. For example, consider the checkout page at an online store, such as the one at the Wrox United online shop, as shown in Figure 6-1.
Figure 6-1
182

Events and Code
The checkout involves several steps, each of which requires users to supply some form of information: making sure they are logged in, checking their address, and authorizing payment. As far as HTTP is concerned, each step is a separate request from the user; the page loading is one request, pressing the Next button is another request, and so on.
When you fill in some details on a page and press a button, that information is posted back to the web server (the term posted derives from the actual HTTP POST command used). When you reach the last of the checkout steps, you need all of the information entered by the user, not just the data supplied with the last step. Because HTTP and HTML don’t retain this information for you, you have to store it yourself. In non-ASP.NET environments this can be quite complex and time consuming, but luckily for us the server controls are clever; they retain their state across postbacks. This means you don’t have to do anything special; if you press a button to post the information back to the server, when the page is refreshed the text boxes still have their data. This is one of the big differences between standard HTML and server controls, and is one of the reasons why we use server controls.
The server controls remove even more of a burden from us. Consider the checkout page shown earlier, which has several text boxes, and that’s only one step; there’s also the login details, plus the credit card details, plus the management of the steps themselves. Server controls are used for all of the text entry, but there is also a Wizard control, designed specially for use in situations like this. It manages the steps, creates the menu of steps on the left, and provides the Previous and Next buttons. All you have to do is define what you want within those steps. When you get to the last step everything the user has typed in is available, and the order can be processed.
Server-Side Events
So far you’ve seen a very simple view of what happens when you interact with a web server — you press a button and something happens. So what is it that actually happens on the server, in your ASP.NET page? Well, simply put, there are a number of events that run; some that always run, some that only run depending on what the user has done (which button they’ve pressed), and some that run due to other actions, such as data being changed. These events are ASP.NET’s way of letting you know something has happened, and they allow you to take some action. For example, all ASP.NET pages have an event that runs when the page loads, and you can place code within this event to perform some action. Buttons have an event that runs when you click them, lists have an event that runs when you select a list item, and so on, and these events are what give you the power to control how the web page reacts to the user.
Before digging into the code, some terms need explaining. When an event happens it is called firing or raising. That is, the event is raised or the event is fired. Both terms are valid, and which you use is a matter of preference (I prefer raised, because fired always makes me think of a poor little event being stuffed into a canon at a circus before being launched into a tiny net to amuse the crowd). Both terms are used regularly in the .NET documentation and on various online sites and articles.
The code that is run when the event is raised is called the event procedure or event handler. Any code you put in here becomes part of the event procedure and runs when the event is raised. For example,
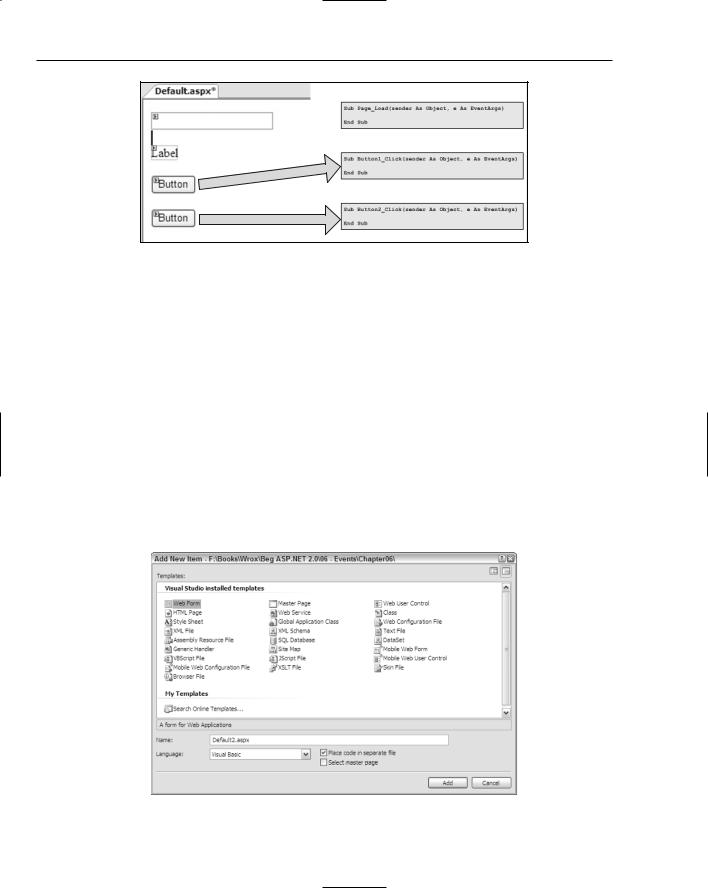
consider a page with two buttons. Each of these buttons could have its own event procedure, while there is a separate event procedure for when the page loads, as illustrated by Figure 6-2.
183
Chapter 6
Figure 6-2
Figure 6-2 shows three event procedures. This first is the Page_Load event, which is raised by ASP.NET and allows you to prepare the page for the user, perhaps fetching data from a database. The other two events are generated by the user when a button is clicked; each button has its own event handler. For example, the first button might save some user-entered details, whereas the second button cancels user-entered details.
Adding Events to the Page
Adding events to ASP.NET pages is simple because Visual Web Developer (VWD) provides a way to do this for you. It allows you to select the page or a control and for the allowable events to be listed. You can then instruct VWD to create the event procedure for you. The first thing that needs to be discussed is where the events are created, because there are two places where events can be created. The first is in the same file as the ASP.NET controls, and this is called code inline. The second place to create events and code is in a separate file and this is called code-behind. Where the code is created depends upon a simple checkbox on the Add New Item dialog, as shown in Figure 6-3.
Figure 6-3
184

Events and Code
You can use either code inline or code-behind, because it doesn’t make any difference to ASP.NET, but code-behind is the accepted standard, and all of the pages in the Wrox United application use codebehind, as do all of the examples in this chapter.
In the following Try It Out, you give events a go and add some events to a page.
Try It Out |
Adding Page and Control Events |
1.Start Visual Web Developer, and open the web site at C:\BegASPNET2\Begin\Chapter06. You should see a screen similar to Figure 6-4.
Figure 6-4
2.Open the Default.aspx file and switch from Source View to Design View.
3.Drag a Label, a TextBox, and two Button controls onto the page, so that it looks like Figure 6-5.
Figure 6-5
185

Chapter 6
4.In an empty area of the page, double-click the left mouse button to load the code file associated with the page and create an empty event procedure for you, as shown in Figure 6-6.
Figure 6-6
5.Switch back to the page design and double-click the first button, Button1. The event procedure for this button is created (see Figure 6-7), underneath the event procedure for the page.
Figure 6-7
6.At the top of the code window, click the drop-down list on the left and select Button2. From the drop-down list on the right, select Click to add another event procedure to the file, as illustrated in Figure 6-8.
Figure 6-8
7.In the Page_Load event procedure, add the following line of code:
186

Events and Code
Label1.Text = “You entered “ & TextBox1.Text
The event procedure will now look something like this (it may be slightly different because the following code has been wrapped to fit on the page):
Protected Sub Page_Load(ByVal sender As Object, ByVal e As System.EventArgs) Handles Me.Load
Label1.Text = “You entered “ & TextBox1.Text
End Sub
8.In the Button1_Click event, add the following line of code:
TextBox1.Text = “You clicked button 1”
9.In the Button2_Click event, add the following line of code:
TextBox1.Text = “You clicked button 2”
10.Press F5 to run the example. Click OK if the Debugging Not Enabled dialog appears, accepting the default selection for adding a new Web.config file with debugging enabled. This is shown in Figure 6-9 and will only appear if debugging is not enabled, so clicking the OK button enables debugging and stops the dialog from appearing again. You may also receive
another dialog or pop-up from a firewall if you have one running; this might be to warn you that a program is trying to access the Internet and if you have an option you should allow the access.
Figure 6-9
11.When the browser window appears you’ll see a screen similar to Figure 6-10. Don’t worry if the numbers after localhost are different, because VWD picks this number.
Figure 6-10
Notice that the label has the text you set in the Page_Load event, but nothing else.
187

Chapter 6
12.Enter your name into the text box and click the first button. For example, I entered Dave because that’s my name, so the figures show Dave. Now the label has the text you entered (as shown in Figure 6-11), but the text box has the text set from the Button1_Click event.
Figure 6-11
13.Now click the second button. Figure 6-12 shows that the label text has changed to what the text box contained in the previous step, and the text box contains the text from the Button2_Click event.
Figure 6-12
14.Now click the first button again, and you’ll see something similar to Figure 6-13.
Figure 6-13
How It Works
Take a look at how this works, starting with the Page_Load event.
Protected Sub Page_Load(ByVal sender As Object, ByVal e As System.EventArgs) Handles Me.Load
This is known as the declaration, and tells you lots about the procedure. It has three main areas: the bits before the parentheses, the bits within them, and the bits after them. So at the beginning of the line you have the following:
Protected Sub Page_Load
188