

Beginning ActionScript 2.0 2006
.pdfChapter 17
var tween3:Tween = new Tween(circleClip, “_alpha”, Regular.easeInOut, ; 100, 0, 1, true);
tween2.stop();
tween3.stop(); tween1.onMotionFinished = function()
{
tween2.start();
}
tween2.onMotionFinished = function()
{
tween3.start();
}
Even if the tweens are stopped right away, they still set the starting value of their respective properties immediately. This means that when the first tween starts, the initial x value will be zero, the initial y value will be zero, and the initial alpha value will be zero, regardless of what the original values were. If the intention is to instead move the movie clip relative to its current position, use the current position in the tween start and end values:
import mx.transitions.Tween; import mx.transitions.easing.*;
var tween1:Tween = new Tween(circleClip, “_x”, Regular.easeInOut, ; circleClip._x, circleClip._x + 200, 2, true);
var tween2:Tween = new Tween(circleClip, “_y”, Regular.easeInOut, ; circleClip._y, circleClip._y + 300, 2, true);
var tween3:Tween = new Tween(circleClip, “_alpha”, Regular.easeInOut, ; 100, 0, 1, true);
tween2.stop();
tween3.stop(); tween1.onMotionFinished = function()
{
tween2.start();
}
tween2.onMotionFinished = function()
{
tween3.start();
}
Try out playing tweens in series.
Try It Out |
Creating an Animation Sequence |
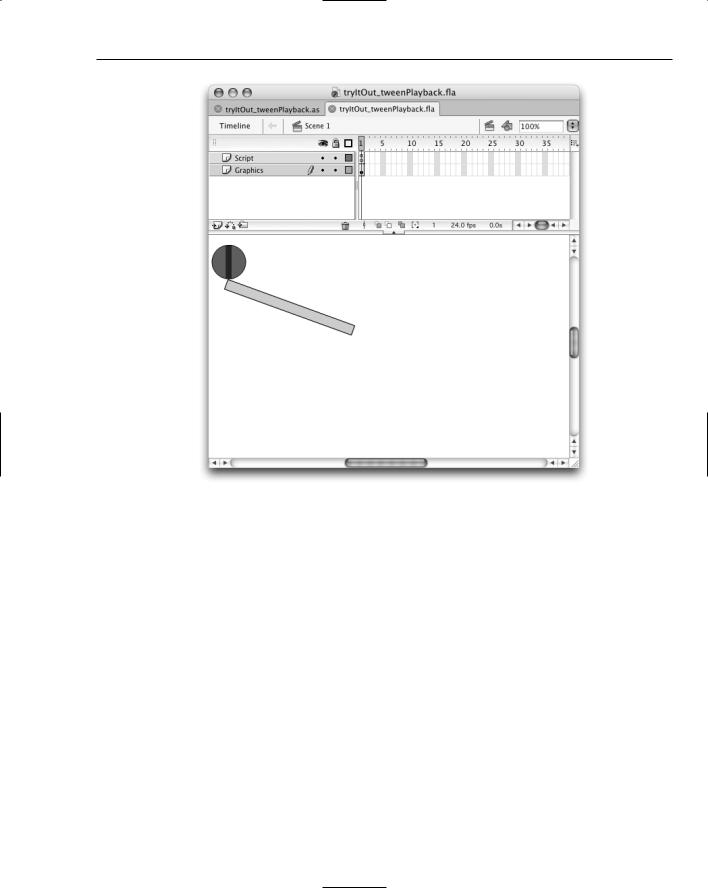
This example plays tweens both in parallel and in sequence. You create a set of library functions to help the process of playing multiple tweens. The project should look something like Figure 17-2.
418
Automated Transitions
Figure 17-2
1.Create a new Macromedia Flash document.
2.Open the Library panel and from the menu at the top right of the panel, choose New Symbol. Within the New Symbol dialog box, set the name to be circleClip. Make sure the Movie Clip radio button is selected. Click OK.
3.Use the Oval tool in the toolbar to draw a circle within the new movie clip. Use any color for fill and line that you want.
4.Double-click the circle to select both the fill and the line. Use the Properties panel (Window Properties) to resize the ball so that it is 50 pixels wide and 50 pixels high.
5.The ball needs to be centered on the movie clip registration point. With the ball still selected, set the x position and the y position to each be –25 pixels.
6.Select the selection arrow from the top left of the Tools palette. Select a narrow vertical slice of the center of the ball to be the stripe. You can perform the selection by clicking outside the ball and dragging across to the outside of the ball on the opposite side.
7.Select the Paint Bucket tool from the Tools palette, choose a different color from the fill color well on the Tools palette, and click within the selected area to give it a different color.
419

Chapter 17
8.Click the Scene 1 button above the timeline to return to the main timeline.
9.Drag the circleClip library symbol to the stage. Use the Properties palette to place the symbol at an x position of 5 pixels and a y position of 15 pixels.
10.Select the Rectangle tool from the Tools palette. Choose any color for line and fill that you want, or keep the colors the same. Create a long thin rectangle just below the ball on the stage.
11.Select the Selection tool from the top left of the Tools palette. Double-click in the middle of the new rectangle to select both the fill and the outline. From the Properties panel, give it a width of 200 pixels, and place it at an x position of 20 and a y position of 100.
12.Open the Transform palette (Window Transform), enter 20 into the rotate box, and press return.
13.Open the Actions panel and type the following ActionScript code:
#include “tryItOut_tweenPlaybackLib.as”
#include “tryItOut_tweenPlayback.as”
14.Select File Save As, name the file tryItOut_tweenPlayback.fla, choose an appropriate directory, and save it.
15.Create a new script file by selecting File New and choosing ActionScript File from the New Document panel.
16.Save it as tryItOut_tweenPlayback.as in the directory containing the Flash project file.
17.Enter the following code into the new ActionScript file:
addTween(0, new Tween(ballClip, “_x”, Regular.easeIn, ; ballClip._x, ballClip._x + 190, 2, true));
addTween(0, new Tween(ballClip, “_y”, Regular.easeIn, ; ballClip._y, ballClip._y + 69, 2, true));
addTween(0, new Tween(ballClip, “_rotation”, Regular.easeIn, ; 0, 360, 2, true));
addTween(1, new Tween(ballClip, “_x”, Regular.easeOut, ; ballClip._x + 196, ballClip._x + 450, 3, true)); addTween(1, new Tween(ballClip, “_y”, Bounce.easeOut, ;
ballClip._y + 73, 375, 2, true));
addTween(1, new Tween(ballClip, “_rotation”, Regular.easeOut, ; 0, 360, 3, true));
addTween(2, new Tween(ballClip, “_width”, Regular.easeOut, 50, 0, 0.5, true)); addTween(2, new Tween(ballClip, “_height”, Regular.easeOut, ;
50, 0, 0.5, true));
addTween(2, new Tween(ballClip, “_alpha”, Regular.easeOut, ; 100, 0, 0.5, true));
startTweenSequence();
18.Save the file and create a new script file.
19.Save the new file as tryItOut_tweenPlaybackLib.as in the directory containing the Flash project file.
420

Automated Transitions
20.Enter the following code into the new ActionScript file:
import mx.transitions.Tween; import mx.transitions.easing.*;
var tweenSequence:Array = new Array(); var currentTween:Number = 0;
var numCompletedTweens:Number = 0;
function addTween(stepNum:Number, tweenHandle:Tween):Void
{
tweenHandle.stop(); tweenHandle.onMotionFinished = callNextTween; if (tweenSequence[stepNum] == undefined)
{
tweenSequence[stepNum] = new Array();
}
tweenSequence[stepNum].push(tweenHandle);
}
function startTweenSequence():Void
{
playTweenSequence(0);
}
function playTweenSequence(sequenceNum:Number):Void
{
for (var i:Number=0; i < tweenSequence[sequenceNum].length; i++)
{
tweenSequence[sequenceNum][i].start();
}
}
function stopTweenSequence():Void
{
for (var i:Number=0; i < tweenSequence[currentTween].length; i++)
{
tweenSequence[currentTween][i].stop();
}
}
function resumeTweenSequence():Void
{
for (var i:Number=0; i < tweenSequence[currentTween].length; i++)
{
tweenSequence[currentTween][i].resume();
}
}
function callNextTween():Void
{
numCompletedTweens += 1;
if (currentTween < tweenSequence.length - 1 && ; numCompletedTweens == tweenSequence[currentTween].length)
421

Chapter 17
{
currentTween += 1 numCompletedTweens = 0;
playTweenSequence(currentTween);
}
}
21.Save the file, return to the Flash document, and select Control Test Movie. You should get an animation of a ball rolling down the incline, bouncing onto the floor, rolling to a stop, and then disappearing from the stage.
How It Works
The first part of this exercise involves setting up the symbols needed for the animation. The stripe on the ball is used so that the effect of the ball rotation can be easily seen. First, take a look at the file that declares the tween setup, tryItOut_tweenPlayback.as. This file uses the tween library functions created in tryItOut_tweenPlaybackLib.as.
First, three tweens are created to run in parallel. The first causes movement along the x-axis, the second causes movement along the y-axis, and the third creates the rotation of the ball. All tweens use Regular.easeIn for the easing function, which starts the ball from rest and accelerates the motion:
addTween(0, new Tween(ballClip, “_x”, Regular.easeIn, ; ballClip._x, ballClip._x + 190, 2, true));
addTween(0, new Tween(ballClip, “_y”, Regular.easeIn, ; ballClip._y, ballClip._y + 69, 2, true));
addTween(0, new Tween(ballClip, “_rotation”, Regular.easeIn, ; 0, 360, 2, true));
Three more tweens are set up to run in parallel after the previous three have finished. The first causes the decelerating movement along the x-axis, the second causes the bouncing motion along the y-axis, and the third continues the rotation:
addTween(1, new Tween(ballClip, “_x”, Regular.easeOut, ; ballClip._x + 196, ballClip._x + 450, 3, true)); addTween(1, new Tween(ballClip, “_y”, Bounce.easeOut, ;
ballClip._y + 73, 375, 2, true));
addTween(1, new Tween(ballClip, “_rotation”, Regular.easeOut, ; 0, 360, 3, true));
The three final tweens run after the ball comes to a stop. They cause the ball to shrink and fade out:
addTween(2, new Tween(ballClip, “_width”, Regular.easeOut, 50, 0, 0.5, true)); addTween(2, new Tween(ballClip, “_height”, Regular.easeOut, ;
50, 0, 0.5, true));
addTween(2, new Tween(ballClip, “_alpha”, Regular.easeOut, ; 100, 0, 0.5, true));
Now that the sequence has been declared, it can be started up:
startTweenSequence();
422

Automated Transitions
Next is a library file that sets up a number of functions to help simplify the process of creating sequences of tweens. The addTween() function from the other file is not a Flash function, it is a helper function created in this library. The library works by allowing each tween to be associated with a number indicating the order of call. Tweens with an order number of zero are called first, then when done, tweens with an order number of one are called, and so on. This allows for tweens to be called in sequence. Tweens with the same order number are all started at the same time, allowing for tweens to be called in parallel. If a number of tweens with the same order number exist, they must all finish before the next group of tweens is called.
First, the usual import statements:
import mx.transitions.Tween; import mx.transitions.easing.*;
A few variables are kept for tracking the tweens. The array stores each tween as it is assigned. Each index in this array represents one step in the sequence of tweens to call. For each step, the array points to another array that stores all the tweens to be called in parallel for this step. The currentTween variable keeps track of which step is currently being played, and the numCompletedTweens variable keeps track of how many tweens playing in parallel in this step have completed. This allows the player to know when to go to the next step of tweens:
var tweenSequence:Array = new Array(); var currentTween:Number = 0;
var numCompletedTweens:Number = 0;
The addTween() function is used to assign a tween to the sequence. A step number is passed in along with a handle to a Tween instance. The tweenSequence array is an array of arrays. The first-level array corresponds to each playback step, and each element in that array points to a second array that stores the actual tweens to be played for each step. The onMotionFinished event is captured for each tween and directed to a function that keeps track of which tweens have played and which should be called next:
function addTween(stepNum:Number, tweenHandle:Tween):Void
{
tweenHandle.stop(); tweenHandle.onMotionFinished = callNextTween; if (tweenSequence[stepNum] == undefined)
{
tweenSequence[stepNum] = new Array();
}
tweenSequence[stepNum].push(tweenHandle);
}
The startTweenSequence() function starts playback of the first set of tweens:
function startTweenSequence():Void
{
playTweenSequence(0);
}
The playTweenSequence() function starts playback of all tweens meant to play in parallel for the given step:
423

Chapter 17
function playTweenSequence(sequenceNum:Number):Void
{
for (var i:Number=0; i < tweenSequence[sequenceNum].length; i++)
{
tweenSequence[sequenceNum][i].start();
}
}
The stopTweenSequence() function pauses playback of all tweens currently playing. It is not used in this exercise, but is a useful function for other potential applications of this library:
function stopTweenSequence():Void
{
for (var i:Number=0; i < tweenSequence[currentTween].length; i++)
{
tweenSequence[currentTween][i].stop();
}
}
The resumeTweenSequence() function resumes playback of all tweens previously paused with the stopTweenSequence() function. It is not used in this exercise, but is a useful function for other potential applications of this library:
function resumeTweenSequence():Void
{
for (var i:Number=0; i < tweenSequence[currentTween].length; i++)
{
tweenSequence[currentTween][i].resume();
}
}
The callNextTween() function is called by every tween when playback of the tween ends, and is not intended to be called outside of the library. It determines whether all the tweens playing in parallel for this step have completed. If they have, and there is at least one step remaining, it starts the tweens from the next step:
function callNextTween():Void
{
numCompletedTweens += 1;
if (currentTween < tweenSequence.length - 1 && ; numCompletedTweens == tweenSequence[currentTween].length)
{
currentTween += 1 numCompletedTweens = 0; playTweenSequence(currentTween);
}
}
424
Automated Transitions
Animating with the Drawing API
So far you have been creating animations basically by moving, resizing, and rotating movie clips. There is certainly a huge amount that can be done with this, however there is even more fun to be had when you can draw your own content. In Chapter 13 you saw how the drawing API can be used to draw out your own content programmatically. When you extend that ability to work with animations, many possibilities for digital artwork or for unique effects emerge.
Earlier in the chapter you saw how the Tween class could drive animation, and the drawing API was used to draw out the animated box. You are not going to dive into much detail of the drawing API itself; Chapter 13 performed that role. Instead, take a look at the drawing API with a bit of a twist this time.
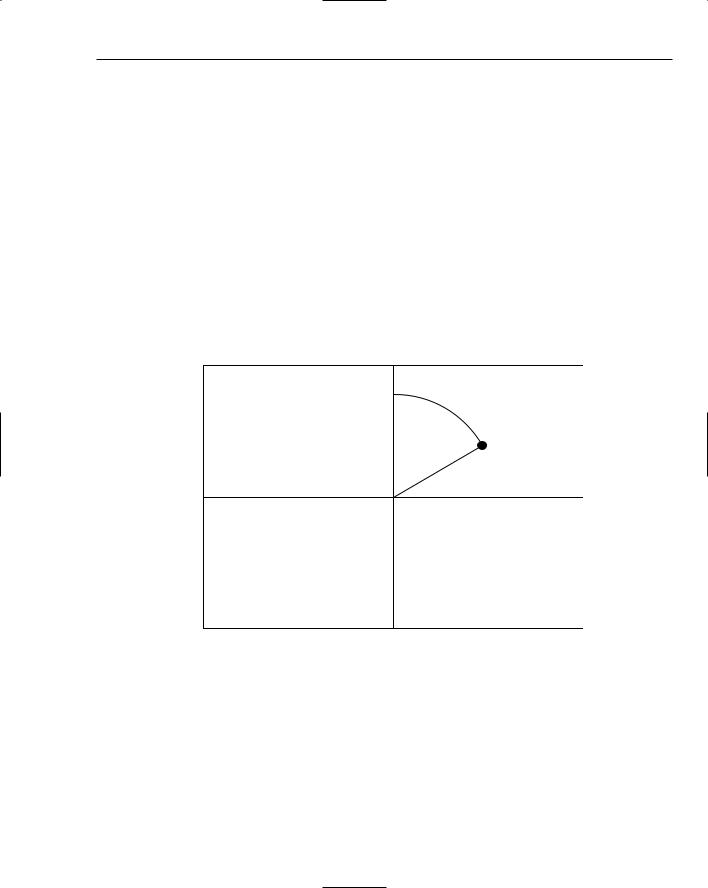
When you work with animating content, you animate it by changing the x and y coordinates of the movie clip relative to the top left of the screen. There is another way of working with coordinate systems that animates points using properties of a circle instead. Those properties are referred to as polar coordinates. Consider Figure 17-3, where two values represent the position of any point relative to the middle of the screen, namely the number of degrees from the top half of the y-axis, and the number of pixels from the middle.
60°
125 px
Figure 17-3
With this change in coordinate system, it is much easier to move a point around the screen in a circular fashion. A point can be rotated in an arc simply by changing the degree value, and can be moved toward and away from the middle with a simple change of the distance value. By working in this way, almost all the math is eliminated. The only math that is needed is a relatively simple conversion when those coordinates need to be mapped to actual x and y values for the Flash player to use. Without this change in thinking, some complex trigonometry would be needed just to figure out where to move the point to its next position along an arc.
425

Chapter 17
This coordinate system works from the middle of the screen, whereas the normal Flash x/y coordinate system works from the top left. You cannot change the Flash coordinate system, but you can create your own movie clip and move it so that its top-left corner aligns with the middle of the stage. This makes working with polar coordinates significantly easier.
For a final hurrah in this chapter, take a bit more of an advanced look into how polar coordinates can be applied to animation.
Try It Out |
Creating a Screen Saver Animation |
This exercise shows how to create an animated screen saver using the lineTo() method from the drawing API. Do not worry if you do not understand every detail of this exercise. The purpose is to get you thinking in different ways when it comes to animation. First, it will get you thinking in something other than normal x and y coordinates, which will open up additional possibilities. Second, it will show you how Flash animation can be used in a purely artistic form. Third, it will give you some strategies for working with animation using the drawing API.
1.Create a new Macromedia Flash document.
2.Click the first frame in the timeline, open the Actions panel (Window Development Panels Actions), and type the following ActionScript code:
#include “tryItOut_screenSaver.as”
3.Select File Save As, name the file tryItOut_screenSaver.fla, choose an appropriate directory, and save it.
4.Create a new script file by selecting File New and choosing ActionScript File from the New Document panel.
5.Select File Save As and ensure it is showing the same directory containing the Flash project file. Give the file the name tryItOut_screenSaver.as and save it.
6.Enter the following code into the new ActionScript file:
var pMaxSize:Number = 150; var pCenterX:Number = 275; var pCenterY:Number = 200; var pNumTraces:Number = 20; var pNumLayers:Number = 30; var pCurrentLayer:Number = 0; var pLineColour:Number;
var pPointDegree:Array = new Array();
var pPointDegreeChange:Array = new Array(); var pPointScale:Array = new Array();
var pPointScaleChange:Array = new Array(); var pPointX:Array = new Array();
var pPointY:Array = new Array();
var pBaseTimeline:MovieClip; var pIntervalId:Number;
function init(baseTimeline:MovieClip):Void
426

Automated Transitions
{
pBaseTimeline = baseTimeline; pBaseTimeline.createEmptyMovieClip(“holder”, 0);
for (var j:Number = 0; j < pNumLayers; j++)
{
pBaseTimeline.createEmptyMovieClip(“layer” + j, j+1); pBaseTimeline[“layer” + j]._x = pCenterX; pBaseTimeline[“layer” + j]._y = pCenterY;
}
initTraces();
pBaseTimeline.holder.onEnterFrame = function()
{
moveSpheres();
}
pIntervalId = setInterval(this, “updateSeeds”, 2000);
}
function initTraces()
{
//Initialize each of the plotter points for (var i:Number = 0; i < pNumTraces; i++)
{
pPointX[i] = 0; pPointY[i] = 0;
pPointDegree[i] = (6.28318530718/pNumTraces) * i; pPointScale[i] = 50;
}
//Update the random values governing the next set of movements updateSeeds();
//Draw the line segment for the next movement for each trace for (i = 0; i < pNumTraces; i++)
{
plotLine(i);
}
}
// Update the x/y coordinates for each dot function moveSpheres()
{
for (var i:Number = 0; i < pNumTraces; i++)
{
//Increment the number of degrees around the center point pPointDegree[i] += pPointDegreeChange[i];
//Increment the scaling (distance from center point); pPointScale[i] += pPointScaleChange[i];
plotLine(i, true);
}
// Perform fading of the trail. Current layer is at 100% alpha,
427