}
: edit_box { label = “2st Edit Box”; key = “edBox2”; is_enabled = “False”;
}
}
ok_cancel;
}
4.From the Files menu in the Visual LISP Editor, choose Save.
The new dialog box and tile definitions are saved out to the MyStuff.DCL file.
5.From the Tools menu in the Visual LISP Editor, choose Interface Tools Preview DCL in Editor.
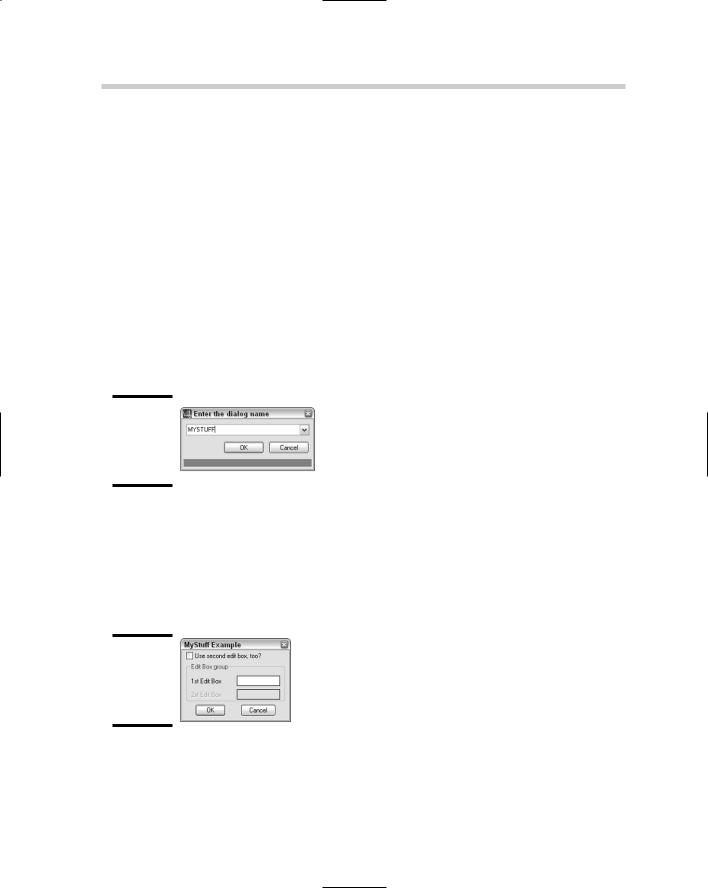
The Enter the Dialog Name dialog box (see Figure 3-13) is displayed. This dialog box allows you to control which dialog box defined in the file should be previewed.
Figure 3-13:
Which dialog box should be previewed?
6.Select MYSTUFF from the down-down list in the Enter the Dialog Name dialog box and click OK to preview the MyStuff Example dialog box.
The MyStuff Example dialog box (see Figure 3-14) should now be displayed, but if you click on anything, nothing is going to happen because there is no AutoLISP code to interact with the action that is defined for the Toggle tile.
Figure 3-14:
Previewing the MyStuff Example dialog box.
7.Click any control to return to the Visual LISP Editor.
The preview of the MyStuff Example dialog box should close and the Visual LISP Editor should now have focus.

(action_tile “cancel” “(do_cancel)”)
;;Enable the dialog box (start_dialog)
;;Unload the dialog box (unload_dialog dld)
)
)
)
10.From the Tools menu in the Visual LISP Editor, choose Load Text in Editor.
The new custom command MS_DCL should now be loaded into AutoCAD and ready to use.
11.Switch to AutoCAD and type MS_DCL at the command line.
One of two things happens: The dialog box either will or won’t be displayed. If the dialog box doesn’t display, check the expressions that are part of the MS_DCL command. If they seem fine, make sure that the MyStuff.DCL file is in one of the AutoCAD support paths.
If you are sure that a file is in one of the AutoCAD Support Search Paths, you can use the AutoLISP FindFile function to find the file. Below is an example of this function:
(findfile “acad.pgp”)
“C:\\Documents and Settings\\<user name>\\Application Data\\Autodesk\\AutoCAD
2007\\R17.0\\enu\\support\\acad.pgp”
Usually by default, AutoCAD does find files in My Documents; however, that can vary from install to install. You can either add the My Documents folder to the Support File Search Path under the Files tab of the Options dialog box or move it to one of the folders listed there.
12.Click the toggle (check box) and note that nothing happens.
There is a function defined as edit_tgl, but it is not assigned to the toggle.
13.Below the AutoLISP expression (action_tile “cancel” “(do_ cancel)”), add this expression:
(action_tile “cancel” “(do_cancel)”)
(action_tile “tgl1” “(edit_tgl)”)
(start_dialog)
The key from the DCL file is how you associate a function with a tile. You could also use the action attribute for the tile in the DCL file.
716 Using ActiveX Automation with AutoLISP
You might be wondering where to go from here. You can find a lot of information in the AutoCAD Online Help system under the topics AutoLISP, Visual LISP, and DXF. Another great resource is
the Internet. You can even find Web sites that are dedicated to tutorials on AutoLISP that you can work through.
To use a method, you use the function Vlax-Invoke-Method. This function requires at least two arguments. The first argument is an object that you are calling the method on, and the second is the method that you want to call on an object. The method might require additional parameters.
An example of calling a method for an object is
(vlax-invoke-method (vlax-get-acad-object) ‘ZoomAll)
Setting and retrieving a property of an object
Properties in the ActiveX Automation are attributes of an object that define the characteristics of that object — these properties can be updated or retrieved. The processes closest in AutoLISP to working with properties are the functions Entget/Entupd and Setvar/Getvar, which allow you to interact with an object and settings. The use of modifying properties on an object is very powerful because after you understand the process, you can do things that you just can’t normally do with AutoLISP alone.
To retrieve the value of a property, you use the function Vlax-Get- Property; to set the value of a property, you use the function Vlax-Put- Property. The Get function requires two arguments, whereas the Put function requires three arguments. The first argument for both Get and Put is the object that you are interested in working with, and the second is the property name. In the case of the Put function, the third argument is the value you want to assign to the property.
An example of retrieving a property for an object is
(vlax-get-property (vlax-get-acad-object) ‘FullName)
An example of setting a property for an object is
(vlax-put-property (vlax-get-acad-object) ‘WindowState 2)

Using ActiveX Automation with AutoLISP 717
Revising the BCIRC command
Using ActiveX Automation with AutoLISP adds a whole new level of complexity to your program, but the ability to use ActiveX Automation with AutoLISP is great when you realize that you can enhance your existing custom programs without the need to rewrite them in a different language like VBA. Earlier in the chapter, you created the custom command BCIRC, which added a new layer to the drawing and asked the user to pick a point to draw a 0.5 diameter circle at. The following steps do the same thing with ActiveX Automation:
1.Launch the Visual LISP Editor and open the file MyStuff.LSP from the My Documents folder.
The MyStuff.LSP file should be open in the Visual LISP Editor.
2.In the Text window, place the cursor behind the last parenthesis on the very last function/command in the file and press Enter twice so there is a blank line at the beginning.
3.In the Text window, enter the following expressions and command:
;;Initiate ActiveX Automation (vl-load-com)
;;Custom command to create a new layer and draw a
;;0.5 diameter circle.
(defun c:BCIRC-AX ( / acadObj docObj mspaceObj curlayer layersObj newLayer colorObj circObj)
;;Get a reference to the AutoCAD object (setq acadObj (vlax-get-acad-object))
;;Get a reference to the active drawing (setq docObj (vlax-get-property acadObj
‘ActiveDocument))
;; Get a reference to Model Space
(setq mspaceObj (vlax-get-property docObj ‘ModelSpace))
;; Get a reference to the active layer (setq curlayer (vlax-get-property docObj ‘ActiveLayer))
;;Get a reference to the Layers table of the
;;current drawing
(setq layersObj (vlax-get-property docObj ‘Layers))
;; Create the new layer named Hole
718 |
Using ActiveX Automation with AutoLISP |
(setq newLayer (vlax-invoke-method layersObj ‘Add “Hole”))
;; Assign the ACI Color Blue to the new layer (setq colorObj (vlax-get-property curlayer ‘TrueColor))
(vlax-put-property colorObj ‘ColorMethod acColorMethodByACI)
(vlax-put-property colorObj ‘ColorIndex acBlue) (vlax-put-property newLayer ‘TrueColor
colorObj)
;; Get the center point for the circle (setq utilityObj (vlax-get-property docObj ‘Utility))
(setq centerPoint (vlax-invoke-method utilityObj ‘GetPoint nil “\nSelect the Center Point: “))
;; Create the new circle in the drawing (setq circObj (vlax-invoke-method mspaceObj ‘AddCircle centerPoint 0.25))
(vlax-put-property circObj ‘Layer “Hole”)
;; Stop an return values from being echoed (princ)
)
4.From the Files menu in the Visual LISP Editor, choose Save.
The new command is saved out to the MyStuff.LSP file.
5.From the Tools menu in the Visual LISP Editor, choose Load Text in Editor.
The custom command is loaded into AutoCAD and should now be ready for use.
6.Switch back to AutoCAD.
Focus should be shifted to the AutoCAD application window.
7.At the command line, type BCIRC-AX.
The new command should work just like the old one did, except this one isn’t dependent on any of the AutoCAD commands, which is why the code is much longer. This code handled passing the point into the AddCircle command. Also, notice how much more complex the layer creation process was compared to before.
Chapter 4: Visual Basic for AutoCAD
In This Chapter
Accessing the VBA environment with commands in AutoCAD
Using the Integrated Development Environment (IDE)
Introducing the AutoCAD Object Model
Creating a basic project
Visual Basic for Applications (VBA), an extension of the very popular programming language Visual Basic (VB), has been around for some
time. VBA is defined as an object-orientated programming (OOP) language. The concept behind OOP is that a computer program is developed using a collection of individual units, or “objects,” as opposed to a listing of instructions. Each one of the objects has the capability to receive messages, process data, and transmit messages to other objects. The objects are self-contained units that can easily be reused and modified for many different purposes, thus saving time and effort.
VBA is part of the programming and development tools provided by Microsoft. Its origins date back to QBasic and MS-Basic, which were both introduced during and prior to the MS-DOS era. VB has been around much longer than VBA and, unlike VBA, VB can be used to build standalone applications that are not dependent on a host application.
A host application is a program that allows the VBA environment to run inside it; AutoCAD is one example. Many other popular Windows-based programs have VBA technology built into them. Some of these other applications are Autodesk Inventor, AutoCAD-based vertical products such as Architectural Desktop (ADT), and Microsoft Word and Excel.
VBA in AutoCAD has been a feature welcomed by both the non-development and development communities. This programming option allows for the integration of business applications directly into the AutoCAD environment, enabling companies to tap into an existing development community that already knows VB/VBA.
720 AutoCAD Commands for VBA
This chapter only scratches the surface of what is possible with VBA for AutoCAD. VBA for AutoCAD goes beyond just drawing simple objects, such as lines and circles. You can use VBA to do all sorts of things, from importing data from a corporate system to doing drawing setups when starting a new design. The power that VBA has is marvelous, especially when you consider how easy it is to use and the depth of capabilities it has compared to other languages.
The benefits of using VBA range from reducing repetitive tasks in AutoCAD to linking to external databases and files to help improve downstream information sharing. The sky is truly the limit, so keep on pushing the boundaries of VBA and AutoCAD.
AutoCAD Commands for VBA
Just like you use commands to draw a line in AutoCAD, you need to know and understand the different commands that are used to access the VBA environment from inside AutoCAD. There are five core commands that you should know to work with VBA projects. These five commands are
VBAIDE
VBALOAD
VBAUNLOAD
VBARUN
VBAMAN
Some other commands are used to interact with the VBA environment, but the functionality that these commands provide can be found in the five commands listed above.
VBAIDE
VBAIDE is used to load the Visual Basic for Applications Integrated Development Environment (VBAIDE). This is where UserForms and code modules are added and organized into a project. The IDE provides tools that help during the coding process and to debug the procedures in a project. We discuss the IDE in greater depth in the section “Working with the IDE.”
VBALOAD
VBALOAD is used to load an existing project from disk into AutoCAD. When you load the project into AutoCAD, it becomes available for both execution and editing.
AutoCAD Commands for VBA 721
VBALOAD can be used two different ways, which are controlled by whether the command’s name is prefixed with a hyphen. Using VBALOAD with no hyphen launches the Open VBA project dialog box. If -VBALOAD is used, the prompt Open VBA Project is displayed at the dynamic input tooltip or command line. This can be useful when loading VBA projects with the AutoLISP programming language or a script file.
If you are working with an existing project or want to view a sample project, you must first load it into AutoCAD. Here’s how:
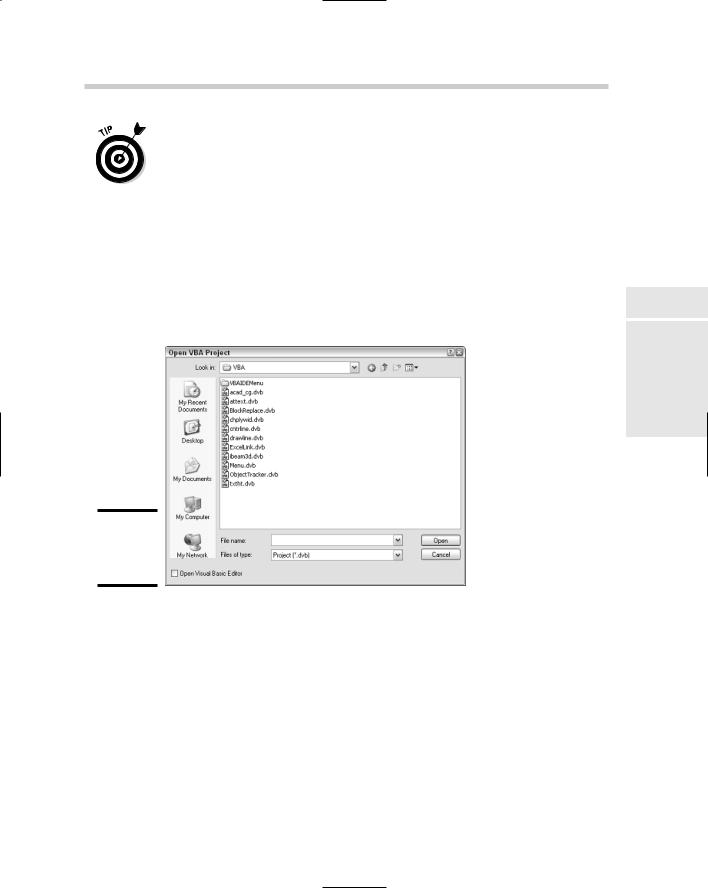
1.At the command line or dynamic input tooltip, type VBALOAD or from the Tools menu, choose Macro Load Project.
The Open VBA Project dialog box (see Figure 4-1) appears. |
Book X |
Chapter 4 |
|
AutoCAD Visual Basic |
|
for |
Figure 4-1:
The Open VBA Project dialog box.
2.Use the Look In drop-down list to specify the location for the VBA project.
AutoCAD comes with some sample project files that can be found in the folder C:\Program Files\AutoCAD 2006\Samples\VBA by default.
3.Select the project from the list box below the Look In drop-down list.
All the available project files in the specified folder are displayed in the list box. VBA project files have a unique file extension of .DVB.
4.Optionally, select the Open Visual Basic Editor check box in the lower-left corner.