

AutoCAD & AutoCAD LT All-In-One Desk Reference For Dummies (2006)
.pdf702 Getting Information to and from the User
Feedback can be in the form of text at the command line or even an alert message box when a problem happens.
Table 3-10 shows some of the different user feedback functions that are available in AutoLISP.
Table 3-10 |
Some of the Basic User Feedback Functions |
|
Function Syntax |
Description |
Result |
|
|
|
(alert message) |
Displays a message box with an OK button |
|
|
on it. |
|
|
Example: |
|
|
(alert “Hello World”) |
|
|
|
|
(prompt message) |
Displays a text string in the command line. |
Hello |
|
Example: |
Worldnil |
|
(prompt “\nHello World”) |
|
|
|
|
(princ [expression |
Prompt returns the value of nil, along with |
Hello |
[filedescripter]]) |
many other AutoLISP functions. You can |
World |
|
keep AutoCAD from echoing nil and the |
|
|
last return value by using a function called |
Select |
|
Princ. Optionally, Princ can also be |
object: |
|
used to display a text string or write a text |
”\nSelect |
|
string to a file. When Princ is used to |
object:” |
|
display a text string, it may display the text |
|
|
string twice because it displays and echoes |
|
|
the message. It is best not to use Princ to |
|
|
display a text string at the command line. |
|
|
Examples: |
|
|
(prompt “\nHello World”) |
|
|
(princ)or (princ “\nSelect |
|
|
object::”) |
|
|
|
|
(textscr) |
Displays the AutoCAD Text window. |
|
|
Example: |
|
|
(textscr) |
|
|
|
|
(graphscr) |
Displays the AutoCAD graphics screen. |
|
|
Example: |
|
|
(graphscr) |
|
|
|
|
Other functions to note
As you might have already noticed, a lot of functionality is packed into the AutoLISP programming language. The functions we cover in this section help to make your custom programs much more robust.

Getting Information to and from the User 703
Table 3-11 shows some of the different other functions that are available in AutoLISP.
Table 3-11 |
Some of the Other Functions |
|
Function Syntax |
Description |
Results |
|
|
|
(while |
Evaluates the test condition. |
Count down: T-10 |
testcondition |
If it is true, the expressions |
Count down: T-9 |
[expression ...]) |
are evaluated repeatedly until |
Count down: T-8 |
|
the test condition is false. |
Count down: T-7 |
|
Example: |
Count down: T-6 |
|
(setq cnt 10) |
Count down: T-5 |
|
(while (> cnt 0) |
Count down: T-4 |
|
(prompt |
Count down: T-3 |
|
(strcat “\nCount |
Count down: T-2 |
|
down: T-” |
Count down: T-1 |
|
(itoa cnt) |
Blast off |
|
) |
|
|
) |
|
|
(setq cnt (1- cnt)) |
|
|
) |
|
|
(prompt “\nBlast off”) |
|
|
|
|
(if testcondition |
Evaluates the test conditional |
Number greater |
then expression |
expression and evaluates one |
than 3. |
[else expression]) |
of the two expressions. If the |
|
|
test conditional expression is |
|
|
true, the then expression is |
|
|
evaluated, and, if not, the else |
|
|
expression is evaluated. |
|
The function progn is used to group more than one AutoLISP expression together as IF can only handle one expression for the then and else expressions.
Example:
(setq XY 3.1)
(if (> XY 3) (progn
(prompt “\nNumber greater than 3.”)
(prompt “\nanother line...”)
)
(prompt “\nNumber less than 3.”)
)
Book X
Chapter 3
AutoLISP |
Introducing |
(continued)

704 Getting Information to and from the User
Table 3-11 (continued)
Function Syntax |
Description |
Results |
(ssget [selection- |
Allows the user to select objects |
You selected |
method] [point1 |
on-screen similar to commands like |
7 objects. |
[ point2]] |
copy and move, but ssget has |
|
[point-list] |
special selection methods and |
|
[filter-list]) |
filtering built into it to give your custom |
|
|
commands and programs some |
|
|
additional control. There are also |
|
|
functions like sslength and |
|
|
ssname, which are specific to |
|
|
working with the returned selection |
|
|
set value. |
|
|
Example: |
|
|
(setq SS (ssget)) |
|
|
(if (/= SS nil) |
|
|
(prompt |
|
|
(strcat “\nYou selected “ |
|
|
(itoa (sslength SS)) |
|
|
“ objects.” |
|
|
) |
|
|
) |
|
|
(prompt “\nNo objects |
|
|
selected.”) |
|
|
) |
|
|
|
|
(entsel [message]) |
Allows the user to select only an |
A circle |
|
individual object. The return value is |
was not |
|
a list of the points selected on-screen |
selected. |
|
and the entity name of the object |
|
|
selected. |
|
|
Example: |
|
|
(setq ENT (entsel “\ |
|
|
nSelect a Circle: “)) |
|
|
(if (/= ENT nil) |
|
|
(progn |
|
|
(if (= (cdr (assoc 0 |
|
|
(entget (car ENT)))) |
|
|
“CIRCLE” |
|
|
) |
|
|
(prompt “\nA Circle |
|
|
was selected.”) |
|
|
(prompt “\nA Circle |
|
|
was not selected.”) |
|
|
) |
|
|
) |
|
|
(prompt “\nNo object |
|
|
was selected.”) |
|
|
(princ) |
|
|
) |
|
|
|
|

Using the Debug Tools in the Visual LISP IDE 705
Using the Debug Tools in the Visual LISP IDE
One of the most challenging aspects of programming is the process of debugging a custom program. Debugging is the process of looking for errors in a program and correcting them. These problems in the program are referred to as defects or bugs. A defect is simply when the program isn’t doing something that the creator intended it to do. The debugging process can be short and very simple in the beginning, but over time, as your programs evolve, the process becomes much longer and more difficult. The Visual LISP editor provides several different tools that can help to make the debugging process go more smoothly.
Breakpoints
Breakpoints are used to identify locations in your custom programs where you would like to stop and evaluate what is happening. This allows you to locate and fix defects in the routine much faster than having to step through the entire program again and again. A breakpoint is represented by a parenthesis with a red background (see Figure 3-8) and is available between AutoCAD sessions — if you close and reopen AutoCAD, the breakpoints are still available the next time you open the LISP file in the Visual LISP editor.
Figure 3-8:
A breakpoint.
Watch what is happening
Watch is a nice process to use when you are getting an unexpected result during the execution of your custom program. Watch is used to evaluate the current value of a variable or the return value of an expression so you can validate when an incorrect value is being returned. Using watch is a two-step process: First you set up a watch through the Add Watch dialog box (see Figure 3-9), and then you monitor the changes in the Watch dialog box
(see Figure 3-10).
Figure 3-9:
Setting up a watch.
Book X
Chapter 3
AutoLISP |
Introducing |

706 Using the Debug Tools in the Visual LISP IDE
Figure 3-10:
Keeping a watch out for strange activity.
Setting up breakpoints and using watch
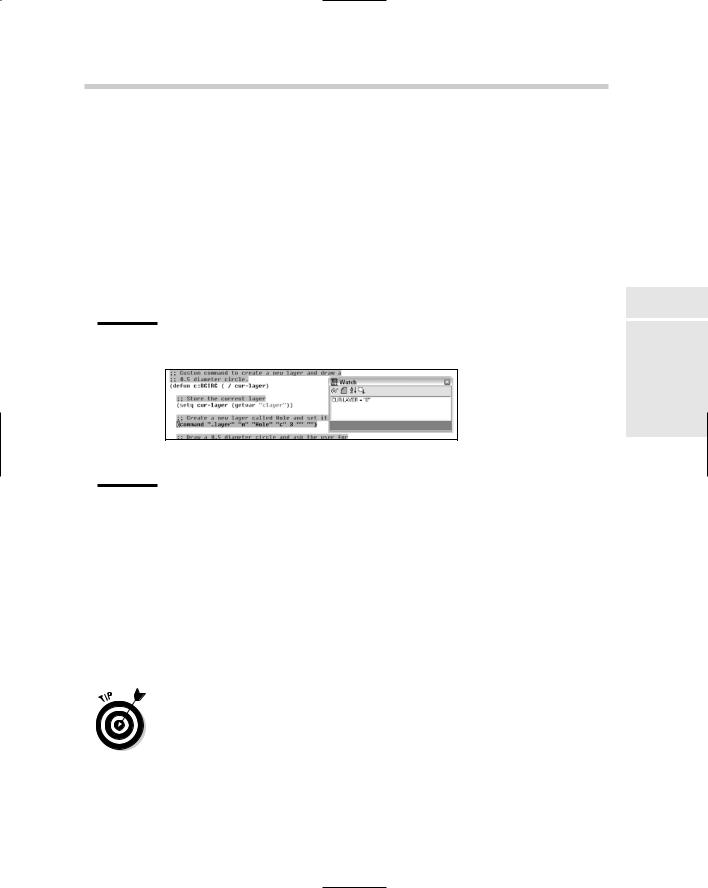
In this procedure, you use breakpoints and watch to monitor what current value that a variable holds during execution of the custom command BCIRC. If you didn’t create the MyStuff.LSP file with the BCIRC command back under the section titled “Exchanging information with AutoCAD,” you should go back to that section and perform the steps there first before continuing on.
1.Launch the Visual LISP Editor and open the MyStuff.LSP file from the My Documents folder.
The MyStuff.LSP file should be open in the Visual LISP Editor.
2.Position the cursor over the variable cur-layer in the custom command BCIRC and double-click.
The variable cur-layer should now be highlighted.
3.Right-click over the variable and select Add Watch.
The variable cur-layer should be added to the Watch dialog box and its current value should be nil (see Figure 3-11). As the custom command is being executed, you are able to see the value of the variable change as it is being set to a different value.
Figure 3-11:
A variable added to the Watch dialog box.
4.Position the cursor over the left parenthesis of the first line that starts with the Command function and right-click.
The right-click menu for the Text window should be displayed.
5.From the right-click menu, select Toggle Breakpoint.
The left parenthesis is highlighted with a red background, denoting the breakpoint has been set.
Using the Debug Tools in the Visual LISP IDE 707
6.From the Tools menu in the Visual LISP Editor, choose Load Text in Editor.
The custom command is loaded into AutoCAD and should now be ready to use.
7.Switch to AutoCAD and type BCIRC at the command line to run the custom command.
Focus switches back to the Visual LISP Editor and highlights the
line the breakpoint is set on (see Figure 3-12). Notice that the variable cur-layer in the Watch dialog box is no longer nil, as it currently holds the value of the system variable CLAYER.
Figure 3-12:
Evaluation of the custom command paused due to the placement of breakpoint.
8.Press F8 on the keyboard to resume stepping through the next expression after the breakpoint.
The next line or expression is highlighted, allowing you to evaluate what is happening line by line in the Watch window and in AutoCAD.
9.Press F8 a few more times.
The next line or expression is highlighted and evaluated.
10.Press CTRL+F8 to resume normal execution of the custom program.
The routine finishes executing.
One thing that can be very helpful when you are first getting started is to add expressions in your custom program that use the Prompt or Alert function so you know which expression is executing. This can be much less distracting than stepping through expressions using the Visual LISP Editor when testing your custom programs.
Book X
Chapter 3
AutoLISP |
Introducing |

708 Using the Debug Tools in the Visual LISP IDE
AutoLISP error messages
As you first start to create your own custom programs with AutoLISP, you will certainly encounter some problems. AutoCAD lets you know that there is a problem but really doesn’t clearly explain how to fix or identify the problem. This can be frustrating, but remember that you have breakpoints and the Watch window at your disposal to help you identify what is going wrong.
Table 3-12 shows some of the more common errors that AutoCAD displays when it can’t evaluate an AutoLISP expression.
Table 3-12 |
Some Common AutoLISP Error Messages |
Error Message |
Description |
|
|
AutoCAD |
One of the functions that you are using in your custom program can’t |
rejected |
be used in the current context. This could be related to functions like |
function |
Setvar, with a read-only variable, Tblnext using an invalid table |
|
entry, or if one of the Getxxx functions for getting input is used in the |
|
Command function. |
|
Example: |
|
(setvar “ACAD” “c:\\”) |
|
; error: AutoCAD variable setting rejected: |
|
“ACAD” “c:\\” |
|
|
Bad |
An incorrect data type was passed into an argument. |
argument |
Example: |
\type |
(setq strName nil) |
|
|
|
(strcat “Hello” strName) |
|
; error: bad argument type: stringp nil |
|
|
(_> |
Extra opening parenthesis or an unbalanced one. This can be one of |
|
the hardest errors to find if your program is large. |
|
Example: |
|
((strcat “Hello” “ World!”) |
|
(_> |
|
|
extra right |
Extra closing parenthesis or an unbalanced one. Like the extra |
paren |
opening parenthesis, this can be hard to find if your program is large. |
|
Example: |
|
(strcat “Hello” “ World!”)) |
|
; error: extra right paren on input |
|
|
(“_> |
A double quote mark that represents a string is missing. |
|
Example: |
|
(strcat “Hello” “ World!) |
|
(“_> |
|
|
Going GUI with DCL 709
Error Message |
Description |
too few |
Required arguments for a function are missing. |
arguments |
Example: |
|
(alert) |
|
; error: too few arguments |
|
|
too many |
There are too many arguments for the function that is being used. |
arguments |
Example: |
|
(prompt “Hello” “ World!”) |
|
; error: too many arguments |
|
|
If you are having problems with unbalanced parentheses in your custom programs, the Visual LISP Editor offers a Parentheses Matching tool under the Edit menu. This can help you identify where the problem with the parentheses exists.
Going GUI with DCL
AutoLISP was designed to be used as a way to automate repetitive tasks and to create custom commands to complete a task that couldn’t normally be completed easily in AutoCAD. As technology moved forward, AutoLISP needed to evolve from a command line utility to having the ability to utilize a dialog box for managing settings and collecting information from the user. To do this, AutoLISP utilizes a language called DCL — Dialog Control Language. This language is used to lay out the structure of the dialog box controls and overall size.
Basics of DCL
DCL files are plain text files but must follow a specific structure and definition system. Two definition systems, the dialog box and tiles, make up the controls that should be displayed. Each of the different tiles and the dialog box have different attributes that can be set to control appearance and functionality. An example of a dialog box structure looks like this:
MYDLG : dialog { label = “My Dialog”; <Tiles go here>
}
The structure that a tile (or control) follows is similar to that of the dialog box. An example of the structure of a Toggle tile is
: toggle { label = “Use second edit box, too.”; value = “0”;
}
Book X
Chapter 3
AutoLISP |
Introducing |

710 Going GUI with DCL
Table 3-13 shows some of the common tiles used in DCL.
Table 3-13 |
Some Common DCL Tiles |
DCL Tile |
Description |
|
|
Dialog |
Defines a dialog box object and is used as a container to hold |
|
different tiles. |
|
Example: |
|
MYDLG : dialog { label = “My Dialog”; |
|
} |
|
|
Button |
Creates a push button or command button with a caption. |
|
Example: |
|
: button { label = “Import...”; |
|
action = “(btn_import)”; |
|
key = “btn_import”; |
|
mnemonic = “I”; |
|
} |
|
|
List_box |
Creates a vertical list of strings that can be selected individually or as |
|
multiples. |
|
Example: |
|
: list_box { action = “(list_clicked)”; |
|
list = “Yes\nNo\nUnknown”; |
|
key = “list”; |
|
value = “Unknown”; |
|
} |
|
|
Ok_only |
Creates an OK button only. |
|
Example: |
|
ok_only; |
|
|
Ok_cancel |
Creates an OK and Cancel button combination. |
|
Example: |
|
ok_cancel; |
|
|
Popup_list |
Creates a drop-down list. |
|
Example: |
|
: popup_list { action = “(pop_clicked)” |
|
list = “Yes\nNo\nUnknown”; |
|
key = “pop”; |
|
value = “Unknown”; |
|
} |
|
|
Radio_ |
Creates a radio or option button. |
button |
Example: |
|
: radio_button { label = “On”; |
|
action = “(radio_clicked)”; |
|
key = “radio_on”; |
|
} |
|
|

Going GUI with DCL 711
DCL Tile |
Description |
Toggle |
Creates a check box. |
|
Example: |
|
: toggle { label = “Use second edit box, too.”; |
|
action = “(toggle_ed2)”; |
|
value = “0”; |
|
} |
|
|
Adding comments
A comment is a line or series of lines in the DCL structure that do not get interpreted. A comment can be used to identify what is taking place at a location in a dialog box or can be a general note at the top of the file that includes general revision or author information. Double forward slashes are placed in front of a text string to designate it as a comment. By default, a comment appears in the purple text with a gray background within the Visual LISP Editor. A sample comment is
// Created on October 16, 2005 by LA
Using AutoLISP to add interaction to DCL
DCL needs AutoLISP in order to do anything: A DCL file itself doesn’t do anything other than take up space on a disk as a file. In these steps, we show you how to display a dialog box with AutoLISP and add an action to a tile to make it interactive:
1.Launch the Visual LISP Editor and open the file MyStuff.LSP from the My Documents folder.
The MyStuff.LSP file should be open in the Visual LISP Editor.
2.Create a new file with the name MyStuff.DCL and make sure it is saved as the type DCL Source File instead of LSP Source File.
A new Text window should be created and titled MyStuff.DCL.
3.In the MyStuff.DCL Text window, enter the following dialog box and tile definitions:
// Dialog box is a support file of MyStuff.lsp MYSTUFF :dialog { label = “MyStuff Example”;
: toggle { label = “Use second edit box, too?”; value = “0”;
key = “tgl1”;
}
:boxed_column { label = “Edit Box group”;
: edit_box { label = “1st Edit Box”; key = “edBox1”;
Book X
Chapter 3
AutoLISP |
Introducing |