Добавил:
Опубликованный материал нарушает ваши авторские права? Сообщите нам.
Вуз: Предмет: Файл:

AutoCAD & AutoCAD LT All-In-One Desk Reference For Dummies (2006)

.pdf
Скачиваний:
90
Добавлен:
17.08.2013
Размер:
17.7 Mб
Скачать

682 Accessing the AutoLISP Development Environment

Visual LISP includes a complete AutoLISP development environment (see Figure 3-1). The development environment includes the capability to see color-coded syntax, use debugging tools, and much more. The development environment is know as the VLIDE — Visual LISP Integrated Development Environment. The VLIDE is accessible directly from AutoCAD.

Figure 3-1:

The Visual

LISP IDE.

Launching the Visual LISP IDE

To launch the Visual LISP IDE, use one of these methods:

Tools menu: Choose Tools AutoLISP Visual LISP Editor.

Keyboard input: Type VLIDE or VLISP at the command line and press Enter.

Loading an existing AutoLISP application file

Use either of the two methods to initiate the VLIDE or VLISP command. The following procedure uses the Tools menu to launch the integrated development environment and explains how to load an existing AutoLISP application file.

1.Choose Tools AutoLISP Visual LISP Editor.

AutoCAD launches the Visual LISP Editor.

Using the VLIDE 683

2.From the Files menu in the Visual LISP Editor, choose Open File.

The Open File to Edit/View dialog box is displayed, allowing you to open AutoLISP, DCL, SQL, or C/C++ source files. The two that you are going to be working with are AutoLISP and DCL files.

3.Click the Files of Type drop-down list and specify the type of application file to filter the list box by.

The selected option controls the type of application files that are displayed in the list box. The default selection is All Files. The drop-down list box allows you to filter on LSP, DCL, SQL, and C/C++ source files.

4.Specify the location for the application file using the Look In dropdown list.

The Look In drop-down list allows you to select a folder or a named location like My Documents to start in.

5.If the application file is located in a folder below the location that you selected in the Look In drop-down list, double-click the folder in the list box below the Look In drop-down list.

The list box displays any folders or files located under the folder selected in the Look In drop-down list. The types of files that are displayed in the list box are dependent on the file filter selected in the Files of Type drop-down list.

6.Keep double-clicking on folders until you have navigated to the folder that contains the application file you want to load. Select the application file from the list box.

The application file should be highlighted in the list box and its name added to the File Name text box.

7.Click Open.

The application file should be opened in its own text window within the Visual LISP Editor.

If you are opening an AutoLISP file for view only, you can select the Open As Read-Only check box at the bottom of the Open File to Edit/View dialog box to avoid accidentally making changes to the file.

Using the VLIDE

Although AutoLISP is not a mainstream programming language, it’s nice to have a development environment dedicated to AutoLISP. In order to take full advantage of the development environment, you should understand some of its basic functionality and behavior.

Book X

Chapter 3

AutoLISP

Introducing

684 Using the VLIDE

The Text window is where you edit and view source code that makes up an AutoLISP application file. This window allows you not only to edit your source code but also to run validation tools on it to test it for things like missing parentheses. Like most development environments, the main window controls how code is represented on-screen. Color coding (see Figure 3-2) is one of the biggest advantages that the Visual LISP editor has over an application like Notepad. (Although this is a black and white book, the different colors are represented by grayscale in the figure.)

Figure 3-2:

AutoLISP said, “Let there be color!” and there was.

Table 3-1 lists some of the default colors for many of the common elements as they appear in the Text window.

Table 3-1

Color Coding the Text Window

Window Element

Description (Default Color Scheme)


:WINDOW-TEXT

Variables and function names that are not protected. (Black text


with a white background.)

:LEX-SPACE

Empty space in the file that is represented by a space or tab.


(Black text with a white background.)

:LEX-STR

A string value that is surrounded with double quote marks.


(Magenta text with a white background.)

:LEX-SYM

Variables and function names that are protected. (Blue text with a


white background.)

:LEX-NUM

Whole number. (Dark green text with a white background.)

:LEX-INT


:LEX-REAL

Real or float number. (Teal text with a white background.)


:LEX-PAREN

Parentheses. (Red text with a white background.)


:LEX-COMM

Comment. (Purple text with a gray background.)


Using the VLIDE 685

Controlling color coding in the Text window

You can change the default colors that are displayed in the Text window for color coding to a certain degree, but the changes are limited to a predetermined color palette. Follow these steps to change the color-coding scheme:

1.From the Tools menu in the Visual LISP editor, choose Window Attributes Configure Current.

The Window Attributes dialog box (see Figure 3-3) is displayed.

Book X

Chapter 3

Figure 3-3:

Adjusting

the Text window colors.

2.Click on the drop-down list under the Text Colors section.

The drop-down list controls the window element that is currently being edited when the color swatches are clicked.

3.Click a color swatch in the top row to adjust the color of text for the selected element.

The top row of color swatches controls the foreground color or the color of the text. The changes in the dialog box appear in both the dialog box along the top of the Text Colors section and in real-time in the editor window, giving you a good understanding of how the changes affect the Text window.

4.Click a color swatch in the bottom row to adjust the color of background for the selected element.

The bottom row of color swatches controls the background color, which in most cases is the color white, except for highlighting, debugging, and comments.

5.In order to use color coding, make sure that the Lexical Colors check box is checked under the Text Colors section.

6.Click OK to save the changes made in the Window Attributes dialog box.

7.Click Yes to save the color scheme as the default editor colors; click No to use the color scheme only while the Text window is open.

AutoLISP

Introducing

686 Using the VLIDE

You can control the number of spaces that appear in the Text window when the tab key is pressed on the keyboard by adjusting the value in the Tab Width text box of the Window Attributes dialog box.

You can control the left margin of the Text window through the Left Margin text box in the Window Attributes dialog box. The value controls the amount of white space from the left edge of the application window to where text first appears. The value is expressed in pixels.

Controlling text size and font style in the Text window

Changing the text size and font style for the Text Window adds a level of personalization to the Visual LISP Editor. Based on the screen resolution that you are running, you may need to change the size of the text for legibility. Follow these steps to change the size and font style used in the Text window:

1.From the Tools menu in the Visual LISP Editor, choose Window Attributes Font.

The Font dialog box (see Figure 3-4) is displayed.

Figure 3-4:

Adjusting text size and font style.

2.Select one of the available fonts from the Font list box.

After you’ve selected a font, the Sample section updates with a preview of the current font settings.

3.Select one of the available font styles from the Font Style list box.

After you’ve selected a font style, the Sample section updates with a preview of the current font settings.

Using the VLIDE 687

4.Select one of the available sizes from the Size list box.

After you’ve selected a size, the Sample section updates with a preview of the current font settings.

5.Click OK to save the changes made in the Font dialog box and update the Text window.

Navigating the Text window

Navigating the Text window doesn’t require much of an explanation: It uses a lot of common Windows functionality that can be found in basic text editors like Notepad. The Text window can be maximized and minimized and contains both horizontal and vertical scroll bars, but it also contains some other nice options that you won’t find in Notepad.

The Visual LISP Editor offers a few ways to improve navigation of both small and large source files. These navigation tools can be found under the Search menu. One option is called Bookmarks and another is called Go to Line:

Bookmarks: Bookmarks allow quick navigation between different sections of a source file. These markers only remain active while the file is open in the Visual LISP Editor. To create a bookmark, click the Search menu, and choose Bookmarks Toggle Bookmark. A dark green oval (see Figure 3-5) appears in the left margin of the Text window.

Figure 3-5:

Bookmark in left margin.

To navigate between the different bookmarks, select Next Bookmark or Previous Bookmark from Search Bookmarks. Choose Search

Bookmarks Clear All Bookmarks to remove all the active bookmarks in the Text window.

Go to Line: Go to Line isn’t as useful as it once was in releases of AutoCAD prior to 2006. This is because in those earlier versions, menu files needed to be edited outside AutoCAD using a text editor. The Go to Line option was perfect for quickly jumping to a line in a menu file when an error was encountered during the compiling process in AutoCAD.

The Go to Line option is still helpful to find a problem in a .DXF file when there is an error during loading. To use the Go to Line option, click the Search menu and choose Go to Line. The Go to Line dialog box (see Figure 3-6) is displayed. In the text field, enter the line in the file you want to jump to and click OK.

Book X

Chapter 3

AutoLISP

Introducing

688 Creating a Basic Program

Figure 3-6:

Go here, go there.

Creating a Basic Program

Now that you have a taste for the Visual LISP editor, we are sure you’re just itching to get started. In the rest of this chapter, as you become familiar with the AutoLISP language, we show you some of the other features of the Visual LISP editor when it makes sense to introduce them.

Creating a new AutoLISP file

To start off creating a basic program, make sure that a blank Text window is available. The following steps explain how to create an empty Text window and to save the contents of the window to a new empty application file.

1.From the Files menu in the Visual LISP Editor, choose New File.

A new Text window is created and is titled <Untitled-0>. The name appears in the caption bar of the Visual LISP Editor if the Text window is maximized or in the caption bar of the Text window. The name of each new Text window is incremented by a value of 1, so the next new Text window would be titled <Untitled-1>, and so on.

2.From the Files menu in the Visual LISP Editor, choose Save As.

The Save As dialog box is displayed, allowing you to specify a new name for the contents of the <Untitiled-0> Text window. By default, Visual LISP offers up the name tmp.LSP for the new filename.

3.Click the Save As Type drop-down list and specify the type of Lisp Source File, if it is not already selected.

The default file type is Lisp Source File.

4.Specify the location the application file should be saved to using the Save In drop-down list.

The Save In drop-down list allows you to select a folder or a named location like My Documents to save the new file to.

If the desired save to location is in a folder below the location that you selected in the Save In drop-down list, double-click the folder in the list box below the Save In drop-down list.

Creating a Basic Program 689

The list box displays any folders or files located under the folder selected in the Save In drop-down list. The types of files that are displayed in the list box depend on the file filter selected in the Save As Type dropdown list.

5.Keep double-clicking on folders until you have navigated to the folder that you want to save the new file to and type a new name in the File Name text box for the file.

You should make the name as descriptive as you can without making it too long, just in case you need to find the file at a later date through Windows Explorer.

6.Click Save to write all the contents of the Text window to the file name and location that you specified. You should also notice that the Text window now displays the updated filename.

Anatomy of an AutoLISP expression

To use the AutoLISP programming language, you must understand how it is structured and what makes up an AutoLISP expression. An AutoLISP expression must begin with either a left (open) parenthesis [(] or an exclamation point ( !):

(: An open parenthesis is used to denote the start of an AutoLISP expression and must be balanced with a closing parenthesis to denote the end of the expression.

!: An exclamation point is used to instruct the AutoLISP interpreter to return the value for the symbol that follows the exclamation point.

If you enter either an opening parenthesis or exclamation point at the command line in AutoCAD, it informs AutoCAD that the following information should be sent to the AutoLISP interpreter. The AutoLISP interpreter then evaluates and analyzes the expression(s) accordingly. If a return value is generated, it is displayed in the command line.

Table 3-2 shows some different AutoLISP samples that can be typed directly at the command line in AutoCAD and what the expected results are.

Table 3-2

Sample AutoLISP Expressions

AutoLISP Expression

Expected Result


!XY

Returns the value of the variable XY, which by default


is nil.

(command “._circle”

Draws a circle at the coordinate 5,5 on the current layer

“5,5” “10”)

with a radius of 10 units.

Book X

Chapter 3

AutoLISP

Introducing

(continued)

690 Creating a Basic Program

Table 3-2 (continued)


AutoLISP Expression

Expected Result


(setq X 4 Y 5 XY 9)

Sets the variable X to a value of 4; sets Y to a value of 5;


and sets XY to a value of 9. The value 9 is returned to the


command line because XY is the last variable that is set,


and the function setq returns the value that it sets to a


variable.


(+ 15 (* 2 12))

Returns a value of 39. The innermost functions are evalu-


ated first in AutoLISP. The 2 multiplied by 12 is evaluated


first for a value of 24. The value of 24 is then added to 15


to get an end result of 39.


(setq str (strcat

The return value is “Welcome to AutoLISP”. The strcat


“Welcome to “

function is used to concatenate string variables together.


“AutoLISP”))


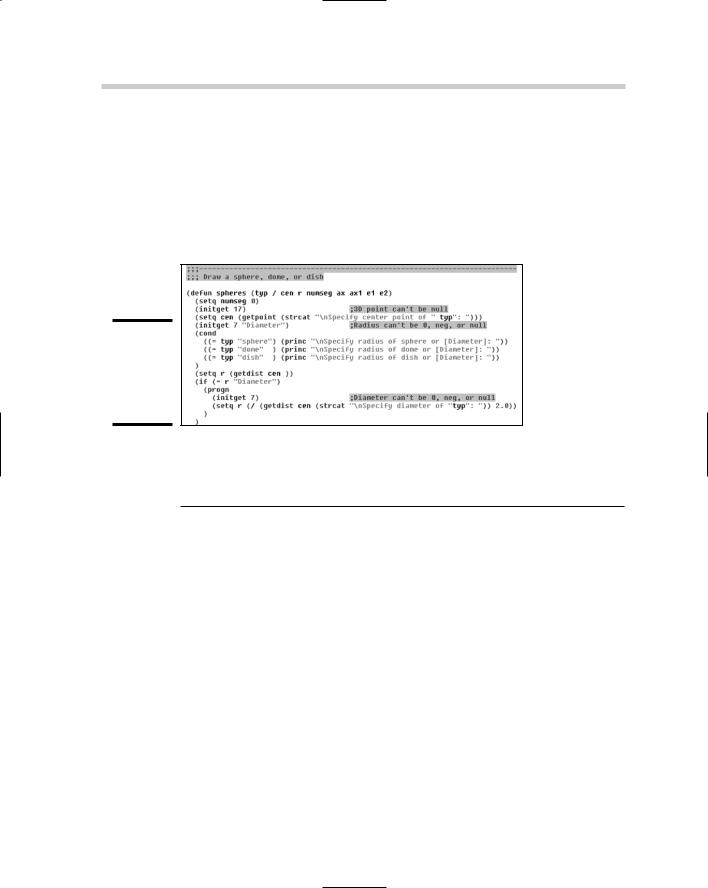
Now that you know how to identify an AutoLISP expression, the next step is


to understand how an AutoLISP expression is structured when it starts with


an open parenthesis. At minimum, an AutoLISP expression must have an


open (left) parenthesis, a function name, and a closing (right) parenthesis


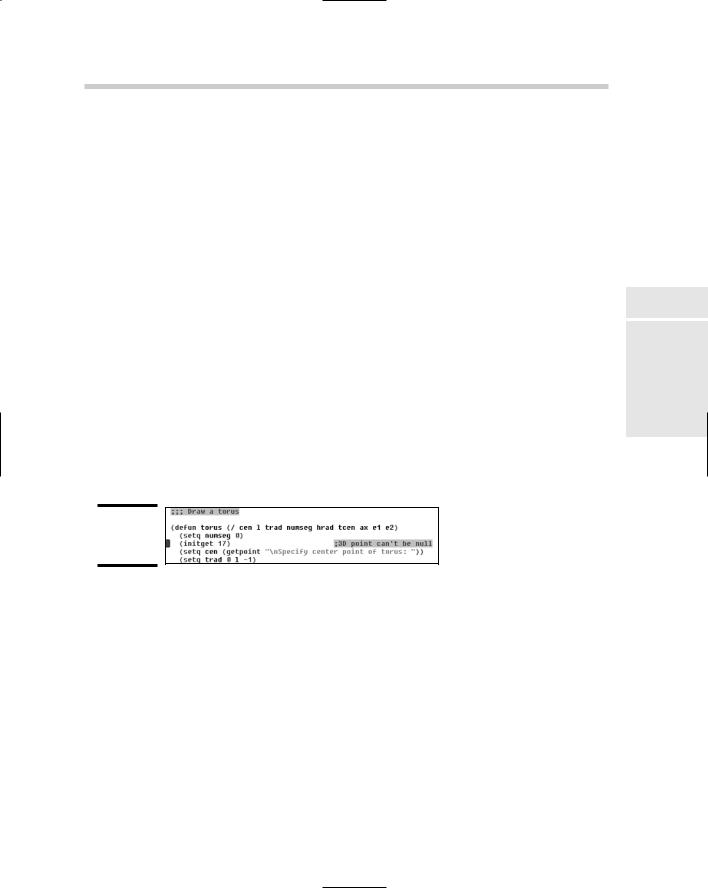
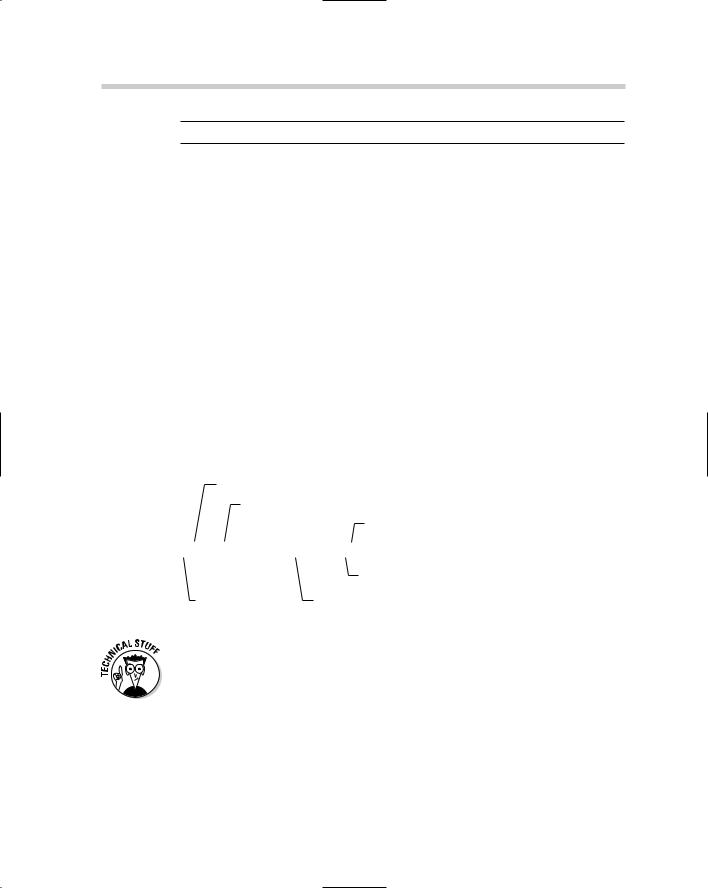
but can contain arguments as well (see Figure 3-7). Usually AutoLISP expres-


sions include arguments like many of the samples in Table 3-2.


Function name


Required argument


Closing parenthesis

Figure 3-7:


The

(setq symbol value [symbol value]...)

anatomy of


an AutoLISP


Possible additional arguments

expression.

Opening parenthesis Optional arguments in brackets


AutoLISP function and variable names are not case-sensitive like function and variable names in other programming languages such as C++, or even VB. In other languages, a variable with the name A might represent something different than a variable with the name a, but not in AutoLISP.

Adding comments

A comment is a string of information that is used to describe a line or series of lines in an application file that do not get evaluated. A comment can identify what is taking place in a function or command, or can be a general note at the top of the file that includes general revision or author information. A

Creating a Basic Program 691

semicolon (;) is placed at the front of a text string to designate it as a comment. By default, a comment appears in purple text with a gray background within the Visual LISP Editor. A sample comment is

; New Custom command to create a dimension style

To command or just to function

When you are creating custom programs in AutoLISP, you have to make a decision whether the custom program will be used to define a new command or a function. Typically, a command is used by entering its name at the AutoCAD command line or executing it from one of the user interface elements. Functions are not usually entered at the command line or with a user interface element, but used in an AutoLISP application file.

AutoLISP commands, on the surface, seem just like normal commands to users unless they try to use the commands in another AutoLISP program. AutoLISP commands are different core commands from those defined in ObjectARX because they can’t be used with the AutoLISP function Command. To create your command or function in AutoLISP, use the function Defun, which stands for Define Function. The syntax for the Defun function is as follows:

(defun function_name ([arguments . . .] [/ variables . . .]) expressions

. . .

)

Here’s a breakdown of the syntax:

Function_filename: The function or command name that can be typed in at the command line or used in a command macro for a toolbar button.

Arguments: Arguments are used to receive values from the calling function. Arguments are not used when creating a command.

Variables: The variables that are defined with the Defun function are declared locally to the function or command. This is a way to manage variables that should exist only while the function or command is running. After the function or command ends, the variables are reset to the previous values they held.

Expressions: A Defun function is a way to group other AutoLISP expressions with a specified name that can be used to reference those lines. Expressions represent AutoLISP expressions that should be executed when the function or command is run from the command line or a command macro.

Book X

Chapter 3

AutoLISP

Introducing