602 Organizing Your Space
All of the tools that are on the Workspaces toolbar, except for the My Workspace tool, can be found under Window Workspaces.
Creating a new Workspace
Follow this procedure to create a new Workspace using the Workspaces toolbar.
1.If the Workspaces toolbar is not displayed, right-click on one of the toolbars that is displayed and select Workspaces.
The Workspaces toolbar is displayed.
2.Move some of the toolbars and dockable windows around on-screen.
By moving some of the toolbars and dockable windows, you should be able to tell whether the changes have been saved to the new Workspace.
3.On the Workspaces toolbar, select Save Current As from the dropdown list.
The Save Workspace dialog box is displayed.
4.In the Save Workspace dialog box, enter a name for the new Workspace in the Name text field and click Save.
The new Workspace is saved to the main customization file and added to the drop-down list on the Workspaces toolbar. An entry for that Workspace is also added under Window Workspaces.
5.Switch between different Workspaces from the drop-down list to see how they are different.
Saving changes to an existing Workspace
To update an existing Workspace, follow the same steps that were in the previous section, “Creating a new Workspace.” Instead of entering a name in the Name text field in Step 4, select an existing Workspace name from the dropdown list. Then click the Save button to update the Workspace.
Using the Customize User Interface editor
The Customize User Interface (CUI) editor offers a full range of control over Workspaces, unlike the Workspaces toolbar. The one thing that you can’t define using the CUI editor is which Workspace is displayed when the My Workspace button on the Workspaces toolbar is clicked.
From the CUI editor, you can do the following:
Create a Workspace. The Customizations In pane allows you to create a new Workspace.
604 Organizing Your Space
As you select toolbars and pull-down menus from the Customizations In pane, they are added to the Workspace under the Workspace Contents pane.
7.Click Done under the Workspace Contents pane after you have added the desired toolbars and pull-down menus to the Workspace.
The changes are saved to the Workspace.
8.Click OK.
The changes are saved to the main CUI file.
Changing the order of pull-down menus
Follow these procedures to reorder the pull-downs that are part of a Workspace:
1.From the menu bar, choose Tools Customize Interface.
The Customize User Interface (CUI) editor is displayed.
2.In the Customize User Interface editor, click the Customize tab along the top.
The Customize tab is set current.
3.In the Customizations In pane, click the plus sign next to the Workspaces node to expand it.
The Workspaces node should expand, revealing the Workspaces that exist in the main CUI file.
4.Select the Workspace in which you want to change the pull-down menu order.
The Workspace Contents pane is displayed, allowing you to make changes to the properties of the associated toolbars and pull-down menus.
5.In the Workspace Contents pane, click the plus sign next to the Menus node.
The associated pull-down menus are displayed under the Menu node.
6.Select the pull-down menu you want to reposition. Keep holding down the mouse button and drag it to its new position.
A horizontal indicator is displayed between the pull-down menus to show where the pull-down menu being dragged will be placed when the mouse button is released.
If you move the CUI editor so that you can see the menu bar along the top of AutoCAD, you can click Apply to see the pull-down menus change positions without needing to exit the CUI editor first.
606 Organizing Your Space
Clean Screen does exactly what the name suggests: gives you a clean screen to work with. It maximizes AutoCAD and turns off all the toolbars and dockable windows and even hides the caption bar along the top of AutoCAD. The pull-down menus are still available along with the command line.
To use the Clean Screen tool, use one of the methods listed below:
View menu: Click View on the menu bar, and then move your mouse pointer down to Clean Screen and click.
Icon Tray: Click the Clean Screen icon on the status bar.
Shortcut key: Press Ctrl+0 (zero).
Keyboard input: Type CLEANSCREENON on the command line and press Enter. Typing CLEANSCREENOFF returns AutoCAD to its previous state.
Chapter 3: Customizing the Tools
In This Chapter
Getting to know the Customize User Interface editor
Customizing toolbars, menus, and shortcut keys
Customizing double-click actions
Migrating and transferring customization
Working with partial and enterprise customization files
AutoCAD customization goes beyond just being able to change the appearance of the application window or controlling the regeneration
process of a drawing. AutoCAD allows you to create your own toolbars, pulldown menus, and shortcut keys, among other user interface elements. This flexibility allows you to further integrate AutoCAD into your workflow and to manage CAD standards.
To customize the user interface, you use the Customize User Interface (CUI) editor. The CUI editor is a graphical editor that reads and writes to customization files, which have a file extension of .CUI. The CUI editor and .CUI file format were first introduced with AutoCAD 2006.
How Customizing the User Interface Has Changed
Users have been able to customize the user interface dating all the way back to AutoCAD R13 and even earlier versions. Since then, many additions, including toolbars and shortcut keys, have been made to the user interface, but one thing has always remained consistent: Customization was done via editing a plain text file with a text editor. That all changed with the introduction of AutoCAD 2006 and the .CUI file format.
If you are relatively new to AutoCAD, you might not know much about previous releases of the software. Those of you who have done some menu customization with AutoCAD 2005 and earlier versions are familiar with the file types .MNU, .MNS, .MNC, and .MNR. The .CUI file format replaced the .MNU,
.MNS, and .MNC file formats.
608 Getting to Know the Customize User Interface Editor
Getting to Know the Customize User Interface Editor
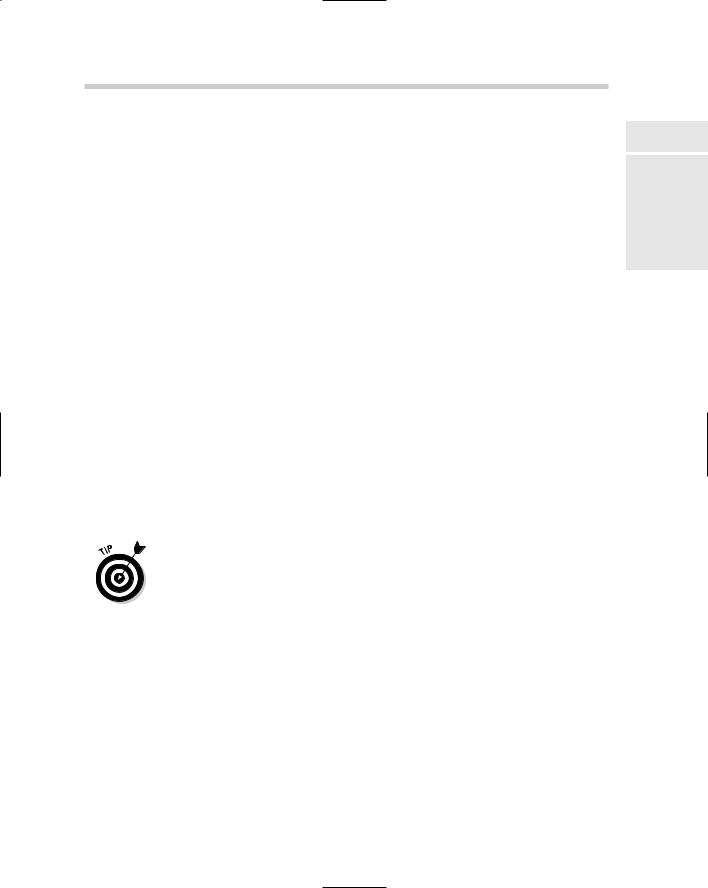
The Customize User Interface (CUI) editor (see Figure 3-1) is a graphically based editor that allows you to customize many of the user interface elements, such as toolbars and pull-down menus. It is also designed to allow you to migrate and transfer existing menu customization into the latest release of AutoCAD. In the next few sections, we cover the different panes of the CUI editor, launching the CUI editor, and some of the basics involved with customizing the AutoCAD user interface. The CUI editor has three main panes: Customizations In pane, Command List pane, and Dynamic pane. The Dynamic pane covers the entire right side of the Customize tab of CUI editor and is the most active pane — it displays information and properties for the selected item in the Customizations In or Command List pane.
Figure 3-1:
The Customize User Interface (CUI) editor.
The Customizations In pane
In Customizations In pane (see Figure 3-2), you can access the user interface elements of any of the loaded customization files in the CUI editor. Two different base customization files can be loaded: main and enterprise customization files. The main and enterprise customization files can load additional menus known as partial customization files. Enterprise and partial customization files are designed to make managing and sharing customization files
610 Getting to Know the Customize User Interface Editor
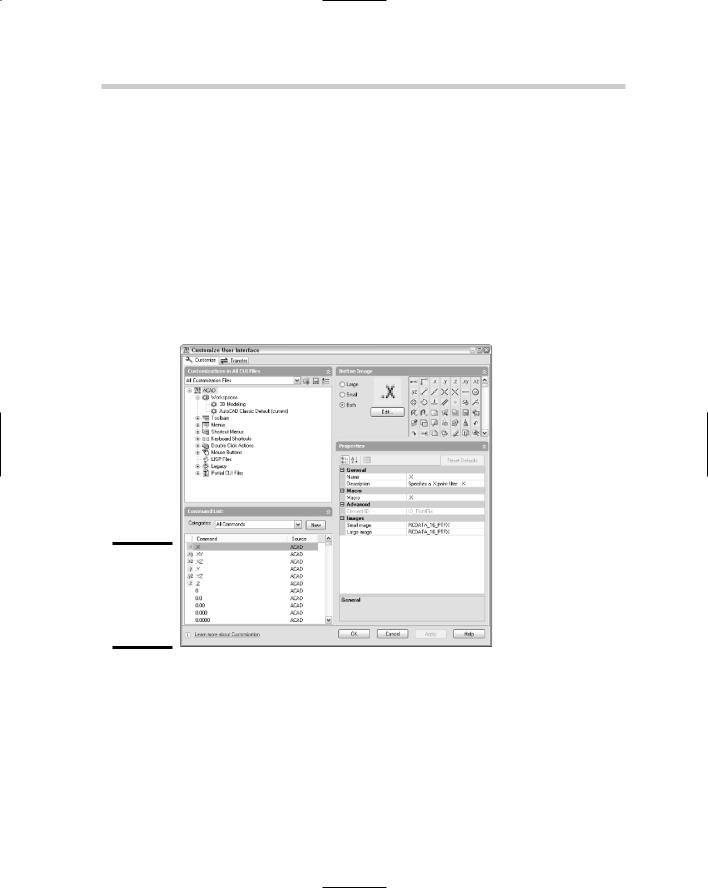
Figure 3-3:
The
Command
List pane.
The Command List pane is also where you go when you want to add a command onto a toolbar. To add the command to a toolbar, you drag it from the Command List pane and drop it onto the correct node under the Toolbars node. Along the top of the Command List pane is a drop-down list of categories that filter the commands displayed in the Command List pane.
The Dynamic pane
The Dynamic pane runs the entire right side of the CUI editor and reacts to what you select under the Customizations In and Command List panes. The Dynamic pane can display a number of different panes based on what is selected on the left side of the CUI editor. Here is an overview of each of the different panes that can be found under the Dynamic pane:
Information: The Information pane provides an overview of what each top-level node does in the Customizations In pane. The Information pane is available only when a top-level node in the Customizations In pane is selected, or when one of the nodes under Keyboard Shortcuts or Legacy is selected.
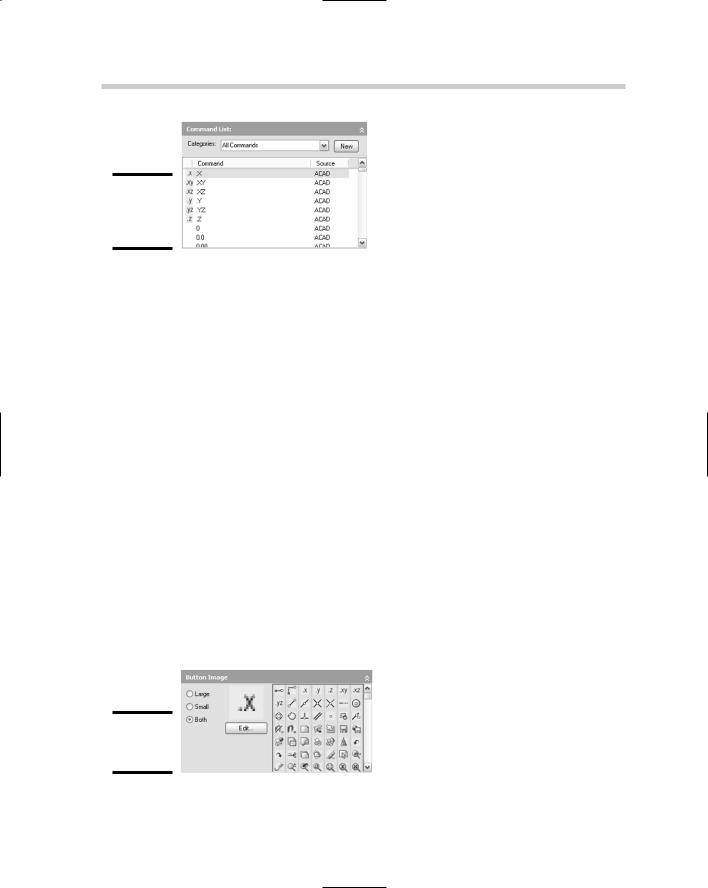
Button Image: The Button Image pane (see Figure 3-4) allows you to access and select one of the preloaded images for a button or create a new image. The Button Image pane is active when a command is selected below one of the nodes in the Customizations In pane or in the Command List pane.
Figure 3-4:
The Button
Image pane.