

AutoCAD & AutoCAD LT All-In-One Desk Reference For Dummies (2006)
.pdf532 Controlling What Happens during a Save
Controlling What Happens during a Save
AutoCAD is a very powerful application that contains many different features designed for specialized uses. Some of these features are not always easy
to find or understand because they are not in the standard workflow. These items include being able to control the default version in which files are saved, password protection, digital signatures, and utilizing indexing for your drawings.
Getting a handle on drawing file formats
What is a drawing file format and why is it important? A drawing format is the structure of how AutoCAD stores information in a drawing file. A format change occurs when major changes are made to the application to support new object types and features. AutoCAD has been on a regular schedule of making a format change about every three releases. By giving you a number of older drawing file formats to save to, AutoCAD makes it easier for you to share your drawing files with customers who might be on an older release than you are. We covered the different drawing file formats and which releases they belong to earlier in Book I, Chapter I.
If you need to exchange drawings with users who still use AutoCAD R12 or R13, you can save your drawings to an R12 .DXF file format. By saving to the R12 .DXF file format, some object types are converted to much simpler types of objects. Multiline text, for example, is converted to a block that contains single line text, and dimensions will no longer be associative.
You are now, once again, able to save back to the AutoCAD R14 file format. This file format was removed a couple releases back and was only supported through an external utility called the Autodesk DWG TrueConvert (formally known as Autodesk Batch Drawing Converter). DWG TrueConvert is available for download if you need to save more than one file to a different format so you can exchange them with another user. It can be downloaded from the URL www.autodesk.com/migrationtools. Autodesk added the support of saving back to the AutoCAD R14 file format after getting a lot of feedback from users that many of their clients and customers were still using AutoCAD R14.
If your company is in the process of upgrading to a newer version, saving drawings back to the previous file format during the rollout period is often a good idea so that everyone can access drawings created with the newer release. This is important because AutoCAD files might not be backward compatible to the release you are upgrading from. For this reason, Autodesk introduced a feature to allow you to specify the default file format when the SAVE, QSAVE, or SAVEAS command is used. You can find this option in the Options dialog box.
Controlling What Happens during a Save 533
The following procedure explains how to set the default file format for saving:
1.Choose Tools Options.
The Options dialog box is displayed.
2.In the Options dialog box, click the Open and Save tab along the top of the dialog box.
The Open and Save tab is used to specify options that are related to saving and opening files.
3.On the Open and Save tab, click the drop-down arrow for the Save as Open under the File Save area and make a selection.
The drop-down list contains the different .DWG, .DWT, and .DXF file formats that you can specify as the default file format for saves.
4.Click Apply or OK.
Clicking Apply saves the changes and keeps the dialog box displayed, whereas clicking OK saves the changes and closes the Options dialog box.
In the Options dialog box under the Open and Save tab, you specify the default save format that will be used when saving a drawing file. This is great when you need to work on projects that must be saved to a specific drawing file format, and eliminates one additional step when saving the drawing.
Indexing the content of a drawing
Indexing a drawing is not quite the same as filing someone’s name in a Rolodex or indexing a book, but the end results are the same. We index things to make them easier and faster to find later. AutoCAD offers two different types of indexing: layer indexing and spatial indexing.
AutoCAD LT does not support file saving with either layer or spatial indexing.
Both of these types of indexing improve the performance when the drawing is demand loaded. Demand loading is a process used with loading external references (Xrefs) and when partially opening a drawing. When demand loading is used, AutoCAD only loads the data from the drawing that is required to properly display the drawing file — objects are loaded as they are required from the drawing to improve overall performance of loading and displaying the drawing file. Layer indexing improves the loading of objects on layers that are on and thawed. Objects on a layer that is frozen or off are not read in with the drawing file. Those layers are read in only when specifically requested.
Spatial indexing is used to organize objects in 3D space and improves the loading performance of a referenced file that has been clipped. Clipping a referenced file allows you to define which part of a referenced file is
Book VIII
Chapter 3
with WorkingFiles Drawing
534 Controlling What Happens during a Save
displayed in the drawing by defining the area to be displayed using a rectangular or polygonal boundary. (Clipping referenced files is covered more in Book VI, Chapter 3.) Both layer and spatial indexing are only helpful if the file is being used as an Xref or is being partially opened. Otherwise, it offers no benefit. If indexing is enabled, saving the drawing file takes slightly longer. Indexing is available in four different options:
None: Indexing is disabled.
Layer: Only layer indexing is enabled.
Spatial: Only spatial indexing is enabled.
Layer & Spatial: Layer and spatial indexing are enabled.
The following procedure explains how to set the indexing type when saving a drawing file:
1.Choose File Save As.
The Save Drawing As dialog box is displayed.
2.In the Save Drawing As dialog box, choose Tools Options.
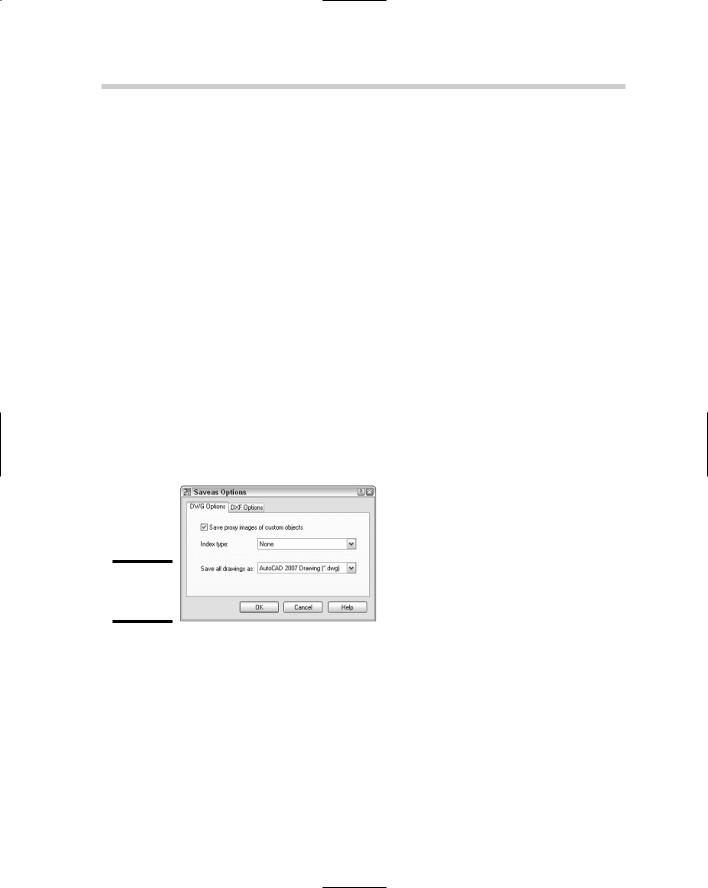
The Saveas Options dialog box (see Figure 3-6) is displayed. It contains some different options for both .DWG and .DXF file formats.
Figure 3-6:
Drawing file options.
3.In the Saveas Options dialog box, click the drop-down arrow for Index Type.
The drop-down list displays the various indexing options you can save your drawing with.
4.Select an option from the drop-down list.
5.Click OK.
The Saveas Options dialog box closes and you are returned to the Save Drawing As dialog box.

Protecting Your Drawings 535
6.Specify the filename and location for the drawing you are saving and click Save.
The Save Drawing As dialog box closes and the drawing is saved with the indexing type specified.
Protecting Your Drawings
You work hard to create the perfect design, so you have every right to make sure that it is kept safe. AutoCAD offers two different options to make sure your design doesn’t get altered without your permission: password protection and digital signatures. Password protection locks the file down and doesn’t allow anyone to view it without first entering the password. Digital signatures aren’t as secure as password-protected files, but they do offer a level of protection by indicating whether the file was altered after it was signed. This can be critical when you need to have a client sign off on a design.
AutoCAD LT does not support the ability to password-protect your drawing files.
Password-protecting
Password-protecting a drawing file in AutoCAD is very similar to passwordprotecting a file in any other application: You provide a password or phrase and specify the type of encryption you want to use. Although password protection offers benefits, it also has a downside.
If you use password protection, you must record the password in a safe place so that you don’t forget it; otherwise, you won’t be able to open the file. No amount of magic can unlock the file after the password has been lost, so you might want to make a backup copy of the drawing file without the password before you save it with one.
We also recommend that you talk to your CAD manager or a senior-level drafter before you start using password protection on drawing files. After all, the drawing file does belong to the company.
Assigning a password to a drawing file
The following procedure explains how to password-protect a drawing file.
1.Choose File Save As.
The Save Drawing As dialog box is displayed.
Book VIII
Chapter 3
with WorkingFiles Drawing
536 Protecting Your Drawings
Removing the security option for password-protecting a drawing file
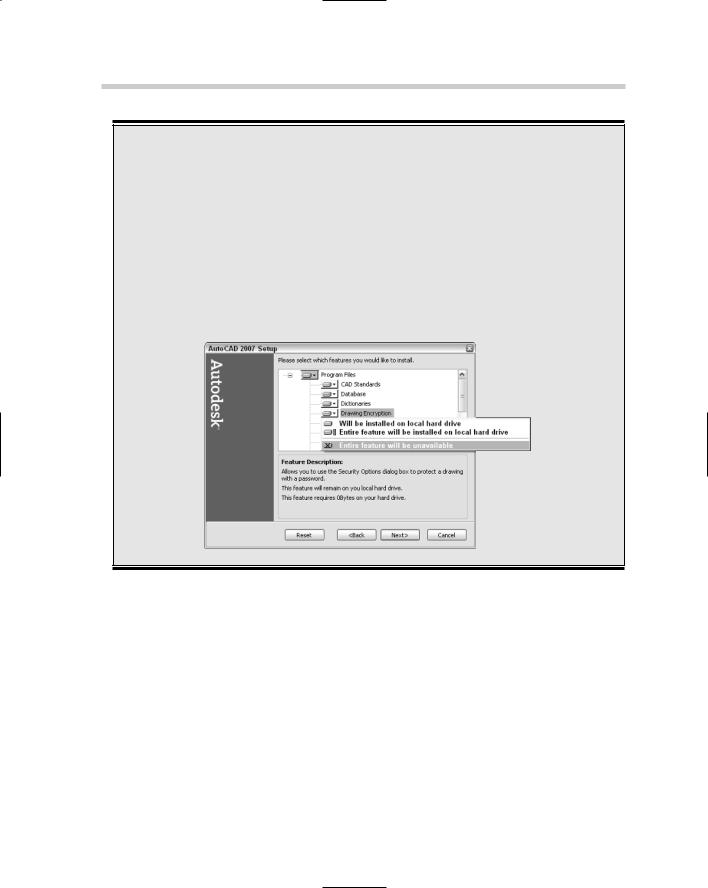
Some companies worry that employees might abuse the capability to password-protect drawing files. This is one reason why Autodesk allows your CAD manager or IS department to remove the feature during installation. The option can be disabled when Custom is selected on the Select Installation Type screen during the installation process. If Typical was selected during installation, you can remove
the password-protect feature through the Add and Remove Programs option in the Windows Control Panel. The following figure shows the Drawing Encryption option that controls whether the password protection feature is available. Disabling this feature only prevents people from password-protecting a drawing file and has no impact on their ability to receive and open one from someone else.
2.In the Save Drawing As dialog box, choose Tools Security Options.
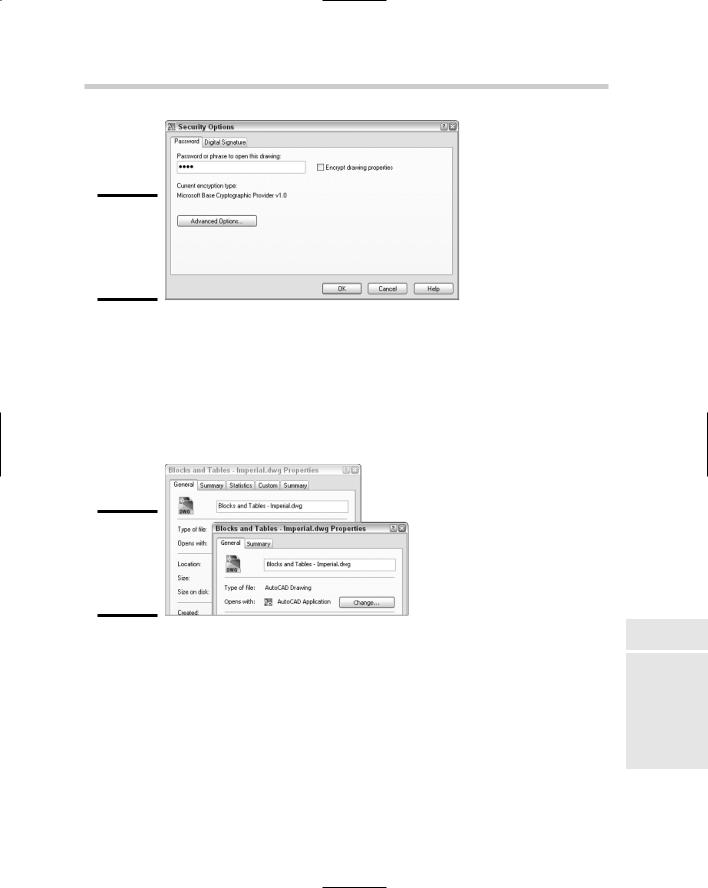
The Security Options dialog box, which contains different options for working with passwords and digital signatures (see Figure 3-7), is displayed.
3.In the Security Options dialog box, enter the password or phrase in the Password or Phrase to Open This Drawing text field.
The value that you enter is masked in the text field as it is entered.
4.Optionally, click Encrypt Drawing Properties.
Protecting Your Drawings 537
Figure 3-7:
Securing the contents of a drawing with a password.
Drawing properties are the kind of information you can view through Windows Explorer, such as author, title, and custom properties. Figure 3-8 shows what the Properties dialog box looks like in Windows Explorer when it is not encrypted through the use of password protection (on the left) and when it is encrypted (on the right). The left image shows that three additional tabs (Statistics, Custom, and Summary) are displayed when the drawing file is not password-protected.
Figure 3-8:
Encrypting properties helps to hide some content.
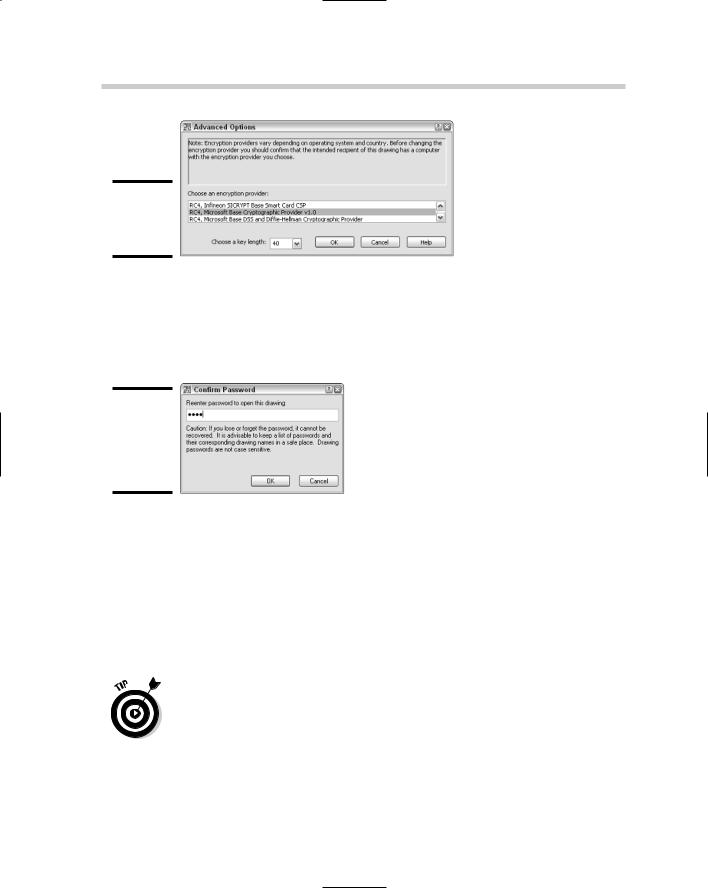
5.Optionally, click Advanced Options.
The Advanced Options dialog box (see Figure 3-9) is displayed. Select an encryption provider that you want to use and the key length. The key length is used to determine the overall length of the encryption key. The higher the value used, the greater the level of security your drawing will have. Based on your operating system and what country you are in, your encryption options may vary. We recommended using the greatest key length possible for the encryption provider you select — in most cases, the value is 128. After all, you want to be sure your data is protected. When you are finished, click OK to accept the changes.
Book VIII
Chapter 3
with WorkingFiles Drawing
538 Protecting Your Drawings
Figure 3-9:
Choosing an encryption type.
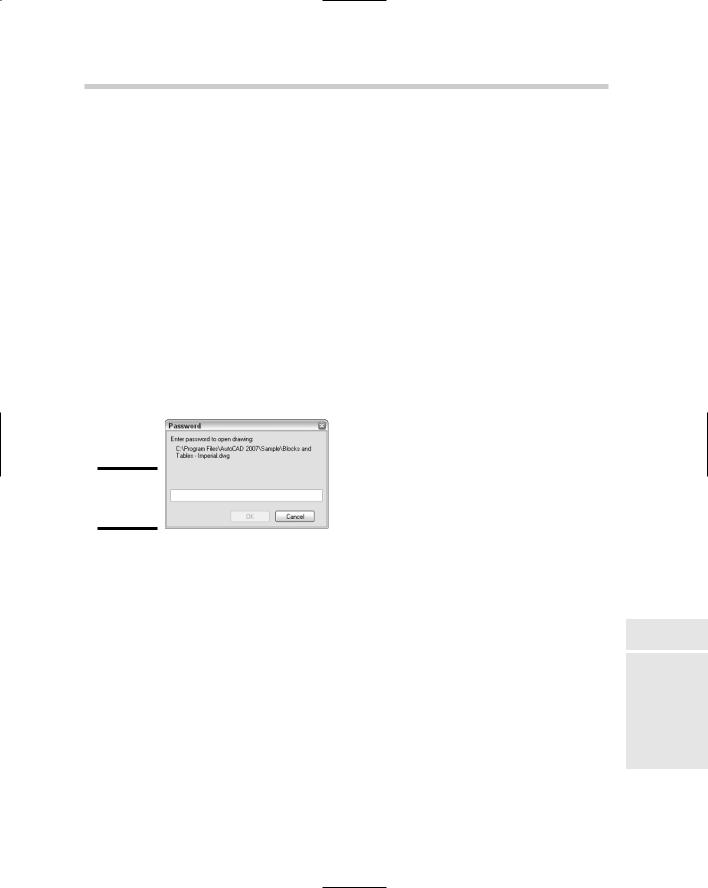
6.In the Security Options dialog box, click OK.
The Confirm Password dialog box (see Figure 3-10) is displayed. It warns you of the dangers of forgetting or losing your password, which we mentioned earlier in this chapter.
Figure 3-10:
Confirming your password is a good thing.
7.In the Confirm Password dialog box, reenter the password in the Reenter Password to Open This Drawing text field and click OK.
If the passwords match, both the Confirm Password and Security Options dialog boxes close, and you are returned to the Save Drawing As dialog box.
8.Finish specifying the filename and location for the drawing you are saving and click Save.
The Save Drawing As dialog box closes and the drawing is saved with the specified password.
Removing the password or the phrase from the Security Options dialog box removes password protection from the drawing file altogether.
Working with a password-protected drawing
Password protection goes beyond just needing to enter a password to open a drawing file. Password protection affects any operation that brings the
Protecting Your Drawings 539
contents of the drawing file into another drawing; this includes, but is not limited to, opening, referencing, or inserting the drawing file into another drawing.
The following procedure explains how to open a drawing that has been saved with a password.
1.Choose File Open.
The Select File dialog box is displayed.
2.In the Select File dialog box, browse and select the file you want to open.
The selected file should be highlighted in the dialog box and its name displayed in the File Name text field.
3.Click Open.
The Select File dialog box closes and the Password dialog box is displayed (see Figure 3-11).
Figure 3-11:
Password,
please.
4.In the Password dialog box, enter the password and click OK.
If you entered the correct password, the drawing file should finish loading. If not, an error message is displayed asking you to retry or cancel the operation. The password is cached in memory; so if you close the drawing and reopen it without restarting AutoCAD, you won’t need to reenter the password.
Digital signatures
Unlike password protection, digital signatures don’t keep anyone from viewing the contents of a file. Instead, they notify the person viewing the file whether a change has been made after it was signed. Digital signatures require a little more work to use them the first time because you must first obtain a digital ID.
Book VIII
Chapter 3
with WorkingFiles Drawing

540 Protecting Your Drawings
You have to obtain a digital ID from a company such as VeriSign (http:// www.verisign.com) or IdenTrust (http://www.digsigtrust.com). After you obtain a digital ID, you can start signing drawing files. Digital IDs can be used with other applications besides AutoCAD; some programs such as Outlook also support digital IDs for signing e-mails. Some companies offer trial periods for testing the use of a digital ID and then require a small annual fee to keep the digital ID valid beyond the trial period.
Obtaining a digital signature from VeriSign
Autodesk has wired AutoCAD to take you to VeriSign’s Web site to obtain a digital signature for signing drawing files, so we thought that we would
follow Autodesk’s recommendation. The following procedure is an overview of how to obtain a digital signature from VeriSign, but feel free to use a different vendor if you want to. The steps will vary from vendor to vendor. If you don’t have a digital ID yet, the Valid Digital ID Not Available dialog box is displayed (see Figure 3-12).
Figure 3-12:
No digital ID found on the computer.
Follow these steps to obtain a digital ID from VeriSign:
1.Choose File Save As.
The Save Drawing As dialog box is displayed.
2.In the Save Drawing As dialog box, choose Tools Security Options.
The Security Options dialog box is displayed and contains different options for working with passwords and digital signatures.
3.In the Security Options dialog box, click the Digital Signature tab.
The Valid Digital ID Not Available dialog box is displayed.
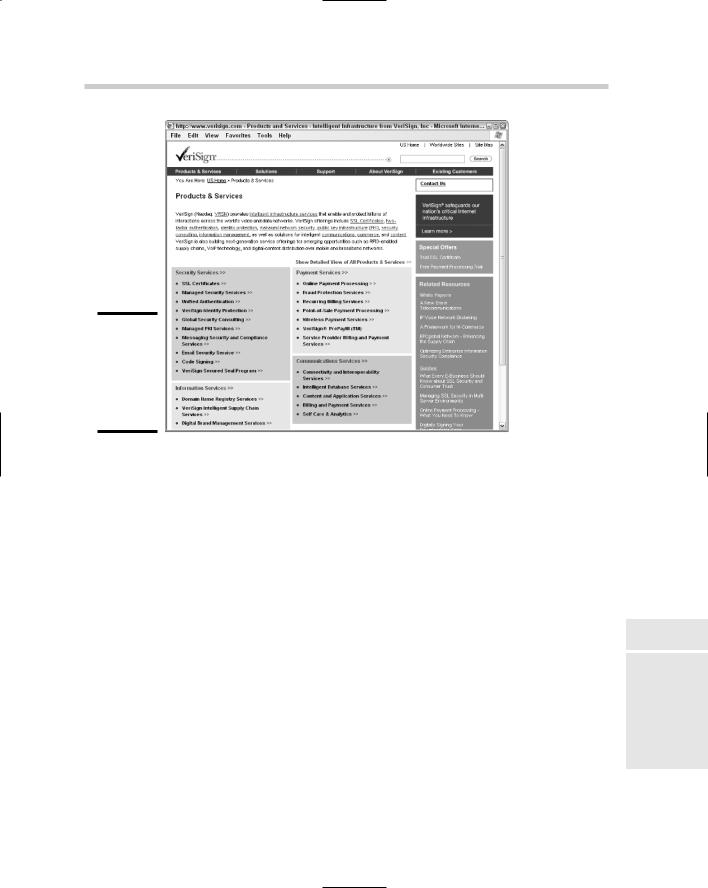
4.In the Valid Digital ID Not Available dialog box, click Get a Digital ID.
The Products & Services page of VeriSign’s Web site is displayed (see Figure 3-13). The Products & Services page can be confusing — none of the options seem to call out and say “Pick me if you are using AutoCAD!”
Protecting Your Drawings 541
Figure 3-13:
Oh, so many products and services to choose from.
5.On the Products & Services page, click the Manages PKI Services link under the Security Services section.
The Managed PKI Services page is displayed with even more options.
6.On the Managed PKI Services page, click the PKI Applications link under the Managed PKI Services Include section (which we are sure you knew without our telling you).
The PKI Applications page is displayed with more options.
7.On the PKI Applications page, click the Digital IDs for Secure Email link (Confused yet? You’re not the only one!).
The Digital IDs for Secure Email page is displayed.
8.On the Digital IDs for Secure Email page, click Buy Now (don’t worry, you get the chance to try before you buy).
The Digital IDs for Secure Email – Digital ID Enrollment page is displayed.
9.On the Digital ID Enrollment page, click Buy Now again (this time it lets you know that you have an option for a 60-day trial).
The Choose Your Browser page is displayed.
10.On the Choose Your Browser page, click Microsoft or Netscape.
The Enrollment page is displayed.
Book VIII
Chapter 3
with WorkingFiles Drawing