

AutoCAD & AutoCAD LT All-In-One Desk Reference For Dummies (2006)
.pdf452 Creating a Sheet Set
The last part of setting up a sheet set involves working with model views. Sheet sets take advantage of named views and allow you to place them on a sheet. Named views are covered in Book II. To access named views from other drawings, they must first be in a location that has been designated through the Sheet Set Manager as a resource location for the sheet set. To finish the setup for adding views to a sheet, you need to specify which callouts and label blocks will be used when views are placed on a sheet. You don’t need to do all of these in order to start using sheet sets.
Starting from scratch
The Create Sheet Set Wizard provides an option to create a new sheet set using existing drawings — from scratch — and requires the most input. This option provides for a good understanding of what is involved with the initial setup of a sheet set. After you create a sheet set, you can use the other option of creating a sheet set from an existing one. You can use the NEWSHEETSET to start the Create Sheet Set Wizard (see Figure 2-2).
To start the NEWSHEETSET command, follow one the following methods:
File menu. Choose File New Sheet Set.
Keyboard input. Type NEWSHEETSET and press Enter.
Drop-down list in the Sheet Set Manager. Click the down arrow on the drop-down list along the top of the Sheet Set Manager and select New Sheet Set.
Figure 2-2:
The Create
Sheet Set
Wizard.

Creating a Sheet Set 453
To create a new sheet set, follow these steps:
1.Start the NEWSHEETSET command.
The Create Sheet Set Wizard appears. You can also choose New Sheet Set from the drop-down list if you have the Sheet Set Manager open. If you use the Sheet Set Manager to create a new sheet set, you must have at least one drawing open.
2.In the Create Sheet Set Wizard on the Begin page, select the Existing Drawings option. Click Next.
The Existing Drawings option allows you to start from scratch with creating a sheet set. If you already have a sheet set created and want to create a new sheet set based on the existing one, select the An Example Sheet Set option.
3.On the Sheet Set Details page, enter a string for the name of the sheet set in the Name of New Sheet Set text box.
The name entered is used as the name for the DST file when the wizard is finished. This is also the name of the top level node displayed in the Sheet Set Manager when the sheet set is opened.
4.Enter a description for the sheet set in the Description text box (optional).
The description is displayed in the Sheet Set Manager and can be referenced in a field and placed as part of the index sheet.
5.Specify where to create the new sheet set by entering a value in the Store Sheet Set Data File (.dst) Here text box or click the ellipsis button to browse to a folder.
The specified location is where the DST file will be created when the Create Sheet Set Wizard is finished. If the ellipsis button is clicked, the Browse for Sheet Set Folder dialog box is displayed. Browse to a location in the dialog box and click open to select that folder. By default, the folder that is used to store sheet sets in is AutoCAD Sheet Sets under My Documents. It is best to place the sheet set on a network drive for others in the office to access.
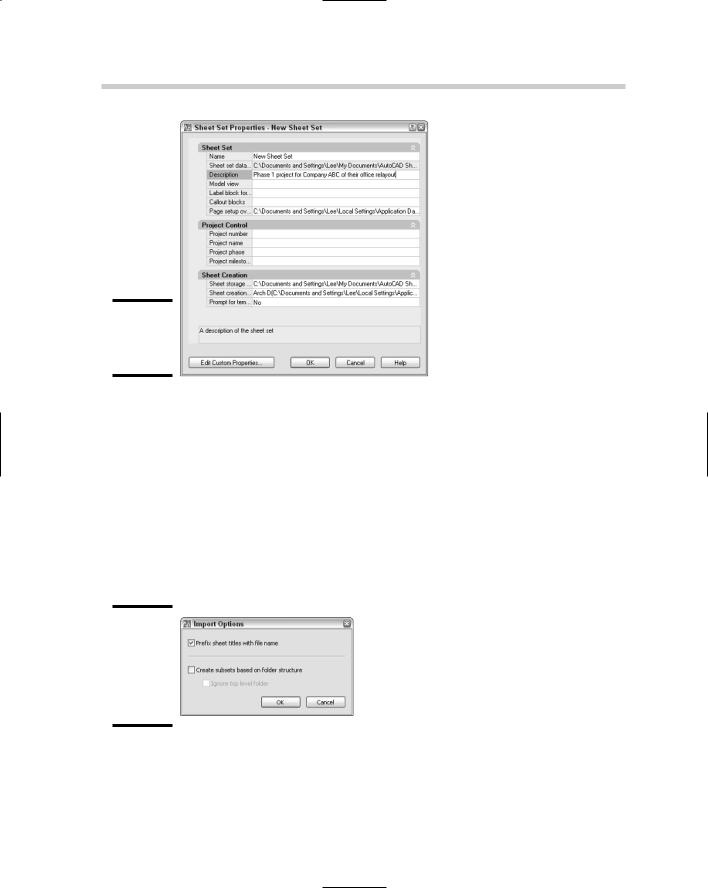
6.Click Sheet Set properties to specify standard and custom properties for the sheet set.
The Sheet Set Properties dialog box appears (see Figure 2-3). The dialog box allows for specifying a variety of properties that range from the location in which callout blocks are stored to the project name and even custom properties that you can add, such as drawn by or checked by information. Custom properties are explained later under the section “Managing Drawings with a Sheet Set.”
Book VII
Chapter 2
Sets SheetRegret
without
454 Creating a Sheet Set
Figure 2-3:
Sheet Set Properties dialog box.
7.Click OK.
The Sheet Set Properties dialog box closes, and you are returned to the Create Sheet Set Wizard.
8.In the Create Sheet Set Wizard, click Next.
The wizard advances to the next page.
9.On the Choose Layouts page, click Import Options to control the behavior for importing layouts.
The Import Options dialog box appears (see Figure 2-4). This dialog box controls naming and folder structure when importing layouts.
Figure 2-4:
Specifying import behavior in the Import Options dialog box.
10.In the Import Options dialog box, specify the options that you want and click OK.
Check or uncheck the Prefix Sheet Titles with Filename to control whether the name of the file is added to the layout name to make up the sheet title.
Creating a Sheet Set 455
The Create Subsets Based on Folder Structure and Ignore Top Level Folder options are used to control how the folder structure on the drive that the layouts are being imported from affects the organization structure of the sheet set. Click OK to close the Import Options dialog box and return to the Create Sheet Set Wizard.
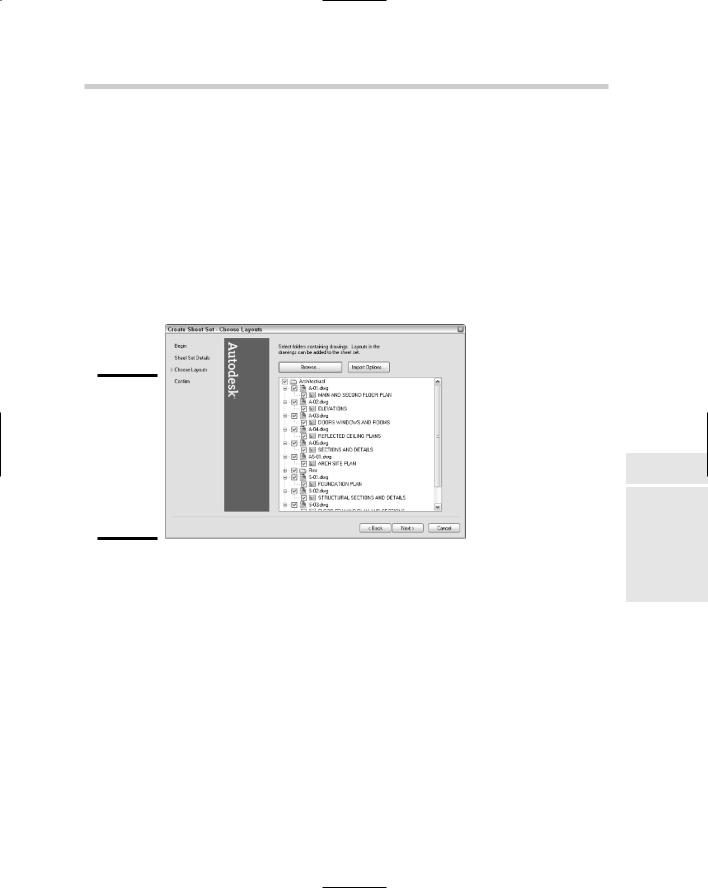
11.On the Choose Layouts page, click Browse.
The Browse for Folder dialog box is displayed. Select a folder and click OK for a list of the drawings in that folder to be displayed in a tree along with folder structure and the paper space layouts contained in each drawing (see Figure 2-5). Only drawings that are not part of a sheet set already are displayed and can be imported into a sheet set.
Figure 2-5:
Tree displays folder structure and available layouts in drawings for import.
12.In the tree view, uncheck the layouts you do not want to import as references into the sheet set. Click Next.
The checked layouts are marked for import once the Create Sheet Set Wizard is finished. The next page of the wizard is displayed.
13.On the Confirm page, review the Sheet Set Preview section and click Back to make any necessary changes in the wizard. Click Finish.
The Create Sheet Set Wizard closes, and the new sheet set DST file is created with the specified name and in the designated folder. The Sheet Set Manager is displayed if it is hidden and the DST file is opened.
Starting from an existing sheet set
You can create a sheet set by using an existing sheet set as a template. Here’s how:
1.Using one of the previously described methods, initiate the NEWSHEETSET command.
Book VII
Chapter 2
Sets SheetRegret
without

456 Managing Drawings with a Sheet Set
The Create Sheet Set Wizard appears.
2.In the Create Sheet Set Wizard on the Begin page, select the An Example Sheet Set option. Click Next.
The An Example Sheet Set option allows you to select an existing sheet set to use as a template.
3.On the Sheet Set Example page, select the Select a Sheet Set to Use as an Example option and then select one of the sheet set files listed, or select Browse to Another Sheet Set to Use as an Example option and then click the ellipsis button to browse to a location that contains a DST file. Click Next.
If you choose the Select a Sheet Set to Use as an Example option, the DST files that are used are located in the Template directory. The location of the DST files can be changed through the Files tab of the Options dialog box by choosing Template Settings Sheet Set Template File Location.
4.On the Sheet Set Details page, you can specify the new sheet set file’s name, description, and save to location, and change its properties with the Sheet Set Properties dialog box. Any subsets are copied over, but any references to layouts that make up the sheets are not carried over to the new sheet set. Click Next.
You get everything that was in the selected sheet set file, minus any sheets. If you want to keep the sheets in the new sheet set, you must make a copy of the original sheet set file by using Windows Explorer.
5.On the Confirm page, review the Sheet Set Preview section and click Back to make any necessary changes in the wizard. Click Finish.
The Create Sheet Set wizard closes and the new sheet set (DST) file is created with the specified name and in the designated folder. The Sheet Set Manager is displayed if it is hidden and the DST file is opened.
Managing Drawings with a Sheet Set
There are a number of ways to work with drawings through a sheet set, which includes navigating to existing files, creating new sheets (drawings), working with title block information, and model views. Some companies have taken the approach of first implementing sheet sets as a way to open and publish drawings much faster, and others have changed their entire drafting process to include the use of sheet sets to manage the views and title block information as well as the benefits of opening and publishing drawings much faster.
Opening a sheet set
After closing and restarting AutoCAD, the OPENSHEETSET command allows you to open a sheet set (DST) file that was previously created. Just like the

Managing Drawings with a Sheet Set 457
NEWSHEETSET command, the OPENSHEETSET command displays the Sheet Set Manager if it is not currently displayed.
To start the OPENSHEETSET command, use one of the following methods:
File menu. Choose File Open Sheet Set.
Keyboard input. Type OPENSHEETSET and press Enter.
Drop-down list in the Sheet Set Manager. Click the down arrow on the drop-down list along the top of the Sheet Set Manager and select Open Sheet Set.
You can open one of the 10 most recently used sheet set (DST) files from the drop-down list in the Sheet Set Manager.
To open a sheet set file, follow these steps:
1.Initiate the OPENSHEETSET command by using one of the methods described previously.
The Open Sheet Set dialog box appears. You can use this dialog box to browse and select an existing sheet set (DST) file.
2.In the Open Sheet Set dialog box, select the sheet set (DST) file you
want to open. Click Open.
The Open Sheet Set dialog box closes and the selected sheet set (DST) file is loaded into the Sheet Set Manager.
Importing existing drawings as sheets
If you have been using AutoCAD at your company for many years, you most likely have created hundreds, if not thousands, of drawings. This is one of the concerns that Autodesk kept in mind when adding sheet sets in AutoCAD 2005. Sheet sets are designed to work in combination with drawing files so that you do not have to completely reinvent a process. You can import paper space layouts from drawings when you create a sheet set based on existing drawings by using the Create Sheet Set Wizard. Most of the time, however, you won’t know which drawings need to be imported right away, or which drawings might come from a vendor that will need to be added to the sheet set later on.
The Sheet Set Manager allows you to import paper space layouts from a drawing into a sheet set file after it has been created. This allows for a lot of flexibility in the workflow of a project. Paper space layouts can be imported at the main root of the sheet set or at the subset level; it all just depends on how the sheet set is laid out. The following procedure steps you through importing paper space layouts as sheets and assumes you already have a sheet set open in the Sheet Set Manager. To open a sheet set, refer to the section “Opening a sheet set.”
Book VII
Chapter 2
Sets SheetRegret
without
458 Managing Drawings with a Sheet Set
1.In the Sheet Set Manager on the Sheet List tab, right-click the top level node that displays the sheet set’s name.
The sheet set shortcut menu is displayed.
2.On the shortcut menu, click Import Layout as Sheet.
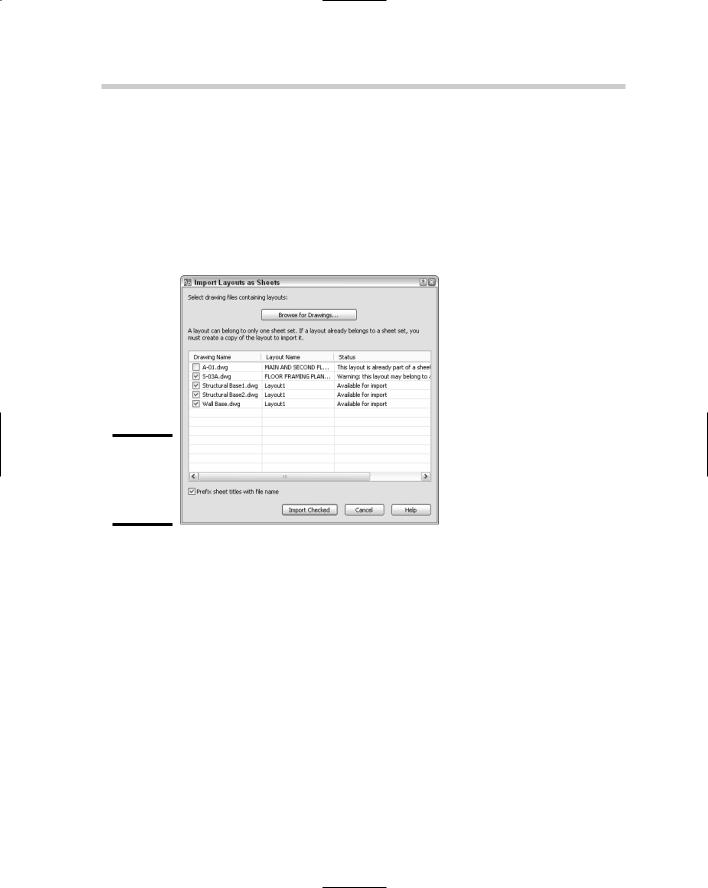
The Import Layouts as Sheets dialog box appears (see Figure 2-6). The dialog box allows you to browse for drawings that contain paper space layouts that you want to import as sheets.
Figure 2-6:
Importing layouts as sheets into a sheet set.
3.In the Import Layouts as Sheets dialog box, click Browse for Drawings.
The Select Drawings dialog box appears, allowing you to browse for drawing files. You can select more than one drawing by holding Ctrl+Shift while selecting files.
4.Click Open.
The Select Drawings dialog box closes, and you are returned to the Import Layout as Sheets dialog box. The selected files are scanned for paper space layouts. During the scanning of the drawings for paper space layouts, the layouts are added to the grid in the center of the Import Layouts as Sheets dialog box and evaluated as to whether they are referenced by a sheet set already.
5.In the Import Layouts as Sheets dialog box, uncheck the layouts you do not want to import as sheets into the sheet set.
Managing Drawings with a Sheet Set 459
By default, if a layout is already associated with a sheet set, the layout is unchecked, and all other layouts are checked. Only paper space layouts can be imported.
6.Uncheck or check the Prefix Sheet Titles with File Name option.
This option controls whether the filename that a layout comes from is added to the sheet’s title. This can be helpful if you do not normally give your layout tabs a specific name in each drawing. The sheet’s title can be changed later.
7.Click Import Checked.
The Import Layouts as Sheets dialog box closes and the checked layouts are added to the sheet set as sheets.
Organizing with subsets
Subsets are used to organize sheets in a sheet set. A subset may represent a folder on a local or network drive, but it doesn’t have to. Subsets can be created at the root level of a sheet set or within another subset. Typically, a subset is used to group similar drawings together (such as by floor or discipline) so that you can find them quickly. The following steps show how to
create a subset. They assume that you have a sheet set open in the Sheet Set Manager. To open a sheet set, refer to the section “Opening a sheet set.”
1.In the Sheet Set Manager on the Sheet List tab, right-click the top level node that displays the sheet set’s name or a subset.
The sheet set or subset shortcut menu is displayed.
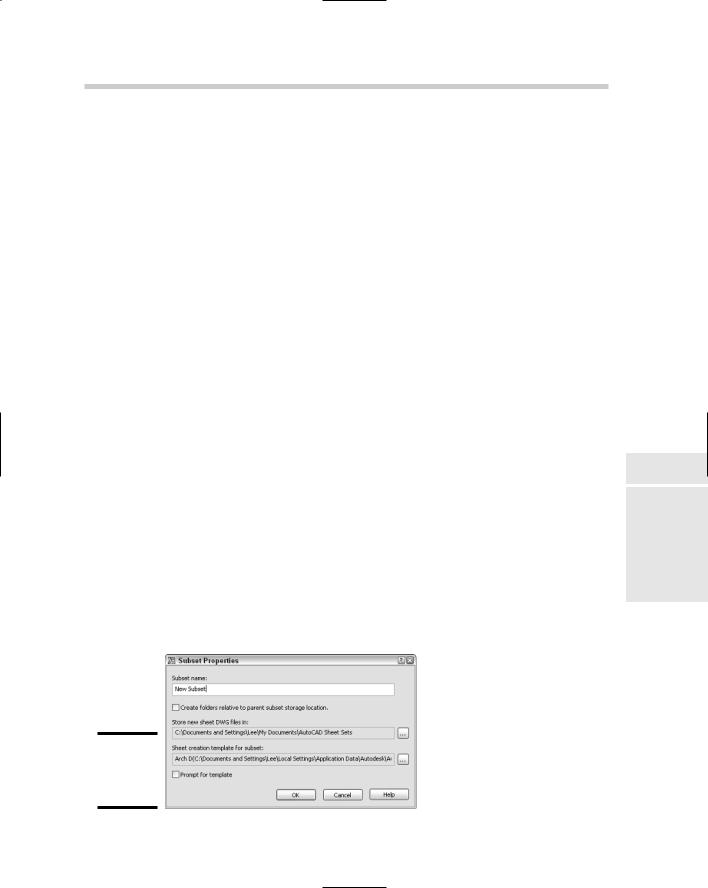
2.On the shortcut menu, click New Subset.
The Subset Properties dialog box appears (see Figure 2-7). You can use this dialog box to specify the name of the subset, whether the folder is created relative to its parent, where new sheets that are added to the subset are created, and which drawing template (DWT) file to use to create new sheets under the subset.
Figure 2-7:
Specifying properties for a subset.
Book VII
Chapter 2
Sets SheetRegret
without

460 Managing Drawings with a Sheet Set
3.In the Subset Properties dialog box, specify the name of the subset in the Subset Name text box.
The name is used in the Sheet Set Manager and for the folder that new sheets will be created in.
4.Specify the location where the folder that represents the subset should be created and whether it should be created relative to its parent in the tree of the Sheet List tab.
A new folder is created as necessary, based on the options you specify.
5.Specify the drawing template that will be used when a new sheet is created under the subset.
If the Prompt for Template option is checked, the user of the sheet set will be prompted to specify a drawing template when a new sheet is created under the subset.
6.Click OK.
The Subset Properties dialog box closes, and the new subset is created.
You can control the order in which sheets and subsets appear on the Sheet List tab by dragging them up and down. Sheets can also be added to a subset by dragging them onto the subset or into a specific location within the subset.
Setting up a sheet set and subset for adding new sheets
Sheets can be created at both the sheet set and the subset level. In order to make this process as streamlined as possible, you must do some minor setup for each of these areas of a sheet set. There are three properties that need to be set, and they are the same between a sheet set and subset. The only difference in the process is how you access the properties.
Setting up drawing template settings for a sheet set
The following steps show how to change the properties used when a new sheet is added to the root level of a sheet set and assumes you already have a sheet set open in the Sheet Set Manager. To open a sheet set, refer to the section, “Opening a sheet sset.”
1.In the Sheet Set Manager on the Sheet List tab, right-click the top level node that displays the sheet set’s name.
The sheet set shortcut menu is displayed.
2.On the shortcut menu, click Properties.
The Sheet Set Properties dialog box is displayed.

Managing Drawings with a Sheet Set 461
3.In the Sheet Set Properties dialog box under the Sheet Creation area, click the Sheet Storage Location text box to display an ellipsis button.
The ellipsis button is displayed.
4.Click the ellipsis button for the sheet storage location property to browse and select the location in which any new sheets that are added to the sheet set are added to. Click Open.
The Browse for Folder dialog box is displayed allowing you to browse and select the folder where any new sheets will be saved. After clicking the Open button you will be returned to the Sheet Set Properties dialog box.
5.Click the Sheet Creation Template text box to display an ellipsis button.
The ellipsis button is displayed.
6.Click the ellipsis button for the sheet creation template property to browse, and select the drawing template (DWT) file that you want to use when a new sheet is added to the sheet set.
The Select Layout as Sheet Template dialog box appears (see Figure 2-8).
Figure 2-8:
Using a layout in a drawing as a template for new sheets.
7.In the Select Layout as Sheet Template dialog box, enter the path and filename for a drawing template file in the Drawing Template File Name text box or click the ellipsis button to browse for and select a drawing template (DWT) file.
If the ellipsis button is clicked, the Select Drawing dialog box is displayed. Browse to and select the drawing, drawing template, or drawing standards file that contains the layout you want to use as the template for new sheets. Click Open to close the Select Drawing dialog box and return to the Select Layout as Sheet Template dialog box.
Book VII
Chapter 2
Sets SheetRegret
without