


Creating and Using Macros
There is more than one way to split an assembly language program into more manageable chunks. Procedures are the most obvious way, and certainly the easiest to understand. The mechanism for calling and returning from procedures is built right into the CPU and is independent of any given assembler product.
Today's major assemblers provide another complexity-management tool that works a little differently: macros. Macros are a different breed of cat entirely. Whereas procedures are implemented by the use of
CALL and RET instructions built right into the instruction set, macros are a trick of the assembler and do not depend on any particular instruction or group of instructions.
Most simply put, a macro is a label that stands for some sequence of text lines. This sequence of text lines can be (but is not necessarily) a sequence of instructions. When the assembler encounters the macro label in a source code file, it replaces the macro label with the text lines that the macro label represents. This is called expanding the macro, because the name of the macro (occupying one text line) is replaced by several lines of text, which are then assembled just as though they had appeared in the source code file all along. (Of course, a macro doesn't have to be several lines of text. It can be only one-but then there's a lot less advantage to using them!)
Macros bear some resemblance to include files in high-level languages such as Pascal. In Turbo Pascal, an include command might look like this:
{$I ENGINE.DEF}
When this include command is encountered, the compiler goes out to disk and finds the file named ENGINE.DEF. It then opens the file and starts feeding the text contained in that file into the source code file at the point where the include command was placed. The compiler then processes those lines as though they had always been in the source code file.
You might think of a macro as an include file that's built right into the source code file. It's a sequence of text lines that is defined once, given a name, and then may be dropped into the source code again and again by simply using the name.
This process is shown in Figure 9.3. The source code as stored on disk has a definition of the macro, bracketed between %macro and %endmacro directives. Later in the file, the name of the macro appears several times. When the assembler processes this file, it copies the macro definition into a buffer somewhere in memory. As it assembles the text read from disk, the assembler drops the statements contained in the macro into the text wherever the macro name appears. The disk file is not affected; the expansion of the macros occurs only in memory.
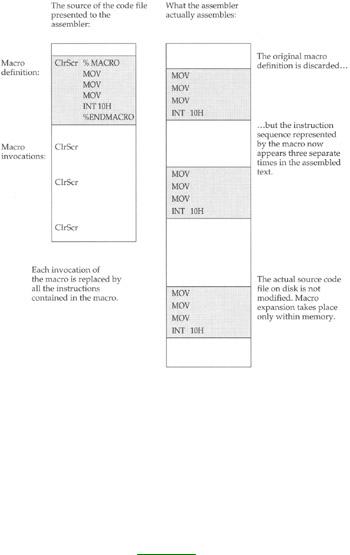
Figure 9.3: How macros work.
Macros versus Procedures: Pro and Con
There are advantages to macros over procedures. One of them is speed. It takes time to execute the
CALL and RET instructions that control entry to and exit from a procedure. In a macro, neither instruction is used. Only the instructions that perform the actual work of the macro are executed, so the macro's work is performed as quickly as possible.
There is a cost to this speed, and the cost is in extra memory used, especially if the macro is called a great many times. Notice in Figure 9.3 that three invocations of the macro generate a total of 12 instructions in memory. If the macro had been set up as a procedure, it would have required the four instructions in the body of the procedure, plus one RET instruction and three CALL instructions to do the same work. This would give you a total of eight instructions for the procedure and 12 for the macro. And if the macro were called five or seven times or more, the difference would grow. Every time a macro is called, all of its instructions are duplicated in the program another time.
In short programs, this may not be a problem, and in situations where the code must be as fast as possible-as in graphics drivers-macros have a lot going for them.
By and large, think macros for speed and procedures for compactness.
The Mechanics of Macro Definition
A macro definition looks a little like a procedure definition, framed between a pair of directives: %macro and %endmacro. Note that the %endmacro directive is on the line after the last line of the macro. Don't make the mistake of treating %endmacro like a label that marks the macro's last line.
One important shortcoming of macros vis-à-vis procedures is that macros can have only one entry point. A macro, after all, is a line of code that is inserted into your program in the midst of the flow of execution; execution has to go through the whole thing. The ClrScr procedure described in the last section cannot be converted into a macro without splitting it up into four separate invocations of VIDEO interrupt 10H. If the ClrScr function (clearing the full screen to blanks for the normal video attribute) alone were written as a macro, it would look like this:
%macro ClrScr
mov CX,0 |
; Upper left corner of full screen |
mov DX,LRXY |
; Load lower-right XY coordinates into DX |
mov AL,0 |
; 0 specifies clear entire region |
mov BH,07H |
; Specify "normal" attribute for blanked line(s) |
mov AH,06H |
; Select VIDEO service 6: Initialize/Scroll |
int 10H |
; Call VIDEO |
%endmacro |
|
You can see that ClrScr has shed its RET instruction and its additional entry points, but apart from that, it's exactly the same sequence of instructions. Functionally it works the same way, except that every time you clear your screen, ClrScr's six instructions are dropped into the source code.
Macros are called simply by naming them. Don't use the CALL instruction! Just place the macro name on a line:
ClrScr
The assembler will handle the rest.
Defining Macros with Parameters
So far, macros may seem useful but perhaps not especially compelling. What makes macros really sing is their ability to mimic high-level language subroutines and take arguments through parameters. For example, if you were to define a macro named GotoXY that would position the hardware cursor, you could pass it the X and Y values as arguments, separated by a comma:
GotoXY 17,3 |
; Move the cursor to the Name field |
You'd have to pinch yourself to be sure you weren't working in Basic, no?
Macro parameters are, again, artifacts of the assembler. They are not pushed on the stack or set into
COMMON or anything like that. The parameters are simply placeholders for the actual values (called arguments) that you pass to the macro through its parameters.
I've converted the GotoXY procedure to a macro to show you how this works. Here's the macro:
%macro |
GotoXY 2 |
; NewX,NewY |
|
mov DH,%2 |
; The NewY parameter loads into DH |
|
mov DL,%1 |
; The NewX parameter loads into DL |
|
mov AH,02H |
; Select VIDEO service 2: Position cursor |
|
mov BH,0 |
; Stay with display page 0 |
%endmacro |
int 10H |
; Call VIDEO |
|
|
So where are the parameters? This is another area where NASM differs radically from MASM. MASM allows you to use symbolic names-such as the words NewX and NewY-to stand for parameters. NASM relies on a simpler system that declares the number of parameters, and then refers to the parameters by number rather than symbolic name.
In the definition of macro GotoXY, the number 2 after the name of the macro indicates that the assembler is to look for two parameters. This number must be present-as 0-even when you have a macro with no parameters. Later down in the macro, the two parameters are referenced by number. "%1" indicates the first parameter used after the name "GotoXY," and "%2" indicates the second parameter:
GotoXY 11,14
Name %1 %2
I call the two parameters NewX and NewY-but they don't exist anywhere in the code! They're strictly creatures of the imagination to help me remember what the macro is doing. This is one place (perhaps the only one) where I think I prefer MASM's way of doing things to NASM's.
Macro parameters are a kind of label, and they may be referenced anywhere within the macro-but only within the macro. Here, the parameters are referenced as operands to a couple of MOV instructions. The arguments passed to the macro in %1 (NewX) and %2 (NewY) are thus loaded into DL and DH.
The actual values passed into the parameters are referred to as arguments. Don't confuse the actual values with the parameters. If you understand Pascal, it's exactly like the difference between formal parameters and actual parameters. A macro's parameters correspond to Pascal's formal parameters, whereas a macro's arguments correspond to Pascal's actual parameters. The macro's parameters are the labels following the name of the macro in the line in which it is defined. The arguments are the values specified on the line where the macro is invoked.
The Mechanics of Macro Parameters
A macro may have as many parameters as will fit on one line. This is a rather arbitrary restriction, leaving you no recourse but to use short parameter names if you need lots of parameters for a single macro.
When a macro is invoked, arguments are separated by commas. The arguments are dropped into the macro's parameters in order, from left to right. If you pass only two arguments to a macro with three parameters, you're likely to get an error message from the assembler, depending on how you've referenced the unfilled parameter. The assembler is building opcodes depending on the types of operands passed as arguments; if you don't pass an argument for a given parameter, any instructions that reference that parameter won't be constructable by the assembler, hence the errors.
If you pass more arguments to a macro than there are parameters to receive the arguments, the extraneous arguments will be ignored.
Local Labels within Macros
I haven't really gone into labels and branches yet, but there's an important problem with labels used inside macros. Labels in assembly language programs must be unique, and yet a macro is essentially duplicated in the source code as many times as it is invoked. This means there will be error messages flagging duplicate labels...unless a macro's labels are treated as local. Local items have no meaning outside the immediate framework within which they are defined. Labels local to a macro are not known outside the macro definition.
All labels defined within a macro are considered local to the macro and are handled specially by the assembler. Here's an example from the file MYLIB.MAC; don't worry if you don't fully understand all of the instructions it uses:
%macro |
UpCase 2 |
; Target,Length |
|
mov CX,%2 |
; CX is acting as length counter for loop |
|
mov BX,%1 |
; String will be at DS:BX |
%%Tester: cmp BYTE [BX],'a' |
; Is string character below 'a'? |
|
|
jb %%Bump |
; If so, leave character alone |
|
cmp BYTE [BX],'z' |
; Is string character above 'z'? |
|
ja %%Bump |
; If so, leave character alone |
%%Bump: |
and BYTE [BX],11011111b ; Char is lc alpha, so force bit 5 to 0 |
|
inc BX |
; Bump BX to point to next char in string |
|
|
loop %%Tester |
; And go back and do it again! |
%endmacro
A label in a macro is made local by beginning it with two percent signs: "%%." When marking a location in the macro, the local label should be followed by a colon. When used as an operand to a jump or call instruction (such as JB and LOOP in the preceding), the local label is not followed by a colon. The important thing is to understand that unless the labels Tester and Bump were made local to the macro by adding the prefix "%%," there would be multiple instances of a label in the program and the assembler would generate a duplicate label error on the second and every subsequent invocation of the macro.
Because labels must in fact be unique within your program, NASM takes a formal label such as
%%Tester and generates an actual label from it that will be unique in your program by using the prefix "..@" plus a four-digit number and the name of the label. Each time your macro is invoked, NASM will
change the number, and thus generate unique synonyms for each local label within the macro. The label
%%Tester, for example, might become ..@1771.Tester and the number would be different each time the macro is invoked. This happens behind the scenes and you'll rarely be aware that it's going on unless you read the code dump listing files generated by NASM.
Macro Libraries
Just as procedures may be gathered in libraries external to your program, so may macros be gathered into macro libraries. A macro library is really nothing but a text file that contains the source code for the macros in the library. Unlike procedures gathered into a module, macro libraries are not separately assembled and must be passed through the assembler each time the program is assembled. This is a problem with macros in general, not only with macros that are gathered into libraries. Programs that manage complexity by dividing code up into macros will assemble more slowly than programs that have been divided up into separately assembled modules.
Macro libraries are used by including them into your program's source code file. The means to do this is the %include directive. The %include directive precedes the name of the macro library:
%include "MYLIB.MAC"
Technically this statement may be anywhere in your source code file, but you must keep in mind that all macros must be fully defined before they are invoked. For this reason, it's a good idea to use the
%include directive near the top of your source code file, before any possible invocation of one of the library macros could occur.
If the macro file you want to include in a program is not in the same directory as NASM itself, you may need to provide a more complete DOS path specification as part of the %include directive:
%include "BOOK\MYLIB.MAC"
Otherwise, NASM may not be able to locate the macro file and will hand you a relatively unhelpful error message:
D:\NASM\BOOK\EAT5.ASM:18: unable to open include file 'MYLIB.MAC'
The following is a macro library containing macro versions of all the procedures we discussed in the previous section, plus a few more:
; Source name |
: MYLIB.MAC |
; File type |
: NASM macro library |
; Code model: |
: Real mode segmented OR flat model |
; Version |
: 2.0 |
; Created date |
: 9/12/1999 |
; Last update |
: 9/18/1999 |
; Author |
: Jeff Duntemann |
; Description |
: A simple example of a multi-line macro file |
; |
for NASM containing utility procedures for |
; |
controlling the PC display. Assembled using |
; |
NASM 0.98. Include this file in your programs |
; |
with the directive: |
; |
%include "MYLIB.MAC" |
;---------------------------------------------------------------
; CLEAR -- Clears the entire visible screen buffer
;Last update 9/16/99
;Caller must pass:
;In VidAddress: The address of the video refresh buffer
;In ClearAtom: The character/attribute pair to fill the
; |
buffer with. The high |
byte |
contains the |
; |
attribute and the low |
byte |
the character. |
;In BufLength: The number of *characters* in the visible
; |
|
|
display buffer, *not* the number of bytes! |
|
; |
|
|
This is typically 2000 for a 25-line screen |
|
; |
Action: |
or 4000 for a 50-line screen. |
||
; |
Clears the screen by machine-gunning the |
|||
; |
|
|
character/attribute pair in AX into the |
|
; |
|
|
display buffer beginning at VidAddress. |
|
; |
--------------------------------------------------------------- |
Clear 3 ;VidAddress,ClearAtom,BufLength |
||
%macro |
||||
|
|
les DI,[%1] |
;VidAddress |
|
|
|
mov AX,%2 |
|
;ClearAtom |
|
|
mov CX,%3 |
|
;BufLength |
|
|
rep stosw |
|
|
|
|
GotoXY 0,0 |
|
|
%endmacro
;---------------------------------------------------------------
; RULER -- Displays a "1234567890"-style ruler on-screen
;Last update 9/16/99
;Caller must pass:
;In VidAddress: The address of the start of the video buffer
; |
In Length: |
The length of the ruler to be displayed |
||
; |
In ScreenW: |
The width of the current screen (usually 80) |
||
; |
In ScreenY: |
The line of the screen where the ruler is |
||
; |
In ScreenX: |
to be displayed (0-24) |
||
; |
The row of the screen where the ruler should |
|||
; |
Action: |
start (0-79) |
||
; |
Displays an ASCII ruler at ScreenX,ScreenY. |
|||
; |
--------------------------------------------------------------- |
Ruler 5 |
;VidAddress,Length,ScreenW,ScreenX,ScreenY |
|
%macro |
||||
|
|
les |
DI,[%1] |
; Load video address to ES:DI |
|
|
mov |
AL,%5 |
; Move Y position to AL |
|
|
mov |
AH,%3 |
; Move screen width to AH |
|
|
imul |
AH |
; Do 8-bit multiply AL*AH to AX |
add |
DI,AX |
; Add Y offset into vidbuff to DI |
add |
DI,%4 |
; Add X offset into vidbuf to DI |
shl |
DI,1 |
; Multiply by two for final address |
mov |
CX,%2 |
; CX monitors the ruler length |
mov |
AH,07 |
; Attribute 7 is "normal" text |
mov |
AL,'1' |
; Start with digit "1" |
%%DoChar: stosw |
AL,'1' |
; Note that there's no REP prefix! |
add |
; Bump the character value in AL up by 1 |
|
aaa |
AL,'0' |
; Adjust AX to make this a BCD addition |
add |
; Basically, put binary 3 in AL's high nybble |
|
mov |
AH,07 |
; Make sure our attribute is still 7 |
loop %%DoChar |
; Go back & do another char until BL goes to 0 |
|
%endmacro |
|
|
;---------------------------------------------------------------
;UPCASE -- Converts lowercase to uppercase characters
; |
in a string. |
;Last update 9/18/99
;Caller must pass:
;In Target: The offset (relative to DS) of the string
;In Length: The length of the string in characters
;Action: Scans the string at DS:BX and replaces chars
; |
in the range 'a'..'z' to 'A'..'Z'. |
|
;--------------------------------------------------------------- |
UpCase 2 |
; Target,Length |
%macro |
||
|
mov CX,%2 |
; CX is acting as length counter for |
|
mov BX,%1 |
; loop |
|
; String will be at DS:BX |
|
%%Tester: cmp BYTE [BX],'a' |
; Is string character below 'a'? |
|
|
jb %%Bump |
; If so, leave character alone |
|
cmp BYTE [BX],'z' |
; Is string character above 'z'? |
|
ja %%Bump |
; If so, leave character alone |
%%Bump: |
and BYTE [BX],11011111b ; Char is lc alpha, so force bit 5 to 0 |
|
inc BX |
; Bump BX to point to next char in |
|
|
loop %%Tester |
; string |
|
; And go back and do it again! |
|
%endmacro |
|
|
;---------------------------------------------------------------
; GOTOXY -- Positions the hardware cursor to X,Y
;Last update 9/18/99
;Caller must pass:
;In NewX: The new X value
;In NewY: The new Y value
;These are both 0-based; i.e., they assume a screen
;whose dimensions are 24 by 79, not 25 by 80.
;Action: Moves the hardware cursor to the X,Y position
; |
passed as NewX and NewY. |
|
;--------------------------------------------------------------- |
GotoXY 2 |
;NewX,NewY |
%macro |
||
|
mov DH,%2 |
;NewY |
|
mov DL,%1 |
;NewX |
|
mov AH,02H |
; Select VIDEO service 2: Position cursor |
|
mov BH,0 |
; Stay with display page 0 |
%endmacro |
int 10H |
; Call VIDEO |
|
|
|
;---------------------------------------------------------------
;NEWLINE -- Sends a newline sequence to DOS Standard Output
; |
|
|
via DOS service 40H |
; |
Last update 9/16/99 |
||
; |
Caller need not pass any parameters. |
||
; |
|||
; |
Action: |
Sends a newline sequence DOS Standard Output |
|
; |
--------------------------------------------------------------- |
Newline 0 |
|
%macro |
|||
%endmacro |
Write CRLF,2 |
||
|
|
||
;--------------------------------------------------------------- |
POKECHAR |
-- Inserts a single character into a string |
|
; |
|||
;Last update 9/16/99
;Caller must pass:
;In Target: The name of the string to be poked at
;In TheChar: The character to be poked into the string
;In ToPos: The 0-based position in the string to poke to
; |
Action: |
Pokes character passed in TheChar into |
string |
; |
|
passed in Target to position passed in |
ToPos. |
; |
|
The first character in the string is 0, etc. |
|
; |
--------------------------------------------------------------- |
|
|
%macro |
PokeChar 3 |
;Target,TheChar,ToPos |
|
mov BX,%1 |
; Load the address of target string into BX |
%endmacro |
mov BYTE [BX+%3],%2 ; Move char into the string |
|
|
|
|
;--------------------------------------------------------------- |
-- Displays information to the screen via DOS |
|
; WRITE |
||
;service 40: Print String to Standard Output
;Last update 9/16/99
; |
Caller must pass: |
|
; |
||
; |
In ShowIt: |
The name of the string to be displayed |
;In ShowLength: The length of the string to be displayed
;Action: Displays the string to DOS Standard Output
;--------------------------------------------------------------- |
Write 2 |
;ShowIt,ShowLength |
%macro |
||
|
mov BX,1 |
; Selects DOS file handle 1: Standard Output |
|
mov CX,%2 |
; ShowLength: Length of string passed in CX |
|
mov DX,%1 |
; Showit: Offset address of string passed in DX |
|
mov AH,40H |
; Select DOS service 40: Print String |
%endmacro |
int 21H |
; Call DOS |
|
|
;---------------------------------------------------------------
;WRITELN -- Displays information to the screen via DOS
; |
service 40H: Display to Standard Output, then |
|
; |
issues a newline |
|
; |
Last update 9/16/99 |
|
; |
Caller must pass: |
|
; |
||
; |
In ShowIt: |
The name of the string to be displayed |
;In ShowLength: The length of the string to be displayed
; |
|
Action: |
Displays the string in ShowIt, then issues a |
; |
|
|
newline. Hardware cursor will move to the |
; |
|
|
left margin of the following line. If the |
; |
|
|
display is to the bottom screen line, the |
; |
Calls: Write |
screen will scroll. |
|
; |
|
||
; |
--------------------------------------------------------------- |
Writeln 2 |
;ShowIt,ShowLength |
%macro |
|||
|
|
Write %1,%2 ; Display the string proper through Write |
|
|
|
Write CRLF,2 ; Display the newline string through Write |
|
%endmacro |
|
||
And, finally, yet another version of EAT.ASM, this time rearranged to make use of the macros in MYLIB.MAC. The macro library is included by way of the %include directive immediately after the
[SECTION .text] command near the top of the file. Note that although EAT5 uses real mode flat model, there is nothing model-specific about the macros in MYLIB.MAC. I've created a version of EAT5 for real mode segmented model called EAT5SEG.ASM, which uses the exact same macros and runs precisely the same way. (EAT5SEG.ASM is on the CD-ROM, but not printed here in the book text.)
; Source name |
: EAT5.ASM |
; Executable name : EAT5.COM |
|
; Code model: |
: Real mode flat model |
; Version |
: 1.0 |
; Created date |
: 9/15/1999 |
; Last update |
: 9/18/1999 |
; Author |
: Jeff Duntemann |
; Description |
: A simple example of a DOS .COM file programmed for |

; |
real mode flat model, using NASM 0.98 and ALINK. |
; |
This program demonstrates how multi-line macros are |
; |
used with NASM. |
[BITS 16] |
; Set 16 bit code generation |
|
[ORG 0100H] |
; Set code start address to 100h (COM file) |
|
[SECTION .text] |
; Section containing code |
|
%include "MYLIB.MAC" ; Load in screen control macro library |
||
START: |
; This is where program execution begins: |
|
Clear VidOrigin,07B0H,4000 ; Replace B0 with 20 for space clear |
||
GotoXY 14H,09H |
; Position cursor |
|
Write Eat1,Eat1Length |
; and display first text line |
|
GotoXY 14H,0AH |
; Position cursor |
|
Writeln Eat2,Eat2Length |
; and display second text line |
|
mov AH,4CH |
; Terminate process DOS service |
|
mov AL,0 |
; Pass this value back to ERRORLEVEL |
|
int 21H |
; Control returns to DOS |
|
[SECTION .data] |
; Section containing initialized data |
|
LRXY |
DW |
184FH ; 18H = 24D; 4FH = 79D; 0-based XY of LR screen corner |
VidOrigin |
DD |
0B8000000H ; Change to 0B0000000H if you have a mono CRT! |
Eat1 |
DB |
"Eat at Joe's..." |
Eat1Length |
EQU $-Eat1 |
|
Eat2 |
DB |
"...ten million flies can't ALL be wrong!" |
Eat2Length |
EQU $-Eat2 |
|
CRLF |
DB |
0DH, 0AH |
EAT5 goes back to real mode flat model and should be assembled and run from within NASM-IDE. The ALINK linker is not required.
You'll spot something odd in EAT5.ASM: Instead of using ClrScr to clear the screen as I have been for the last several incarnations of EAT, I've replaced ClrScr with a new macro called Clear. Clear (defined in VIDLIB.MAC) uses some technology I haven't explained yet, but will return to in Chapter 11. The lesson is that there are numerous ways to skin a screen, and we've moved here from having the BIOS do it for us to doing it all on our own. Take it on faith for now, until I come back to it. More to the point for the current discussion is the use of the GotoXY and Write and Writeln macros.
Additionally, if you look closely at the main program procedure in EAT5.ASM, something odd may occur to you: It's starting to look like something other than an assembly language program. This is true, and it's certainly possible to create so many macros that your programs will begin to look like some odd highlevel language. I actually used such a language in my first job as a programmer, and so complete was the transformation that I didn't actually realize I was using assembly macros until someone pointed it out.
The danger there is that unless you name your macros carefully and document them both in their macro library files and on the lines where they are invoked, your programs will not be any more comprehensible for their presence. Dividing complexity into numerous compartments is only half the job-labeling the compartments is just as (or more) important!
Chapter 10: Bits, Flags, Branches, and Tables
Easing into Mainstream Assembly Programming
Overview
You don't take off until all your flight checks are made.
That's the reason that we haven't done a lot of instruction arranging in this book up until here, now that we are in the last quarter of the book. I've found that machine instructions aren't the most important part of assembly language programming. What's most important is understanding your machine and your tools and how everything fits together. Higher-level languages such as Pascal and Modula-2 hide much of those essential details from you. In assembly language you must see to them yourself. For some reason, authors of previous beginner books on assembly language haven't caught on to this fact.
This fact (in fact) was the major motivation for my writing this book.
If you've digested everything I've said so far, however, you're ready to get in and understand the remainder of the x86 instruction set. I won't teach it all in this book, but the phrase ready to understand is germane. You can now find yourself a reference and learn what instructions I don't cover on your own. The skills you need to build programming expertise are now yours, and if this book has accomplished that much, I'd say it's accomplished a lot.
So, let the fun begin.