

Using NASM-IDE's Tools
The very best way to explain NASM-IDE's various features and how they are used is to run through a simple programming session with a real assembly language program and explain what happens as we go. The program we'll use is EAT2.ASM, which is shown later in this book. It's not much of a program, really, and exists only to get you started in understanding the internal mechanisms of a real, working assembly language program.
The goal of EAT2.ASM is to be assembled into the executable program file EAT2.COM. When run (either from inside NASM-IDE or from the DOS prompt), EA2.COM displays this simple message on your screen:
Eat at Joe's . . .
. . . ten million flies can't ALL be wrong!
That's all it does. After it displays those two lines, it ceases executing and returns control to DOS.
The file EAT2.ASM is present on the CD-ROM, along with NASM-IDE and the other tools provided for you. If you don't have or can't read the CD-ROM for this book, you can download all the example code files from my Web site at www.duntemann.com/downloads.htm.
If, as I have suggested earlier, you have created a subdirectory on your hard disk called ASM (or if you've copied the CD-ROM directory ASM over to your hard drive), all the .ASM example files need to be in the ASM directory. In order for NASM-IDE to operate correctly, the assembler executable NASM.EXE must be available on your hard drive where NASM-IDE can find it. Your best bet is to copy the ASM directory over from the CD-ROM either using Windows Explorer (if you're working from within Windows) or using DOS XCOPY.
Invoking NASM-IDE
Make the current directory your working assembly language subdirectory, which I have suggested you (nay, have pestered you mercilessly) to call ASM. From the DOS prompt, invoke NASM-IDE with the file name EAT2 after it:
C:\ASM>NASMIDE EAT2.ASM
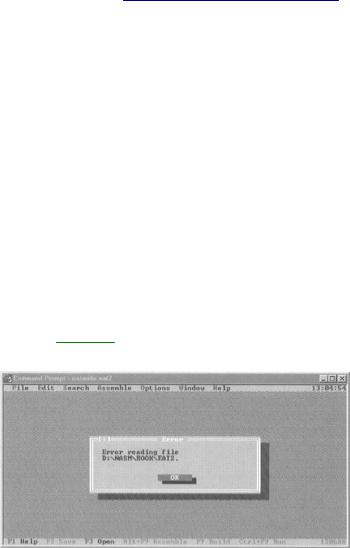
Two things: Notice first that you must type the ".ASM" at the end of the file name EAT2! Unlike many similar utilities, NASM-IDE has no default file extension and will not automatically append ".ASM" at the end of a file name entered without an extension. In other words, if you don't enter the ".ASM" file extension, NASM-IDE will not be able to find the file and will put up an error message window like the one shown in Figure 5.2.
Figure 5.2: A NASM-IDE error message box.
Also, keep in mind that while NASM-IDE's official name (when we're talking about it in this book) has a hyphen between "NASM" and "IDE," the name of the file that you type on the command line is "NASMIDE" without a hyphen. If you type "NASM-IDE" at the DOS command line, DOS will not know what you're talking about.
What happens if you simply run NASM-IDE without specifying a file name? If you have been working on a .ASM file of some sort and last exited NASM-IDE with that file still in a window, NASM-IDE will load that file from disk and put it in a window, just as it was when you last shut down NASM-IDE. If, on the other hand, you're bringing up NASM-IDE for the very first time, or if there was no file in a window when you last shut NASM-IDE down, there will be no file in a window when the NASM-IDE environment appears. NASM-IDE remembers what it was doing when you last shut it down, and absent other instructions, it will pick up precisely where it left off.
NASM-IDE's ability to remember the name of the last file you worked on makes it unnecessary for you to remember what project you were in the middle of when you pulled the plug and went to bed. Furthermore, NASM-IDE also remembers the exact cursor position where the cursor was when you saved your file and exited, as well as whether the edit window was zoomed. So, most of the time, if you're in the middle of a project and want to get back down to it, you only need to type "NASMIDE" followed by Enter on the DOS command line. If you were working on EAT2.ASM before and had it open when you shut NASM-IDE down, you don't have to type EAT2.ASM again on the command line when you invoke NASM-IDE.
When you create a new file or load a file into the editor for the first time, it becomes, by default, the current file. This means it is the file that will be assembled when you tell NASM-IDE to invoke NASM to translate your source code file to an executable or an object code file. I explain more about the concept of the current file later in this book. Typically, unless you begin doing fancier things, the current file will simply be the source code file you have open in an edit window.
Moving Around the Edit Window
When you're in NASM-IDE and an assembly language source code file is displayed in an edit window, any characters you type on the keyboard will be inserted into the file and displayed on your screen. You can move the cursor around within the current file by using any of a number of cursor movement keys.
The easiest to remember are the PC's cursor keypad keys. The four arrow keys will move the cursor one character position in the direction the arrow points. The PgUp key will move the cursor up one page (that is, the size of your text screen; typically 25, 43, or 50 lines depending on how you set it upmore on that shortly) whereas PgDn will move the cursor one page down. The Home key will move the cursor immediately to the left screen margin, and the End key will move the cursor immediately to the end of the current line. (The end of the line is defined as the character after the rightmost nonblank character in the line.)
There are numerous other cursor movement keys that you can use within JED. I describe them all in detail later in this chapter. You can also zero in on a particular location in the file by clicking on a character with the mouse. The cursor will move immediately to the point at which you clicked. You can use the mouse to slide up and down within the file by clicking on the "thumb" of the scroll bar on the right-hand edge of the edit window, and then dragging the thumb up or down. (The thumb is a small rectangle set into the scroll bar.)
Take a few moments scooting around inside EAT2.ASM until you feel comfortable with it.
Making Changes to the File
The simplest way to change the file is simply to type something at the keyboard. All such characters will appear at the cursor, and the cursor will move one position to the right for each character.
You can insert a new line beneath the current line by pressing Enter.
Getting rid of unwanted text is as important as adding new text. Deleting one character at a time can be done by moving the cursor to the immediate right of the offending character, and simply using the backspace key to back the cursor over it. The character will disappear. You can also place the cursor to the left of the text you want to delete, and then press the Del key once for each character to be deleted. Text to the right of the cursor will be pulled in toward the left as characters disappear.
You can delete an entire line by placing the cursor on the line and pressing Ctrl-Y. This can be done all too easily by accident, and you lose a line that you may or may not have in your head or written down on paper. Be careful!
NASM-IDE contains several other ways to delete text, all of which will be described later in this chapter. For the sake of the current guided tour through NASM-IDE, move the cursor to the blank line immediately beneath EAT2.ASM's comment header (line 9 in the file) and type the phrase "MVO ax,bx." That done, press Enter and add a new line beneath it.
Saving Changes to a File
As they say in Chicago, that grand old (and cold) town where I grew up, "Vote early and often." The same philosophy applies to saving the changes you make to your current file within NASM-IDE. Every so often, perhaps when you kick back in your chair to think for a bit, save your work. It's easy: one keystroke, the function key F2. There's no visible indicator that anything's actually happening, but pressing F2 will save your file in its entirety back to the place from which you loaded it, wherever that might be on your system.
Get in the habit of pressing F2 once in a while. Keep in mind that if you save your work every five minutes, you will never lose more than five minutes of work!
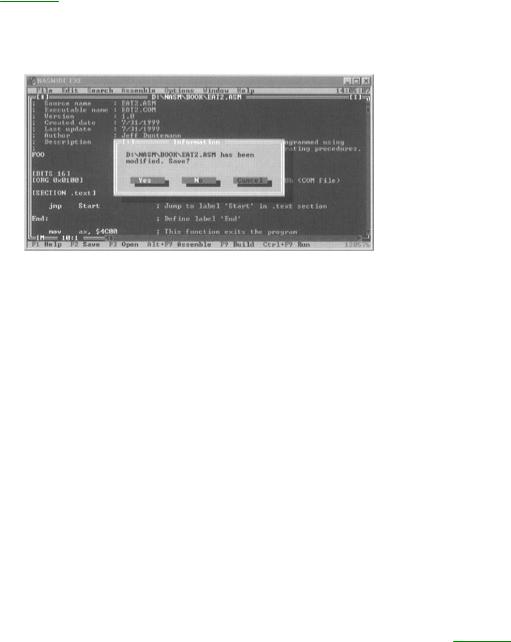
NASM-IDE keeps an eye on things and does its level best to keep you from losing any of your work. If you try to exit NASM-IDE without saving your file to disk, it will remind you with the dialog box shown in Figure 5.3.
Before it will exit back to DOS, NASM-IDE will require some response from you. If you click on the green button reading "Yes," NASM-IDE
Figure 5.3: When you exit without saving.
will save your work to disk, just as though you had pressed F2. Clicking on the button reading "No" will allow you to exit NASM-IDE without saving your work-and any changes you made that you have not saved will be lost. Finally, if you click on the button reading "Cancel," the command will be cancelled, and nothing else will happen. Your work will not be saved, nor will NASM-IDE exit back to DOS.
If you don't have a mouse, you can press Enter to select "Yes," which is the default option for this dialog box. (NASM-IDE gives you every opportunity not to lose your changes!) If you want to move to one of the other buttons but don't have a mouse, you must use the Tab key to bounce from one button to another. The buttons will change when they are selected: The text after the initial character of the button labels will be in white rather than yellow. The three buttons cycle, so if you tab right past the button you want, press it a few more times and you'll get back to your chosen button. Then when you press Enter, that button will be clicked and the appropriate action taken.
Assembling the Current File
If you're satisfied that you've understood all the various NASM-IDE features I've described so far on this tour, it's time to assemble EAT2.ASM and make an actual runnable program file out of it. Press function key F9. NASM-IDE will invoke the assembler NASM behind the scenes. You won't see anything to indicate it on your screen; NASM-IDE will remain there as always.
However, assuming you did what I told you earlier and typed some new text at line 9 of EAT2.ASM, the screen will split horizontally and a new window will be displayed beneath the text window containing EAT2.ASM. This window has the title "Error Information" and will look a lot like Figure 5.4.
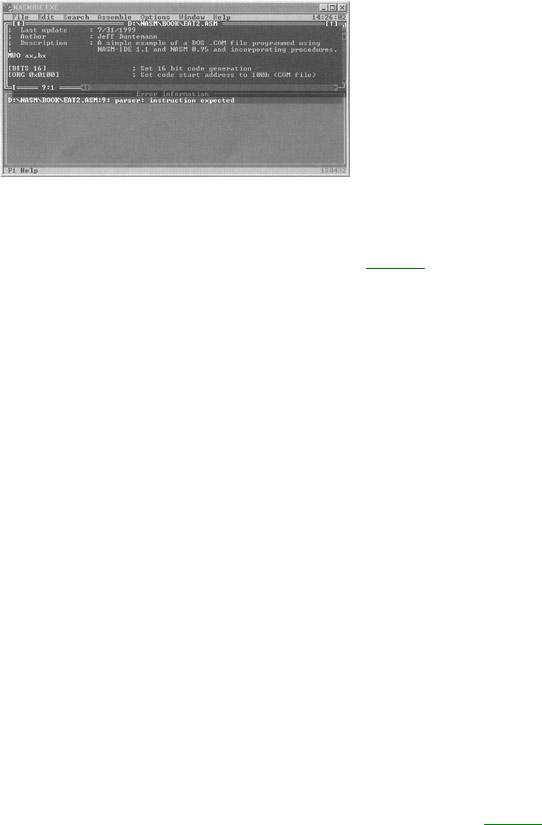
Figure 5.4: The error information window appears.
If you recall, you made a change to EAT2.ASM a little earlier by typing the phrase "MVO ax,bx" on line 9. This phrase is something like an assembly language mnemonic-but only something, and in the form I gave it to you the assembler NASM will have no idea what to do with it. So, NASM dutifully complained in the form of an error message. You can see this error message in Figure 5.4. When NASM tells you "Parser: Instruction Expected" that means that what it got in the line it paused at was not an instruction. You've inserted an error into EAT2.ASM here because no instruction in the 86-family instruction set is named MVO. This may not prevent your fevered fingers from transforming MOV (which is a legal instruction) to MVO in the furious passion of creation-or under the influence of the caffeine shakes.
The error information window will remain on the screen until you close it, which you can do by clicking on the close control at the upper-left corner of the window. And until you fix the error you inserted into EAT2.ASM, that's as far as we can go here.
Fixing it, however, is easy. NASM-IDE is reasonably smart and has placed the cursor right where it thinks the error is in the edit window.
In this case, the error was pretty blatant, and NASM-IDE has no trouble spotting it. That may not always be the case. There is no ironclad guarantee that after spotting an error, the cursor will be placed at the location of the error. Assembly language is nothing if not tricky. You have to be able to identify errors based on what you've written, not simply on where NASM-IDE suggests they may be hiding.
In this case NASM-IDE has the error dead to rights, and you can fix the error by nuking the whole line with a quick Ctrl-Y. After that, press F2 to save the file to disk again. Then press F9 again to try the assembly process once more.
Note that the error information window will still appear. However, it carries a brighter message this time: "No errors occurred." Every time you assemble, the error information message will appear, either with this message-or with an error message or a warning. (More on warnings later on.)
Running the Executable File
If you don't see any error messages in the error information window, that means NASM got through it all right and created the executable .COM file that is the point of the whole exercise. You can run the EAT2.COM file from the DOS prompt, just like you can run any .COM or .EXE file from the DOS prompt. However, it's easier than even that. NASM-IDE can run your executable program file for you, right from inside NASM-IDE.
The shortcut is Ctrl-F9. If you prefer, you can pull down the Assemble menu and select Run. NASMIDE will go away for a moment, and instead you'll see a blank DOS screen with the output of your program on it-in this case, the backhanded advertising slogan for Joe's Restaurant. See Figure 5.5.
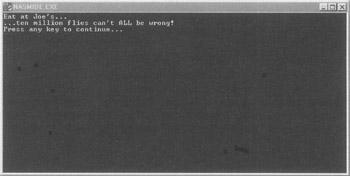
Figure 5.5: Running the executable program file.
Getting back to NASM-IDE is no big deal: Just do as the screen instructs you, and press any key.