

Compilers and Assemblers
With that understanding of DOS files under your belt, you can come to understand the nature of two important kinds of programs: compilers and assemblers. Both fall into a larger category of programs we call translators.
A translator is a program that accepts human-readable source code files and generates some kind of binary file. The binary file could be an executable program file that the CPU can understand, or it could be a font file, or a compressed binary data file, or any of a hundred other types of binary file.
Program translators are translators that generate machine instructions that the CPU can understand. A program translator reads a source code file line by line, and writes a binary file of machine instructions that accomplishes the computer actions that the source code file describes. This binary file is called an object code file.
A compiler is a program translator that reads in source code files written in higher-level languages such as C++ and Pascal and writes out object code files.
An assembler is a special type of compiler. It, too, is a program translator that reads source code files and outputs object code files for execution by the CPU. However, an assembler is a translator designed specifically to translate what we call assembly language into object code. In the same sense that a language compiler for Pascal or C++ compiles a source code file to an object code file, we say that an assembler assembles an assembly language source code file to an object code file. The process, one of translation, is similar in both cases. Assembly language, however, has an overwhelmingly important characteristic that sets it apart from compilers: total control over the object code.
Assembly Language
Some people define assembly language as a language in which one line of source code generates one machine instruction. This has never been literally true, since some lines in an assembly language source code file are instructions to the translator program (rather than to the CPU) and do not generate machine instructions at all.
Here's a better definition:
Assembly language is a translator language that allows total control over every individual machine instruction generated by the translator program. Such a translator program is called an assembler.
Pascal or C++ compilers, on the other hand, make a multitude of invisible and inalterable decisions about how a given language statement will be translated into machine instructions. For example, the following single Pascal instruction assigns a value of 42 to a numeric variable called I:
I := 42;
When a Pascal compiler reads this line, it outputs a series of four or five machine instructions that take the value 42 and store it in memory at a location encoded by the name I. Normally, you the Pascal programmer have no idea what these four or five instructions actually are, and you have utterly no way of changing them, even if you know a sequence of machine instructions that is faster and more efficient than the sequence that the compiler uses. The Pascal compiler has its own way of generating machine instructions, and you have no choice but to accept what it writes to disk to accomplish the work of the Pascal statements in the source code file.
An assembler, however, has at least one line in the source code file for every machine instruction it generates. It has more lines than that to handle numerous other things, but every machine instruction in the final object code file is controlled by a corresponding line in the source code file.
Each of the CPU's many machine instructions has a corresponding mnemonic in assembly language. As the word suggests, these mnemonics began as devices to help programmers remember a particular binary machine instruction. For example, the mnemonic for binary machine instruction 9CH, which pushes the flags register onto the stack, is PUSHF—which is a country mile easier to remember than 9CH.
When you write your source code file in assembly language, you will arrange series of mnemonics, typically one mnemonic per line in the source code text file. A portion of a source code file might look like this:
MOV |
AH,12H |
; 12H is Motor Information Service |
MOV |
AL,03H |
; 03H is Return Current Speed function |
XOR |
BH,BH |
; Zero BH for safety's sake |
INT |
71H |
; Call Motor Services Interrupt |
Here, the words MOV, XOR, and INT are the mnemonics. The numbers and other items to the immediate right of each mnemonic are that mnemonic's operands. There are various kinds of operands for various machine instructions, and some instructions (such as PUSHF mentioned previously) have no operands at all. I thoroughly describe each instruction's operands when we cover that instruction.
Taken together, a mnemonic and its operands are called an instruction. This is the word I'll be using most of the time in this book to indicate the human-readable proxy of one of the CPU's pure binary machine code instructions. To talk about the binary code specifically, we'll always refer to a machine instruction.
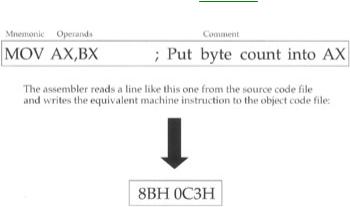
The assembler's most important job is to read lines from the source code file and write machine instructions to an object code file. See Figure 4.3.
Figure 4.3: What the assembler does.
Comments
To the right of each instruction is some information starting with a semicolon. This information is called a comment, and its purpose should be plain: to cast some light on what the associated assembly language instruction is for. The instruction MOV AH,12H places the value 12H in register AH—but why? What is the instruction accomplishing in the context of the assembly language program that you're writing? The comment provides the why.
Far more than in any other programming language, comments are critical to the success of your assembly language programs. My own recommendation is that every instruction in your source code files should have a comment to its right.
Structurally, a comment begins with the first semicolon on a line, and continues to the EOL marker at the end of that line. This is one instance where understanding how a text file is structured is very important—because in assembly language, comments end at the ends of lines. In most other languages such as Pascal and C++, comments are placed between pairs of comment delimiters like (* and *), and EOL markers at line ends are ignored.
Comments begin at semicolons and end at EOL.
Beware "Write-Only" Source Code!
This is as good a time as any to point out a serious problem with assembly language. The instructions themselves are almost vanishingly terse, and while each instruction states what it does, there is nothing

to indicate a context within which that instruction operates. You can build that context into your Pascal or Basic code with some skill and discipline (along with identifiers that point to their purpose), but in assembly language you can only add context through comments.
Without context, assembly language starts to turn into what we call "write-only" code. It can happen like this: On November 1, in the heat of creation, you crank out about 300 instructions in a short utility program that does something important. You go back on January 1 to add a feature to the program—and discover that you no longer remember how it works. The individual instructions are all correct, and the program assembles and runs as it should, but knowledge of how it all came together and how it works from a height have vanished under Christmas memories and eight weeks of doing other things. In other words, you wrote it, but you can no longer read it, or change it. Voila! Write-only code.
Comment like crazy. Each individual line should have a comment, and every so often in a sizeable source code file, take a few lines out and make entire lines into comments, explaining what the code is up to at this point in its execution.
While comments do take room in your source code disk files, they are not copied into your object code files, and a program with loads of comments runs exactly as fast as the same program with no comments at all.
You will be making a considerable investment in time and energy when you write assembly language programs—far more than in "halfway to heaven" languages like C and C++, and unthinkably more than in "we do it all for you" IDEs like Delphi and Visual Basic. It's more difficult than just about any other way of writing programs, and if you don't comment, you may end up having to simply toss out hundreds of lines of inexplicable code and write it again, from scratch.
Work smart. Comment till you drop.
Object Code and Linkers
There's no reason at all why an assembler cannot read a source code file and write out a finished, executable program file as its object code file. The assembler I'm teaching in this book, NASM, can do precisely that, and for much of the book we'll use it that way. Most of the older assemblers, including Microsoft's MASM and Borland's TASM, don't have this ability, however. Object code files produced by such assemblers are a sort of intermediate step between source code and executable program. This intermediate step is a type of binary file called a relocatable object module, or (more simply) an .OBJ file, after the file extension used by the assembler when it creates the file. For example, a source code file called FOO.ASM would be assembled into an object file called FOO.OBJ. (The "relocatable" portion of the concept is crucial, but a little advanced for this chapter. More on it later.)
.OBJ files cannot themselves be run as programs. An additional step, called linking, is necessary to turn .OBJ files into executable program files.
The reason for .OBJ files as intermediate steps is that a single large source code file may be cut up into numerous smaller source code files to keep them manageable in size and complexity. The assembler assembles the various component fragments separately, and the several resulting .OBJ files are woven together into a single, executable program file. This process is shown in Figure 4.4.
Figure 4.4: The assembler and linker.
When you're first starting out, it's unlikely that you will be writing programs spread out across several source code files. That's why we won't be using a linker initially. However, once you get into certain more advanced assembly ideas, you'll want to use the linker to change even a single .OBJ file into an executable program file. The larger your programs become, however, the more time can be saved by cutting them up into components. There are two reasons for this:
1.You can move tested, proven routines into separate libraries and link them into any program you write that might need them. This way, you can reuse code over and over again and not build the same old wheels every time you begin a new programming project in assembly language.
2.Once portions of a program are tested and found to be correct, there's no need to waste time assembling them over and over again along with newer, untested portions of a program. Once a major program gets into the tens of thousands of lines of code (and you'll get there sooner than you might think), you can save an enormous amount of time by assembling only the portion of a program that you are currently working on, and linking the finished portions into the final program without reassembling the whole thing every time.
Executable Program Files
Programs are written to be executed, and the file that you ultimately create in assembly language programming (or most any programming, actually) is called an executable program file. Under Linux (as I describe toward the end of this book), there is only a single kind of executable program file. In DOS work, however, there are two types of executable program files: .COM files and .EXE files. I deal with both in this book, and the specific technical differences will have to wait until I've covered a little more ground. But in purely practical terms, .COM files are produced directly by the NASM assembler, whereas .EXE files are generated by a linker.
The linker program may be seen as a kind of translator program, but its major role lies in combining multiple object code files into a single executable program file. The linker would accept, for example, three object code files: FOO.OBJ, BAR.OBJ, and BAS.OBJ, and knit them together into a single executable program file. This file would by default be called FOO.EXE, but you can specify any name you like to the linker.
An executable file can be run by typing its name (without the .COM or .EXE extension) at the DOS prompt and pressing Enter:
C:\>FOO

A Real Assembler: NASM
For quite a few years there was only one assembler product in general use for the PC: Microsoft's Macro Assembler, better known as MASM. MASM was and remains an enormously popular program and has established a standard for assembler operation on the PC. In 1988, Borland International released its answer to MASM in the form of Turbo Assembler, which was quickly christened TASM by syllable-conserving programmers. TASM was a great deal faster than MASM and started an arms race with MASM that went on for some years. Borland's products (and eventually Borland itself) began losing the race with Microsoft in the later 1990s, and today TASM is no longer available. MASM can be purchased from Microsoft, and is included in several of Microsoft's developer product bundles. It's an excellent product, and if you go on to do professional (that is, paying) work in assembly language, you're more than likely to be called upon to use it.
I'm not, however, going to be covering MASM in any detail in this book.
Something wonderful happened in the mid-1990s that changed the world of software forever. The idea of open source software caught fire and caught the imagination of programmers everywhere. In open source software, programmers collaborate (generally over the Internet) with dozens or even hundreds of other programmers and create software products that no single programmer (or even two or three) could have produced alone. To facilitate the collaborative process (and to eliminate fights over who owns the software), open source software is turned loose with all of its source code and documentation, and made available for free to whoever wants it.
When the idea first got the attention of the mainstream, it seemed simply nuts. Why would programmers do all this work for nothing? While some of the founders of the open source movement, such as the estimable Richard Stallman, insist that software should ideally be free for ethical reasons, the practical reality is that the open source concept of free software makes projects possible that would never happen otherwise. Many hands are required to create complex software, and the arguments that arise over ownership, marketing, and distribution have killed many good software products that the world could well have used. By making software "no secrets" by design and letting anyone who wants it have it, these arguments go away and collaborative effort becomes possible.
The largest and most visible open source project, of course, is the Linux operating system, begun by Linus Torvalds, a Finnish college student, in 1991. I have a couple of chapters on writing assembly language under Linux toward the end of this book. But the big win for us assembly language geeks is that in 1997, an open source assembler appeared. Its name is NASM, the Net-Wide Assembler, and it has improved relentlessly since its first release. Now, in 2000, it is brutally effective, easy to learn, and best of all, it's still free. I explain lots more about NASM through the course of this book, but you should fire up your Web browser and go look at the NASM Web site at www.web-sites.co.uk/nasm/tools.html.
In case the copy of the book you own no longer has the CD-ROM in it, or if the CD-ROM is damaged or otherwise unreadable, you can download NASM from this Web site and many other places. The version of NASM I'm using throughout this book (the one that is on the CD-ROM) is 0.98. If you have an older version from somewhere, please obtain the 0.98 release so you don't get confused when I talk about features that don't exist in your copy!
Most commercial assemblers (such as MASM and TASM) come with their own special debugging tools, called debuggers. MASM's debugger is called CodeView, and TASM's debugger is called Turbo Debugger. Both are enormously sophisticated programs, and I won't be discussing either in this book, in part due to their intimate connection with their associated assemblers, but mostly because there is a debugger shipped with every copy of DOS and Windows—even Windows NT. This debugger, simply named DEBUG, is more than enough debugger to cut your teeth on and will get you familiar enough with debugger concepts to move up to a commercial debugger later on.
I describe DEBUG much more fully in a following section.
Setting Up a Working Directory
The process of creating and perfecting assembly language programs involves a lot of different kinds of DOS files and numerous separate software tools. Unlike the tidy, fully integrated environments of Turbo
Pascal, Delphi, or Visual Basic, assembly language development comes in a great many pieces with (as it were) some assembly required.
I recommend setting up a development subdirectory on your hard disk and putting all of the various pieces in that subdirectory. For ease of understanding, let's call this directory ASM. I've actually created an ASM directory for you on the CD-ROM that comes with this book. It's completely set up and ready to go, software and all, and all you need to do is copy the contents of the CD-ROM directory FORDOS\ASM to one of your hard disk drive units. You can't run any of the software correctly from the CD-ROM! (CD-ROMs are by nature read-only devices, and you'll need to be writing files right and left.) If you're doing your assembly work in a DOS box under Windows, it's easy: Go back "up" into Windows and drag the contents of the FORDOS directory from the CD-ROM to an appropriate hard drive location, most likely on C: or D: but wherever you have room for it. ASM and all its subdirectories will come right along.
If you're using DOS, you'll need to use the XCOPY command, like this:
C:\>XCOPY F:\FORDOS C: /s
Note that by convention here, the CD-ROM drive is F: and the destination hard disk drive unit is C:. Use whatever your particular drive units might be. Don't forget the /s parameter. It tells XCOPY to bring the directory structure along as it copies, so the subdirectories on the CD-ROM will be reproduced on your hard drive.
Once you've copied the ASM directory from the CD-ROM, that's all the copying you'll need to do.
If you don't have a usable CD-ROM for this book (and if you bought it used, the CD-ROM is often missing or damaged), you'll have to create the ASM directory and load it yourself. Create and move into ASM by using these DOS commands:
C:\>MD ASM
C:\>CD ASM
(Obviously, you don't have to put the ASM directory on the C: drive. Put it where it goes best on your system.) Then, install the following:
1.Your text editor or development environment. If you're using NASM-IDE (see Chapter 5), you'll need to obtain the archive file NASMIDE.ZIP and unzip it into the ASM directory. Make sure you've enabled your ZIP utility to create directories, because the NASM-IDE archive contains example code residing in a subdirectory called EXAMPLES. You can download NASM-IDE from its home page www.inglenook.co.uk/nasmide/. (This URL was current late winter 2000.) For other text editors such as Brief or Epsilon, you'll need to consult the product's documentation.
2.The assembler NASM itself. Like NASM-IDE, NASM comes in a ZIP archive, and you must unzip it into the ASM directory. Make sure the copy you obtain is version 0.98! (Version 0.97 is still widely present on download sites like SimTel. Don't use it!) The archive file name is NASM098.ZIP. You can download the latest version of NASM from the NASM home page www.web-sites.co.uk/nasm/.
3.The subdirectories. As with NASM-IDE, there are subdirectories encoded in the NASM ZIP archive file, and you must enable your unzip utility to create those subdirectories during the process of extracting the files from the archive.
4.Your linker. Commercial assemblers such as MASM and TASM include their own linkers. Many people who use NASM under DOS use the ALINK linker, created by Anthony Williams. With Anthony's permission I've included ALINK on the CD-ROM. It's the only linker I discuss in this book. ALINK has a home page from which you can download the latest version in case you're reading this book long after its publication date: http://alink.home.dhs.org/.
5.DEBUG. A copy of DEBUG.EXE is installed with all current copies of DOS and Windows, even Windows NT. In ancient times, DEBUG.EXE was actually DEBUG.COM. If your version of DOS is that old, you probably ought to upgrade. Find DEBUG.EXE on your system and copy it to the ASM directory or to some directory on your DOS path.
6.
6.Odds and ends. A source code listing program, while not essential, can be very helpful—such programs print out neatly formatted listings on your printer. I have written a useful one called JLIST10 that I have placed on the CD-ROM for this book—but you need to understand that it only operates with LaserJet or compatible laser printers. Add anything else that may be helpful, keeping in mind that a lot of files are generated during assembly language development, and you should strive to keep unnecessary clutter to a minimum.