

ASP.NET 2.0 Visual Web Developer 2005 Express Edition Starter Kit (2006)
.pdfChapter 9
9.From the page-content folder, open Web.Config.txt, and copy the contents (the siteMap section).
10.Open Web.config, and underneath the </authentication> element, paste the code you copied from Web.Config.txt.
11.Save the file and run the application. Notice that the Admin item is now not shown on the menu.
12.Login as Dave (using dave@123), and you see that the Admin item still isn’t shown. Log out, and log in as Alex (using alex@123), and notice that the Admin item appears.
Let’s see how this works.
How It Works
The first thing you did was to add a new siteMapNode to the menus structure. This adds the Admin item to the bottom of the menu.
<siteMapNode url=”Admin.aspx” title=”Admin” description=”Edit Pizzas” />
You then added a LoginView control to the master page, and this is a clever control. When you are not logged into the site, the LoginView control shows a Login link. When you click this link, you are redirected to the login page (the login page you defined earlier in the chapter) with the loginUrl attribute on the login element in the authentication section. Once you have logged in, the LoginView control shows a Logout link, which, when clicked, will log you out of the site.
You then ran the application and used the LoginView to log into, and out of, the site, but noticed that the Admin link was shown no matter who you logged in as. This is because, by default, the menu system doesn’t apply any security. To correct that, you modified the Web configuration file, and a sitemap element:
<siteMap defaultProvider=”AspXmlSiteMapProvider” enabled=”true”> <providers>
<clear/>
<add name=”AspXmlSiteMapProvider” type=”System.Web.XmlSiteMapProvider, System.Web, Version=2.0.3600.0, Culture=neutral, PublicKeyToken=b03f5f7f11d50a3a”
siteMapFile=”web.sitemap” securityTrimmingEnabled=”true”/> </providers>
</siteMap>
You don’t need to know what all of this means, except for the securityTrimmingEnabled attribute, which is the key to the menu security. When securityTrimmingEnabled is set to True, the menu system will check the authorization for each page before displaying it. When logged in as Dave, the menu system checks each page before showing it, and Dave isn’t authorized to access the Admin page, so it isn’t shown on the menu. Alex is authorized, so the page is shown on the menu.
Once again this shows the power of the security system in ASP.NET, and how you can easily add power to your Web sites with very little effort. Let’s now see how we can use the security system from code, to help the checkout page.
274

Security and Deployment
Try It Out |
Modifying the Checkout Page |
1.Open Checkout.aspx, and double-click anywhere on the page, outside of the Content control. This will open the code file, and create the Page_Load event.
2.Into the event procedure, add the following code:
If Not Page.IsPostBack Then
If User.Identity.IsAuthenticated Then Dim rbl As RadioButtonList = _
DirectCast(Wizard1.FindControl(“RadioButtonList1”), RadioButtonList) rbl.Items.Add(New ListItem(“Charge my account”, “Account”))
End If End If
3.Save the file and run the application.
4.Navigate to the checkout page, and step into the Payment step. Notice how the payment options list shows only two items.
5.Log in to the site. Repeat step 4, and notice how there are now three items on the payment options list.
Let’s see how this works.
How It Works
You added code to the Page_Load event, which will run whenever the page is loaded. The first line checks to see if the IsPostBack property of the Page is set. If it is, then a button or link on the page has been clicked, and it isn’t the first time the page is loaded. If the IsPostBack is not set, then it is the first time the page has loaded, so further code is to be run.
If Not Page.IsPostBack Then
You then use the Membership service from code, starting with the User class, which identifies the current user. The User class has an Identity property, which gives further details about the user, and one of those further details is the IsAuthenticated property. If this is set, then the user is authenticated (that is, logged into the site).
If User.Identity.IsAuthenticated Then
Next, you obtained a reference to the RadioButtonList control that shows the payment method.
Dim rbl As RadioButtonList = _ DirectCast(Wizard1.FindControl(“RadioButtonList1”), RadioButtonList)
You then add a new ListItem to the RadioButtonList, with a Text value of Charge my account, and a Value of Account.
rbl.Items.Add(New ListItem(“Charge my account”, “Account”)) End If
End If
275

Chapter 9
That’s all there is to the code. When the page first loads, you check to see if the user is logged in. ASP.NET provides a User object, which has a property called Identity, and this identifies the user. A property of the Identity object, IsAuthenticated, tells us whether or not the user has been authenticated (that is, if they have logged in). If the user is logged in, you add another option to the list, which you could then use in the final stage of the payment to charge the user’s account.
That’s the end of modifying the pages, so let’s now look at how you can transfer this site to a Web server.
Publishing a Site
When using VWD, you have a built-in way to run the Web pages. But for live Web sites, you need a public Web server, and these are managed either by your company or by a service provider. To make your site available, you need to copy it to the target Web server, and there is a utility provided within VWD to help you with it.
This utility is available from the Copy Web Site . . . option from the Website menu, which shows the Copy Web page (see Figure 9-9)
Figure 9-9: The initial Copy Web page
276

Security and Deployment
To pick the target site, select the “Connect to . . .” option, which shows the Open Web Site window. You have the option of copying to a folder, a Web server (Local IIS), an FTP Site, or a Web site using HTTP (Remote Site). Figure 9-10 shows connecting to an FTP site.
Figure 9-10: The Open Web Site page
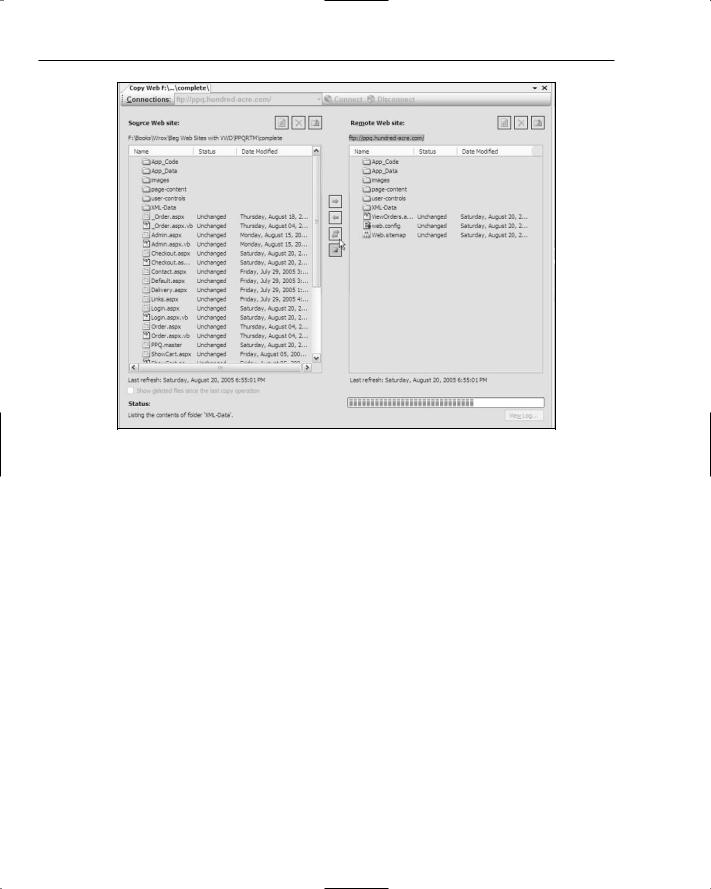
Once connected, you can see the files from the local site on the left, with the files from the remote site on the right, and you have options to copy between the two sites. For example, Figure 9-11 shows uploading files to a remote Web site using the FTP option.
277
Chapter 9
Figure 9-11: Uploading files to a Web site
The Copy Web feature allows copying both ways, so if you’ve mistakenly deleted some files from the local site, you can always fetch them from the remote site.
Summar y
This chapter has covered two major topics: security and deployment.
For security, we looked at how you can use the Web Site Configuration Tool to set up security, add users, and set the roles for the users (that is, authentication). We then discussed how to secure Web pages so that only authorized users can access them, both directly and from a menu. This allows you to create pages that only selected users can see, and this aspect, although not covered here, can be extended to parts of a page, so that a page will show different content depending upon the user.
You saw that the security system is extremely simple to set up, with only a few configuration options required to protect a site. Not only can you use the security controls to interact with the Membership service but you can also use code. This brings added flexibility and becomes more useful as you add more code to your sites.
278

Security and Deployment
Finally, we briefly looked at how you can deploy your Web site to a remote location, using the Copy Web tool. This allows you to use a variety of methods to copy sites to public Web servers. There are other ways to deploy applications, but these aren’t built into the tool. The deployment offered in VWD allows for a variety of protocols and covers the basics of what you’ll need to deploy to a remote location.
In all, we’ve covered a lot of ground in this book, but we have really only scratched the surface of what ASP.NET can achieve. You’ve seen how to use databases, how to structure sites using master pages and navigation, how to view and update data in grids, how to create custom classes, and how to implement security. These cover the basics of what you need to construct Web sites and give you good grounding from which to continue your exploration of ASP.NET.
We hope that you’ve enjoyed this book and that you continue to explore both ASP.NET and Visual Web Developer as a means to creating Web sites.
279


Symbols
@ (at) symbol, 138 @Page directive, 56
/* */ (forward slash plus asterisk) symbol, 102–103 ~ (tilde) symbol, 56
_ (underscore) symbol, 258
A
abstractions (object-oriented programming), 206 Access databases (Microsoft), connecting to, 16–17 access permissions (Internet Information Services),
8–9 accessibility features
identifying accessibility needs, 32 testing, 63–64
text links, 33
Active User box (Security Setup Wizard), 267
Add Connection dialog box (Database Explorer, Data Connections), 16–19
Add New Item dialog box (skeleton solution, Web site menu)
Master Page, 38–39 Web form, 22–23
Web User Control, 164
Add New Stored Procedure (Stored Procedures context menu), 102–103
Add New View option (Views context menu), 104 Add ORDER BY clause dialog box, 137–138
Add Table dialog box
Database Diagram window, 91 Query Editor, 13
Add WHERE clause dialog box opening the dialog, 134 selecting columns for, 135–137
Admin role
accessing from menu, 273–274 setting up, 267–268
Index
Index
Admin.aspx
adding to menu, 273–274 creating, 269–270
how it works, 270–271 uses for, 174, 190
Advanced Properties dialog box (Add Connection dialog box), 19
Advanced SQL Generation options dialog box, 175 alignment settings (Content Page), 58–59 allow element (web.config file), 271
Alt property (Image control), 45–46
AlternateText property (Image control) binding to columns, 120
uses for, 113
anchors, target, adding to Master Page, 46–47
App_Code folder (Class Files file), 197
AppSettings property (ConfigurationManager class), 208
</asp:Content> tags, 62–63 ASP.NET 2.0
building web pages opening a Web site, 20 server controls, 23, 48
exception handling, 260–262 IIS access permission, 8 Master Page support, 34 navigation controls, 35 objects overview, 109–110
.aspx pages
Admin.aspx
adding to menu, 273–274 creating, 269–271 function, 174, 190
Checkout.aspx
adding delivery address form, 239–245 adding order confirmation, 248–253 adding payment details, 245–248 completing the order, 253–254 creating, 223, 236
security modifications, 275–276 creating, overview, 22–23, 131–133

.aspx pages (continued)
.aspx pages (continued) |
bit data type, 110–111 |
Default.aspx |
<body> element (Master Page), 40–41 |
accessing, 55, 56–57 |
BoundField control |
adding content to, 57 |
with GridView control, 110, 181 |
adding pages to, 163 |
hiding, 182 |
Content Page, 60 |
BoundField properties settings (Fields dialog box), |
creating, 56 |
26, 182 |
editing, 60 |
“bread-crumb trails” |
executing, 170 |
ASP.NET 2.0 controls for, 35 |
viewing, 55 |
how they work, 33 |
Delivery.aspx, 158 |
implementing using SiteMapPath control, 54 |
for interface implementation, 131–133 |
|
Login.aspx |
C |
creating, 271–272 |
|
how it works, 272 |
canceling orders, code for, 256 |
Order.aspx |
Cart user control (shopping cart), 233 |
creating, 190 |
CartItem class |
formatting, 220–221 |
creating, 199–200 |
Order.aspx.vb.text, 220 |
properties, 205–206 |
ShowMenu.aspx |
storing data from, 207 |
creating, 150–153 |
Subtotal property, 209 |
how it works, 153–157 |
Total property, 209 |
TestMenu.aspx, 22–23, 60–61 |
variable definitions, 203–204 |
TestMenu2.aspx, 94, 104–105 |
Cascade action (Delete and Update Rules), 89 |
TestMenu3.aspx.vb, 141 |
Cascading Style Sheet (CSS) |
ViewOrder.aspx, 253–254 |
adding images using, 44 |
at (@) symbol (SQL server parameters), 138 |
adding to Content Page, 58 |
authentication |
applying typefaces using, 35 |
adding to checkout page, 276 |
casting, 218 |
code for, 266 |
Catch statements |
security function, 265 |
exception handling using, 261–262 |
web.config file for |
with Order Confirmation step, 259–260 |
how it works, 268–269 |
transaction handling using, 263 |
set up process, 266–268 |
cell properties (tables), 240 |
authorization |
checkout process |
security function, 265 |
adding security tools, 275–276 |
web.config file for |
collecting delivery address |
allow and deny element configurations, 271 |
code for, 239–242 |
code for, 269 |
how it works, 243–245 |
how it works, 270–271 |
testing collection form, 242–243 |
Auto Format dialog box |
collecting payment details |
DetailsView pane, 124 |
code for, 243–245 |
GridView Tasks pane, 25–26 |
how it works, 246–248 |
Menu Tasks pane, 54 |
designing, 235 |
Auto StepType value (WizardStep control), 238 |
Order Complete step |
AutoGenerateColumns property (GridView control), |
code for, 253–255 |
111, 180 |
how it works, 255–260 |
AutoPostBack property (RadioButton control), 245 |
Order Confirmation step |
|
code for, 248–251 |
B |
displaying shopping cart, 248–249 |
displaying subtotals and totals, 249–251 |
|
BeginTransaction method (Transaction |
how it works, 251–252 |
object), 263 |
Web form for, 236 |
Bind() code expression, 120 |
Wizard control for, 235 |
bindings, two-way, 120 |
|
282

|
controls (ASP.NET 2.0) |
Checkout.aspx |
ImageField, 114–117 |
adding delivery address form, 239–245 |
indexing in tables, 85–87 |
adding order confirmation page, 248–253 |
TemplateField, 117–123 |
adding payment details form, 245–248 |
CommandField control, delimiters for, 181 |
adding to ViewOrder.aspx, 253–254 |
comments, delimiters for, 103 |
completing the order, 253–254 |
Commit method (Transaction object), 263 |
creating, 223, 236 |
complete solution (Database Explorer) |
security modifications, 275–276 |
accessing, 13 |
Class Files file (App_Code folder), 197 |
Criteria grid section, 15 |
classes (ASP.NET 2.0) |
versus skeleton solution, 12–13 |
CartItem |
Complete StepType value (WizardStep control), 238 |
creating, 199–200 |
ConfigurationManager class |
properties, 205–206 |
formatting sales taxes using, 208 |
storing data from, 207 |
using with Order Confirmation step, 257 |
Subtotal property, 209 |
Configure Data Source Wizard |
Total property, 209 |
accessing and using, 94–95 |
variable definitions, 203–204 |
creating stored procedures, 102–104 |
ConfigurationManager |
nested displays |
formatting sales taxes using, 208 |
creating connection string, 134 |
using with Order Confirmation step, 257 |
Parameter Values Editor dialog box, 138–139 |
implementing |
sorting data items, 137–138 |
events for, 198 |
with SqlDataSource control, 175–178 |
methods for, 198 |
with StoredShoppingCart class, 226–228 |
properties for, 197 |
using data views as source, 105 |
ShoppingCart |
viewing and testing SQL statements, 99–100 |
creating and editing, 201–203 |
Configure the Select Statement dialog box, 175 |
custom code for, 197–202 |
connection strings |
methods, 209–210 |
creating, 94–95 |
properties, 211 |
nested displays, 134, 154 |
using, 206 |
SqlDataAdapter, 154–156 |
StoredShoppingCart |
Content Page |
adding user controls, 226–232 |
accessibility testing, 63–64 |
function of, 219 |
converting existing pages to, 60–61 |
how it works, 216–219 |
creating |
methods, 213–216, 225 |
adding content, 57 |
with ObjectDataSource, 213, 249 |
adding styles, 58 |
storing, 197 |
code for, 55–56 |
as templates, 197 |
Content control, 56, 62 |
Codd, E. F. (Ted) (programmer), 72 |
Default.aspx, 56 |
code, custom |
formatting, 58 |
dynamic text-linked user controls, 162–170 |
for nested displays, 150 |
for nested displays |
viewing and debugging, 60 |
advantages of using, 143–144 |
ContentPlaceHolder control (Master Page), 39 |
combining SQL with ASP.NET code, 144–158 |
ContentPlaceHolderID attribute, 56 |
XML data binding, 158–162 |
context menu, icon for, 97 |
for shopping carts, 197–202 |
controls (ASP.NET 2.0) |
for XML data, 161–162 |
adding from Toolbox, 41–42 |
“code inline” Web site design model, 39 |
BoundField |
code line continuation character, 258 |
with GridView control, 110, 181 |
code-behind approach, 131 |
hiding, 182 |
ColSpan properties (<td> element), 42 |
Cart, 233 |
columns |
CommandField, 181 |
changing data types for, 111–123 |
Content |
defining explicitly, 181 |
adding to Content Page, 56 |
HyperlinkField, 114–115 |
adding to existing Web pages, 62 |
Index
283