

ASP.NET 2.0 Visual Web Developer 2005 Express Edition Starter Kit (2006)
.pdfChapter 6
Figure 6-12: Binding the SelectedValue to a field
11.Click the OK button to close the window.
12.On the DropDownList Tasks, select Edit Items . . . .
13.On the ListItem Collection Editor, click Add to add a new member. Set the Text and Value properties to Pizza. Click Add again, and for the new member set the Text and Value properties to Drink.
14.Click OK to close the editor.
15.Select End Template Editing from the GridView Tasks.
16.Save the file. Right-click on the file background, and select View in Browser.
17.Select the Margherita pizza, and click the Edit link. Notice how the MenuItemType has a drop-down list displayed.
18.From this list, select Drink (well, Margherita is a drink, too), and click the Update button. Notice that back in view mode, the list isn’t shown. Change the type back to Pizza, and close the browser.
Let’s see how this works.
How It Works
The first thing you did was to hide the MenuItemID column by setting its Visible property to False. Although this is set to read-only, you don’t need to see this column, and we deleted it to show that updates work even though you don’t have the key field visible.
Next, you converted the MenuItemType into a TemplateColumn, so instead of a BoundField, you have a TemplateField:
<asp:TemplateField HeaderText=”MenuItemType” SortExpression=”MenuItemType”>
184

Managing and Editing Data
The TemplateField has the HeaderText property set to display text in the header, and the SortExpression to the name of the column (we haven’t enabled sorting on this grid).
Within the TemplateField there are two templates:
The EditItemTemplate is used when the row is in Edit mode (that is, when a user clicks the Edit link). When that happens, ASP.NET automatically displays the contents of the
EditItemTemplate.
The ItemTemplate is used when the row is in View mode.
Therefore, the templates contain the controls to be displayed when that template is active.
<EditItemTemplate>
For the EditItemTemplate you added a DropDownList, which gives the user a choice of values, so, instead of typing in the text (and possibly getting it wrong), the list limits users to the correct choices.
<asp:DropDownList ID=”DropDownList1” runat=”server” SelectedValue=’<%# Bind(“MenuItemType”) %>’>
<asp:ListItem Selected=”True” Value=”Pizza”>Pizza</asp:ListItem> <asp:ListItem>Drink</asp:ListItem>
</asp:DropDownList>
</EditItemTemplate>
The list automatically displays the value held in the MenuItemType column because you set the data bindings, setting the SelectedValue property to the MenuItemType. This manifests itself in a data binding expression, which is:
<%# Bind(“MenuItemType”) %>
This simply indicates that the value for the property should be bound to the MenuItemType column.
The ItemTemplate shows fields only when in View mode, so it simply contains a Label control. The Text property of the label is set to the same binding expression as used by the DropDownList — it simply displays the value of the MenuItemType field.
<ItemTemplate>
<asp:Label ID=”Label1” runat=”server”
Text=’<%# Bind(“MenuItemType”) %>’></asp:Label> </ItemTemplate>
</asp:TemplateField>
Using edit templates is useful for a number of reasons. For a start, it gives you control over exactly what is displayed, allowing you to show content other than just the column. Also, it allows you to add validation, ensuring that the data entered by the user is correct.
One key area to understand is how the data being edited gets back into the database. You saw how the SqlDataSource control has commands that define the SQL statements to be run for inserts, updates, and deletes. There are also parameters that define the names and data types of the columns, and it is
185
Chapter 6
these parameters that are significant because they match up to the fields used. So, a BoundField with a DataField property of ItemName will match to a parameter named ItemName — the BoundField is two-way, so it both displays data from the SqlDataSource, and sends the value back when editing. The same applies to the MenuItemType, where a BoundField wasn’t used, but a TemplateField was used instead. Within the TemplateField, though, the Bind statement has the name of the column. Because Bind provides two-way binding, we have the same functionality as with a BoundField.
Adding New Rows
One of disadvantages of the GridView is that it doesn’t support adding rows. There are Edit and Delete buttons, but no Add button. You can modify the CommandField to show a new link by setting the ShowInsertButton property to True, but the GridView itself doesn’t support the idea of new rows.
In fact, you might also think that using the Grid for editing isn’t the best solution, especially if you have fields that contain large amounts of text — the description field for example, is displayed in a short text field, so not all of it can be seen.
One way around these problems is to use the DetailsView control, so let’s modify the page to use a DetailsView for both adding rows and editing. There are a lot of steps in this exercise, but it’s really very simple.
Try It Out |
Using the DetailsView Control |
1.Close the running browser, and in Design view, select the GridView. For the CommandField, set the ShowDeleteButton and ShowEditButton properties to False, and the
ShowSelectButton to True.
2.Drag a SqlDataSource control onto the page, and drop it underneath the GridView.
3.From the SqlDataSource Tasks, select Configure Data Source . . . .
4.Select PPQ_DataConnectionString1 for the data connection, and click the Next button.
5.To configure the data source, select the MenuItems table, and select the * item from the Fields.
6.Click Next and then Finish to close the configuration.
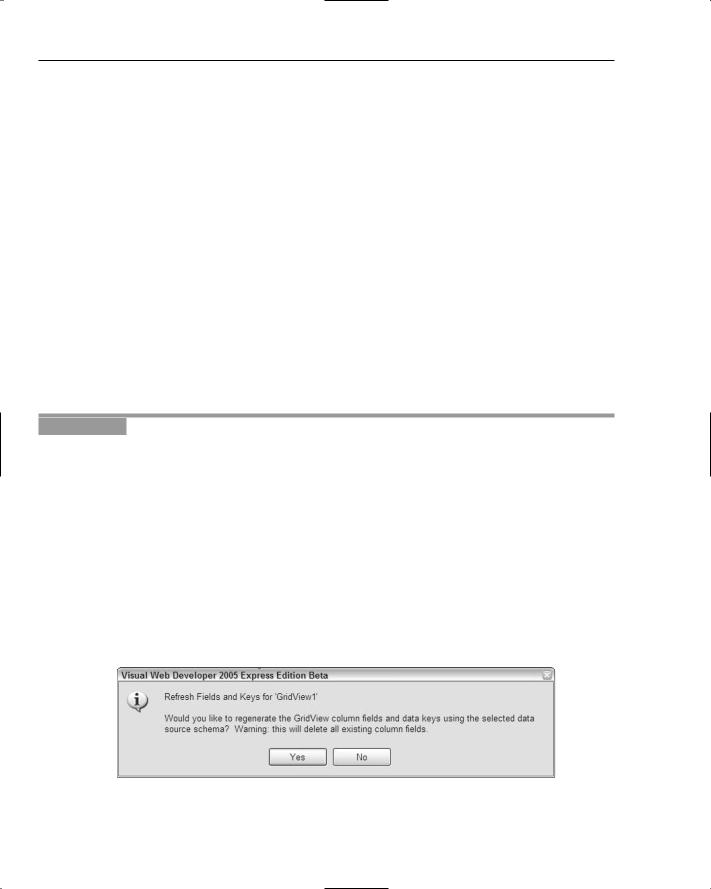
7.Select the GridView and open the GridView Tasks. In Choose Data Source, select SqlDataSource2, and you will see a warning dialog asking if you wish to refresh the fields (see Figure 6-13). Select Yes.
Figure 6-13: Refreshing keys and fields
186
Managing and Editing Data
8.On the GridView Tasks, tick the Enable Selection option.
9.Select the first data source, SqlDataSource1, and from SqlDataSource Tasks, select Configure Data Source . . . .
10.Click Next (because the data connection is OK), and, on the configuration page, click the WHERE . . . button.
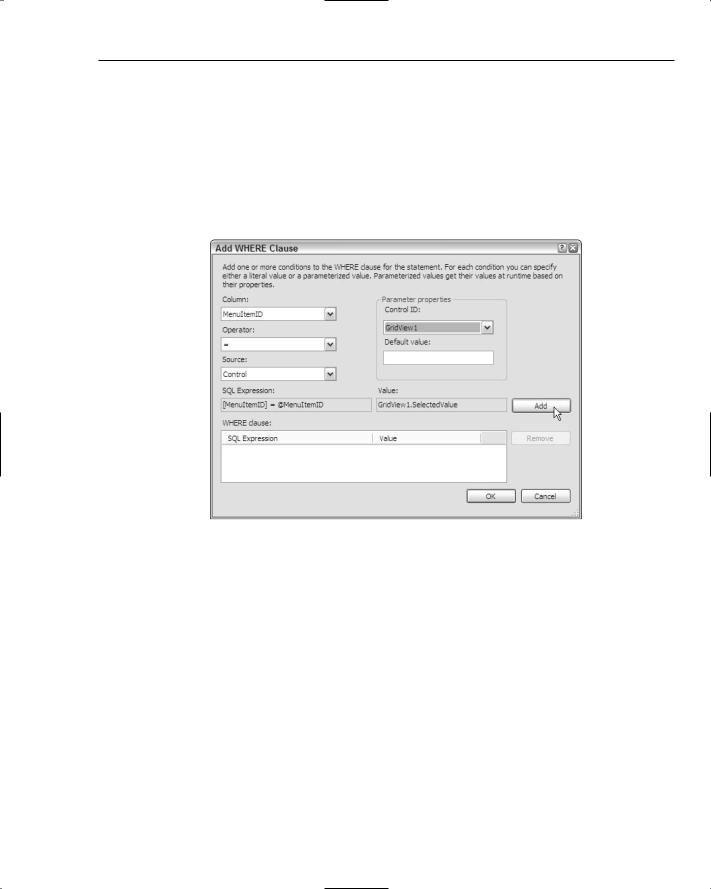
11.On the Add WHERE Clause window (see Figure 6-14), set the Column to MenuItemID, the Operator to =, and the Source to Control. In the Parameter properties area, select GridView1, and click the Add button.
Figure 6-14: Adding a WHERE clause to a SqlDataSource control
12.Click the OK button to return to the SqlDataSource Configuration Wizard. Click Next and then Finish.
13.Drag a DetailsView control onto the form, dropping it underneath SqlDataSource2.
14.On the DetailsViewTasks, select SqlDataSource1 from the Choose Data Source list.
15.Tick the Enable Inserting, Enable Editing, and Enable Deleting options.
16.On the DetailsViewTasks, click Edit Fields . . . .
17.Select MenuItemType from the Selected fields, and click “Convert this field into a TemplateField”.
18.Click OK to close the field editor.
19.Click the Edit Templates link, and from the Template Editing Mode, select EditItemTemplate.
20.Select the text box in the template and delete it.
21.From the Standard section of the Toolbox, drag a DropDownList into the EditItemTemplate.
187
Chapter 6
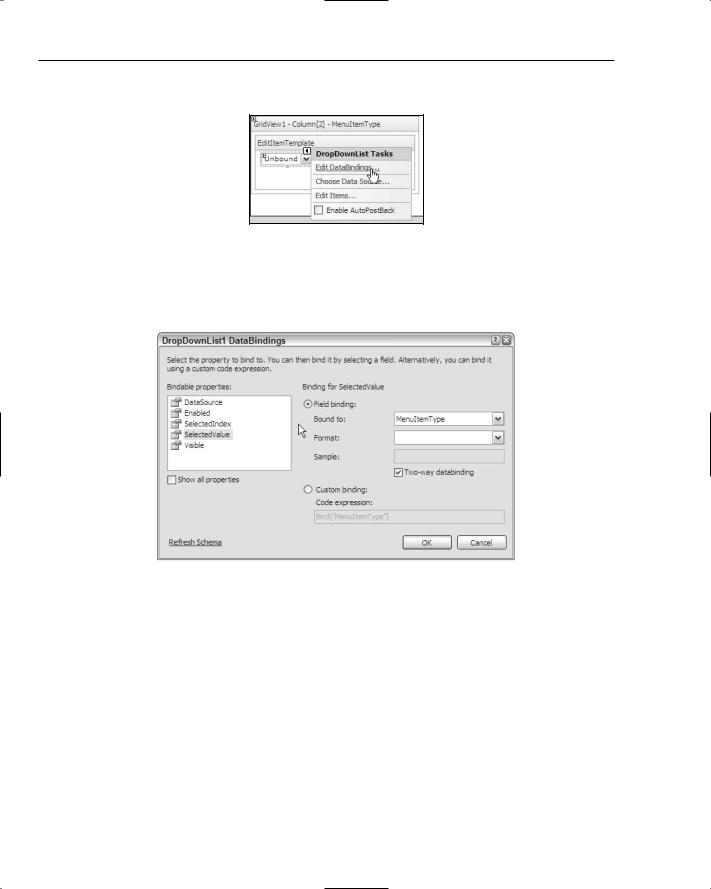
22.From the DropDownList Tasks, select Edit DataBindings (see Figure 6-15).
Figure 6-15: Editing the data bindings for a DropDownList
23.On the DropDownList1 DataBindings window, ensure that SelectedValue from the “Bindable properties” is selected, and pick MenuItemType from the “Binding for SelectedValue” (see Figure 6-16).
Figure 6-16: Binding the SelectedValue to a field
24.Click the OK button to close the window.
25.On the DropDownList Tasks, select Edit Items . . . .
26.On the ListItem Collection Editor, click Add to add a new member. Set the Text and
Value properties to Pizza. Click Add again, and for the new member, set the Text and Value properties to Drink.
27.Click OK to close the editor.
28.Repeat steps 20 to 27 for the InsertItemTemplate, deleting the existing text box, and adding and configuring a DropDownList control.
29.Select End Template Editing from the GridView Tasks.
30.Save the file. Right-click on the file background, and select View in Browser.
188
Managing and Editing Data
31.Click the Select link on the Margherita item.
32.On the DetailsView click the Edit button, change the MenuItemType to Drink, and click the Update button. Notice that the GridView hasn’t changed.
33.Click the New button, and enter the following for the new, empty item:
MenuItemType — Drink
ItemName — Margarita
Pizza Toppings — Leave empty
Description — Tequila, Cointreau, Lime juice
GraphicFileName — Leave empty
34.Click the Insert link to insert the new item. Notice that the new item doesn’t appear in the
GridView.
35.Close the browser window.
36.Select SqlDataSource1, and select the Events in the properties window (the button that looks like a fork of lightning).
37.Double-click next to the Updated property, to have the event procedure created for you.
38.Between the Protected Sub and End Sub, add the following:
GridView1.DataBind()
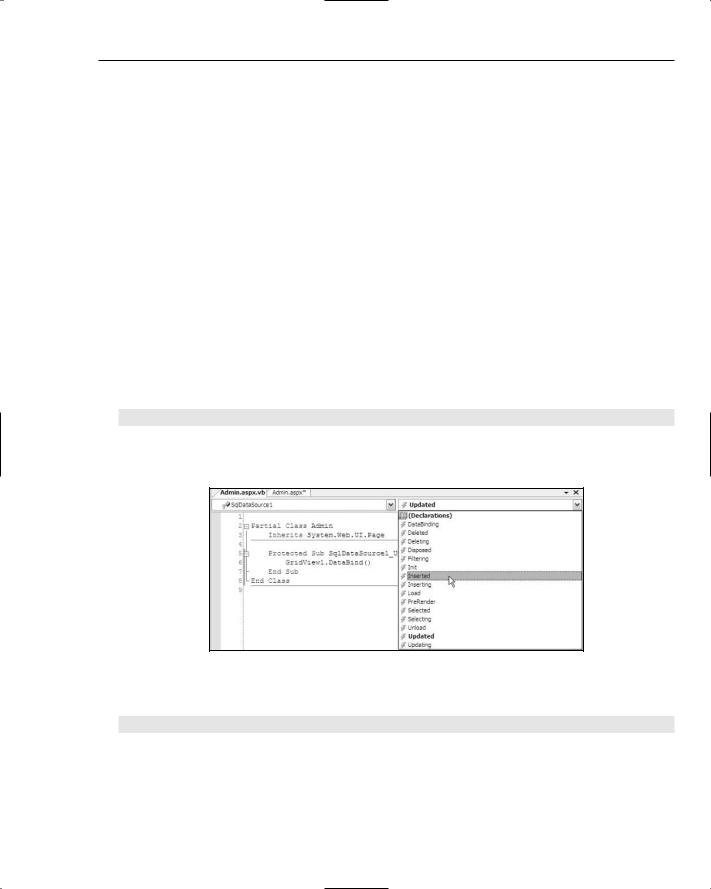
39.From the list at the top of the code page, select SqlDataSource1, and from the list on the right, select Inserted (see Figure 6-17).
Figure 6-17: Selecting Inserted
40.Between the Protected Sub and End Sub, add the following:
GridView1.DataBind()
41.From the list at the top of the code page select SqlDataSource1. From the list on the right, select Deleted (see Figure 6-17).
189

Chapter 6
42.Between the Protected Sub and End Sub, add the following:
GridView1.DataBind()
43.Save both files, and view the page in the browser (you’ll need to be on the Admin.aspx page to do this).
44.Select the Margherita pizza, and edit it, changing the item type from Drink to Pizza. Click the Update link in the DetailsView, and notice that the grid updates this time.
45.Click the New link, and add a new item, using the following:
MenuItemType — Pizza
ItemName — Pepperoni Special
Pizza Toppings — Sliced meat
Description — Several inches of pepperoni.
GraphicFileName — Leave empty
46.Click the Insert button to insert the new item, and notice that the new item shows up on the grid.
47.Select this new item, and click the Delete link.
There’s a lot here, so let’s see how all of this works.
How It Works
In this exercise, you used the GridView for selection of rows, and you used a second SqlDataSource control for this. The reason is that you already had a SqlDataSource control configured for updates (SqlDataSource1), and rather than change that to remove the modify commands and parameters, it made sense to use it for the DetailsView, which does require updates. You modified this to add a WHERE clause, setting the MenuItemID column to match the SelectedValue of GridView1. This works because the key field for the grid is MenuItemID, as set in the DataKeyFields property. This means that whenever a row is selected in the grid, the query for the second data source control is rerun, using the newly selected ID. This way, the DetailsView will be refreshed with the details of the selected row.
The DetailsView is similar in working to the GridView, and this is deliberate. Many of the controls work in similar ways, which means that once you’ve learned how one works, it’s easy to learn how the others work. You can see this clearly by the initial declaration of the DetailsView, which has properties
AutoGenerateRows, DataKeyNames, and DataSourceID, which work in the same way as the GridView control.
<asp:DetailsView ID=”DetailsView1” runat=”server” AutoGenerateRows=”False” DataKeyNames=”MenuItemID” DataSourceID=”SqlDataSource1” Height=”50px” Width=”125px”>
The DetailsView uses a <Fields> element to identify the fields to show, and these, too, should be familiar.
<Fields>
190

Managing and Editing Data
The first field is a BoundField for the MenuItemID, with the ReadOnly property set to True, so that it cannot be edited.
<asp:BoundField DataField=”MenuItemID” HeaderText=”MenuItemID” InsertVisible=”False” ReadOnly=”True” SortExpression=”MenuItemID” />
Next is a TemplateField, for the MenuItemType.
<asp:TemplateField HeaderText=”MenuItemType” SortExpression=”MenuItemType”>
The TemplateField contains three templates: one for editing, one for inserting, and one for displaying. Having separate templates allows you to have different functionality — for example, you might not want to allow editing of the MenuItemType once it has been set, so you could have a different template. For our template, the content of the EditItemTemplate and the InsertItem template is the same — a
DropDownList whose SelectedValue property is bound to MenuItemType. The ItemTemplate is a
Label control, which simply displays the item type when the DetailsView is not being edited or inserting data.
<EditItemTemplate>
<asp:DropDownList ID=”DropDownList1” runat=”server” SelectedValue=’<%# Bind(“MenuItemType”) %>’>
<asp:ListItem>Pizza</asp:ListItem>
<asp:ListItem>Drink</asp:ListItem>
</asp:DropDownList>
</EditItemTemplate>
<InsertItemTemplate>
<asp:DropDownList ID=”DropDownList2” runat=”server” SelectedValue=’<%# Bind(“MenuItemType”) %>’>
<asp:ListItem Selected=”True”>Pizza</asp:ListItem> <asp:ListItem>Drink</asp:ListItem>
</asp:DropDownList>
</InsertItemTemplate>
<ItemTemplate>
<asp:Label ID=”Label1” runat=”server”
Text=’<%# Bind(“MenuItemType”) %>’></asp:Label> </ItemTemplate>
</asp:TemplateField>
The next four fields are all BoundField controls. So, display data in View mode, and show a text box when in Edit or Insert mode.
<asp:BoundField DataField=”ItemName” HeaderText=”ItemName” SortExpression=”ItemName” />
<asp:BoundField DataField=”PizzaToppings” HeaderText=”PizzaToppings” SortExpression=”PizzaToppings” />
<asp:BoundField DataField=”Description” HeaderText=”Description” SortExpression=”Description” />
<asp:BoundField DataField=”GraphicFileName” HeaderText=”GraphicFileName” SortExpression=”GraphicFileName” />
191

Chapter 6
The final field is a CommandField, where the Delete, Edit, and Insert buttons are visible.
<asp:CommandField ShowDeleteButton=”True” ShowEditButton=”True” ShowInsertButton=”True” />
</Fields>
</asp:DetailsView>
You can see that the DetailsView control behaves in a similar way to the GridView, with columns and commands that react in different modes. Clicking the Update button places the control in update mode, so the EditItemTemplate is shown for TemplateField controls, and for BoundField controls a text box is shown. Clicking Insert displays the InsertItemTemplate for TemplateField controls, and a text box for BoundField controls. Actually, saving the data runs the appropriate SQL command to update the database.
The first time you ran the page, you could edit data in the DetailsView, but the changes weren’t reflected in the GridView. This is because the grid and data source control don’t know that the data has changed. To get around this, you have to resort to code and you used three events for this: the Deleted, Inserted, and Updated events (we’ve wrapped the code to make it clearer to read, but in your code, the event procedure declaration will be on a single line).
Protected Sub SqlDataSource1_Deleted(ByVal sender As Object,
ByVal e As System.Web.UI.WebControls.SqlDataSourceStatusEventArgs) Handles SqlDataSource1.Deleted
GridView1.DataBind() End Sub
Protected Sub SqlDataSource1_Inserted(ByVal sender As Object,
ByVal e As System.Web.UI.WebControls.SqlDataSourceStatusEventArgs) Handles SqlDataSource1.Inserted
GridView1.DataBind() End Sub
Protected Sub SqlDataSource1_Updated(ByVal sender As Object,
ByVal e As System.Web.UI.WebControls.SqlDataSourceStatusEventArgs) Handles SqlDataSource1.Updated
GridView1.DataBind() End Sub
The data source control raises these events after it has sent the changes back to the database, and in the event procedure for these, the grid is simply re-bound to the data using the DataBind method. This tells the data source to fetch a new copy of the data.
There is also another control, the FormView, which works like the DetailsView control to provide display and editing of a single row. The difference is that the DetailsView automatically displays the row in a table, with the field names on the left, and the fields on the right. The FormView has no automatic display — you have to provide the layout yourself. We’re not going to cover it here, but it works in the same way, and allows you to lay out the fields however you want, rather than sticking to the table design of the DetailsView.
192

Managing and Editing Data
Summar y
In this chapter, we have looked at how to edit data from the database, using three controls. The SqlDataSource control provides the link between the database and the display of data, and has properties allowing you to set different SQL commands for different types of changes — inserts, deletes, and updates.
The GridView not only displays data, but also allows editing, simply by setting a few properties —
AutoGenerateEditButton and AutoGenerateDeleteButton. These add a link to the grid allowing editing — no code is required.
The DetailsView provides the same features, but a different view of the data, showing only a single row at a time. This is much more useful for editing data because it shows the data in a formlike way, which is much more intuitive.
The one trouble with this page is that anyone can access it and update the details. In Chapter 9, we will look at how to protect this page from users, allowing access to it only when one is logged into the site. For now though, let’s continue our exploration of editing data and look at the ordering process, seeing how users can order menu items online.
193