
- •Preface
- •About This Book
- •Acknowledgments
- •Contents at a Glance
- •Contents
- •Relaxing at the Beach
- •Dressing the Scene
- •Animating Motion
- •Rendering the Final Animation
- •Summary
- •The Interface Elements
- •Using the Menus
- •Using the Toolbars
- •Using the Viewports
- •Using the Command Panel
- •Using the Lower Interface Bar Controls
- •Interacting with the Interface
- •Getting Help
- •Summary
- •Understanding 3D Space
- •Using the Viewport Navigation Controls
- •Configuring the Viewports
- •Working with Viewport Backgrounds
- •Summary
- •Working with Max Scene Files
- •Setting File Preferences
- •Importing and Exporting
- •Referencing External Objects
- •Using the File Utilities
- •Accessing File Information
- •Summary
- •Customizing Modify and Utility Panel Buttons
- •Working with Custom Interfaces
- •Configuring Paths
- •Selecting System Units
- •Setting Preferences
- •Summary
- •Creating Primitive Objects
- •Exploring the Primitive Object Types
- •Summary
- •Selecting Objects
- •Setting Object Properties
- •Hiding and Freezing Objects
- •Using Layers
- •Summary
- •Cloning Objects
- •Understanding Cloning Options
- •Mirroring Objects
- •Cloning over Time
- •Spacing Cloned Objects
- •Creating Arrays of Objects
- •Summary
- •Working with Groups
- •Building Assemblies
- •Building Links between Objects
- •Displaying Links and Hierarchies
- •Working with Linked Objects
- •Summary
- •Using the Schematic View Window
- •Working with Hierarchies
- •Setting Schematic View Preferences
- •Using List Views
- •Summary
- •Working with the Transformation Tools
- •Using Pivot Points
- •Using the Align Commands
- •Using Grids
- •Using Snap Options
- •Summary
- •Exploring the Modifier Stack
- •Exploring Modifier Types
- •Summary
- •Exploring the Modeling Types
- •Working with Subobjects
- •Modeling Helpers
- •Summary
- •Drawing in 2D
- •Editing Splines
- •Using Spline Modifiers
- •Summary
- •Creating Editable Mesh and Poly Objects
- •Editing Mesh Objects
- •Editing Poly Objects
- •Using Mesh Editing Modifiers
- •Summary
- •Introducing Patch Grids
- •Editing Patches
- •Using Modifiers on Patch Objects
- •Summary
- •Creating NURBS Curves and Surfaces
- •Editing NURBS
- •Working with NURBS
- •Summary
- •Morphing Objects
- •Creating Conform Objects
- •Creating a ShapeMerge Object
- •Creating a Terrain Object
- •Using the Mesher Object
- •Working with BlobMesh Objects
- •Creating a Scatter Object
- •Creating Connect Objects
- •Modeling with Boolean Objects
- •Creating a Loft Object
- •Summary
- •Understanding the Various Particle Systems
- •Creating a Particle System
- •Using the Spray and Snow Particle Systems
- •Using the Super Spray Particle System
- •Using the Blizzard Particle System
- •Using the PArray Particle System
- •Using the PCloud Particle System
- •Using Particle System Maps
- •Controlling Particles with Particle Flow
- •Summary
- •Understanding Material Properties
- •Working with the Material Editor
- •Using the Material/Map Browser
- •Using the Material/Map Navigator
- •Summary
- •Using the Standard Material
- •Using Shading Types
- •Accessing Other Parameters
- •Using External Tools
- •Summary
- •Using Compound Materials
- •Using Raytrace Materials
- •Using the Matte/Shadow Material
- •Using the DirectX 9 Shader
- •Applying Multiple Materials
- •Material Modifiers
- •Summary
- •Understanding Maps
- •Understanding Material Map Types
- •Using the Maps Rollout
- •Using the Map Path Utility
- •Using Map Instances
- •Summary
- •Mapping Modifiers
- •Using the Unwrap UVW modifier
- •Summary
- •Working with Cameras
- •Setting Camera Parameters
- •Summary
- •Using the Camera Tracker Utility
- •Summary
- •Using Multi-Pass Cameras
- •Creating Multi-Pass Camera Effects
- •Summary
- •Understanding the Basics of Lighting
- •Getting to Know the Light Types
- •Creating and Positioning Light Objects
- •Viewing a Scene from a Light
- •Altering Light Parameters
- •Working with Photometric Lights
- •Using the Sunlight and Daylight Systems
- •Using Volume Lights
- •Summary
- •Selecting Advanced Lighting
- •Using Local Advanced Lighting Settings
- •Tutorial: Excluding objects from light tracing
- •Summary
- •Understanding Radiosity
- •Using Local and Global Advanced Lighting Settings
- •Working with Advanced Lighting Materials
- •Using Lighting Analysis
- •Summary
- •Using the Time Controls
- •Working with Keys
- •Using the Track Bar
- •Viewing and Editing Key Values
- •Using the Motion Panel
- •Using Ghosting
- •Animating Objects
- •Working with Previews
- •Wiring Parameters
- •Animation Modifiers
- •Summary
- •Understanding Controller Types
- •Assigning Controllers
- •Setting Default Controllers
- •Examining the Various Controllers
- •Summary
- •Working with Expressions in Spinners
- •Understanding the Expression Controller Interface
- •Understanding Expression Elements
- •Using Expression Controllers
- •Summary
- •Learning the Track View Interface
- •Working with Keys
- •Editing Time
- •Editing Curves
- •Filtering Tracks
- •Working with Controllers
- •Synchronizing to a Sound Track
- •Summary
- •Understanding Your Character
- •Building Bodies
- •Summary
- •Building a Bones System
- •Using the Bone Tools
- •Using the Skin Modifier
- •Summary
- •Creating Characters
- •Working with Characters
- •Using Character Animation Techniques
- •Summary
- •Forward versus Inverse Kinematics
- •Creating an Inverse Kinematics System
- •Using the Various Inverse Kinematics Methods
- •Summary
- •Creating and Binding Space Warps
- •Understanding Space Warp Types
- •Combining Particle Systems with Space Warps
- •Summary
- •Understanding Dynamics
- •Using Dynamic Objects
- •Defining Dynamic Material Properties
- •Using Dynamic Space Warps
- •Using the Dynamics Utility
- •Using the Flex Modifier
- •Summary
- •Using reactor
- •Using reactor Collections
- •Creating reactor Objects
- •Calculating and Previewing a Simulation
- •Constraining Objects
- •reactor Troubleshooting
- •Summary
- •Understanding the Max Renderers
- •Previewing with ActiveShade
- •Render Parameters
- •Rendering Preferences
- •Creating VUE Files
- •Using the Rendered Frame Window
- •Using the RAM Player
- •Reviewing the Render Types
- •Using Command-Line Rendering
- •Creating Panoramic Images
- •Getting Printer Help
- •Creating an Environment
- •Summary
- •Creating Atmospheric Effects
- •Using the Fire Effect
- •Using the Fog Effect
- •Summary
- •Using Render Elements
- •Adding Render Effects
- •Creating Lens Effects
- •Using Other Render Effects
- •Summary
- •Using Raytrace Materials
- •Using a Raytrace Map
- •Enabling mental ray
- •Summary
- •Understanding Network Rendering
- •Network Requirements
- •Setting up a Network Rendering System
- •Starting the Network Rendering System
- •Configuring the Network Manager and Servers
- •Logging Errors
- •Using the Monitor
- •Setting up Batch Rendering
- •Summary
- •Compositing with Photoshop
- •Video Editing with Premiere
- •Video Compositing with After Effects
- •Introducing Combustion
- •Using Other Compositing Solutions
- •Summary
- •Completing Post-Production with the Video Post Interface
- •Working with Sequences
- •Adding and Editing Events
- •Working with Ranges
- •Working with Lens Effects Filters
- •Summary
- •What Is MAXScript?
- •MAXScript Tools
- •Setting MAXScript Preferences
- •Types of Scripts
- •Writing Your Own MAXScripts
- •Learning the Visual MAXScript Editor Interface
- •Laying Out a Rollout
- •Summary
- •Working with Plug-Ins
- •Locating Plug-Ins
- •Summary
- •Low-Res Modeling
- •Using Channels
- •Using Vertex Colors
- •Rendering to a Texture
- •Summary
- •Max and Architecture
- •Using AEC Objects
- •Using Architectural materials
- •Summary
- •Tutorial: Creating Icy Geometry with BlobMesh
- •Tutorial: Using Caustic Photons to Create a Disco Ball
- •Summary
- •mental ray Rendering System
- •Particle Flow
- •reactor 2.0
- •Schematic View
- •BlobMesh
- •Spline and Patch Features
- •Import and Export
- •Shell Modifier
- •Vertex Paint and Channel Info
- •Architectural Primitives and Materials
- •Minor Improvements
- •Choosing an Operating System
- •Hardware Requirements
- •Installing 3ds max 6
- •Authorizing the Software
- •Setting the Display Driver
- •Updating Max
- •Moving Max to Another Computer
- •Using Keyboard Shortcuts
- •Using the Hotkey Map
- •Main Interface Shortcuts
- •Dialog Box Shortcuts
- •Miscellaneous Shortcuts
- •System Requirements
- •Using the CDs with Windows
- •What’s on the CDs
- •Troubleshooting
- •Index
982 Part X Rendering
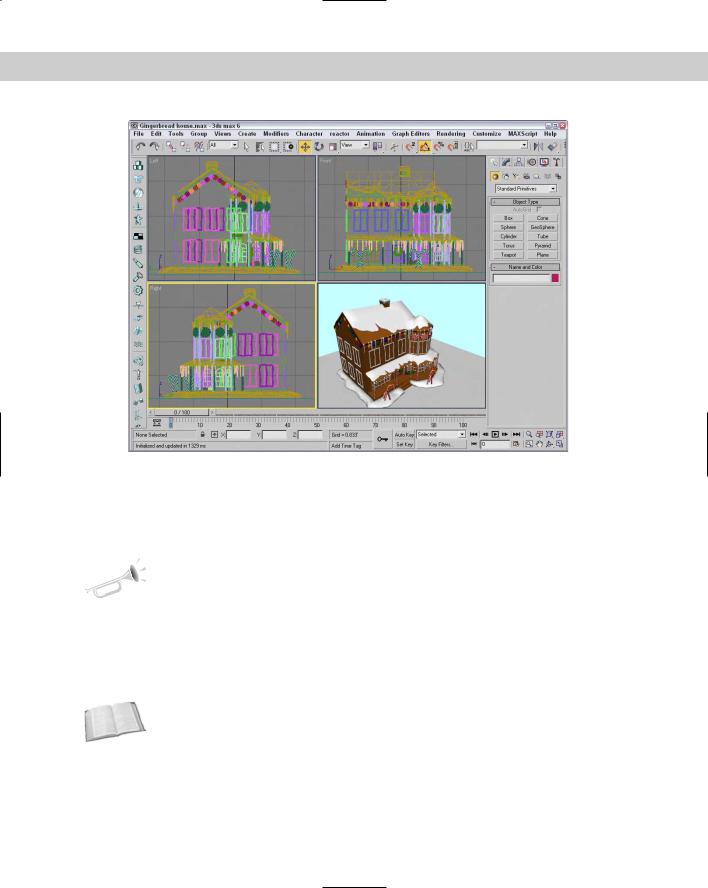
Figure 41-2: You can view the ActiveShade window in a viewport.
Render Parameters
Commands and settings for rendering an image are contained within the Render Scene dialog box. This dialog box includes several tabbed panels.
New |
The tabbed panels in the Render Scene dialog box are new to 3ds max 6. |
Feature |
|
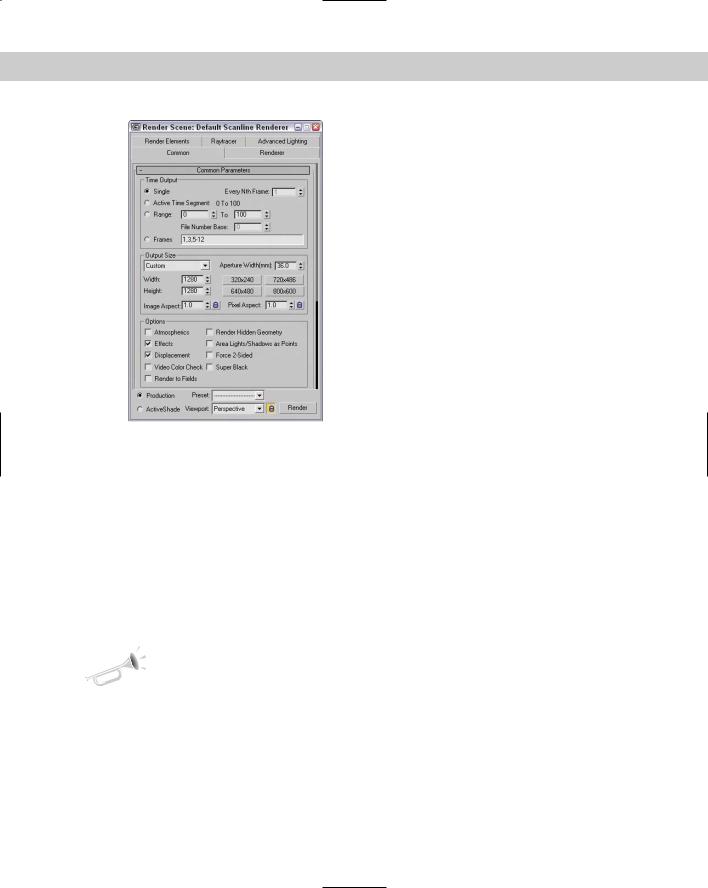
After you’re comfortable with the scene file and you’re ready to render a file, you need to open the Render Scene dialog box, shown in Figure 41-3, by means of the Rendering Render menu command (F10) or by clicking the Render Scene button on the main toolbar. This dialog box has several panels: Common, Renderer, Render Elements, Raytracer, and Advanced Lighting. The Common panel includes commands that are common for all renderers, but the Renderer panel includes specific settings for the selected renderer.
Cross-
Reference
The Common and Renderer panels for the Default Scanline Renderer are covered in this chapter. The Raytracer and Renderer panel for the mental ray renderer are covered in Chapter 44, “Raytracing and mental ray,” the Render Elements panel is covered in Chapter 43, “Using Render Elements and Effects,” and the Advanced Lighting panel is covered in Chapter 28, “Advanced Lighting and Light Tracing.”
Chapter 41 Rendering Basics 983
Figure 41-3: You use the Render Scene dialog box to render the final output.
Initiating a render job
At the bottom of the Render Scene dialog box are several controls that are visible for all panels; these controls let you initiate a render job. The render modes are Production and ActiveShade. Each of these modes can use a different renderer with different render settings as defined using the Assign Renderer rollout.
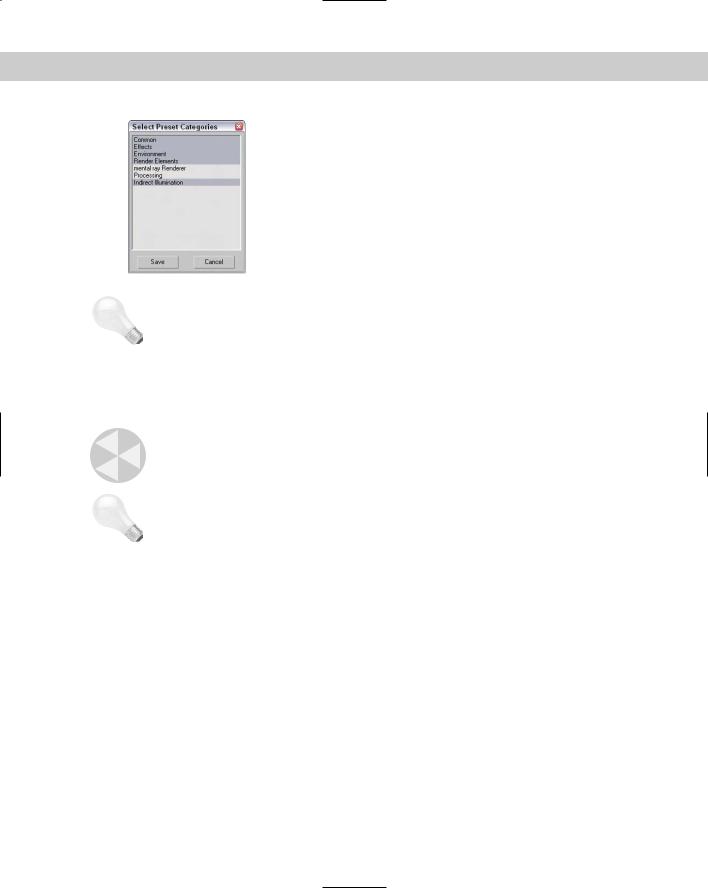
The Preset option lets you save and load a saved preset of renderer settings. When saving or loading a preset, the Select Preset Categories dialog box, shown in Figure 41-4, opens (after selecting a preset file in a file dialog box). In this dialog box, you can select which panels of settings to include in the preset. The panels listed will depend on the renderer that is selected. All presets are saved to the disk as files with the .RPS file extension.
New |
Rendering presets are new to 3ds max 6. |
Feature |
|
The Viewport drop-down list includes all the available viewports. When the Render Scene dialog box opens, the currently active viewport appears in the Viewport drop-down list. The one selected is the one that gets rendered when you click the Render button. The Render button starts the rendering process. You can click the Render button without changing any settings, and the default parameters are used.
984 Part X Rendering
Figure 41-4: The Select Preset Categories dialog box lets you choose which settings to include in the preset.
Tip |
The little lock icon next to the Viewport indicates that the selected viewport is always |
|
rendered when the Render button is clicked, regardless of the active viewport. |
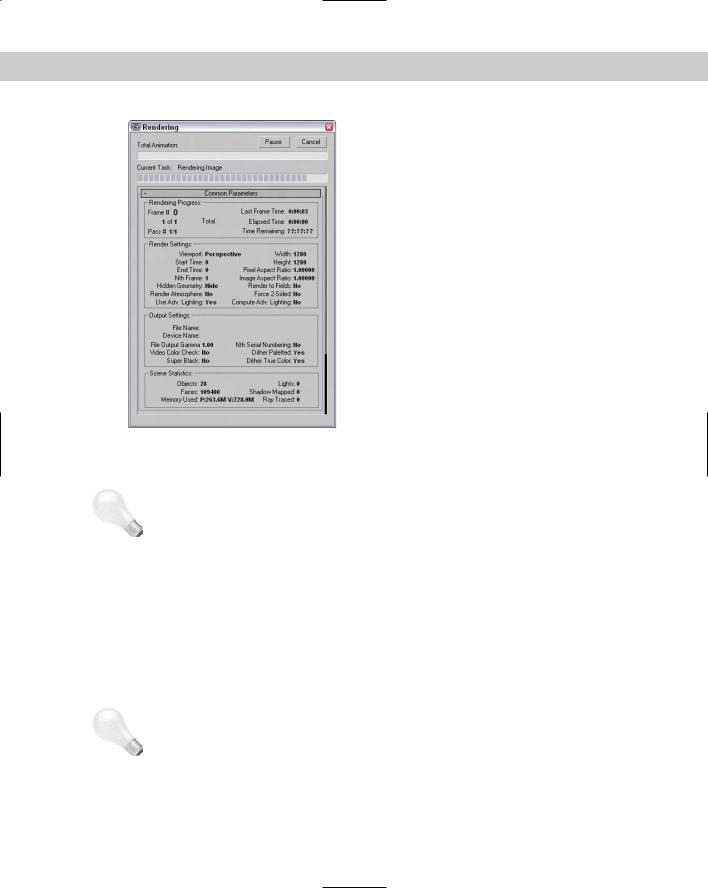
When you click the Render button, the Rendering dialog box appears. This dialog box, shown in Figure 41-5, displays all the settings for the current render job and tracks its progress. The Rendering dialog box also includes Pause and Cancel buttons for halting the rendering process. If the rendering is stopped, the Rendering dialog box disappears, but the Rendered Frame Window stays open.
Caution |
If you close the Rendered Frame Window, the render job still continues. To cancel the |
|
rendering, click the Pause or Cancel button, or press the Esc key on your keyboard. |
Tip After you’ve set up the render settings for an image, you can re-render an image without opening the Render Scene dialog box by clicking the Quick Render button on the main toolbar or by using the Shift+Q keyboard shortcut.
Common parameters
The Common Parameters rollout in the Render Scene dialog box includes the same controls regardless of the renderer being used.
The Time Output section defines which animation frames to include in the output. The Single option renders the current frame specified by the Time Slider. The Active Time Segment option renders the complete range of frames. The Range option lets you set a unique range of frames to render by entering the beginning and ending frame numbers. The last option is Frames, where you can enter individual frames and ranges using commas and hyphens. For example, entering “1, 6, 8-12” renders frames 1, 6, and 8 through 12. The Every Nth Frame value is active for the Active Time Segment and Range options. It renders every nth frame in the active segment. For example, entering 3 would cause every third frame to be rendered. This option is useful for sped-up animations. The File Number Base is the number to add or subtract from the current frame number for the reference numbers attached to the end of each image file. For example, a File Number Base value of 10 for a Range value of 1–10 would label the files as image0011, image0012, and so on.
Chapter 41 Rendering Basics 985
|
Figure 41-5: The Rendering dialog box |
|
displays the current render settings and |
|
progress of the render job. |
Tip |
Don’t render long animation sequences using the .AVI or .MOV formats. If the rendering has |
|
trouble, the entire file will be corrupt. Instead, choose to render the frames as individual |
|
images. These individual images can then be reassembled into a video format using the |
|
Video Post interface or an external package like Adobe’s Premiere. |
|
The Output Size section defines the resolution of the rendered images or animation. The |
|
drop-down list includes a list of standard film and video resolutions, including various 35mm |
|
and 70mm options, Anamorphic, Panavision, IMAX, VistaVision, NTSC, PAL, and HDTV stan- |
|
dards. A Custom option allows you to select your own resolution. |
|
Aperture Width is a property of cameras that defines the relationship between the lens and |
|
the field of view. The resolutions listed in the Aperture Width drop-down list alter this value |
|
without changing the view by modifying the Lens value in the scene. |
|
For each resolution, you can change the Width and Height values. Each resolution also has |
|
six preset buttons for setting these values. |
Tip |
You can set the resolutions of any of the preset buttons by right-clicking the button that you |
|
want to change. The Configure Preset dialog box opens, where you can set the button’s |
|
Width, Height, and Pixel Aspect values. |
The Image Aspect is the ratio of the image width to its height. You can also set the Pixel Aspect ratio to correct rendering on different devices. Both of these values have lock icons to
986 Part X Rendering
their left that lock the aspect ratio for the set resolution. Locking the aspect ratio automatically changes the Width dimension whenever the Height value is changed and vice versa. The Aperture Width, Image Aspect, and Pixel Aspect values can be set only when Custom is selected in the drop-down list.
The Options section includes the following options:
Atmospherics: Renders any atmospheric effects that are set up in the Environment dilog box.
Effects: Enables any Render Effects that have been set up.
Displacement: Enables any surface displacement caused by an applied displacement map.
Video Color Check: Enables a check for nonsafe NTSC or PAL colors. Nonsafe colors are displayed incorrectly when these formats are used.
Render to Fields: Enables animations to be rendered as fields. Fields are used by video formats. Video animations include a field with every odd scan line and one field with every even scan line. These fields are composited when displayed.
Render Hidden Geometry: Renders all objects in the scene, including hidden objects. Using this option, you can hide objects for quick viewport updates and include them in the final rendering.
Area Lights/Shadows as Points: Rendering area lights and shadows can be time consuming, but point lights render much quicker. By enabling this option, you can speed the rendering process.
New |
The Area Lights/Shadows as Points option is new to 3ds max 6. |
Feature |
|
Force 2-Sided: Renders both sides of every face. This option essentially doubles the render time and should be used only if singular faces or the inside of an object are visible.
Super Black: Enables Super Black, which is used for video compositing. Rendered images with black backgrounds have trouble in some video formats. The Super Black option prevents these problems.
The Advanced Lighting panel offers options to use Advanced Lighting or Computer Advanced Lighting when Required. Advanced lighting can take a long time to compute, so these two options give you the ability to turn advanced lighting on or off.
Cross- Advanced lighting is covered in more detail in Chapter 28, “Advanced Lighting and Light
Reference Tracing.”
The Render Output section enables you to output the image or animations to a file, a device, or the Rendered Frame Window. To save the output to a file, click the Files button and select a location in the Render Output File dialog box. Supported formats include .AVI, .BMP, .DDS, Postscript (.EPS), JPEG, Kodak Cineon (.CIN), .FLC, Radiance Image File (.HDRI), QuickTime
Chapter 41 Rendering Basics 987
(.MOV), .PNG, .RLA, .RPF, SGI’s Format (.RGB), Targa (.TGA), and .TIF. The Device button can output to a device such as a video recorder. If the Rendered Frame Window option is selected, then both the Files and Devices buttons are disabled. (The Rendered Frame Window is discussed later in this chapter.)
The Net Render option enables network rendering. The Skip Existing Images option doesn’t replace any images with the same filename, a feature that you can use to continue a rendering job that has been canceled.
Cross- |
For more information on network rendering, see Chapter 45, “Network Rendering.” |
Reference |
|
E-mail notifications
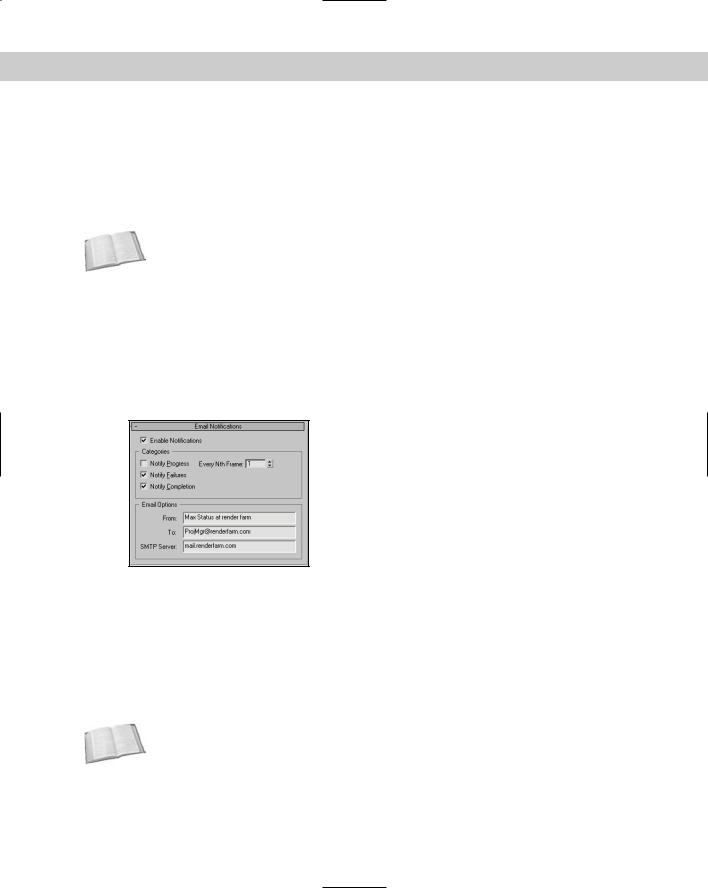
The process of rendering an animation (or even a single frame) can be brief or it can take several days depending on the complexity of the scene. For complex scenes that will take a while to render, you can configure Max to send you an e-mail when your rendering is complete or if it fails. These options are in the Email Notifications rollout, shown in Figure 41-6.
In addition to the options, you can enter who the e-mail is from, who it is to, and an SMTP Server.
Figure 41-6: The Email Notifications rollout includes options for sending an e-mail to report on rendering status.
Assigning renderers
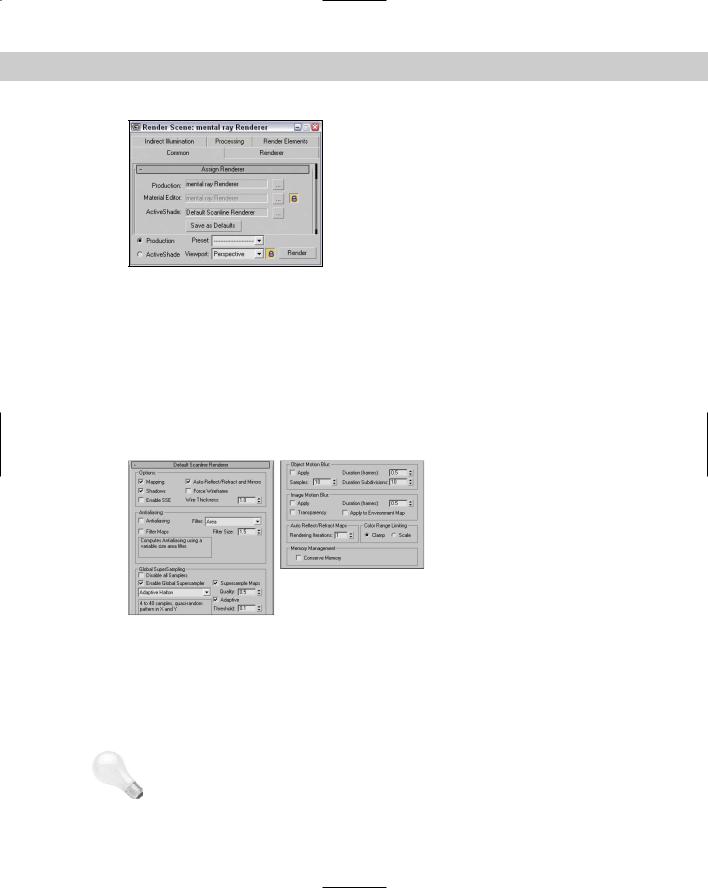
To change the default renderer, look in the Assign Renderer rollout in the Common panel of the Render Scene dialog box (F10), shown in Figure 41-7. Here you can select different renderers for the Production, Material Editor, and ActiveShade modes. For each, you can select from the Default Scanline Renderer, the mental ray Renderer, or the VUE File Renderer.
Cross- |
The VUE File Renderer is covered later in this chapter, and the mental ray rendering engine is |
Reference |
covered in Chapter 44, “Raytracing and mental ray.” |
|
988 Part X Rendering
Figure 41-7: The Assign Renderer rollout in the Render Scene dialog box lets you select which render engine to use.
The lock next to the Material Editor option indicates that the same renderer is used for both Production and Material Editor.
Scanline A-Buffer renderer
The Default Scanline Renderer rollout, found in the Renderer panel and shown in Figure 41-8, is the default renderer rollout that appears in the Render Scene dialog box. If a different renderer is loaded, then a different rollout for that renderer is displayed in the Renderer panel.
Figure 41-8: The Default Scanline Renderer rollout includes settings unique to this renderer.
You can use the Options section at the top of the Default Scanline Renderer rollout to quickly disable various render options for quicker results. These options include Mapping, Shadows, Auto Reflect/Refract and Mirrors, and Force Wireframe. For the Force Wireframe option, you can define a Wire Thickness value in pixels. The Enabled SSE option uses Streaming SIMD (Single Instruction, Multiple Data) Extensions to speed up the rendering process by processing more data per instruction.
Tip Intel Pentium III and later processors include the SSE instructions and can benefit from enabling this option.

Chapter 41 Rendering Basics 989
Anti-alias filters
Another way to speed up rendering is to disable the Anti-aliasing and Filter Maps features. Anti-aliasing smoothes jagged edges that appear where colors change. The Filter Maps option allows you to disable the computationally expensive process of filtering material maps. The Filter drop-down list lets you select image filters that are applied at the pixel level during rendering. Below the drop-down list is a description of the current filter. The Filter Size value applies only to the Soften filter. Available filters include the following:
Area: Does an anti-aliasing sweep using the designated area specified by the Filter Size value.
Blackman: Sharpens the image with a 25-pixel area. It provides no edge enhancement.
Blend: Somewhere between a sharp and a coarse Soften filter. It includes Filter Size and Blend values.
Catmull-Rom: Sharpens with a 25-pixel filter and includes edge enhancement.
Cook Variable: Can produce sharp results for small Filter Size values and blurred images for larger values.
Cubic: Based on cubic-spline curves and produces a blurring effect.
Mitchell-Netravali: Includes Blur and Ringing parameters.
Plate Match/MAX R2: Matches mapped objects against background plates as used in Max R2.
Quadratic: Based on a quadratic spline and produces blurring with a 9-pixel area.
Sharp Quadratic: Produces sharp effects from a 9-pixel area.
Soften: Causes mild blurring and includes a Filter Size value.
Video: Blurs the image using a 25-pixel filter optimized for NTSC and PAL video.
SuperSampling
Global SuperSampling is an additional anti-aliasing process that you can apply to materials. This process can improve image quality, but it can take a long time to render; you can disable it using the Disable all Samplers option. Supersampling can be enabled in the Material Editor for specific materials, but the SuperSampling rollout in the Material Editor also includes an option to Use Global Settings. The Global Settings are defined in the Default Scanline Renderer rollout.
Max includes anti-aliasing filters as part of the rendering process. You have several SuperSampling methods to choose from.
SuperSampling can be enabled even if the Antialiasing option is disabled. Global Supersampling can be enabled using the Enable Global Supersampler option.
In a SuperSampling pass, the colors at different points around the center of a pixel are sampled. These samples are then used to compute the final color of each pixel. Max has four available SuperSampling methods: Max 2.5 Star, Hammersley, Adaptive Halton, and Adaptive Uniform.
Cross- |
You can find more information on each of these sampling methods in Chapter 20, “Creating |
Reference |
and Applying Simple Materials.” |
|
