

Pro CSharp 2008 And The .NET 3.5 Platform [eng]
.pdf942 CHAPTER 26 ■ INTRODUCING WINDOWS WORKFLOW FOUNDATION
Recall that in Chapter 25 we defined a WCF service contract that also manipulated two numbers via an addition operation, using the following service interface:
namespace MathServiceLibrary
{
[ServiceContract(Namespace = "www.intertech.com")] public interface IBasicMath
{
[OperationContract] int Add(int x, int y);
}
}
Also recall that this interface was implemented on a type named MathService and hosted by a Windows service named MathWindowsServiceHost.exe. The Windows service exposed said functionality from the following endpoint:
http://localhost:8080/MathService
Assuming you created and installed this service (see Chapter 25 for details), you can update your current WFMathClient project to communicate with it using the SendActivity type. The first step is to add a reference to the service in the expected manner, using the Add Service Reference dialog box (see Figure 26-20). This will generate a client-side proxy and update your App.config file with WCF-specific settings.
Figure 26-20. Referencing the WCF MathService
Now, drag a SendActivity type onto your WF designer surface (named WCFSendAddActivity), directly after the final Code activity. Using the Properties window, click the ellipsis button of the ServiceOperationInfo property and from the resulting dialog box click Import. This will present you with a secondary dialog box where you are able to associate a SendActivity type with a metadata
CHAPTER 26 ■ INTRODUCING WINDOWS WORKFLOW FOUNDATION |
943 |
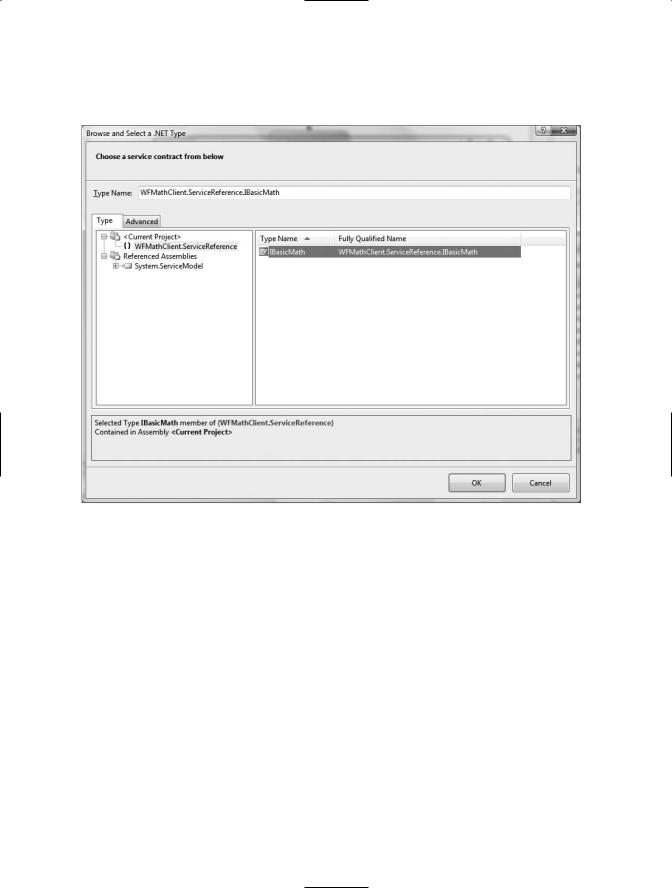
description for a given WCF service contract. Select the only contract available at this endpoint, IBasicMath (see Figure 26-21).
Figure 26-21. Associating a service method to a SendActivity type
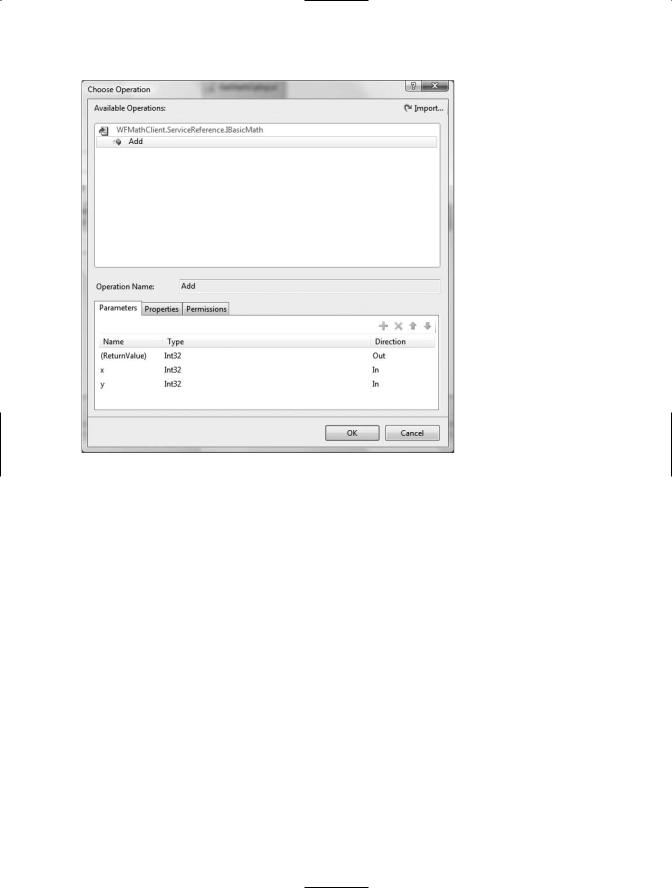
Once you do so, you will then be able to pick which operation on the selected contract the SendActivity should invoke. In our case, the only option is the Add() method (see Figure 26-22).
We have a few additional configuration steps to take before the SendActivity is ready to pass the values maintained by the FirstNumber and SecondNumber properties to the MathService for processing. Specifically, we need to inform the SendActivity which binding will be used during the invocation by setting a value to the ChannelToken property (recall that a single WCF service can be configured in such a way that it is exposed from several bindings). If you open the updated App. config file and locate the <client> section, you will find that the name of the generated binding is
WSHttpBinding_IBasicMath:
<client>
<endpoint address="http://localhost:8080/MathServiceLibrary" binding="wsHttpBinding" bindingConfiguration="WSHttpBinding_IBasicMath" contract="WFMathClient.ServiceReference.IBasicMath" name="WSHttpBinding_IBasicMath"
>
<identity>
<servicePrincipalName value="host/InterUber.intertech-inc.com" /> </identity>
</endpoint>
</client>
944 CHAPTER 26 ■ INTRODUCING WINDOWS WORKFLOW FOUNDATION
Figure 26-22. Selecting the Add() operation
Copy this value to your clipboard and paste it into the ChannelToken property using the IDE’s Properties window. Once you have done so, you will notice that the ChannelToken property has two subnodes named EndpointName and OwnerActivityName. Because the MathService exposes only a single endpoint, copy the same value set to ChannelToken (WSHttpBinding_IBasicMath) to the EndpointName, and select the name of your workflow instance (WCFSendAddActivity) as the owner.
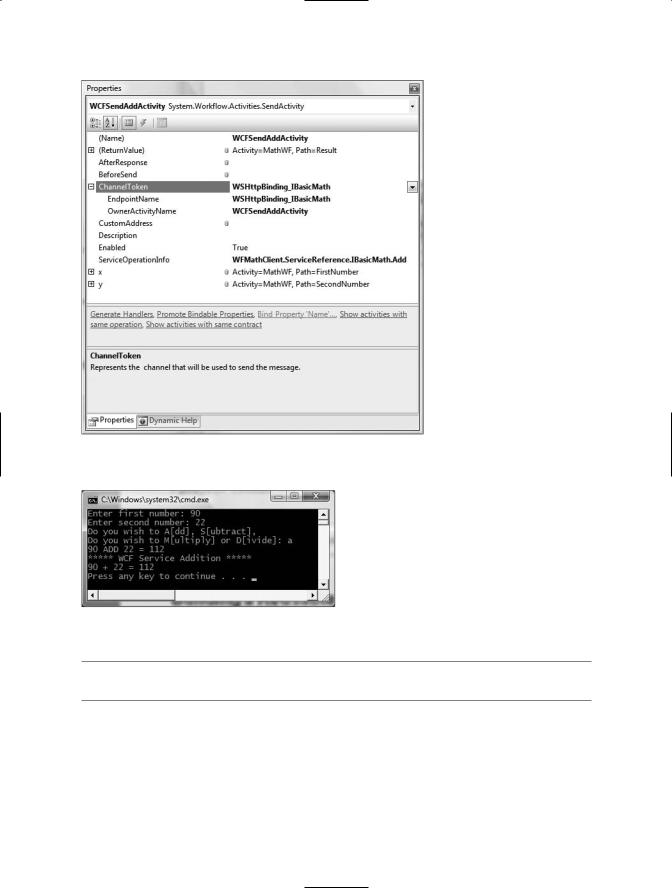
Last but not least, we need to connect the x and y parameters of the Add() method to our FirstNumber and SecondNumber properties, and the return value to our Result property. The process of doing so is identical to configuring the InvokeWebService activity (click the ellipsis buttons to pick the property name). Figure 26-23 shows the fully configured SendActivity.
To view the result, place a final Code activity on your workflow designer and assign the ExecuteCode value to a method named WCFResult(), which is implemented like so:
private void WCFResult(object sender, EventArgs e)
{
Console.WriteLine("***** WCF Service Addition *****");
Console.WriteLine("{0} + {1} = {2}", FirstNumber, SecondNumber, Result);
}
Figure 26-24 shows the final output.
CHAPTER 26 ■ INTRODUCING WINDOWS WORKFLOW FOUNDATION |
945 |
Figure 26-23. The fully configured SendActivity
Figure 26-24. Communicating with a WCF service
■Source Code The WFMathClient example is included under the Chapter 26 subdirectory.
Building a Reusable WF Code Library
These first examples allowed you to play around with various WF activities at design time, interact with the workflow runtime engine (by passing custom parameters), and get into the overall WF mind-set using console-based WF hosts. While this is great from a learning point of view, I bet you can easily envision building workflow-enabled Windows Forms applications, WPF applications, or
946CHAPTER 26 ■ INTRODUCING WINDOWS WORKFLOW FOUNDATION
ASP.NET web applications. Furthermore, I am sure you can imagine the need to reuse a workflow across numerous applications by packaging the functionality within a reusable .NET code library.
The next WF example illustrates how to package workflows into *.dll assemblies and make use of them from a hosting Windows Forms application (which, by the way, is the same process as hosting an external workflow within any executable, such as a WPF application). We will design a workflow that models the basic process of checking credit to place an order to purchase an automobile from the AutoLot database created in Chapter 22.
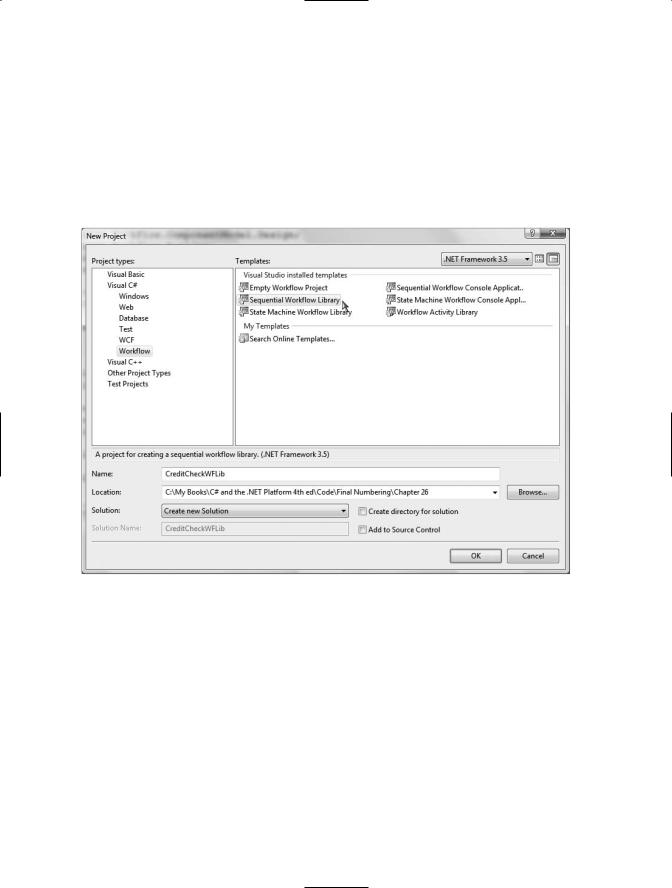
Begin by selecting a Sequential Workflow Library project named CreditCheckWFLib (see Figure 26-25) and rename your initial file to CreditCheckWF.cs.
Figure 26-25. Creating a Sequential Workflow Library project
At this point, you will be provided with an initial workflow designer. Be aware that a single workflow code library can contain multiple workflows, each of which can be inserted using the Project Add New Item dialog box. In any case, add a reference to your AutoLotDAL.dll assembly created in Chapter 22, and update your initial code file to import the AutoLotConnectedLayer namespace:
// Add the following import. using AutoLotConnectedLayer;
namespace CreditCheckWFLib
{
...
}

CHAPTER 26 ■ INTRODUCING WINDOWS WORKFLOW FOUNDATION |
947 |
Next, add an automatic property to represent the customer’s ID:
public sealed partial class CreditCheckWF : SequentialWorkflowActivity
{
// ID of customer to run credit check against. public int ID { get; set; }
...
}
When we build the client application at a later step, this property will be set using an incoming Dictionary<string, object> object passed to the workflow runtime.
Performing a Credit Check
Modify your class with an addition automatic property (CreditOK), which represents if the customer has passed our “rigorous” credit validation process:
public sealed partial class CreditCheckWF : SequentialWorkflowActivity
{
//We will use this to determine if the credit check
//has passed or failed.
public bool CreditOK { get; set; }
...
}
Now place a Code activity onto your WF designer named ValidateCreditActivity and set the ExecuteCode value to a new method named ValidateCredit. Obviously, a production-level credit check could involve a good number of subactivities, database lookups, and so forth. Here, we will generate a random number to represent the chance the caller passes our credit test:
private void ValidateCredit(object sender, EventArgs e)
{
//Pretend that we have preformed some exotic
//credit validation here...
Random r = new Random(); int value = r.Next(500); if (value > 300)
CreditOK = true; else
CreditOK = false;
}
Next, add an IfElse activity named CreditCheckPassedActivity with two branches named CreditCheckOK and CreditCheckFailed. Configure the left branch to be evaluated using a new declarative rule condition using the following conditional expression:
this.CreditOK == true
If the user fails the credit check, our goal is to remove them from the Customers table and add them to the CreditRisks table. Given that Chapter 22 already accounted for this possibility using the
ProcessCreditRisk() method of the InventoryDAL type, add a new CodeActivity type within the CreditCheckFailed branch named ProcessCreditRiskActivity mapped to a method named
ProcessCreditRisk(). Implement this method as so:
■Note Recall that we added a bool parameter to the InventoryDAL.ProcessCreditRisk() method to force the transaction to fail for testing purposes. Be sure to pass the value false as the first parameter.

948CHAPTER 26 ■ INTRODUCING WINDOWS WORKFLOW FOUNDATION
private void ProcessCreditRisk(object sender, EventArgs e)
{
//Ideally we would store the connection string externally.
InventoryDAL dal = new InventoryDAL();
dal.OpenConnection(@"Data Source=(local)\SQLEXPRESS;Integrated Security=SSPI;" + "Initial Catalog=AutoLot");
try
{
dal.ProcessCreditRisk(false, ID);
}
finally
{
dal.CloseConnection();
}
}
If the credit check succeeds, we will simply display an informational message box to inform the caller that the credit check succeeded. In a real workflow, the next steps might involve placing an order, sending out an order verification e-mail, and so on. Assuming you have referenced the System.Windows.Forms.dll assembly, place a Code activity in the leftmost branch of your IfElse activity named PurchaseCarActivity, which is mapped to a method name PurchaseCar() implemented as so:
private void PurchaseCar(object sender, EventArgs e)
{
//Here, we will opt for simplicity. However, we could easily update
//AutoLotDAL.dll with a new method to place a new order within the Orders table.
System.Windows.Forms.MessageBox.Show("Your credit has been approved!");
}
To complete your workflow, add a final CodeActivity to the rightmost branch directly after the
ProcessCreditRiskActitity. Name this new activity ShowDenyMessageActivity, which is mapped to the following method:
private void CreditDenied(object sender, EventArgs e)
{
System.Windows.Forms.MessageBox.Show("You are a CREDIT RISK!", "Order Denied!");
}
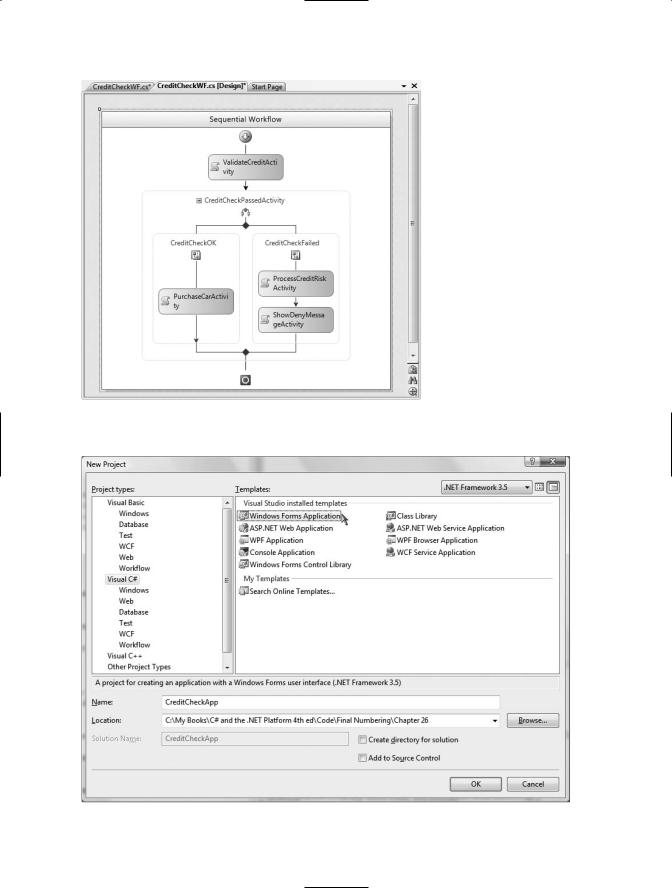
At this point, your workflow looks something like Figure 26-26.
■Source Code The CreditCheckWFLib example is included under the Chapter 26 subdirectory.
Creating a Windows Forms Client Application
Now that you have authored a reusable .NET code library that contains a custom workflow, you are able to build any sort of .NET application to make use of it. Although we have not yet examined the details of building GUIs using the Windows Forms API, here we will build a very crude UI just to test our workflow logic (Chapter 27 will begin your investigation of GUI-based .NET applications). To begin, create a new Windows Forms Application project named CreditCheckApp (see Figure 26-27).
950 CHAPTER 26 ■ INTRODUCING WINDOWS WORKFLOW FOUNDATION
Once you have done so, rename your initial Form1.cs file to the more fitting MainForm.cs by right-clicking the Form1.cs icon in Solution Explorer and selecting the Rename option. Next, add a reference to each of the following .NET assemblies:
•CreditCheckWFLib.dll
•System.Workflow.Runtime.dll
•System.Workflow.Activities.dll
•System.Workflow.ComponentModel.dll
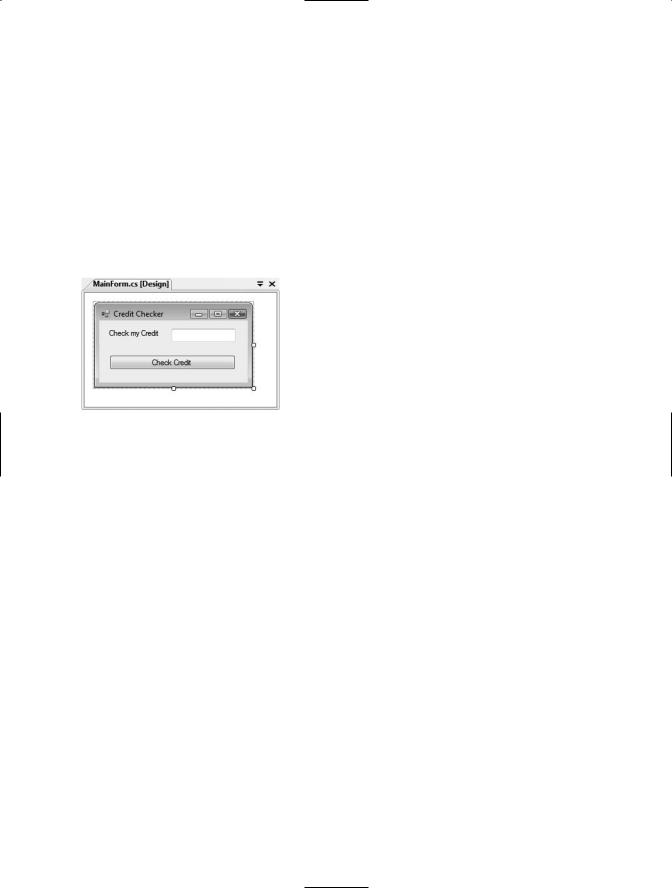
The user interface of our application will consist of a descriptive Label, a TextBox (named txtCustomerID), and a single Button type (named btnExecuteWorkflow) on the initial form. Figure 26-28 shows one possible design.
Figure 26-28. A simple UI to test our workflow library
Once you place these UI elements on the designer, handle the Click event of the Button type by double-clicking the button icon located on the designer surface.
Within your code file, implement the Click event handler to fire up the WF runtime engine and create an instance of your custom workflow. Notice that the following code is identical to that found within a console-based workflow application (minus the threading code required to keep the console program alive until the workflow completes):
//Initial using statements removed for simplicity.
...
//Need the WF runtime!
using System.Workflow.Runtime;
// Be sure to reference our custom WF library. using CreditCheckWFLib;
namespace WinFormsWFClient
{
public partial class MainForm : Form
{
public MainForm()
{
InitializeComponent();
}
private void btnCheckCustomerCredit_Click(object sender, EventArgs e)
{
// Create the WF runtime.
WorkflowRuntime wfRuntime = new WorkflowRuntime();

CHAPTER 26 ■ INTRODUCING WINDOWS WORKFLOW FOUNDATION |
951 |
//Get ID in the TextBox to pass to the workflow.
Dictionary<string, object> args = new Dictionary<string, object>();
args.Add("ID", int.Parse(txtCustomerID.Text));
//Get an instance of our WF.
WorkflowInstance myWorkflow = wfRuntime.CreateWorkflow(typeof(CreditCheckWF), args);
// Start it up! myWorkflow.Start();
}
}
}
When you run your application, enter a customer ID value, ensuring that the customer ID you enter does not current have a reference in the Orders table (to ensure that the item will be successfully deleted from the Customers table).
As you test credit ratings, you should eventually find that a risky customer has been deleted from the Customers table and placed into the CreditRisk table. In fact, for testing purposes, you may wish to add a dummy entry into the Customers table and attempt to verify credit for a fixed individual.
■Source Code The WinFormsWFClient example is included under the Chapter 26 subdirectory.
A Brief Word Regarding Custom Activities
At this point, you have seen how to configure a handful of common WF activities within different types of projects. While these built-in activities certainly are a firm starting point for many WF applications, they do not account for every possible circumstance. Thankfully, the WF community has been creating new custom activities, many of which are freely downloadable, and others of which are offered through third parties at various price points.
If you are interested in examining some additional workflow activities, a good starting point is http:// wf.netfx3.com. Here, you can download a good number of additional activities that extend those that ship with the product.
Despite the number of auxiliary activities that can be obtained from the online WF community, it is also entirely possible (and in some cases necessary) to build a custom activity from scratch. As you might guess, Visual Studio 2008 provides a Workflow Activity Library project template for this very purpose. If you select this project type, you will be given a designer surface to create your custom activity, using an identical approach to building a workflow itself (add new activities, connect them to code, etc.).
Much like the process of building a custom Windows Forms control, a custom activity can be adorned with numerous .NET attributes that control how the component should integrate within the IDE—for example, which bitmap image to display on the toolbar, which configuration dialogs (if any) to display when a property is configured within the Properties window, and so forth.