

Pro CSharp 2008 And The .NET 3.5 Platform [eng]
.pdf972 CHAPTER 27 ■ PROGRAMMING WITH WINDOWS FORMS
Table 27-5. Continued
Property |
Meaning in Life |
StartPosition |
Gets or sets the starting position of the form at runtime, as specified |
|
by the FormStartPosition enumeration. |
WindowState |
Configures how the form is to be displayed on startup. Used in |
|
conjunction with the FormWindowState enumeration. |
|
|
In addition to numerous On-prefixed default event handlers, Table 27-6 gives a list of some core methods defined by the Form type.
Table 27-6. Key Methods of the Form Type
Method |
Meaning in Life |
Activate() |
Activates a given form and gives it focus |
Close() |
Closes a form |
CenterToScreen() |
Places the form in the dead-center of the screen |
LayoutMDI() |
Arranges each child form (as specified by the LayoutMDI enumeration) within |
|
the parent form |
ShowDialog() |
Displays a form as a modal dialog box |
|
|
Finally, the Form class defines a number of events, many of which fire during the form’s lifetime. Table 27-7 hits the highlights.
Table 27-7. Select Events of the Form Type
Event |
Meaning in Life |
Activated |
Occurs whenever the form is activated, meaning the form has been given the |
|
current focus on the desktop |
Closed, Closing |
Used to determine when the form is about to close or has closed |
Deactivate |
Occurs whenever the form is deactivated, meaning the form has lost current |
|
focus on the desktop |
Load |
Occurs after the form has been allocated into memory, but is not yet visible |
|
on the screen |
MDIChildActive |
Sent when a child window is activated |
|
|
The Life Cycle of a Form Type
If you have programmed user interfaces using GUI toolkits such as Java Swing, Mac OS X Cocoa, or the raw Win32 API, you are aware that “window types” have a number of events that fire during their lifetime. The same holds true for Windows Forms. As you have seen, the life of a form begins when the type constructor is called prior to being passed into the Application.Run() method.
Once the object has been allocated on the managed heap, the framework fires the Load event. Within a Load event handler, you are free to configure the look and feel of the Form, prepare any contained child controls (such as ListBoxes, TreeViews, and whatnot), or simply allocate resources used during the Form’s operation (database connections, proxies to remote objects, and whatnot).
Once the Load event has fired, the next event to fire is Activated. This event fires when the form receives focus as the active window on the desktop. The logical counterpart to the Activated event

CHAPTER 27 ■ PROGRAMMING WITH WINDOWS FORMS |
973 |
is (of course) Deactivate, which fires when the form loses focus as the active window. As you can guess, the Activated and Deactivate events can fire numerous times over the life of a given Form type as the user navigates between active applications.
When the user has chosen to close the form in question, two close-centric events fire: Closing and Closed. The Closing event is fired first and is an ideal place to prompt the end user with the much hated (but useful) “Are you sure you wish to close this application?” message. This conformational step is quite helpful to ensure the user has a chance to save any application-centric data before terminating the program.
The Closing event works in conjunction with the CancelEventHandler delegate defined in the
System.ComponentModel namespace. If you set the CancelEventArgs.Cancel property to true, you prevent the window from being destroyed and instruct it to return to normal operation. If you set CancelEventArgs.Cancel to false, the Closed event fires, and the Windows Forms application exits, which unloads the AppDomain and terminates the process.
To solidify the sequence of events that take place during a form’s lifetime, assume you have a new Windows Forms project named FormLifeTime and have renamed the initial form to MainWindow.cs (via Solution Explorer). Now, within your form’s constructor, handle the Load, Activated, Deactivate, Closing, and Closed events (recall from Chapter 11 that the IDE will autogenerate the correct delegate and event handler when you press the Tab key twice after typing +=):
public MainWindow()
{
InitializeComponent();
// Handle various lifetime events.
Closing += new CancelEventHandler(MainWindow_Closing); Load += new EventHandler(MainWindow_Load);
Closed += new EventHandler(MainWindow_Closed); Activated += new EventHandler(MainWindow_Activated); Deactivate += new EventHandler(MainWindow_Deactivate);
}
■Note The reason we are handling these events manually is that the Properties window (for some strange reason) does not list the Closing or Closed events. However, the Load, Activated, and Deactivate events can be handled using this design-time tool.
Within the Load, Closed, Activated, and Deactivate event handlers, you are going to update the value of a new Form-level string member variable (named lifeTimeInfo) with a simple message that displays the name of the event that has just been intercepted. As well, notice that within the Closed event handler, you will display the value of this string within a message box:
private void MainWindow_Load(object sender, System.EventArgs e)
{
lifeTimeInfo += "Load event\n";
}
private void MainWindow_Activated(object sender, System.EventArgs e)
{
lifeTimeInfo += "Activate event\n";
}
private void MainWindow_Deactivate(object sender, System.EventArgs e)
{


976 CHAPTER 27 ■ PROGRAMMING WITH WINDOWS FORMS
Table 27-8. Continued
Property |
Meaning in Life |
Location Returns a Point that contains the current X and Y values
XGets the x-coordinate of a mouse click
YGets the y-coordinate of a mouse click
Let’s implement our MouseMove handler to display the current X and Y position of the mouse on the Form’s caption using the Location property:
private void MainWindow_MouseMove(object sender, MouseEventArgs e)
{
Text = string.Format("Mouse Position: {0}", e.Location);
}
When you run the application and move the mouse over the window, you will find the position displayed on the title area of your MainWindow type (see Figure 27-14).
Figure 27-14. Intercepting mouse movement
Determining Which Mouse Button Was Clicked
Another common mouse-centric detail to attend to is determining which button has been clicked when a MouseUp, MouseDown, MouseClick, or MouseDoubleClick event occurs. When you wish to determine exactly which button was clicked (such as left, right, or middle), you need to examine the Button property of the MouseEventArgs class. The value of the Button property is constrained by the related MouseButtons enumeration:
public enum MouseButtons
{
Left,
Middle,
None,
Right,
XButton1,
XButton2
}
To illustrate, handle the MouseUp event on your MainWindow type using the Properties window. The following MouseUp event handler displays which mouse button was clicked inside a message box:
private void MainWindow_MouseUp (object sender, MouseEventArgs e)
{
// Which mouse button was clicked?


978 CHAPTER 27 ■ PROGRAMMING WITH WINDOWS FORMS
Table 27-9. Continued
Property |
Meaning in Life |
KeyCode |
Gets the keyboard code for a KeyDown or KeyUp event |
Modifiers |
Indicates which modifier keys (Ctrl, Shift, and/or Alt) were pressed |
Shift |
Gets a value indicating whether the Shift key was pressed |
|
|
To illustrate, assume you have a new Windows Application named KeyboardEventApp, which handles the KeyUp event as follows.
public partial class MainWindow : Form
{
public MainWindow()
{
InitializeComponent();
}
private void MainWindow_KeyUp(object sender, KeyEventArgs e)
{
Text = string.Format("Key Pressed: {0} Modifiers: {1}", e.KeyCode.ToString(), e.Modifiers.ToString());
}
}
Now compile and run your program. You should be able to determine not only which mouse button was clicked, but also which keyboard key was pressed. For example, Figure 27-15 shows the result of pressing the P, Ctrl, and Shift keys simultaneously.
Figure 27-15. Intercepting keyboard activity
■Source Code The KeyboardEventApp project is included under the Chapter 27 subdirectory.
Designing Dialog Boxes
Within a graphical user interface program, dialog boxes tend to be the primary way to capture user input for use within the application itself. Unlike other GUI APIs you may have used in the past, there is no “Dialog” base class. Rather, dialog boxes under Windows Forms are simply types deriving from the Form class.

CHAPTER 27 ■ PROGRAMMING WITH WINDOWS FORMS |
979 |
In addition, many dialog boxes are intended to be nonsizable; therefore, you will typically want to set the FormBorderStyle property to FormBorderStyle.FixedDialog. As well, dialog boxes typically set the MinimizeBox and MaximizeBox properties to false. In this way, the dialog box is configured to be a fixed constant. Finally, if you set the ShowInTaskbar property to false, you will prevent the form from being visible in the Windows taskbar.
To illustrate building and manipulating dialog boxes, create a new Windows Application project named CarOrderApp. Rename the initial Form1.cs file to MainWindow.cs using Solution Explorer, and using the Forms designer, create a simple File Exit menu as well as a Tool Order Automobile . . . menu item. Once you have done so, handle the Click event for the Exit and Order Automobile submenus via the Properties window. Figure 27-16 shows the initial design of the main window.
Figure 27-16. Menu system of the main window
Implement the File Exit menu handler to simply terminate the application via a call to
Application.Exit():
private void exitToolStripMenuItem_Click(object sender, EventArgs e)
{
Application.Exit();
}
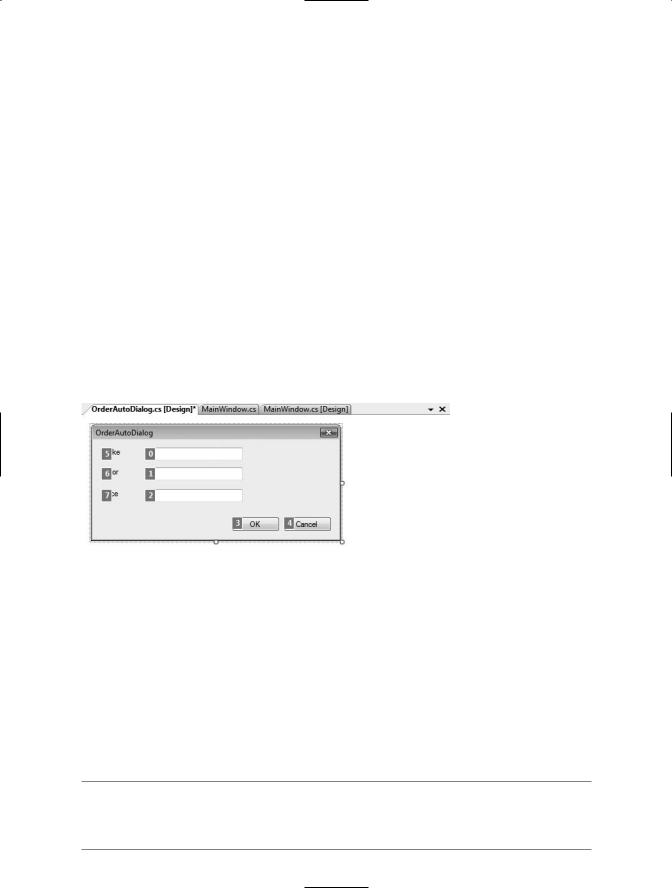
Now, using the Project menu of Visual Studio, select the Add Windows Forms menu option. Name your new form OrderAutoDialog.cs (see Figure 27-17).
For this example, design a dialog box that has the expected OK and Cancel button (named btnOK and btnCancel, respectively) as well as three TextBox controls named txtMake, txtColor, and txtPrice. Now, using the Properties window, finalize the design of your dialog box as follows:
•Set the FormBorderStyle property to FixedDialog.
•Set the MinimizeBox and MaximizeBox properties to false.
•Set the StartPosition property to CenterParent.
•Set the ShowInTaskbar property to false.

CHAPTER 27 ■ PROGRAMMING WITH WINDOWS FORMS |
981 |
Configuring the Tab Order
Now that you have created a somewhat interesting dialog box, let’s formalize the issue of tab order. As you may know, when a form contains multiple GUI widgets, users expect to be able to shift focus using the Tab key. Configuring the tab order for your set of controls requires that you understand two key properties: TabStop and TabIndex.
The TabStop property can be set to true or false, based on whether or not you wish this GUI item to be reachable using the Tab key. Assuming the TabStop property has been set to true for a given widget, the TabOrder property is then set to establish its order of activation in the tabbing sequence (which is zero based). Consider this example:
// Configure tabbing properties. txtMake.TabIndex = 0; txtMake.TabStop = true;
The Tab Order Wizard
While you could set the TabStop and TabIndex manually using the Properties window, the Visual Studio 2008 IDE supplies a Tab Order Wizard, which you access by choosing View Tab Order (be aware that you will not find this menu option unless the Forms designer is active). Once activated, your design-time form displays the current TabIndex value for each widget. To change these values, click each item in the order you choose (see Figure 27-19).
Figure 27-19. The Tab Order Wizard
To exit the Tab Order Wizard, simply press the Esc key.
Setting the Form’s Default Input Button
Many user-input forms (especially dialog boxes) have a particular Button that will automatically respond to the user pressing the Enter key. For the current form, if you wish to ensure that when the user presses the Enter key, the Click event handler for btnOK is invoked, simply set the form’s AcceptButton property as follows (this same setting can be established using the Properties window):
//When the Enter key is pressed, it is as if
//the user clicked the btnOK button.
this.AcceptButton = btnOK;
■Note Some forms require the ability to simulate clicking the form’s Cancel button when the user presses the Esc key. This can be done by assigning the CancelButton property of the Form to the Button object representing the clicking of the Cancel button.