
- •Microsoft C# Programming for the Absolute Beginner
- •Table of Contents
- •Microsoft C# Programming for the Absolute Beginner
- •Introduction
- •Overview
- •Chapter 1: Basic Input and Output: A Mini Adventure
- •Project: The Mini Adventure
- •Reviewing Basic C# Concepts
- •Namespaces
- •Classes
- •Methods
- •Statements
- •The Console Object
- •.NET Documentation
- •Getting into the Visual Studio .Net Environment
- •Examining the Default Code
- •Creating a Custom Namespace
- •Adding Summary Comments
- •Creating the Class
- •Moving from Code to a Program
- •Compiling Your Program
- •Looking for Bugs
- •Getting Input from the User
- •Creating a String Variable
- •Getting a Value with the Console.ReadLine() Method
- •Incorporating a Variable in Output
- •Combining String Values
- •Combining Strings with Concatenation
- •Adding a Tab Character
- •Using the Newline Sequence
- •Displaying a Backslash
- •Displaying Quotation Marks
- •Launching the Mini Adventure
- •Planning the Story
- •Creating the Variables
- •Getting Values from the User
- •Writing the Output
- •Finishing the Program
- •Summary
- •Chapter 2: Branching and Operators: The Math Game
- •The Math Game
- •Using Numeric Variables
- •The Simple Math Game
- •Numeric Variable Types
- •Integer Variables
- •Long Integers
- •Data Type Problems
- •Math Operators
- •Converting Variables
- •Explicit Casting
- •The Convert Object
- •Creating a Branch in Program Logic
- •The Hi Bill Game
- •Condition Testing
- •The If Statement
- •The Else Clause
- •Multiple Conditions
- •Working with The Switch Statement
- •The Switch Demo Program
- •Examining How Switch Statements Work
- •Creating a Random Number
- •Introducing the Die Roller
- •Exploring the Random Object
- •Creating a Random Double with the .NextDouble() Method
- •Getting the Values of Dice
- •Creating the Math Game
- •Designing the Game
- •Creating the Variables
- •Managing Addition
- •Managing Subtraction
- •Managing Multiplication and Division
- •Checking the Answers
- •Waiting for the Carriage Return
- •Summary
- •Chapter 3: Loops and Strings: The Pig Latin Program
- •Project: The Pig Latin Program
- •Investigating The String Object
- •The String Mangler Program
- •A Closer Look at Strings
- •Using the Object Browser
- •Experimenting with String Methods
- •Performing Common String Manipulations
- •Using a For Loop
- •Examining The Bean Counter Program
- •Creating a Sentry Variable
- •Checking for an Upper Limit
- •Incrementing the Variable
- •Examining the Behavior of the For Loop
- •The Fancy Beans Program
- •Skipping Numbers
- •Counting Backwards
- •Using a Foreach Loop to Break Up a Sentence
- •Using a While Loop
- •The Magic Word Program
- •Writing an Effective While Loop
- •Planning Your Program with the STAIR Process
- •S: State the Problem
- •T: Tool Identification
- •A: Algorithm
- •I: Implementation
- •R: Refinement
- •Applying STAIR to the Pig Latin Program
- •Stating the Problem
- •Identifying the Tools
- •Creating the Algorithm
- •Implementing and Refining
- •Writing the Pig Latin Program
- •Setting Up the Variables
- •Creating the Outside Loop
- •Dividing the Phrase into Words
- •Extracting the First Character
- •Checking for a Vowel
- •Adding Debugging Code
- •Closing Up the code
- •Summary
- •Introducing the Critter Program
- •Creating Methods to Reuse Code
- •The Song Program
- •Building the Main() Method
- •Creating a Simple Method
- •Adding a Parameter
- •Returning a Value
- •Creating a Menu
- •Creating a Main Loop
- •Creating the Sentry Variable
- •Calling a Method
- •Working with the Results
- •Writing the showMenu() Method
- •Getting Input from the User
- •Handling Exceptions
- •Returning a Value
- •Creating a New Object with the CritterName Program
- •Creating the Basic Critter
- •Using Scope Modifiers
- •Using a Public Instance Variable
- •Creating an Instance of the Critter
- •Adding a Method
- •Creating the talk() Method for the CritterTalk Program
- •Changing the Menu to Use the talk() Method
- •Creating a Property in the CritterProp Program
- •Examining the Critter Prop Program
- •Creating the Critter with a Name Property
- •Using Properties as Filters
- •Making the Critter More Lifelike
- •Adding More Private Variables
- •Adding the Age() Method
- •Adding the Eat() Method
- •Adding the Play() Method
- •Modifying the Talk() Method
- •Making Changes in the Main Class
- •Summary
- •Introducing the Snowball Fight
- •Inheritance and Encapsulation
- •Creating a Constructor
- •Adding a Constructor to the Critter Class
- •Creating the CritViewer Class
- •Reviewing the Static Keyword
- •Calling a Constructor from the Main() Method
- •Working with Multiple Files
- •Overloading Constructors
- •Viewing the Improved Critter Class
- •Adding Polymorphism to Your Objects
- •Modifying the Critter Viewer in CritOver to Demonstrate Overloaded Constructors
- •Using Inheritance to Make New Classes
- •Creating a Class to View the Clone
- •Creating the Critter Class
- •Improving an Existing Class
- •Introducing the Glitter Critter
- •Adding Methods to a New Class
- •Changing the Critter Viewer Again
- •Creating the Snowball Fight
- •Building the Fighter
- •Building the Robot Fighter
- •Creating the Main Menu Class
- •Summary
- •Overview
- •Introducing the Visual Critter
- •Thinking Like a GUI Programmer
- •Creating a Graphical User Interface (GUI)
- •Examining the Code of a Windows Program
- •Adding New Namespaces
- •Creating the Form Object
- •Creating a Destructor
- •Creating the Components
- •Setting Component Properties
- •Setting Up the Form
- •Writing the Main() Method
- •Creating an Interactive Program
- •Responding to a Simple Event
- •Creating and Adding the Components
- •Adding an Event to the Program
- •Creating an Event Handler
- •Allowing for Multiple Selections
- •Choosing a Font with Selection Controls
- •Creating the User Interface
- •Examining Selection Tools
- •Creating Instance Variables in the Font Chooser
- •Writing the AssignFont() Method
- •Writing the Event Handlers
- •Working with Images and Scroll Bars
- •Setting Up the Picture Box
- •Adding a Scroll Bar
- •Revisiting the Visual Critter
- •Designing the Program
- •Determining the Necessary Tools
- •Designing the Form
- •Writing the Code
- •Summary
- •Chapter 7: Timers and Animation: The Lunar Lander
- •Introducing the Lunar Lander
- •Reading Values from the Keyboard
- •Introducing the Key Reader Program
- •Setting Up the Key Reader Program
- •Coding the KeyPress Event
- •Coding the KeyDown Event
- •Determining Which Key Was Pressed
- •Animating Images
- •Introducing the ImageList Control
- •Setting Up an Image List
- •Looking at the Image Collection
- •Displaying an Image from the Image List
- •Using a Timer to Automate Animation
- •Introducing the Timer Control
- •Configuring the Timer
- •Adding Motion
- •Checking for Keyboard Input
- •Working with the Location Property
- •Detecting Collisions between Objects
- •Coding the Crasher Program
- •Getting Values for newX and newY
- •Bouncing the Ball off the Sides
- •Checking for Collisions
- •Extracting a Rectangle from a Component
- •Getting More from the MessageBox Object
- •Introducing the MsgDemo Program
- •Retrieving Values from the MessageBox
- •Coding the Lunar Lander
- •The Visual Design
- •The Constructor
- •The timer1_Tick() Method
- •The moveShip() Method
- •The checkLanding() Method
- •The theForm_KeyDown() Method
- •The showStats() Method
- •The killShip() Method
- •The initGame() Method
- •Summary
- •Chapter 8: Arrays: The Soccer Game
- •The Soccer Game
- •Introducing Arrays
- •Exploring the Counter Program
- •Creating an Array of Strings
- •Referring to Elements in an Array
- •Working with Arrays
- •Using the Array Demo Program to Explore Arrays
- •Building the Languages Array
- •Sorting the Array
- •Designing the Soccer Game
- •Solving a Subset of the Problem
- •Adding Percentages for the Other Players
- •Setting Up the Shot Demo Program
- •Setting Up the List Boxes
- •Using a Custom Event Handler
- •Writing the changeStatus() Method
- •Kicking the Ball
- •Designing Programs by Hand
- •Examining the Form by Hand Program
- •Adding Components in the Constructor
- •Responding to the Button Event
- •Building the Soccer Program
- •Setting Up the Variables
- •Examining the Constructor
- •Setting Up the Players
- •Setting Up the Opponents
- •Setting Up the Goalies
- •Responding to Player Clicks
- •Handling Good Shots
- •Handling Bad Shots
- •Setting a New Current Player
- •Handling the Passage of Time
- •Updating the Score
- •Summary
- •Chapter 9: File Handling: The Adventure Kit
- •Introducing the Adventure Kit
- •Viewing the Main Screen
- •Loading an Adventure
- •Playing an Adventure
- •Creating an Adventure
- •Reading and Writing Text Files
- •Exploring the File IO Program
- •Importing the IO Namespace
- •Writing to a Stream
- •Reading from a Stream
- •Creating Menus
- •Exploring the Menu Demo Program
- •Adding a MainMenu Object
- •Adding a Submenu
- •Setting Up the Properties of Menu Items
- •Writing Event Code for Menus
- •Using Dialog Boxes to Enhance Your Programs
- •Exploring the Dialog Demo Program
- •Adding Standard Dialogs to Your Form
- •Using the File Dialog Controls
- •Responding to File Dialog Events
- •Using the Font Dialog Control
- •Using the Color Dialog Control
- •Storing Entire Objects with Serialization
- •Exploring the Serialization Demo Program
- •Creating the Contact Class
- •Referencing the Serializable Namespace
- •Storing a Class
- •Retrieving a Class
- •Returning to the Adventure Kit Program
- •Examining the Room Class
- •Creating the Dungeon Class
- •Writing the Game Class
- •Writing the Editor Class
- •Writing the MainForm Class
- •Summary
- •Chapter 10: Chapter Basic XML: The Quiz Maker
- •Introducing the Quiz Maker Game
- •Taking a Quiz
- •Creating and Editing Quizzes
- •Investigating XML
- •Defining XML
- •Creating an XML Document in .NET
- •Creating an XML Schema for Your Language
- •Investigating the .NET View of XML
- •Exploring the XmlNode Class
- •Exploring the XmlDocument Class
- •Reading an Existing XML Document
- •Creating the XML Viewer Program
- •Writing New Values to an XML Document
- •Building the Document Structure
- •Adding an Element to the Document
- •Displaying the XML Code
- •Examining the Quizzer Program
- •Building the Main Form
- •Writing the Quiz Form
- •Writing the Editor Form
- •Summary
- •Overview
- •Introducing the SpyMaster Program
- •Creating a Simple Database
- •Accessing the Data Server
- •Accessing the Data in a Program
- •Using Queries to Modify Data Results
- •Limiting Data with the SELECT Statement
- •Using an Existing Database
- •Adding the Capability to Display Queries
- •Creating a Visual Query Builder
- •Working with Relational Databases
- •Improving Your Data with Normalization
- •Using a Join to Connect Two Tables
- •Creating a View
- •Referring to a View in a Program
- •Incorporating the Agent Specialty Attribute
- •Working with Other Databases
- •Creating a New Connection
- •Converting a Data Set to XML
- •Reading from XML to a Data Source
- •Creating the SpyMaster Database
- •Building the Main Form
- •Editing the Assignments
- •Editing the Specialties
- •Viewing the Agents
- •Editing the Agent Data
- •Summary
- •List of Figures
- •List of Tables
- •List of Sidebars

Creating an XML Document in .NET
You can create any kind of XML document you want in order to describe any kind of data you want to work with. However, XML works best with hierarchical types of data structures that can be organized in an outline form. The first step of defining an XML language is to look at the data you are working with and try to organize it into an outline form. For the quiz program, I realized that a quiz is made up of several problems. (I avoided the use of the term question to describe the major element of a quiz because I wanted to use question to describe the question being asked.)
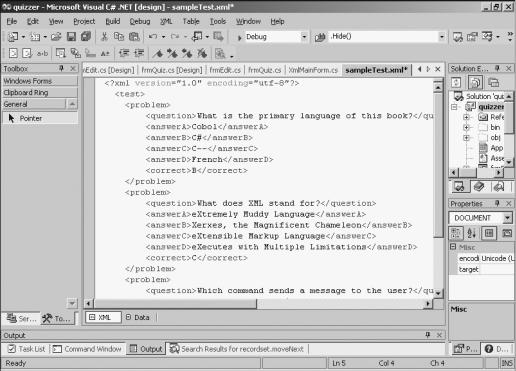
Each problem consists of a question, four possible answers, and the correct answer. To simplify the example, I decided to work only with multiple−choice questions with four answers. When I had decided what kinds of tags I would have, I started to build a sample document. You can use any text editor you want to build an XML document, but Visual Studio comes with a very nice XML document editor that makes the task simple. To use the XML editor, open up a project in the editor, and choose Add New Item from the Project menu. Select XML Document from the resulting dialog to open the XML editor. If you already have an XML document that you’d like to open in the editor, choose Open File from the File menu, and select the XML file from the drive system. (Alternatively, you can choose Add Existing Item from the Project menu. Opening a file doesn’t necessarily add the file to your project, but adding an existing item does.) Figure 10.5 shows an XML file being written in the Visual Studio XML editor.
Figure 10.5: The Visual Studio XML editor automatically indents your code and creates a closing tag for each opening tag.
The XML editor included with Visual Studio makes writing XML easy because it automatically indents your XML code and, each time you create a tag, it creates an ending tag. The editor also color−codes the XML much like normal C# code, which helps you to separate the XML code from the actual data. Visual Studio also includes a very handy editor for writing your own XML schema, but you will not need it for this brief introduction to XML. After you create the basic framework of your data structure, you can click the data tag at the bottom of the XML code window to switch to a table view (see Figure 10.6).
283

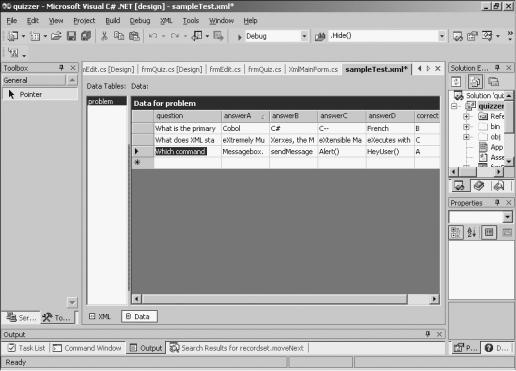
Figure 10.6: After you define your data set, you can enter it in, just like a database.
Visual Studio can automatically convert your XML structure into a table for easy data entry. It allows you to enter your data quickly and accurately without having to repeat all the XML tags. This gives you the flexibility of XML with the easy data access of a more formal database. In Chapter 11, “Databases and ADO.NET: The Spymaster Database,” you will learn more about the relationship between XML and databases in .NET.
Creating an XML Schema for Your Language
If you’re going to reuse your language or you expect other people to use it, you should have a formal definition of the rules of your language. There has been some debate among the XML community about how this should be done, but .NET provides a solution that is extremely simple and elegant. When you load or create XML code in the IDE XML editor, a new XML menu appears on the menu bar. After you define your first set of data, you can choose Schema from the XML menu visible in the XML editor. This creates a new XML document that describes how your data works. The following XML code illustrates the schema automatically generated for the quiz document:
<?xml version="1.0" ?> <xs:schema id="test"
targetNamespace="http://tempuri.org/sampleTest.xsd"
xmlns:mstns="http://tempuri.org/sampleTest.xsd"
xmlns="http://tempuri.org/sampleTest.xsd"
xmlns:xs="http://www.w3.org/2001/XMLSchema"
xmlns:msdata="urn:schemas−microsoft−com:xml−msdata"
attributeFormDefault="qualified"
elementFormDefault="qualified"> <xs:element name="test"
msdata:IsDataSet="true"
msdata:EnforceConstraints="False">
<xs:complexType>
<xs:choice maxOccurs="unbounded"> <xs:element name="problem">
<xs:complexType>
284
<xs:sequence>
<xs:element name="question" type="xs:string" minOccurs="0" /> <xs:element name="answerA" type="xs:string" minOccurs="0" /> <xs:element name="answerB" type="xs:string" minOccurs="0" /> <xs:element name="answerC" type="xs:string" minOccurs="0" /> <xs:element name="answerD" type="xs:string" minOccurs="0" /> <xs:element name="correct" type="xs:string" minOccurs="0" />
</xs:sequence>
</xs:complexType>
</xs:element>
</xs:choice>
</xs:complexType>
</xs:element>
</xs:schema>
The meaning of this code is beyond the scope of an introduction to XML, but the code is automatically generated, so you can use it even if you don’t know exactly what it’s doing.
You can also choose Validate from the XML menu to ensure that your data follows the guidelines generated by the schema. For a beginner, creating a schema and validating your documents are not necessary because your first attempts at XML code will probably be simple and nobody but you will use your particular XML dialect. If you write an XML language that others will use, you will want to explore data validation because it can prevent many kinds of data errors. In this chapter most of the XML will be generated automatically by the programs, so there is no need to validate it.
Investigating the .NET View of XML
The .NET framework defines a set of classes that map to an XML document and its constituent parts. An XML document is essentially seen as a tree. The document itself is the base of the tree. The document contains a series of nodes. .NET has a class to define the Node element. Each pair of tags (such as <question> and </question>) is considered an element. The information between the tags is the data (usually text). The .NET environment provides three classes that are critical for using XML:
∙The XmlNode class defines the basic characteristics of any node in an XML document.
∙The XmlElement class extends XmlNode and adds a few methods for dealing with attributes.
∙The XmlDocument class also extends XmlNode, but it adds several methods, mainly for storing and loading documents and creating new nodes.
Essentially, you work with an XML document in .NET by defining an XmlDocument, which is mapped to a specific document on the drive system. All the tags in the document are instances of the XmlElement class. Because both XmlDocument and XmlElement are derived from XmlNode, they also share the characteristics of the XmlNode class.
Exploring the XmlNode Class
The XmlNode class describes each node in a document. A node can be an entire XML document, an element (a pair of tags), or data (the text inside a pair of tags). The XmlNode class has properties and methods that enable you to figure out what type of node you are working with. It also features the capability to extract and modify the data in a node. Table 10.1 presents important properties and methods of the XmlNode class.
Table 10.1: Selected Members of the XmlNode Class
285
Element |
Type of |
Description |
Example |
|
Element |
|
|
ChildNodes |
Property |
A collection of all the |
MessageBox.Show |
|
|
children of the node |
(theNode. ChildNodes[2].InnerText); |
|
|
|
//shows the text of child |
|
|
|
node 3 of the current node |
FirstChild |
Property |
The first child of a |
MessageBox.Show |
|
|
node |
(theNode. |
|
|
|
FirstChild.InnerText); //shows the text of |
|
|
|
the first child of the current node |
InnerText |
Property |
Gets or sets the text of |
MessageBox.Show |
|
|
this node and all its |
(theNode.InnerText); |
|
|
children |
//shows the text value of the current |
|
|
|
node |
Name |
Property |
Returns or sets the |
MessageBox.Show |
|
|
name of the node |
(theNode. Name); |
|
|
|
//displays the name of the current node |
NextSibling |
Property |
Returns the next node |
theNode = |
|
|
at the current level of |
theNode. NextSibling; |
|
|
the hierarchy (or null) |
//moves the node to its next sibling or |
|
|
|
sets the node to null |
ParentNode |
Property |
Returns the parent of |
theNode = |
|
|
the current node |
theNode.ParentNode; |
|
|
|
//sets the node to its parent |
AppendChild(node) |
Method |
Adds a child node to |
theNode.AppendNode(newNode); |
|
|
the end of this node’s |
//adds newNode to theNode's children |
|
|
children |
|
Clone() |
Method |
Creates a copy of this |
theNode.ParentNode. |
|
|
node |
AppendNode(theNode.Clone()); |
|
|
|
//adds a copy of this node at the same |
|
|
|
level as the node |
RemoveChild(node) |
Method |
Removes a child node |
theNode.Remove |
|
|
from the current node |
(theNode. FirstChild); |
|
|
|
//removes the first child from the node |
The XmlNode class is rarely used directly, but it has two descendants that form the foundation of all XML documents. The XmlDocument class describes an entire document, and the XmlElement class describes an element, which is the part of an XML document surrounded by a pair of tags. Much of the functionality of the XmlDocument and XmlElement classes is inherited from the XmlNode class, but the XmlDocument class has a few important properties and methods of its own, which are particular to a document.
Exploring the XmlDocument Class
The XmlDocument class describes an XML document. It features important properties and methods for working with the entire document. It has save and load methods, which allow you to save and load a document directly, without needing to use streams. The XmlDocument has methods for creating various elements inside the document, including the CreateElement() and CreateAttribute() methods. It has methods for adding a node to a document: Append(), InsertBefore(), and InsertAfter().
286