
- •Microsoft C# Programming for the Absolute Beginner
- •Table of Contents
- •Microsoft C# Programming for the Absolute Beginner
- •Introduction
- •Overview
- •Chapter 1: Basic Input and Output: A Mini Adventure
- •Project: The Mini Adventure
- •Reviewing Basic C# Concepts
- •Namespaces
- •Classes
- •Methods
- •Statements
- •The Console Object
- •.NET Documentation
- •Getting into the Visual Studio .Net Environment
- •Examining the Default Code
- •Creating a Custom Namespace
- •Adding Summary Comments
- •Creating the Class
- •Moving from Code to a Program
- •Compiling Your Program
- •Looking for Bugs
- •Getting Input from the User
- •Creating a String Variable
- •Getting a Value with the Console.ReadLine() Method
- •Incorporating a Variable in Output
- •Combining String Values
- •Combining Strings with Concatenation
- •Adding a Tab Character
- •Using the Newline Sequence
- •Displaying a Backslash
- •Displaying Quotation Marks
- •Launching the Mini Adventure
- •Planning the Story
- •Creating the Variables
- •Getting Values from the User
- •Writing the Output
- •Finishing the Program
- •Summary
- •Chapter 2: Branching and Operators: The Math Game
- •The Math Game
- •Using Numeric Variables
- •The Simple Math Game
- •Numeric Variable Types
- •Integer Variables
- •Long Integers
- •Data Type Problems
- •Math Operators
- •Converting Variables
- •Explicit Casting
- •The Convert Object
- •Creating a Branch in Program Logic
- •The Hi Bill Game
- •Condition Testing
- •The If Statement
- •The Else Clause
- •Multiple Conditions
- •Working with The Switch Statement
- •The Switch Demo Program
- •Examining How Switch Statements Work
- •Creating a Random Number
- •Introducing the Die Roller
- •Exploring the Random Object
- •Creating a Random Double with the .NextDouble() Method
- •Getting the Values of Dice
- •Creating the Math Game
- •Designing the Game
- •Creating the Variables
- •Managing Addition
- •Managing Subtraction
- •Managing Multiplication and Division
- •Checking the Answers
- •Waiting for the Carriage Return
- •Summary
- •Chapter 3: Loops and Strings: The Pig Latin Program
- •Project: The Pig Latin Program
- •Investigating The String Object
- •The String Mangler Program
- •A Closer Look at Strings
- •Using the Object Browser
- •Experimenting with String Methods
- •Performing Common String Manipulations
- •Using a For Loop
- •Examining The Bean Counter Program
- •Creating a Sentry Variable
- •Checking for an Upper Limit
- •Incrementing the Variable
- •Examining the Behavior of the For Loop
- •The Fancy Beans Program
- •Skipping Numbers
- •Counting Backwards
- •Using a Foreach Loop to Break Up a Sentence
- •Using a While Loop
- •The Magic Word Program
- •Writing an Effective While Loop
- •Planning Your Program with the STAIR Process
- •S: State the Problem
- •T: Tool Identification
- •A: Algorithm
- •I: Implementation
- •R: Refinement
- •Applying STAIR to the Pig Latin Program
- •Stating the Problem
- •Identifying the Tools
- •Creating the Algorithm
- •Implementing and Refining
- •Writing the Pig Latin Program
- •Setting Up the Variables
- •Creating the Outside Loop
- •Dividing the Phrase into Words
- •Extracting the First Character
- •Checking for a Vowel
- •Adding Debugging Code
- •Closing Up the code
- •Summary
- •Introducing the Critter Program
- •Creating Methods to Reuse Code
- •The Song Program
- •Building the Main() Method
- •Creating a Simple Method
- •Adding a Parameter
- •Returning a Value
- •Creating a Menu
- •Creating a Main Loop
- •Creating the Sentry Variable
- •Calling a Method
- •Working with the Results
- •Writing the showMenu() Method
- •Getting Input from the User
- •Handling Exceptions
- •Returning a Value
- •Creating a New Object with the CritterName Program
- •Creating the Basic Critter
- •Using Scope Modifiers
- •Using a Public Instance Variable
- •Creating an Instance of the Critter
- •Adding a Method
- •Creating the talk() Method for the CritterTalk Program
- •Changing the Menu to Use the talk() Method
- •Creating a Property in the CritterProp Program
- •Examining the Critter Prop Program
- •Creating the Critter with a Name Property
- •Using Properties as Filters
- •Making the Critter More Lifelike
- •Adding More Private Variables
- •Adding the Age() Method
- •Adding the Eat() Method
- •Adding the Play() Method
- •Modifying the Talk() Method
- •Making Changes in the Main Class
- •Summary
- •Introducing the Snowball Fight
- •Inheritance and Encapsulation
- •Creating a Constructor
- •Adding a Constructor to the Critter Class
- •Creating the CritViewer Class
- •Reviewing the Static Keyword
- •Calling a Constructor from the Main() Method
- •Working with Multiple Files
- •Overloading Constructors
- •Viewing the Improved Critter Class
- •Adding Polymorphism to Your Objects
- •Modifying the Critter Viewer in CritOver to Demonstrate Overloaded Constructors
- •Using Inheritance to Make New Classes
- •Creating a Class to View the Clone
- •Creating the Critter Class
- •Improving an Existing Class
- •Introducing the Glitter Critter
- •Adding Methods to a New Class
- •Changing the Critter Viewer Again
- •Creating the Snowball Fight
- •Building the Fighter
- •Building the Robot Fighter
- •Creating the Main Menu Class
- •Summary
- •Overview
- •Introducing the Visual Critter
- •Thinking Like a GUI Programmer
- •Creating a Graphical User Interface (GUI)
- •Examining the Code of a Windows Program
- •Adding New Namespaces
- •Creating the Form Object
- •Creating a Destructor
- •Creating the Components
- •Setting Component Properties
- •Setting Up the Form
- •Writing the Main() Method
- •Creating an Interactive Program
- •Responding to a Simple Event
- •Creating and Adding the Components
- •Adding an Event to the Program
- •Creating an Event Handler
- •Allowing for Multiple Selections
- •Choosing a Font with Selection Controls
- •Creating the User Interface
- •Examining Selection Tools
- •Creating Instance Variables in the Font Chooser
- •Writing the AssignFont() Method
- •Writing the Event Handlers
- •Working with Images and Scroll Bars
- •Setting Up the Picture Box
- •Adding a Scroll Bar
- •Revisiting the Visual Critter
- •Designing the Program
- •Determining the Necessary Tools
- •Designing the Form
- •Writing the Code
- •Summary
- •Chapter 7: Timers and Animation: The Lunar Lander
- •Introducing the Lunar Lander
- •Reading Values from the Keyboard
- •Introducing the Key Reader Program
- •Setting Up the Key Reader Program
- •Coding the KeyPress Event
- •Coding the KeyDown Event
- •Determining Which Key Was Pressed
- •Animating Images
- •Introducing the ImageList Control
- •Setting Up an Image List
- •Looking at the Image Collection
- •Displaying an Image from the Image List
- •Using a Timer to Automate Animation
- •Introducing the Timer Control
- •Configuring the Timer
- •Adding Motion
- •Checking for Keyboard Input
- •Working with the Location Property
- •Detecting Collisions between Objects
- •Coding the Crasher Program
- •Getting Values for newX and newY
- •Bouncing the Ball off the Sides
- •Checking for Collisions
- •Extracting a Rectangle from a Component
- •Getting More from the MessageBox Object
- •Introducing the MsgDemo Program
- •Retrieving Values from the MessageBox
- •Coding the Lunar Lander
- •The Visual Design
- •The Constructor
- •The timer1_Tick() Method
- •The moveShip() Method
- •The checkLanding() Method
- •The theForm_KeyDown() Method
- •The showStats() Method
- •The killShip() Method
- •The initGame() Method
- •Summary
- •Chapter 8: Arrays: The Soccer Game
- •The Soccer Game
- •Introducing Arrays
- •Exploring the Counter Program
- •Creating an Array of Strings
- •Referring to Elements in an Array
- •Working with Arrays
- •Using the Array Demo Program to Explore Arrays
- •Building the Languages Array
- •Sorting the Array
- •Designing the Soccer Game
- •Solving a Subset of the Problem
- •Adding Percentages for the Other Players
- •Setting Up the Shot Demo Program
- •Setting Up the List Boxes
- •Using a Custom Event Handler
- •Writing the changeStatus() Method
- •Kicking the Ball
- •Designing Programs by Hand
- •Examining the Form by Hand Program
- •Adding Components in the Constructor
- •Responding to the Button Event
- •Building the Soccer Program
- •Setting Up the Variables
- •Examining the Constructor
- •Setting Up the Players
- •Setting Up the Opponents
- •Setting Up the Goalies
- •Responding to Player Clicks
- •Handling Good Shots
- •Handling Bad Shots
- •Setting a New Current Player
- •Handling the Passage of Time
- •Updating the Score
- •Summary
- •Chapter 9: File Handling: The Adventure Kit
- •Introducing the Adventure Kit
- •Viewing the Main Screen
- •Loading an Adventure
- •Playing an Adventure
- •Creating an Adventure
- •Reading and Writing Text Files
- •Exploring the File IO Program
- •Importing the IO Namespace
- •Writing to a Stream
- •Reading from a Stream
- •Creating Menus
- •Exploring the Menu Demo Program
- •Adding a MainMenu Object
- •Adding a Submenu
- •Setting Up the Properties of Menu Items
- •Writing Event Code for Menus
- •Using Dialog Boxes to Enhance Your Programs
- •Exploring the Dialog Demo Program
- •Adding Standard Dialogs to Your Form
- •Using the File Dialog Controls
- •Responding to File Dialog Events
- •Using the Font Dialog Control
- •Using the Color Dialog Control
- •Storing Entire Objects with Serialization
- •Exploring the Serialization Demo Program
- •Creating the Contact Class
- •Referencing the Serializable Namespace
- •Storing a Class
- •Retrieving a Class
- •Returning to the Adventure Kit Program
- •Examining the Room Class
- •Creating the Dungeon Class
- •Writing the Game Class
- •Writing the Editor Class
- •Writing the MainForm Class
- •Summary
- •Chapter 10: Chapter Basic XML: The Quiz Maker
- •Introducing the Quiz Maker Game
- •Taking a Quiz
- •Creating and Editing Quizzes
- •Investigating XML
- •Defining XML
- •Creating an XML Document in .NET
- •Creating an XML Schema for Your Language
- •Investigating the .NET View of XML
- •Exploring the XmlNode Class
- •Exploring the XmlDocument Class
- •Reading an Existing XML Document
- •Creating the XML Viewer Program
- •Writing New Values to an XML Document
- •Building the Document Structure
- •Adding an Element to the Document
- •Displaying the XML Code
- •Examining the Quizzer Program
- •Building the Main Form
- •Writing the Quiz Form
- •Writing the Editor Form
- •Summary
- •Overview
- •Introducing the SpyMaster Program
- •Creating a Simple Database
- •Accessing the Data Server
- •Accessing the Data in a Program
- •Using Queries to Modify Data Results
- •Limiting Data with the SELECT Statement
- •Using an Existing Database
- •Adding the Capability to Display Queries
- •Creating a Visual Query Builder
- •Working with Relational Databases
- •Improving Your Data with Normalization
- •Using a Join to Connect Two Tables
- •Creating a View
- •Referring to a View in a Program
- •Incorporating the Agent Specialty Attribute
- •Working with Other Databases
- •Creating a New Connection
- •Converting a Data Set to XML
- •Reading from XML to a Data Source
- •Creating the SpyMaster Database
- •Building the Main Form
- •Editing the Assignments
- •Editing the Specialties
- •Viewing the Agents
- •Editing the Agent Data
- •Summary
- •List of Figures
- •List of Tables
- •List of Sidebars

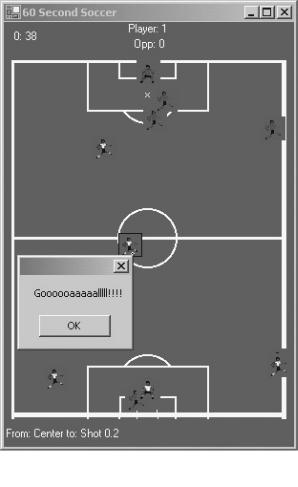
Figure 8.1: The player within the square outline has the ball. He can either pass to another player or make a shot on the goal.
Introducing Arrays
Although you can’t tell by looking at the Soccer game from the outside, the game relies heavily on lists of information. Lists are so useful that every major programming language supports them in one way or another. Of course, programmers love fancy words and refuse to use the straightforward term list. They much prefer the more esoteric term array. An array is not complicated. It is simply a list of variables with the same name and the same type of data. If you’ve played golf (or even miniature golf), you’ve probably seen a scorecard that looks something like the one in Figure 8.2.
204

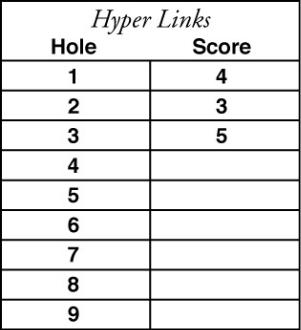
Figure 8.2: A golf scorecard is a good example of an array in everyday life.
A small golf course might have nine holes. These holes are usually numbered. Each golfer keeps track of how many strokes it takes to get the ball in the cup. The golfer might refer to the first score as the score for hole 1. The next score would be the score for hole 2, and so on. Programming languages usually refer to this kind of structure as an array. C# refers to an array with a bracket ([ ]) notation. If you wanted to make a golfing game in C# (hey, that’s a great idea, but I’ve already thought up the game for this chapter), you would make an array of integers named score. You could assign the score for the first hole by writing score[1] = 3;. If you wanted to know the score for the fourth hole, you could write something like MessageBox.Show(score[4].ToString());.
Exploring the Counter Program
A sample program can clarify the concept of arrays, so take a look at the Counter program featured in Figures 8.3 and 8.4. The program counts to 4 and then repeats. The counting behavior itself is unremarkable. The more interesting problem is how to get the text values One, Two, and so on, in the right order. You guessed it. An array is the secret to this program’s magic.
205

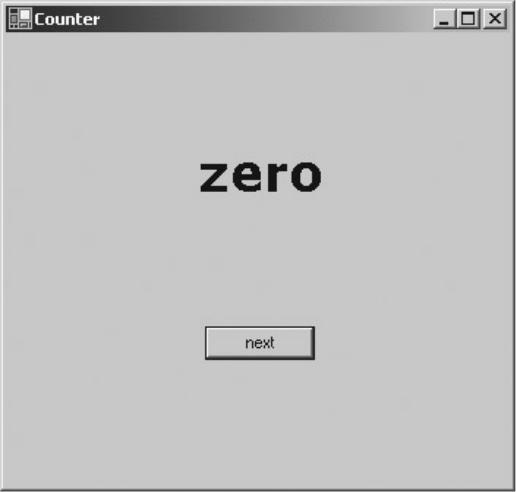
Figure 8.3: The label says zero before the user presses any buttons.
206

Figure 8.4: After the user presses the button, the value changes.
Creating an Array of Strings
The Counter program has only a few controls. The label holding the numeric text is named lblOutput, and the button is named btnNext. I added two variable declarations inside the class definition:
private int counter;
private string[] numbers = new String[5];
The counter variable is used to count numerically from 0 to 4 and also serves as an index in the array. Whenever you use an array, usually you also use an integer variable as an index.
The second statement declares numbers as an array of five strings. Making an array is different from making ordinary variables because an array is a type of object in C#. The term string[] indicates that you want to make an array of string objects, instead of an ordinary string variable. The = new String[5] part of the statement creates the array in memory and sets aside enough memory for five elements.
Trick If you don’t know how many elements will be in your array, you can look up the more flexible ArrayList object. This object allows you to have an array with an indeterminate length. However, it requires much more work on the processor, so it can slow down your programs. Normal arrays are fine for most work.
207