

- •Microsoft C# Programming for the Absolute Beginner
- •Table of Contents
- •Microsoft C# Programming for the Absolute Beginner
- •Introduction
- •Overview
- •Chapter 1: Basic Input and Output: A Mini Adventure
- •Project: The Mini Adventure
- •Reviewing Basic C# Concepts
- •Namespaces
- •Classes
- •Methods
- •Statements
- •The Console Object
- •.NET Documentation
- •Getting into the Visual Studio .Net Environment
- •Examining the Default Code
- •Creating a Custom Namespace
- •Adding Summary Comments
- •Creating the Class
- •Moving from Code to a Program
- •Compiling Your Program
- •Looking for Bugs
- •Getting Input from the User
- •Creating a String Variable
- •Getting a Value with the Console.ReadLine() Method
- •Incorporating a Variable in Output
- •Combining String Values
- •Combining Strings with Concatenation
- •Adding a Tab Character
- •Using the Newline Sequence
- •Displaying a Backslash
- •Displaying Quotation Marks
- •Launching the Mini Adventure
- •Planning the Story
- •Creating the Variables
- •Getting Values from the User
- •Writing the Output
- •Finishing the Program
- •Summary
- •Chapter 2: Branching and Operators: The Math Game
- •The Math Game
- •Using Numeric Variables
- •The Simple Math Game
- •Numeric Variable Types
- •Integer Variables
- •Long Integers
- •Data Type Problems
- •Math Operators
- •Converting Variables
- •Explicit Casting
- •The Convert Object
- •Creating a Branch in Program Logic
- •The Hi Bill Game
- •Condition Testing
- •The If Statement
- •The Else Clause
- •Multiple Conditions
- •Working with The Switch Statement
- •The Switch Demo Program
- •Examining How Switch Statements Work
- •Creating a Random Number
- •Introducing the Die Roller
- •Exploring the Random Object
- •Creating a Random Double with the .NextDouble() Method
- •Getting the Values of Dice
- •Creating the Math Game
- •Designing the Game
- •Creating the Variables
- •Managing Addition
- •Managing Subtraction
- •Managing Multiplication and Division
- •Checking the Answers
- •Waiting for the Carriage Return
- •Summary
- •Chapter 3: Loops and Strings: The Pig Latin Program
- •Project: The Pig Latin Program
- •Investigating The String Object
- •The String Mangler Program
- •A Closer Look at Strings
- •Using the Object Browser
- •Experimenting with String Methods
- •Performing Common String Manipulations
- •Using a For Loop
- •Examining The Bean Counter Program
- •Creating a Sentry Variable
- •Checking for an Upper Limit
- •Incrementing the Variable
- •Examining the Behavior of the For Loop
- •The Fancy Beans Program
- •Skipping Numbers
- •Counting Backwards
- •Using a Foreach Loop to Break Up a Sentence
- •Using a While Loop
- •The Magic Word Program
- •Writing an Effective While Loop
- •Planning Your Program with the STAIR Process
- •S: State the Problem
- •T: Tool Identification
- •A: Algorithm
- •I: Implementation
- •R: Refinement
- •Applying STAIR to the Pig Latin Program
- •Stating the Problem
- •Identifying the Tools
- •Creating the Algorithm
- •Implementing and Refining
- •Writing the Pig Latin Program
- •Setting Up the Variables
- •Creating the Outside Loop
- •Dividing the Phrase into Words
- •Extracting the First Character
- •Checking for a Vowel
- •Adding Debugging Code
- •Closing Up the code
- •Summary
- •Introducing the Critter Program
- •Creating Methods to Reuse Code
- •The Song Program
- •Building the Main() Method
- •Creating a Simple Method
- •Adding a Parameter
- •Returning a Value
- •Creating a Menu
- •Creating a Main Loop
- •Creating the Sentry Variable
- •Calling a Method
- •Working with the Results
- •Writing the showMenu() Method
- •Getting Input from the User
- •Handling Exceptions
- •Returning a Value
- •Creating a New Object with the CritterName Program
- •Creating the Basic Critter
- •Using Scope Modifiers
- •Using a Public Instance Variable
- •Creating an Instance of the Critter
- •Adding a Method
- •Creating the talk() Method for the CritterTalk Program
- •Changing the Menu to Use the talk() Method
- •Creating a Property in the CritterProp Program
- •Examining the Critter Prop Program
- •Creating the Critter with a Name Property
- •Using Properties as Filters
- •Making the Critter More Lifelike
- •Adding More Private Variables
- •Adding the Age() Method
- •Adding the Eat() Method
- •Adding the Play() Method
- •Modifying the Talk() Method
- •Making Changes in the Main Class
- •Summary
- •Introducing the Snowball Fight
- •Inheritance and Encapsulation
- •Creating a Constructor
- •Adding a Constructor to the Critter Class
- •Creating the CritViewer Class
- •Reviewing the Static Keyword
- •Calling a Constructor from the Main() Method
- •Working with Multiple Files
- •Overloading Constructors
- •Viewing the Improved Critter Class
- •Adding Polymorphism to Your Objects
- •Modifying the Critter Viewer in CritOver to Demonstrate Overloaded Constructors
- •Using Inheritance to Make New Classes
- •Creating a Class to View the Clone
- •Creating the Critter Class
- •Improving an Existing Class
- •Introducing the Glitter Critter
- •Adding Methods to a New Class
- •Changing the Critter Viewer Again
- •Creating the Snowball Fight
- •Building the Fighter
- •Building the Robot Fighter
- •Creating the Main Menu Class
- •Summary
- •Overview
- •Introducing the Visual Critter
- •Thinking Like a GUI Programmer
- •Creating a Graphical User Interface (GUI)
- •Examining the Code of a Windows Program
- •Adding New Namespaces
- •Creating the Form Object
- •Creating a Destructor
- •Creating the Components
- •Setting Component Properties
- •Setting Up the Form
- •Writing the Main() Method
- •Creating an Interactive Program
- •Responding to a Simple Event
- •Creating and Adding the Components
- •Adding an Event to the Program
- •Creating an Event Handler
- •Allowing for Multiple Selections
- •Choosing a Font with Selection Controls
- •Creating the User Interface
- •Examining Selection Tools
- •Creating Instance Variables in the Font Chooser
- •Writing the AssignFont() Method
- •Writing the Event Handlers
- •Working with Images and Scroll Bars
- •Setting Up the Picture Box
- •Adding a Scroll Bar
- •Revisiting the Visual Critter
- •Designing the Program
- •Determining the Necessary Tools
- •Designing the Form
- •Writing the Code
- •Summary
- •Chapter 7: Timers and Animation: The Lunar Lander
- •Introducing the Lunar Lander
- •Reading Values from the Keyboard
- •Introducing the Key Reader Program
- •Setting Up the Key Reader Program
- •Coding the KeyPress Event
- •Coding the KeyDown Event
- •Determining Which Key Was Pressed
- •Animating Images
- •Introducing the ImageList Control
- •Setting Up an Image List
- •Looking at the Image Collection
- •Displaying an Image from the Image List
- •Using a Timer to Automate Animation
- •Introducing the Timer Control
- •Configuring the Timer
- •Adding Motion
- •Checking for Keyboard Input
- •Working with the Location Property
- •Detecting Collisions between Objects
- •Coding the Crasher Program
- •Getting Values for newX and newY
- •Bouncing the Ball off the Sides
- •Checking for Collisions
- •Extracting a Rectangle from a Component
- •Getting More from the MessageBox Object
- •Introducing the MsgDemo Program
- •Retrieving Values from the MessageBox
- •Coding the Lunar Lander
- •The Visual Design
- •The Constructor
- •The timer1_Tick() Method
- •The moveShip() Method
- •The checkLanding() Method
- •The theForm_KeyDown() Method
- •The showStats() Method
- •The killShip() Method
- •The initGame() Method
- •Summary
- •Chapter 8: Arrays: The Soccer Game
- •The Soccer Game
- •Introducing Arrays
- •Exploring the Counter Program
- •Creating an Array of Strings
- •Referring to Elements in an Array
- •Working with Arrays
- •Using the Array Demo Program to Explore Arrays
- •Building the Languages Array
- •Sorting the Array
- •Designing the Soccer Game
- •Solving a Subset of the Problem
- •Adding Percentages for the Other Players
- •Setting Up the Shot Demo Program
- •Setting Up the List Boxes
- •Using a Custom Event Handler
- •Writing the changeStatus() Method
- •Kicking the Ball
- •Designing Programs by Hand
- •Examining the Form by Hand Program
- •Adding Components in the Constructor
- •Responding to the Button Event
- •Building the Soccer Program
- •Setting Up the Variables
- •Examining the Constructor
- •Setting Up the Players
- •Setting Up the Opponents
- •Setting Up the Goalies
- •Responding to Player Clicks
- •Handling Good Shots
- •Handling Bad Shots
- •Setting a New Current Player
- •Handling the Passage of Time
- •Updating the Score
- •Summary
- •Chapter 9: File Handling: The Adventure Kit
- •Introducing the Adventure Kit
- •Viewing the Main Screen
- •Loading an Adventure
- •Playing an Adventure
- •Creating an Adventure
- •Reading and Writing Text Files
- •Exploring the File IO Program
- •Importing the IO Namespace
- •Writing to a Stream
- •Reading from a Stream
- •Creating Menus
- •Exploring the Menu Demo Program
- •Adding a MainMenu Object
- •Adding a Submenu
- •Setting Up the Properties of Menu Items
- •Writing Event Code for Menus
- •Using Dialog Boxes to Enhance Your Programs
- •Exploring the Dialog Demo Program
- •Adding Standard Dialogs to Your Form
- •Using the File Dialog Controls
- •Responding to File Dialog Events
- •Using the Font Dialog Control
- •Using the Color Dialog Control
- •Storing Entire Objects with Serialization
- •Exploring the Serialization Demo Program
- •Creating the Contact Class
- •Referencing the Serializable Namespace
- •Storing a Class
- •Retrieving a Class
- •Returning to the Adventure Kit Program
- •Examining the Room Class
- •Creating the Dungeon Class
- •Writing the Game Class
- •Writing the Editor Class
- •Writing the MainForm Class
- •Summary
- •Chapter 10: Chapter Basic XML: The Quiz Maker
- •Introducing the Quiz Maker Game
- •Taking a Quiz
- •Creating and Editing Quizzes
- •Investigating XML
- •Defining XML
- •Creating an XML Document in .NET
- •Creating an XML Schema for Your Language
- •Investigating the .NET View of XML
- •Exploring the XmlNode Class
- •Exploring the XmlDocument Class
- •Reading an Existing XML Document
- •Creating the XML Viewer Program
- •Writing New Values to an XML Document
- •Building the Document Structure
- •Adding an Element to the Document
- •Displaying the XML Code
- •Examining the Quizzer Program
- •Building the Main Form
- •Writing the Quiz Form
- •Writing the Editor Form
- •Summary
- •Overview
- •Introducing the SpyMaster Program
- •Creating a Simple Database
- •Accessing the Data Server
- •Accessing the Data in a Program
- •Using Queries to Modify Data Results
- •Limiting Data with the SELECT Statement
- •Using an Existing Database
- •Adding the Capability to Display Queries
- •Creating a Visual Query Builder
- •Working with Relational Databases
- •Improving Your Data with Normalization
- •Using a Join to Connect Two Tables
- •Creating a View
- •Referring to a View in a Program
- •Incorporating the Agent Specialty Attribute
- •Working with Other Databases
- •Creating a New Connection
- •Converting a Data Set to XML
- •Reading from XML to a Data Source
- •Creating the SpyMaster Database
- •Building the Main Form
- •Editing the Assignments
- •Editing the Specialties
- •Viewing the Agents
- •Editing the Agent Data
- •Summary
- •List of Figures
- •List of Tables
- •List of Sidebars
Chapter 1: Basic Input and Output: A Mini Adventure
Programming is not something you learn by reading. You learn programming only by writing programs. In this chapter, you get started by writing a simple (silly) adventure game. You also get the basic concepts behind programming in general and C# in particular. In addition to learning how C# is organized, you learn how to
∙Write the simplest interface for a C# console program.
∙Write data to the screen.
∙Get information from the user.
∙Create basic variables.
Project: The Mini Adventure
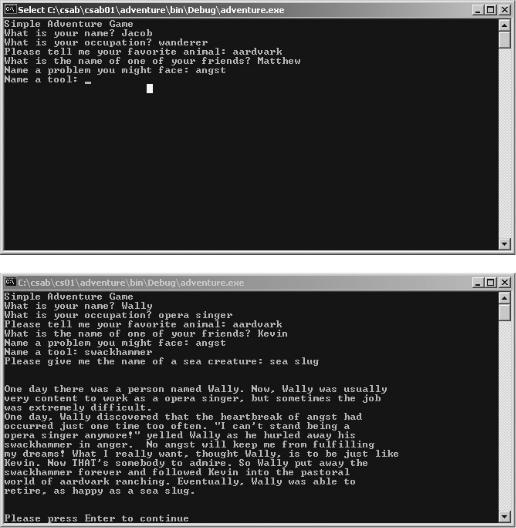
The game at the end of this chapter is simple but fun. Showing you the game in progress is easier than describing it, so take a look at Figures 1.1 and 1.2, which show the game in progress. The computer asks the user a few questions and then makes a silly story based on the user responses.
Figure 1.1: The game begins by asking the user a few questions.
Figure 1.2: The user’s answers result in a silly story.
You can see that the game asks the user questions and then incorporates the answers to create a silly story. This game probably won’t sell a million copies, but it’s quite impressive for a first
5