
- •Microsoft C# Programming for the Absolute Beginner
- •Table of Contents
- •Microsoft C# Programming for the Absolute Beginner
- •Introduction
- •Overview
- •Chapter 1: Basic Input and Output: A Mini Adventure
- •Project: The Mini Adventure
- •Reviewing Basic C# Concepts
- •Namespaces
- •Classes
- •Methods
- •Statements
- •The Console Object
- •.NET Documentation
- •Getting into the Visual Studio .Net Environment
- •Examining the Default Code
- •Creating a Custom Namespace
- •Adding Summary Comments
- •Creating the Class
- •Moving from Code to a Program
- •Compiling Your Program
- •Looking for Bugs
- •Getting Input from the User
- •Creating a String Variable
- •Getting a Value with the Console.ReadLine() Method
- •Incorporating a Variable in Output
- •Combining String Values
- •Combining Strings with Concatenation
- •Adding a Tab Character
- •Using the Newline Sequence
- •Displaying a Backslash
- •Displaying Quotation Marks
- •Launching the Mini Adventure
- •Planning the Story
- •Creating the Variables
- •Getting Values from the User
- •Writing the Output
- •Finishing the Program
- •Summary
- •Chapter 2: Branching and Operators: The Math Game
- •The Math Game
- •Using Numeric Variables
- •The Simple Math Game
- •Numeric Variable Types
- •Integer Variables
- •Long Integers
- •Data Type Problems
- •Math Operators
- •Converting Variables
- •Explicit Casting
- •The Convert Object
- •Creating a Branch in Program Logic
- •The Hi Bill Game
- •Condition Testing
- •The If Statement
- •The Else Clause
- •Multiple Conditions
- •Working with The Switch Statement
- •The Switch Demo Program
- •Examining How Switch Statements Work
- •Creating a Random Number
- •Introducing the Die Roller
- •Exploring the Random Object
- •Creating a Random Double with the .NextDouble() Method
- •Getting the Values of Dice
- •Creating the Math Game
- •Designing the Game
- •Creating the Variables
- •Managing Addition
- •Managing Subtraction
- •Managing Multiplication and Division
- •Checking the Answers
- •Waiting for the Carriage Return
- •Summary
- •Chapter 3: Loops and Strings: The Pig Latin Program
- •Project: The Pig Latin Program
- •Investigating The String Object
- •The String Mangler Program
- •A Closer Look at Strings
- •Using the Object Browser
- •Experimenting with String Methods
- •Performing Common String Manipulations
- •Using a For Loop
- •Examining The Bean Counter Program
- •Creating a Sentry Variable
- •Checking for an Upper Limit
- •Incrementing the Variable
- •Examining the Behavior of the For Loop
- •The Fancy Beans Program
- •Skipping Numbers
- •Counting Backwards
- •Using a Foreach Loop to Break Up a Sentence
- •Using a While Loop
- •The Magic Word Program
- •Writing an Effective While Loop
- •Planning Your Program with the STAIR Process
- •S: State the Problem
- •T: Tool Identification
- •A: Algorithm
- •I: Implementation
- •R: Refinement
- •Applying STAIR to the Pig Latin Program
- •Stating the Problem
- •Identifying the Tools
- •Creating the Algorithm
- •Implementing and Refining
- •Writing the Pig Latin Program
- •Setting Up the Variables
- •Creating the Outside Loop
- •Dividing the Phrase into Words
- •Extracting the First Character
- •Checking for a Vowel
- •Adding Debugging Code
- •Closing Up the code
- •Summary
- •Introducing the Critter Program
- •Creating Methods to Reuse Code
- •The Song Program
- •Building the Main() Method
- •Creating a Simple Method
- •Adding a Parameter
- •Returning a Value
- •Creating a Menu
- •Creating a Main Loop
- •Creating the Sentry Variable
- •Calling a Method
- •Working with the Results
- •Writing the showMenu() Method
- •Getting Input from the User
- •Handling Exceptions
- •Returning a Value
- •Creating a New Object with the CritterName Program
- •Creating the Basic Critter
- •Using Scope Modifiers
- •Using a Public Instance Variable
- •Creating an Instance of the Critter
- •Adding a Method
- •Creating the talk() Method for the CritterTalk Program
- •Changing the Menu to Use the talk() Method
- •Creating a Property in the CritterProp Program
- •Examining the Critter Prop Program
- •Creating the Critter with a Name Property
- •Using Properties as Filters
- •Making the Critter More Lifelike
- •Adding More Private Variables
- •Adding the Age() Method
- •Adding the Eat() Method
- •Adding the Play() Method
- •Modifying the Talk() Method
- •Making Changes in the Main Class
- •Summary
- •Introducing the Snowball Fight
- •Inheritance and Encapsulation
- •Creating a Constructor
- •Adding a Constructor to the Critter Class
- •Creating the CritViewer Class
- •Reviewing the Static Keyword
- •Calling a Constructor from the Main() Method
- •Working with Multiple Files
- •Overloading Constructors
- •Viewing the Improved Critter Class
- •Adding Polymorphism to Your Objects
- •Modifying the Critter Viewer in CritOver to Demonstrate Overloaded Constructors
- •Using Inheritance to Make New Classes
- •Creating a Class to View the Clone
- •Creating the Critter Class
- •Improving an Existing Class
- •Introducing the Glitter Critter
- •Adding Methods to a New Class
- •Changing the Critter Viewer Again
- •Creating the Snowball Fight
- •Building the Fighter
- •Building the Robot Fighter
- •Creating the Main Menu Class
- •Summary
- •Overview
- •Introducing the Visual Critter
- •Thinking Like a GUI Programmer
- •Creating a Graphical User Interface (GUI)
- •Examining the Code of a Windows Program
- •Adding New Namespaces
- •Creating the Form Object
- •Creating a Destructor
- •Creating the Components
- •Setting Component Properties
- •Setting Up the Form
- •Writing the Main() Method
- •Creating an Interactive Program
- •Responding to a Simple Event
- •Creating and Adding the Components
- •Adding an Event to the Program
- •Creating an Event Handler
- •Allowing for Multiple Selections
- •Choosing a Font with Selection Controls
- •Creating the User Interface
- •Examining Selection Tools
- •Creating Instance Variables in the Font Chooser
- •Writing the AssignFont() Method
- •Writing the Event Handlers
- •Working with Images and Scroll Bars
- •Setting Up the Picture Box
- •Adding a Scroll Bar
- •Revisiting the Visual Critter
- •Designing the Program
- •Determining the Necessary Tools
- •Designing the Form
- •Writing the Code
- •Summary
- •Chapter 7: Timers and Animation: The Lunar Lander
- •Introducing the Lunar Lander
- •Reading Values from the Keyboard
- •Introducing the Key Reader Program
- •Setting Up the Key Reader Program
- •Coding the KeyPress Event
- •Coding the KeyDown Event
- •Determining Which Key Was Pressed
- •Animating Images
- •Introducing the ImageList Control
- •Setting Up an Image List
- •Looking at the Image Collection
- •Displaying an Image from the Image List
- •Using a Timer to Automate Animation
- •Introducing the Timer Control
- •Configuring the Timer
- •Adding Motion
- •Checking for Keyboard Input
- •Working with the Location Property
- •Detecting Collisions between Objects
- •Coding the Crasher Program
- •Getting Values for newX and newY
- •Bouncing the Ball off the Sides
- •Checking for Collisions
- •Extracting a Rectangle from a Component
- •Getting More from the MessageBox Object
- •Introducing the MsgDemo Program
- •Retrieving Values from the MessageBox
- •Coding the Lunar Lander
- •The Visual Design
- •The Constructor
- •The timer1_Tick() Method
- •The moveShip() Method
- •The checkLanding() Method
- •The theForm_KeyDown() Method
- •The showStats() Method
- •The killShip() Method
- •The initGame() Method
- •Summary
- •Chapter 8: Arrays: The Soccer Game
- •The Soccer Game
- •Introducing Arrays
- •Exploring the Counter Program
- •Creating an Array of Strings
- •Referring to Elements in an Array
- •Working with Arrays
- •Using the Array Demo Program to Explore Arrays
- •Building the Languages Array
- •Sorting the Array
- •Designing the Soccer Game
- •Solving a Subset of the Problem
- •Adding Percentages for the Other Players
- •Setting Up the Shot Demo Program
- •Setting Up the List Boxes
- •Using a Custom Event Handler
- •Writing the changeStatus() Method
- •Kicking the Ball
- •Designing Programs by Hand
- •Examining the Form by Hand Program
- •Adding Components in the Constructor
- •Responding to the Button Event
- •Building the Soccer Program
- •Setting Up the Variables
- •Examining the Constructor
- •Setting Up the Players
- •Setting Up the Opponents
- •Setting Up the Goalies
- •Responding to Player Clicks
- •Handling Good Shots
- •Handling Bad Shots
- •Setting a New Current Player
- •Handling the Passage of Time
- •Updating the Score
- •Summary
- •Chapter 9: File Handling: The Adventure Kit
- •Introducing the Adventure Kit
- •Viewing the Main Screen
- •Loading an Adventure
- •Playing an Adventure
- •Creating an Adventure
- •Reading and Writing Text Files
- •Exploring the File IO Program
- •Importing the IO Namespace
- •Writing to a Stream
- •Reading from a Stream
- •Creating Menus
- •Exploring the Menu Demo Program
- •Adding a MainMenu Object
- •Adding a Submenu
- •Setting Up the Properties of Menu Items
- •Writing Event Code for Menus
- •Using Dialog Boxes to Enhance Your Programs
- •Exploring the Dialog Demo Program
- •Adding Standard Dialogs to Your Form
- •Using the File Dialog Controls
- •Responding to File Dialog Events
- •Using the Font Dialog Control
- •Using the Color Dialog Control
- •Storing Entire Objects with Serialization
- •Exploring the Serialization Demo Program
- •Creating the Contact Class
- •Referencing the Serializable Namespace
- •Storing a Class
- •Retrieving a Class
- •Returning to the Adventure Kit Program
- •Examining the Room Class
- •Creating the Dungeon Class
- •Writing the Game Class
- •Writing the Editor Class
- •Writing the MainForm Class
- •Summary
- •Chapter 10: Chapter Basic XML: The Quiz Maker
- •Introducing the Quiz Maker Game
- •Taking a Quiz
- •Creating and Editing Quizzes
- •Investigating XML
- •Defining XML
- •Creating an XML Document in .NET
- •Creating an XML Schema for Your Language
- •Investigating the .NET View of XML
- •Exploring the XmlNode Class
- •Exploring the XmlDocument Class
- •Reading an Existing XML Document
- •Creating the XML Viewer Program
- •Writing New Values to an XML Document
- •Building the Document Structure
- •Adding an Element to the Document
- •Displaying the XML Code
- •Examining the Quizzer Program
- •Building the Main Form
- •Writing the Quiz Form
- •Writing the Editor Form
- •Summary
- •Overview
- •Introducing the SpyMaster Program
- •Creating a Simple Database
- •Accessing the Data Server
- •Accessing the Data in a Program
- •Using Queries to Modify Data Results
- •Limiting Data with the SELECT Statement
- •Using an Existing Database
- •Adding the Capability to Display Queries
- •Creating a Visual Query Builder
- •Working with Relational Databases
- •Improving Your Data with Normalization
- •Using a Join to Connect Two Tables
- •Creating a View
- •Referring to a View in a Program
- •Incorporating the Agent Specialty Attribute
- •Working with Other Databases
- •Creating a New Connection
- •Converting a Data Set to XML
- •Reading from XML to a Data Source
- •Creating the SpyMaster Database
- •Building the Main Form
- •Editing the Assignments
- •Editing the Specialties
- •Viewing the Agents
- •Editing the Agent Data
- •Summary
- •List of Figures
- •List of Tables
- •List of Sidebars

handles the backwards behavior. Notice that I had to start i with a value larger than 0 and that my condition checks whether i is larger than 0. The i−− behavior decrements i, so i−− means the same as i = i − 1.
Using a Foreach Loop to Break Up a Sentence
The for loop has one more variation that is useful in certain circumstances. The foreach loop will be valuable in the Pig Latin program, so I’ll show it to you now, even though its full value will be apparent only after you learn arrays in Chapter 8, "Arrays: The Soccer Game." The foreach loop extracts specific elements from a group. The line in the Fancy Beans program that uses the foreach loop looks like this:
foreach (string word in sentence.Split()){
In a foreach loop, you can use any kind of variable as the sentinel variable, but you must get that variable from a group. The Split() method of a string automatically splits a phrase into a group of words, so this foreach loop repeats one time for each word in a phrase. Each time through the loop, the word variable contains the next word in the sentence. Inside the loop, you can see that I use WriteLine() to print each word on a separate line in the output. When you need to break a phrase or sentence into words, use the foreach loop.
Hint This description of the foreach loop might be unsatisfactory because the foreach loop is dependent on arrays, which you will learn about in Chapter 8, "Arrays: The Soccer Game." You will also see more about the use of the foreach loop in that chapter. In the meantime, simply remember that the foreach code combined with the string.Split() method makes a loop that features each word in a sentence. You will be able to use this feature even if you don’t completely understand it.
Using a While Loop
For loops are good for repeating things a certain number of times; however, in some of your programs, though, you won’t know how many times something is going to happen. In these instances, you need a while loop. For example, you might need a program to continue asking a question until the user gets the correct answer, or you might write a card program that continues drawing cards until it pulls an ace. In either case, you don’t know beforehand how many times the loop will occur, so a while loop is the best solution for this type of situation.
Trap It is possible to use for loops for any kind of looping situation, but using one for indeterminate repetition is a bad idea. For loops are best for situations in which you know how many times something will happen or when you want to take advantage of the counting nature of the loop. For other kinds of looping situations, you use a variation of the while loop.
C# provides another loop, which is driven by a conditional statement (such as the if statement). On the surface, while loops are easier to understand than for loops. However, you need to be careful when you use them because sometimes you can accidentally create a minefield. I’ll show you a program that uses a while loop correctly, and then I’ll show you what you need to remember to make the loop work correctly.
65

The Magic Word Program
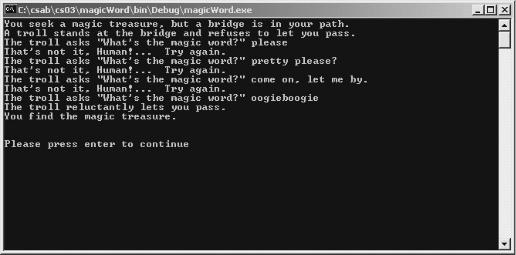
Here’s an illustration that uses a traditional bedtime story to explain loops. In the story, you are seeking a magical treasure. On your way to the magical treasure, you encounter a troll standing in front of a bridge. He will not let you cross the bridge until you utter the magic words. Figure 3.7 demonstrates the troll bridge drama in all its intense glory.
Figure 3.7: The troll won’t let you pass until you say the magic word.
You can see why a for loop just won’t work in this situation. As the programmer, you have no way of knowing how many guesses it will take for the user to figure out the magic word. Here’s the source code of the Magic Word program:
using System;
namespace magicWord
{
///<summary>
///Demonstrate while loops by asking for the magic word
///until user enters the correct answer
///Andy Harris, 11/25/01
///</summary>
class MagicWord
{
static void Main(string[] args)
{
string theAnswer = "oogieboogie"; string response = "";
Console.WriteLine("You seek a magic treasure, but a bridge is in your path."); Console.WriteLine("A troll stands at the bridge and refuses to let you pass.");
while (response != theAnswer){
Console.Write("The troll asks \"What's the magic word? \" "); response = Console.ReadLine();
if (response != theAnswer){
Console.WriteLine("That's not it, Human!... Try again.");
} // end if
}// end while
Console.WriteLine("The troll reluctantly lets you pass.");
Console.WriteLine("You find the magic treasure.");
Console.WriteLine();
66

Console.WriteLine("Please press enter to continue");
Console.ReadLine();
} // end main } // end class
}// end namespace
Most of the program consists of WriteLine commands to give the program some character. The real work happens in the while loop, which looks like this:
while (response != theAnswer){
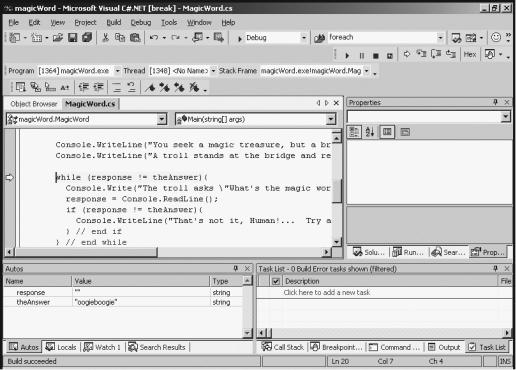
A while loop is a very simple construct. The while is followed by a condition. If the condition is evaluated to true, everything in the braces that follows the looping structure is executed. When the code reaches the right brace, it returns to the beginning and checks the condition again. If the condition is true, the code inside the loop happens again. If the condition is evaluated as false, program control passes to the next line after the right brace that follows the loop. Again, use the F11 key to watch the progress of your program so that you can see how the logic flows. Take a careful look at the editor screen in Figure 3.8.
Figure 3.8: The first time through the loop, the condition is false.
In Figure 3.8, you see in the Autos window the values of response and theAnswer. Because these values are different, the condition (response != theAnswer) is true. Therefore, the code inside the loop will execute. Press the F11 key a few more times to see the code continue, and the console window will appear, waiting for a user input. Type in oogieboogie (which is the expected response), and press F11 until the while loop line is highlighted again. This situation is pictured in Figure 3.9.
67

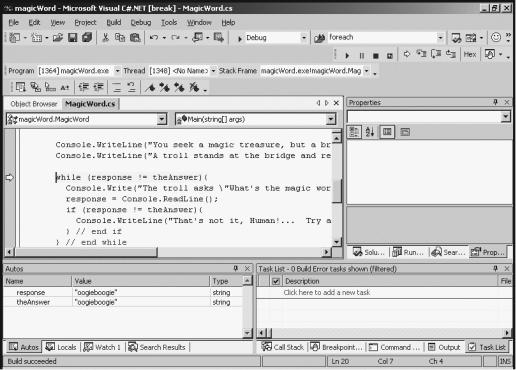
Figure 3.9: Now response is equal to theAnswer, so the condition is false.
As you can see, things look the same, except that the variables response and theAnswer contain the same value. Now the condition (response != theAnswer) is false. Because the condition is false, program control jumps to the next line outside the while loop, which congratulates the user for defeating the troll. Keep pressing the F11 key to verify this behavior until the program ends.
Trick This technique of stepping through the code one line at a time and looking at the values of the variables is called code tracing, and it is an invaluable tool. Whenever you are confused (which happens often, even to the pros), use this technique to see what your program is doing. Walking through your programs one line at a time to see what’s happening in your variables is one of the best things about tools like the .NET IDE.
Writing an Effective While Loop
While loops are easy to write, but they are also easy to mess up. Following are some of the rules that experienced programmers use to prevent problems with while loops.
Creating and Initializing a Sentry Variable
While loops usually have sentry variables, just like for loops. The sentry variable will be one of the variables in your while condition. Generally, the sentry variable is designed to change while the loop is running. Sometimes you compare the sentry variable to another variable (as I did in the Magic Word game). In that case, you need to think carefully about both variables. Before the while loop starts, make sure that any variables used in the condition have appropriate starting values. If you’re not careful, you can have a loop that never runs. Consider this example:
string response = ""; while (response != ""){
Console.WriteLine ("Say something"); response = Console.ReadLine();
} // end if
68

This loop was intended to keep going until the user typed an empty line (""). However, because the sentry variable begins empty, the while loop skips the first time, and the loop never runs. If your loops never run, take a look at the initial value of the variables used in the conditional statement.
Designing an Appropriate Condition
In addition to thinking carefully about the initialization of the sentry variable, consider the condition statement. If the condition is always false, the loop will never run. If the condition is always true, the loop will never quit. You need to devise a condition that will cause the loop to keep going as long as you want and yet leave at the right time. This technique is somewhat of an art form, but there are some steps you can take to make it easier:
∙Start by writing the condition in English.
∙Convert the condition into a comparison between a variable and a value.
∙Define the condition in terms of something that will be true when the loop should execute and false otherwise.
Of course, the condition will use the sentry variable. It may also use another variable, or it may compare against some type of value.
Changing the Variable inside the Loop
Another common problem is to forget changing the value of a variable inside a loop.
Examine the following code fragment:
int counter = 0;
while (counter < 10) { counter = 1;
} // end while
Even though the loop has a good variable and condition, it will never exit because the value of counter is set to 1 in every iteration of the loop. Because counter never gets larger than 1, the counter never gets larger than 10, so the loop never exits!
The basic rule is to make sure that inside your loop you have code that makes it possible for the loop to exit. This might seem obvious, but keeping track of this when your programs become large and complex can be difficult. If you encounter an endless loop, use the F11 key to step through the loop, and keep a careful eye on the sentry variable in the Autos window. If you don’t have any code inside the loop that allows that variable to change to an appropriate value (one that would make the condition false), your loop will never exit.
In the Real World
Two types of programmers exist in the world: those who have written endless loops and those who will. You will write an endless loop or two in your career, but don’t worry. In C#, it’s easy to get out of these monsters because you can simply close the console window or click the Stop button in the IDE. However, to see what an endless loop does to your computer, try running the performance meter (press Ctrl+Alt+Delete, and then click the Performance tab) while you have an endless loop running. The simple code in the counting example will use up nearly 100 percent of your processor capacity. Fortunately, it’s not quite 100 percent, or your computer wouldn’t be able to let you close the program. When your computer bogs down and acts sluggish, often one of the programs
69