
- •Microsoft C# Programming for the Absolute Beginner
- •Table of Contents
- •Microsoft C# Programming for the Absolute Beginner
- •Introduction
- •Overview
- •Chapter 1: Basic Input and Output: A Mini Adventure
- •Project: The Mini Adventure
- •Reviewing Basic C# Concepts
- •Namespaces
- •Classes
- •Methods
- •Statements
- •The Console Object
- •.NET Documentation
- •Getting into the Visual Studio .Net Environment
- •Examining the Default Code
- •Creating a Custom Namespace
- •Adding Summary Comments
- •Creating the Class
- •Moving from Code to a Program
- •Compiling Your Program
- •Looking for Bugs
- •Getting Input from the User
- •Creating a String Variable
- •Getting a Value with the Console.ReadLine() Method
- •Incorporating a Variable in Output
- •Combining String Values
- •Combining Strings with Concatenation
- •Adding a Tab Character
- •Using the Newline Sequence
- •Displaying a Backslash
- •Displaying Quotation Marks
- •Launching the Mini Adventure
- •Planning the Story
- •Creating the Variables
- •Getting Values from the User
- •Writing the Output
- •Finishing the Program
- •Summary
- •Chapter 2: Branching and Operators: The Math Game
- •The Math Game
- •Using Numeric Variables
- •The Simple Math Game
- •Numeric Variable Types
- •Integer Variables
- •Long Integers
- •Data Type Problems
- •Math Operators
- •Converting Variables
- •Explicit Casting
- •The Convert Object
- •Creating a Branch in Program Logic
- •The Hi Bill Game
- •Condition Testing
- •The If Statement
- •The Else Clause
- •Multiple Conditions
- •Working with The Switch Statement
- •The Switch Demo Program
- •Examining How Switch Statements Work
- •Creating a Random Number
- •Introducing the Die Roller
- •Exploring the Random Object
- •Creating a Random Double with the .NextDouble() Method
- •Getting the Values of Dice
- •Creating the Math Game
- •Designing the Game
- •Creating the Variables
- •Managing Addition
- •Managing Subtraction
- •Managing Multiplication and Division
- •Checking the Answers
- •Waiting for the Carriage Return
- •Summary
- •Chapter 3: Loops and Strings: The Pig Latin Program
- •Project: The Pig Latin Program
- •Investigating The String Object
- •The String Mangler Program
- •A Closer Look at Strings
- •Using the Object Browser
- •Experimenting with String Methods
- •Performing Common String Manipulations
- •Using a For Loop
- •Examining The Bean Counter Program
- •Creating a Sentry Variable
- •Checking for an Upper Limit
- •Incrementing the Variable
- •Examining the Behavior of the For Loop
- •The Fancy Beans Program
- •Skipping Numbers
- •Counting Backwards
- •Using a Foreach Loop to Break Up a Sentence
- •Using a While Loop
- •The Magic Word Program
- •Writing an Effective While Loop
- •Planning Your Program with the STAIR Process
- •S: State the Problem
- •T: Tool Identification
- •A: Algorithm
- •I: Implementation
- •R: Refinement
- •Applying STAIR to the Pig Latin Program
- •Stating the Problem
- •Identifying the Tools
- •Creating the Algorithm
- •Implementing and Refining
- •Writing the Pig Latin Program
- •Setting Up the Variables
- •Creating the Outside Loop
- •Dividing the Phrase into Words
- •Extracting the First Character
- •Checking for a Vowel
- •Adding Debugging Code
- •Closing Up the code
- •Summary
- •Introducing the Critter Program
- •Creating Methods to Reuse Code
- •The Song Program
- •Building the Main() Method
- •Creating a Simple Method
- •Adding a Parameter
- •Returning a Value
- •Creating a Menu
- •Creating a Main Loop
- •Creating the Sentry Variable
- •Calling a Method
- •Working with the Results
- •Writing the showMenu() Method
- •Getting Input from the User
- •Handling Exceptions
- •Returning a Value
- •Creating a New Object with the CritterName Program
- •Creating the Basic Critter
- •Using Scope Modifiers
- •Using a Public Instance Variable
- •Creating an Instance of the Critter
- •Adding a Method
- •Creating the talk() Method for the CritterTalk Program
- •Changing the Menu to Use the talk() Method
- •Creating a Property in the CritterProp Program
- •Examining the Critter Prop Program
- •Creating the Critter with a Name Property
- •Using Properties as Filters
- •Making the Critter More Lifelike
- •Adding More Private Variables
- •Adding the Age() Method
- •Adding the Eat() Method
- •Adding the Play() Method
- •Modifying the Talk() Method
- •Making Changes in the Main Class
- •Summary
- •Introducing the Snowball Fight
- •Inheritance and Encapsulation
- •Creating a Constructor
- •Adding a Constructor to the Critter Class
- •Creating the CritViewer Class
- •Reviewing the Static Keyword
- •Calling a Constructor from the Main() Method
- •Working with Multiple Files
- •Overloading Constructors
- •Viewing the Improved Critter Class
- •Adding Polymorphism to Your Objects
- •Modifying the Critter Viewer in CritOver to Demonstrate Overloaded Constructors
- •Using Inheritance to Make New Classes
- •Creating a Class to View the Clone
- •Creating the Critter Class
- •Improving an Existing Class
- •Introducing the Glitter Critter
- •Adding Methods to a New Class
- •Changing the Critter Viewer Again
- •Creating the Snowball Fight
- •Building the Fighter
- •Building the Robot Fighter
- •Creating the Main Menu Class
- •Summary
- •Overview
- •Introducing the Visual Critter
- •Thinking Like a GUI Programmer
- •Creating a Graphical User Interface (GUI)
- •Examining the Code of a Windows Program
- •Adding New Namespaces
- •Creating the Form Object
- •Creating a Destructor
- •Creating the Components
- •Setting Component Properties
- •Setting Up the Form
- •Writing the Main() Method
- •Creating an Interactive Program
- •Responding to a Simple Event
- •Creating and Adding the Components
- •Adding an Event to the Program
- •Creating an Event Handler
- •Allowing for Multiple Selections
- •Choosing a Font with Selection Controls
- •Creating the User Interface
- •Examining Selection Tools
- •Creating Instance Variables in the Font Chooser
- •Writing the AssignFont() Method
- •Writing the Event Handlers
- •Working with Images and Scroll Bars
- •Setting Up the Picture Box
- •Adding a Scroll Bar
- •Revisiting the Visual Critter
- •Designing the Program
- •Determining the Necessary Tools
- •Designing the Form
- •Writing the Code
- •Summary
- •Chapter 7: Timers and Animation: The Lunar Lander
- •Introducing the Lunar Lander
- •Reading Values from the Keyboard
- •Introducing the Key Reader Program
- •Setting Up the Key Reader Program
- •Coding the KeyPress Event
- •Coding the KeyDown Event
- •Determining Which Key Was Pressed
- •Animating Images
- •Introducing the ImageList Control
- •Setting Up an Image List
- •Looking at the Image Collection
- •Displaying an Image from the Image List
- •Using a Timer to Automate Animation
- •Introducing the Timer Control
- •Configuring the Timer
- •Adding Motion
- •Checking for Keyboard Input
- •Working with the Location Property
- •Detecting Collisions between Objects
- •Coding the Crasher Program
- •Getting Values for newX and newY
- •Bouncing the Ball off the Sides
- •Checking for Collisions
- •Extracting a Rectangle from a Component
- •Getting More from the MessageBox Object
- •Introducing the MsgDemo Program
- •Retrieving Values from the MessageBox
- •Coding the Lunar Lander
- •The Visual Design
- •The Constructor
- •The timer1_Tick() Method
- •The moveShip() Method
- •The checkLanding() Method
- •The theForm_KeyDown() Method
- •The showStats() Method
- •The killShip() Method
- •The initGame() Method
- •Summary
- •Chapter 8: Arrays: The Soccer Game
- •The Soccer Game
- •Introducing Arrays
- •Exploring the Counter Program
- •Creating an Array of Strings
- •Referring to Elements in an Array
- •Working with Arrays
- •Using the Array Demo Program to Explore Arrays
- •Building the Languages Array
- •Sorting the Array
- •Designing the Soccer Game
- •Solving a Subset of the Problem
- •Adding Percentages for the Other Players
- •Setting Up the Shot Demo Program
- •Setting Up the List Boxes
- •Using a Custom Event Handler
- •Writing the changeStatus() Method
- •Kicking the Ball
- •Designing Programs by Hand
- •Examining the Form by Hand Program
- •Adding Components in the Constructor
- •Responding to the Button Event
- •Building the Soccer Program
- •Setting Up the Variables
- •Examining the Constructor
- •Setting Up the Players
- •Setting Up the Opponents
- •Setting Up the Goalies
- •Responding to Player Clicks
- •Handling Good Shots
- •Handling Bad Shots
- •Setting a New Current Player
- •Handling the Passage of Time
- •Updating the Score
- •Summary
- •Chapter 9: File Handling: The Adventure Kit
- •Introducing the Adventure Kit
- •Viewing the Main Screen
- •Loading an Adventure
- •Playing an Adventure
- •Creating an Adventure
- •Reading and Writing Text Files
- •Exploring the File IO Program
- •Importing the IO Namespace
- •Writing to a Stream
- •Reading from a Stream
- •Creating Menus
- •Exploring the Menu Demo Program
- •Adding a MainMenu Object
- •Adding a Submenu
- •Setting Up the Properties of Menu Items
- •Writing Event Code for Menus
- •Using Dialog Boxes to Enhance Your Programs
- •Exploring the Dialog Demo Program
- •Adding Standard Dialogs to Your Form
- •Using the File Dialog Controls
- •Responding to File Dialog Events
- •Using the Font Dialog Control
- •Using the Color Dialog Control
- •Storing Entire Objects with Serialization
- •Exploring the Serialization Demo Program
- •Creating the Contact Class
- •Referencing the Serializable Namespace
- •Storing a Class
- •Retrieving a Class
- •Returning to the Adventure Kit Program
- •Examining the Room Class
- •Creating the Dungeon Class
- •Writing the Game Class
- •Writing the Editor Class
- •Writing the MainForm Class
- •Summary
- •Chapter 10: Chapter Basic XML: The Quiz Maker
- •Introducing the Quiz Maker Game
- •Taking a Quiz
- •Creating and Editing Quizzes
- •Investigating XML
- •Defining XML
- •Creating an XML Document in .NET
- •Creating an XML Schema for Your Language
- •Investigating the .NET View of XML
- •Exploring the XmlNode Class
- •Exploring the XmlDocument Class
- •Reading an Existing XML Document
- •Creating the XML Viewer Program
- •Writing New Values to an XML Document
- •Building the Document Structure
- •Adding an Element to the Document
- •Displaying the XML Code
- •Examining the Quizzer Program
- •Building the Main Form
- •Writing the Quiz Form
- •Writing the Editor Form
- •Summary
- •Overview
- •Introducing the SpyMaster Program
- •Creating a Simple Database
- •Accessing the Data Server
- •Accessing the Data in a Program
- •Using Queries to Modify Data Results
- •Limiting Data with the SELECT Statement
- •Using an Existing Database
- •Adding the Capability to Display Queries
- •Creating a Visual Query Builder
- •Working with Relational Databases
- •Improving Your Data with Normalization
- •Using a Join to Connect Two Tables
- •Creating a View
- •Referring to a View in a Program
- •Incorporating the Agent Specialty Attribute
- •Working with Other Databases
- •Creating a New Connection
- •Converting a Data Set to XML
- •Reading from XML to a Data Source
- •Creating the SpyMaster Database
- •Building the Main Form
- •Editing the Assignments
- •Editing the Specialties
- •Viewing the Agents
- •Editing the Agent Data
- •Summary
- •List of Figures
- •List of Tables
- •List of Sidebars

Absolute Beginners. However, if you count the characters, you find that the word for starts at character 16! The reason for this anomaly is that humans usually begin counting with the number 1. Computers almost always begin counting with the value 0. This can trip you up if you’re not careful.
You can do much more with strings, and there are variations of the methods I have shown you. However, the real focus here is not to show you every method of the string object. Instead, I hope that you will see how you can investigate the string object (or any other object you might encounter) so that you can exploit its properties, methods, and events.
Using a For Loop
The branching behavior you learned in Chapter 2, “Branching and Operators: The Math Game,” is very important because it gives your programs the capability to make rudimentary choices. The other major way to control the flow of your programs is through looping behavior. Loops are code structures that allow parts of your program to repeat. There are a couple standard types of loops. One prominent type of looping structure repeats a code segment some specified number of times. This counting loop is called the for loop. To demonstrate the for loop, I’ll imitate a bureaucrat.
Examining The Bean Counter Program
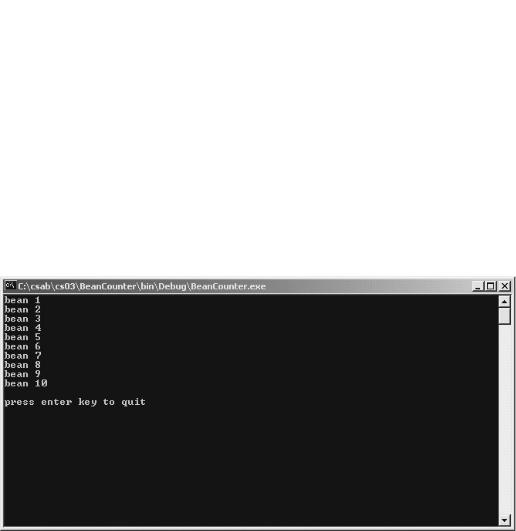
Although many of my sample programs are pointless, this one takes special pride in looking as though it’s doing something important. The program featured in Figure 3.4 simply counts beans.
Figure 3.4: The bean counter uses a for loop to repeat behavior.
The program behind this code is reminiscent of a bureaucrat trying to look busier than he is. If you examine the output, you would expect there to be 11 different WriteLine calls, but when you examine the code, you see that there are only two! The for loop structure causes the two WriteLine calls to repeat.
using System;
namespace BeanCounter
{
///<summary>
///Repeats a simple task a number of times
///Demonstrates the basic for loop
///Andy Harris, 11/29/01
60
/// </summary> class Counter
{
static void Main(string[] args)
{
int beanNumber;
for (beanNumber = 1; beanNumber <= 10; beanNumber++){ Console.WriteLine("bean {0}", beanNumber);
} // end for
Console.WriteLine();
Console.WriteLine("press enter key to quit");
Console.ReadLine();
} // end main } // end class
}// end namespace
The only new part of this program is the line starting with for, which indicates the beginning of a for loop. Only three elements belong in the parentheses after for. These elements help to ensure that the loop will operate smoothly. The for line is followed by a set of braces containing one or more lines of code. The code inside the braces will repeat a certain number of times, based on the way the for loop is set up.
Creating a Sentry Variable
The part that says beanNumber = 1; establishes a special variable that will be used to control the loop. The value of this variable will control how long the loop continues. Because the variable is like a gatekeeper for the loop, it is frequently referred to as a sentry variable. For loops almost always use integers as sentry variables. It is important that I established the starting value of the variable at 1. As you will see shortly, you can start with other values, but most often your loop’s sentry variable will start at 0 or 1.
Checking for an Upper Limit
The next part of the for loop is a condition that checks whether the variable is past a limit. In the Bean Counter program, this section looks like beanNumber <= 10;. As long as the condition is true (in this case, as long as beanNumber is less than or equal to the value 10), the loop will continue. As soon as the condition is evaluated to false (because, for example, beanNumber is 11), the loop will stop, and the next line of code after the right brace (}) will execute.
Incrementing the Variable
The last part of the for line increments the sentry variable. Remember from Chapter 2 that the beanNumber++ statement is actually a shortcut for beanNumber = beanNumber + 1. The sentry variable must be incremented for the loop to exit.
Examining the Behavior of the For Loop
Even though I have explained the structure of the for loop statement, I recommend that you take advantage of the IDE’s terrific debugging mode so you will really understand what’s going on. Load or type the Bean Counter program in your editor, and use the F11 (function key F11) to run your program one line at a time. As you run your program, you will see the current line in your editor highlighted in yellow. Be sure that the debugging box at the bottom−left of the screen is set to Autos
61

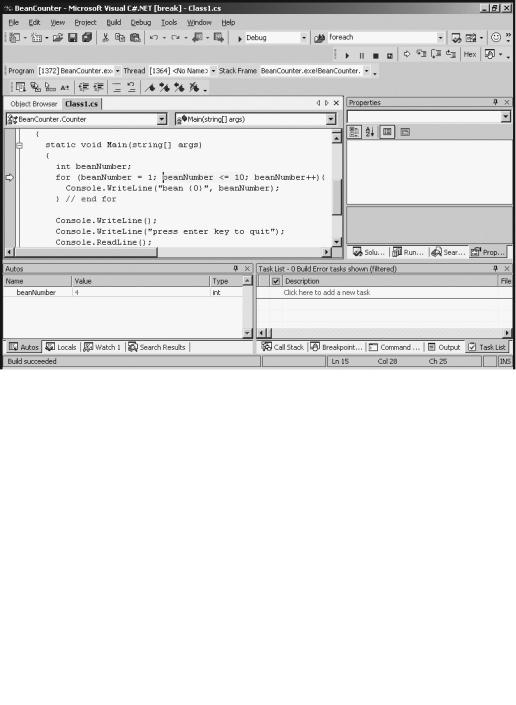
(as I have done in Figure 3.5), and you’ll see the value of beanNumber, which starts at 0.
Figure 3.5: The highlight indicates the current line being executed, and the Autos window describes the value of the variables.
Press the F11 key repeatedly, and see what happens to the highlight indicating program control. Also watch what happens to the beanNumber variable. The first time through, the program sets the value of beanNumber to 1 and then checks whether beanNumber is less than or equal to 10. It is, so the code in the loop activates. After the WriteLine code happens, look at the output screen. (It is probably running, but you will not see it unless you call it to the foreground by clicking its icon in the task bar.) When the program reaches the right brace that ends the for loop, it goes back to the top of the loop. It increments the variable and checks the condition again. It still finds the condition true, so it continues executing the loop. Eventually, the value of beanNumber will be larger than 10, so the loop will exit.
Trick Learning how and when to use the debugging mode can save you hours of frustration. The worst kinds of bugs to fix are those that occur when the program is working almost correctly, but somewhere something is going wrong. The ability to step through the code one line at a time and examine the values of the variables in slow motion is invaluable. It’s also a great technique for making sure that you understand how program control is flowing, as you’re doing in this example.
Varying the For Loop’s Behavior
Several variations of this basic loop are used for different kinds of counting situations. You can set up for loops that skip over numbers, count by two, or count backwards. The basic design of the for statement is the same, but you can change the way the three parts of the for loop are written to change the way the loop acts.
62

The Fancy Beans Program
The Fancy Beans program demonstrates a few variations on the theme of the basic for loop. Take a look at the output of this program in Figure 3.6, then I’ll show you how the code works.
Figure 3.6: This bean counter can count by fives, backwards, and pulls the words out of a sentence one at a time.
Take a look at the code for the fancier bean counter, and I’ll explain the details:
using System;
namespace fancyBean
{
///<summary>
///Demonstrates a number of variations of the for loop
///Andy Harris, 11/29/01
///</summary>
class fancyBean
{
static void Main(string[] args)
{
int i;
string sentence = "Count those fancy beans";
//counting by fives Console.WriteLine("Counting by fives:"); for(i = 0; i <= 100; i += 5){
Console.Write(i + "\t"); } // end for loop Console.WriteLine(); Console.WriteLine();
//count backwards Console.WriteLine("Counting backwards:"); for(i = 10; i > 0; i−−){
Console.Write(i + "\t"); } // end for loop Console.WriteLine(); Console.WriteLine();
//demonstrate foreach loop Console.WriteLine("Getting words in a sentence"); foreach (string word in sentence.Split()){
Console.WriteLine(word);
63