

CSharp Bible (2002) [eng]
.pdfIn this chapter, you learn to use the Reflection namespace for examining objects at runtime. You also learn to late bind to objects and use methods and properties within these late bound objects.
Understanding the Type Class
The Type class acts as a window into the Reflection API, enabling access to metadata. The abstract class, System.Type, represents a type in the Common Type System (CTS). This Common Type System is what enables you to examine objects across all languages in the
.NET family. Because each object uses the same framework, runtime, and type system, object and type information is easily obtainable.
One of the Type classes greatest assets is the capability to create objects dynamically and use them at runtime.
Retrieving type Information
Type information can be retrieved from objects using several methods. The following sections describe how to do this in three different ways: by using a type name, by using a process name, or by specifying an assembly name to retrieve the information. Although all of these implementations perform essentially the same task, each is useful in its own right. Depending on the requirements of your application, you might only need to use one form of the typegathering abilities.
Retrieving types by name
By simply specifying the name of a type, you can query almost all aspects of the object. You can determine whether the object is a class, what its base system type is, and many other properties.
To test this, you can build a simple application to view some properties of the System.String class, as shown in Listing 32-1.
Listing 32-1: Querying Type Information by Name
using System;
using System.Reflection;
class NameType
{
public static void Main()
{
Type t = Type.GetType("System.String"); Console.WriteLine("Name : {0}",t.Name); Console.WriteLine("Underlying System Type :
{0}",t.UnderlyingSystemType); Console.WriteLine("Is Class : {0}",t.IsClass);
}
}
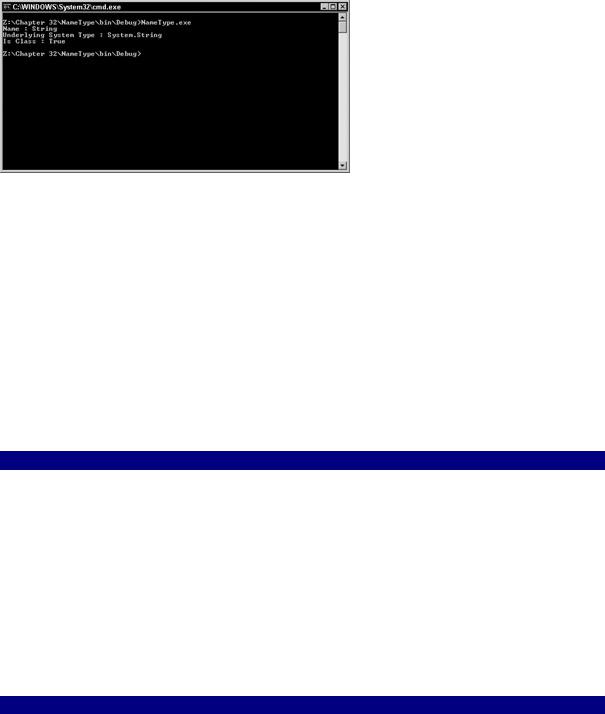
Figure 32-1 shows that System.String is the base system type, and that the object is indeed a class.
Figure 32-1: Query type information by object name.
You may be wondering why this information is useful. Suppose you are building an application that needs to generate insert statements to put information into SQL Server. Typing a large amount of information takes an extremely long time. Using Reflection and the Type class, you can examine the underlying type of each piece of information you want to insert into SQL Server and map those types to a valid SQL Server data type. This greatly eases the process of programmatically generating the insert statements that you require.
Retrieving types by instance
Rather than use the name of a type, you may simply use an instance of an object that you want to examine. Listing 32-2 represents an example similar to the preceding one.
Listing 32-2: Querying Type Information Using the Instance of an Object
using System;
using System.Reflection;
class InstanceType
{
public static void Main()
{
String myVar = "Brian Patterson"; Type t = myVar.GetType();
Console.WriteLine("Name : {0}",t.Name); Console.WriteLine("Underlying System Type :
{0}",t.UnderlyingSystemType);
Console.WriteLine("Is Class : {0}",t.IsClass);
}
}
In this example, rather than specify that you want to view type information of System.String, you create an instance of a string variable on which you then call the GetType() method. The information obtained here is the same as that obtained in the preceding example, the difference being that you don't have to know the type before the fact. You simply call the GetType() method and assign it to a Type object, which you can the query for the name, underlying system type, and so on.

Retrieving types in an assembly
Many times, you will want to examine types contained within an assembly. This assembly could be an executable or even a dynamic link library contained on the system.
Listing 32-3 contains the code necessary to examine the type information of the executable itself.
Listing 32-3: Examining a Currently Running Process for Type Information
using System;
using System.Reflection; using System.Diagnostics;
class AssemType
{
public static void Main(string[] args)
{
Process p = Process.GetCurrentProcess(); string assemblyName = p.ProcessName + ".exe";
Console.WriteLine("Examining : {0}", assemblyName); Assembly a = Assembly.LoadFrom(assemblyName);
Type[] types = a.GetTypes(); foreach(Type t in types)
{
Console.WriteLine("\nType : {0}",t.FullName); Console.WriteLine("\tBase class :
{0}",t.BaseType.FullName);
}
}
}
The preceding code introduces a few new items. The process type is used to examine running processes. In this context, you use it to get the name of your program, and then append .exe to the end of the name so you can examine the assembly. You can just as easily hard code in the name of your application, but this method ensures that it will work no matter what you name the application.
Figure 32-2 shows the output for this application. Not a very dramatic result, as your program contains only one class.
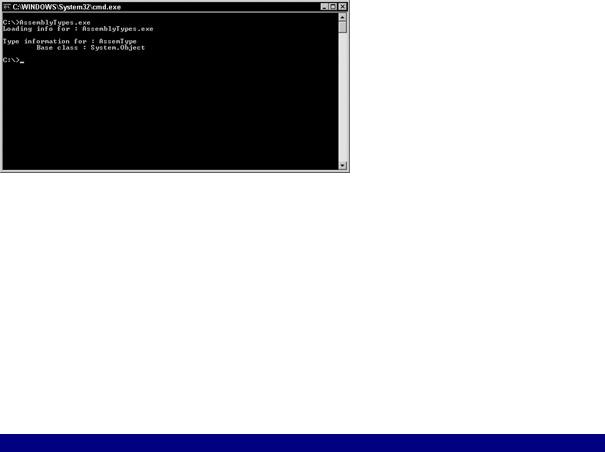
Figure 32-2: Process information obtained with the Reflection API
As you can see in Figure 32-2, you have examined the current running process and the actual application itself and displayed all internal classes and their types. For the sake of experimentation, trying adding a few more dummy classes to this project and then rerun the application. You should see a list of all the classes contained therein, as well as their types.
Interrogating objects
Listing 32-4 contains the source listing for the ReflectionTest application, which examines a class and provides the details about that class. This application is a good conglomerate of everything you learned about Reflection up to this point.
Listing 32-4: Class Objects Are Easily Transversed for Member Information
namespace ReflectionTest
{
using System ;
using System.Reflection ;
public class Class1
{
public static int Main ( )
{
Type t = typeof( aUsefulClass ) ; Console.WriteLine ( "Type of class: " + t ) ; Console.WriteLine ( "Namespace: " + t.Namespace ) ; ConstructorInfo[] ci = t.GetConstructors( );
Console.WriteLine("-----------------------------------------------
");
Console.WriteLine( "Constructors are:" ) ; foreach( ConstructorInfo i in ci )
{
Console.WriteLine( i ) ;
} |
|
PropertyInfo[] pi = t.GetProperties( ); |
"); |
Console.WriteLine("----------------------------------------------- |
|
Console.WriteLine( "Properties are:" ) ; |
|
foreach( PropertyInfo i in pi ) |
|
{ |
|
Console.WriteLine( i ) ; |
|
} |
|
MethodInfo[] mi = t.GetMethods( ) ; |
|

Console.WriteLine("----------------------------------------------- |
"); |
Console.WriteLine( "Methods are:" ) ; |
|
foreach( MethodInfo i in mi )
{
Console.WriteLine( "Name: " + i.Name ) ; ParameterInfo[] pif = i.GetParameters () ; foreach ( ParameterInfo p in pif )
{
Console.WriteLine("Type: " + p.ParameterType + " parameter name:
" + p.Name ) ;
}
}
return 0 ;
}
public class aUsefulClass
{
public int pubInteger ; private int _privValue;
public aUsefulClass()
{
}
public aUsefulClass ( int IntegerValueIn )
{
pubInteger = IntegerValueIn ;
}
public int Add10 ( int IntegerValueIn )
{
Console.WriteLine ( IntegerValueIn ) ; return IntegerValueIn + 10 ;
}
public int TestProperty
{
get
{
return _privValue ;
}
set
{
_privValue = value ;
}
}
}
}
}
Here you have created two classes, Class1 and aUsefulClass. Class1 contains the main entry point into our application (void Main), while the other class is there for examination purposes only.
To examine the aUsefulClass, perform the following steps within the main procedure: First, declare a Type object and, using the typeof keyword, point it to the aUsefulClass. You then display the class Type and the namespace. You then use the GetConstructors to retrieve a list of the class constructs. Next, loop through this of constructors and display them on the screen. As with the constructors, use GetProperties to retrieve a list of all the properties so that you can iterate through the list and the properties out the console window.
GetMethods retrieves all the method names, as well as the methods that make up the get and set accessors of your properties. This information is then iterated and displayed at the console. You also call GetParameters to retrieve a list of the parameters for each method and display that information as well.
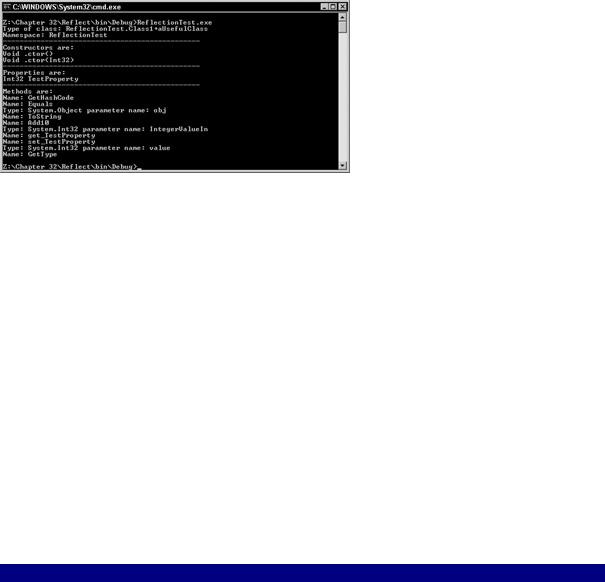
As you can see in Figure 32-3, your application has revealed a wealth of information about the class object.
Figure 32-3: The Reflection and Type classes reveal a great deal of information regarding the class object.
Obviously, this application isn't particularly useful, as you have the source code for the class in question and don't need Reflection to give you the details. The important thing to remember here is that Reflection works in the exact same manner even if you are dealing with an assembly for which you do not have the source code.
Generating dynamic code through Reflection
You can create code at runtime using the System.Reflection.Emit namespace. Using the classes in this namespace, an assembly can be defined in the memory, a module can be created for that assembly, new types can be defined for a module (including its members), and MSIL opcodes for the application's logic can be emitted.
Note "Opcodes" is short for operation codes. This is the actual code that is generated by the
.NET compiler.
Listing 32-5 contains the code that can be used to generate code at runtime.
Listing 32-5: Generating Code Dynamically at Runtime
using System;
using System.Reflection; using System.Reflection.Emit;
namespace DynamicCode
{
class CodeGenerator
{
Type t;
AppDomain currentDomain; AssemblyName assemName; AssemblyBuilder assemBuilder; ModuleBuilder moduleBuilder; TypeBuilder typeBuilder; MethodBuilder methodBuilder; ILGenerator msilG;
public static void Main()
{
CodeGenerator codeGen = new CodeGenerator(); Type t = codeGen.T;
if (t != null)
{
object o =
Activator.CreateInstance(t);
MethodInfo helloWorld =
t.GetMethod("HelloWorld");
if (helloWorld != null)
{
// Run the HelloWorld Method helloWorld.Invoke(o, null);
}
else
{
Console.WriteLine("Could not retrieve
MethodInfo");
}
}
else
{
Console.WriteLine("Could not access
the Type");
}
public CodeGenerator()
{
//Get the current Application Domain.
//This is needed when building code. currentDomain = AppDomain.CurrentDomain;
//Create a new Assembly
for our Methods
assemName = new AssemblyName(); assemName.Name = "BibleAssembly";
assemBuilder = currentDomain.DefineDynamicAssembly(assemName, AssemblyBuilderAccess.Run);
//Create a new module within this assembly moduleBuilder =
assemBuilder.DefineDynamicModule("BibleModule");
//Create a new type within the module
typeBuilder = moduleBuilder.DefineType("BibleClass",TypeAttributes.Public);
//Now we can add the
//HelloWorld method to the class that was just
created.
methodBuilder = typeBuilder.DefineMethod("HelloWorld", MethodAttributes.Public,null,null);
//Now we can generate some Microsoft Intermediate
//Language Code that simply writes a line of text
out
// to the console.
msilG = methodBuilder.GetILGenerator(); msilG.EmitWriteLine("Hello from C# Bible"); msilG.Emit(OpCodes.Ret);
// Create a type.
t = typeBuilder.CreateType();
}
public Type T
{
get
{
return this.t;
}
}
}
}
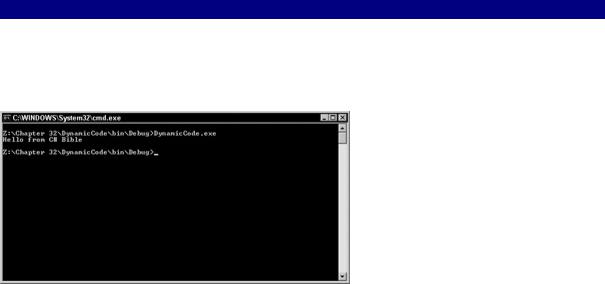
As expected, this application simply prints a message out to the console, as shown in Figure 32-4.
Figure 32-4: The results of the dynamically generated code
This capability of Reflection to generate objects and code at runtime is truly impressive and provides the backbone for generating fuzzy logic applications that adapt and learn as they see fit.
Note Fuzzy logic is defined as a form of algebra that uses the values of true and false to make decisions based on imprecise data. Fuzzy logic is generally attributed to artificial intelligence systems.
Summary
The Reflection and Type classes go hand in hand when you need to discover type information at runtime. These classes enable you to examine objects, load the objects dynamically at runtime, and even generate code as needed.
Chapter 33: C# Threading
In This Chapter
The multithreading power of the .NET Framework enables you to write very robust multithreaded applications in any .NET language. In this chapter, you learn the ins and outs of threading. The chapter starts with an overview of the different types of threading and how they work in the .NET Framework, and then you learn what you can do with multithreading in your own applications. As you read this chapter, carefully consider the dangers of adding multiple threads to your applications before implementing them, because multithreading is not a trivial concept.
Understanding Threading
Before you start writing multithreaded applications, you should understand what happens when threads are created, and how the operating system handles threads.
When an application executes, a primary thread is created, and the application's scope is based on this thread. An application can create additional threads to perform additional tasks. An example of creating a primary thread would be firing up Microsoft Word. The application execution starts the main thread. Within the Word application, the background printing of a document would be an example of an additional thread being created to handle another task. While you are still interacting with the main thread (the Word document), the system is carrying out your printing request. After the main application thread is killed, all other threads created as a result of that thread are also killed.
Consider these two definitions from the Microsoft Foundation Classes Software Development Kit (MFCSDK):
•Process: An executing instance of an application
•Thread: A path of execution within a process
C++ and the MFC have long supported the concept of developing multithreaded applications. Because the core of the Windows operating system is written using these tools, it is important that they support the capability to create threads in which tasks can be assigned and executed. In the early days of Windows 3.1, multitasking did not exist; this concept became a reality in Windows NT 3.5, and NT 4.0, and then Windows 95, 98, 98SE, ME, 2000, and XP. To take advantage of the operating system's features, multithreaded applications became more