
- •Table of Contents
- •Preface
- •What is ASP.NET?
- •Installing the Required Software
- •Installing the Web Server
- •Installing Internet Information Services (IIS)
- •Installing Cassini
- •Installing the .NET Framework and the SDK
- •Installing the .NET Framework
- •Installing the SDK
- •Configuring the Web Server
- •Configuring IIS
- •Configuring Cassini
- •Where do I Put my Files?
- •Using localhost
- •Virtual Directories
- •Using Cassini
- •Installing SQL Server 2005 Express Edition
- •Installing SQL Server Management Studio Express
- •Installing Visual Web Developer 2005
- •Writing your First ASP.NET Page
- •Getting Help
- •Summary
- •ASP.NET Basics
- •ASP.NET Page Structure
- •Directives
- •Code Declaration Blocks
- •Comments in VB and C# Code
- •Code Render Blocks
- •ASP.NET Server Controls
- •Server-side Comments
- •Literal Text and HTML Tags
- •View State
- •Working with Directives
- •ASP.NET Languages
- •Visual Basic
- •Summary
- •VB and C# Programming Basics
- •Programming Basics
- •Control Events and Subroutines
- •Page Events
- •Variables and Variable Declaration
- •Arrays
- •Functions
- •Operators
- •Breaking Long Lines of Code
- •Conditional Logic
- •Loops
- •Object Oriented Programming Concepts
- •Objects and Classes
- •Properties
- •Methods
- •Classes
- •Constructors
- •Scope
- •Events
- •Understanding Inheritance
- •Objects In .NET
- •Namespaces
- •Using Code-behind Files
- •Summary
- •Constructing ASP.NET Web Pages
- •Web Forms
- •HTML Server Controls
- •Using the HTML Server Controls
- •Web Server Controls
- •Standard Web Server Controls
- •Label
- •Literal
- •TextBox
- •HiddenField
- •Button
- •ImageButton
- •LinkButton
- •HyperLink
- •CheckBox
- •RadioButton
- •Image
- •ImageMap
- •PlaceHolder
- •Panel
- •List Controls
- •DropDownList
- •ListBox
- •RadioButtonList
- •CheckBoxList
- •BulletedList
- •Advanced Controls
- •Calendar
- •AdRotator
- •TreeView
- •SiteMapPath
- •Menu
- •MultiView
- •Wizard
- •FileUpload
- •Web User Controls
- •Creating a Web User Control
- •Using the Web User Control
- •Master Pages
- •Using Cascading Style Sheets (CSS)
- •Types of Styles and Style Sheets
- •Style Properties
- •The CssClass Property
- •Summary
- •Building Web Applications
- •Introducing the Dorknozzle Project
- •Using Visual Web Developer
- •Meeting the Features
- •The Solution Explorer
- •The Web Forms Designer
- •The Code Editor
- •IntelliSense
- •The Toolbox
- •The Properties Window
- •Executing your Project
- •Using Visual Web Developer’s Built-in Web Server
- •Using IIS
- •Using IIS with Visual Web Developer
- •Core Web Application Features
- •Web.config
- •Global.asax
- •Using Application State
- •Working with User Sessions
- •Using the Cache Object
- •Using Cookies
- •Starting the Dorknozzle Project
- •Preparing the Sitemap
- •Using Themes, Skins, and Styles
- •Creating a New Theme Folder
- •Creating a New Style Sheet
- •Styling Web Server Controls
- •Adding a Skin
- •Applying the Theme
- •Building the Master Page
- •Using the Master Page
- •Extending Dorknozzle
- •Debugging and Error Handling
- •Debugging with Visual Web Developer
- •Other Kinds of Errors
- •Custom Errors
- •Handling Exceptions Locally
- •Summary
- •Using the Validation Controls
- •Enforcing Validation on the Server
- •Using Validation Controls
- •RequiredFieldValidator
- •CompareValidator
- •RangeValidator
- •ValidationSummary
- •RegularExpressionValidator
- •Some Useful Regular Expressions
- •CustomValidator
- •Validation Groups
- •Updating Dorknozzle
- •Summary
- •What is a Database?
- •Creating your First Database
- •Creating a New Database Using Visual Web Developer
- •Creating Database Tables
- •Data Types
- •Column Properties
- •Primary Keys
- •Creating the Employees Table
- •Creating the Remaining Tables
- •Executing SQL Scripts
- •Populating the Data Tables
- •Relational Database Design Concepts
- •Foreign Keys
- •Using Database Diagrams
- •Diagrams and Table Relationships
- •One-to-one Relationships
- •One-to-many Relationships
- •Many-to-many Relationships
- •Summary
- •Speaking SQL
- •Reading Data from a Single Table
- •Using the SELECT Statement
- •Selecting Certain Fields
- •Selecting Unique Data with DISTINCT
- •Row Filtering with WHERE
- •Selecting Ranges of Values with BETWEEN
- •Matching Patterns with LIKE
- •Using the IN Operator
- •Sorting Results Using ORDER BY
- •Limiting the Number of Results with TOP
- •Reading Data from Multiple Tables
- •Subqueries
- •Table Joins
- •Expressions and Operators
- •Transact-SQL Functions
- •Arithmetic Functions
- •String Functions
- •Date and Time Functions
- •Working with Groups of Values
- •The COUNT Function
- •Grouping Records Using GROUP BY
- •Filtering Groups Using HAVING
- •The SUM, AVG, MIN, and MAX Functions
- •Updating Existing Data
- •The INSERT Statement
- •The UPDATE Statement
- •The DELETE Statement
- •Stored Procedures
- •Summary
- •Introducing ADO.NET
- •Importing the SqlClient Namespace
- •Defining the Database Connection
- •Preparing the Command
- •Executing the Command
- •Setting up Database Authentication
- •Reading the Data
- •Using Parameters with Queries
- •Bulletproofing Data Access Code
- •Using the Repeater Control
- •More Data Binding
- •Inserting Records
- •Updating Records
- •Deleting Records
- •Using Stored Procedures
- •Summary
- •DataList Basics
- •Handling DataList Events
- •Editing DataList Items and Using Templates
- •DataList and Visual Web Developer
- •Styling the DataList
- •Summary
- •Using the GridView Control
- •Customizing the GridView Columns
- •Styling the GridView with Templates, Skins, and CSS
- •Selecting Grid Records
- •Using the DetailsView Control
- •Styling the DetailsView
- •GridView and DetailsView Events
- •Entering Edit Mode
- •Using Templates
- •Updating DetailsView Records
- •Summary
- •Advanced Data Access
- •Using Data Source Controls
- •Binding the GridView to a SqlDataSource
- •Binding the DetailsView to a SqlDataSource
- •Displaying Lists in DetailsView
- •More on SqlDataSource
- •Working with Data Sets and Data Tables
- •What is a Data Set Made From?
- •Binding DataSets to Controls
- •Implementing Paging
- •Storing Data Sets in View State
- •Implementing Sorting
- •Filtering Data
- •Updating a Database from a Modified DataSet
- •Summary
- •Security and User Authentication
- •Basic Security Guidelines
- •Securing ASP.NET 2.0 Applications
- •Working with Forms Authentication
- •Authenticating Users
- •Working with Hard-coded User Accounts
- •Configuring Forms Authentication
- •Configuring Forms Authorization
- •Storing Users in Web.config
- •Hashing Passwords
- •Logging Users Out
- •ASP.NET 2.0 Memberships and Roles
- •Creating the Membership Data Structures
- •Using your Database to Store Membership Data
- •Using the ASP.NET Web Site Configuration Tool
- •Creating Users and Roles
- •Changing Password Strength Requirements
- •Securing your Web Application
- •Using the ASP.NET Login Controls
- •Authenticating Users
- •Customizing User Display
- •Summary
- •Working with Files and Email
- •Writing and Reading Text Files
- •Setting Up Security
- •Writing Content to a Text File
- •Reading Content from a Text File
- •Accessing Directories and Directory Information
- •Working with Directory and File Paths
- •Uploading Files
- •Sending Email with ASP.NET
- •Configuring the SMTP Server
- •Sending a Test Email
- •Creating the Company Newsletter Page
- •Summary
- •The WebControl Class
- •Properties
- •Methods
- •Standard Web Controls
- •AdRotator
- •Properties
- •Events
- •BulletedList
- •Properties
- •Events
- •Button
- •Properties
- •Events
- •Calendar
- •Properties
- •Events
- •CheckBox
- •Properties
- •Events
- •CheckBoxList
- •Properties
- •Events
- •DropDownList
- •Properties
- •Events
- •FileUpload
- •Properties
- •Methods
- •HiddenField
- •Properties
- •HyperLink
- •Properties
- •Image
- •Properties
- •ImageButton
- •Properties
- •Events
- •ImageMap
- •Properties
- •Events
- •Label
- •Properties
- •LinkButton
- •Properties
- •Events
- •ListBox
- •Properties
- •Events
- •Literal
- •Properties
- •MultiView
- •Properties
- •Methods
- •Events
- •Panel
- •Properties
- •PlaceHolder
- •Properties
- •RadioButton
- •Properties
- •Events
- •RadioButtonList
- •Properties
- •Events
- •TextBox
- •Properties
- •Events
- •Properties
- •Validation Controls
- •CompareValidator
- •Properties
- •Methods
- •CustomValidator
- •Methods
- •Events
- •RangeValidator
- •Properties
- •Methods
- •RegularExpressionValidator
- •Properties
- •Methods
- •RequiredFieldValidator
- •Properties
- •Methods
- •ValidationSummary
- •Properties
- •Navigation Web Controls
- •SiteMapPath
- •Properties
- •Methods
- •Events
- •Menu
- •Properties
- •Methods
- •Events
- •TreeView
- •Properties
- •Methods
- •Events
- •HTML Server Controls
- •HtmlAnchor Control
- •Properties
- •Events
- •HtmlButton Control
- •Properties
- •Events
- •HtmlForm Control
- •Properties
- •HtmlGeneric Control
- •Properties
- •HtmlImage Control
- •Properties
- •HtmlInputButton Control
- •Properties
- •Events
- •HtmlInputCheckBox Control
- •Properties
- •Events
- •HtmlInputFile Control
- •Properties
- •HtmlInputHidden Control
- •Properties
- •HtmlInputImage Control
- •Properties
- •Events
- •HtmlInputRadioButton Control
- •Properties
- •Events
- •HtmlInputText Control
- •Properties
- •Events
- •HtmlSelect Control
- •Properties
- •Events
- •HtmlTable Control
- •Properties
- •HtmlTableCell Control
- •Properties
- •HtmlTableRow Control
- •Properties
- •HtmlTextArea Control
- •Properties
- •Events
- •Index
Chapter 5: Building Web Applications
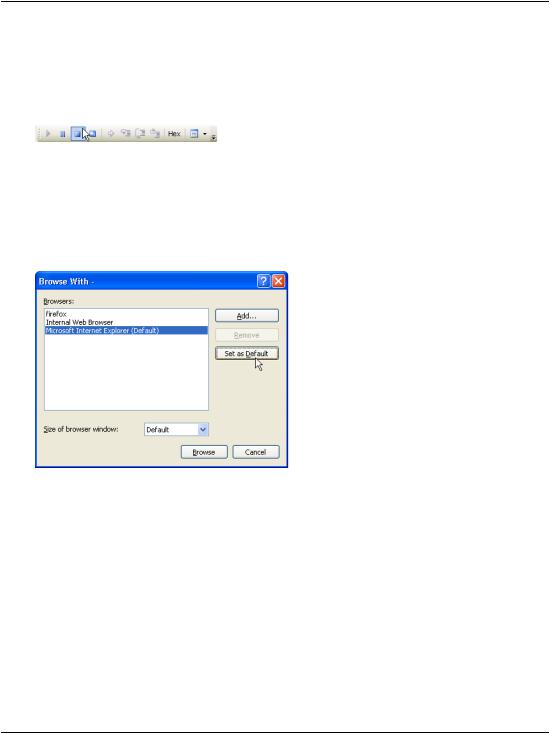
Developer will stop the application automatically. Otherwise, you’d need to stop it manually by selecting Debug > Stop Debugging, or clicking the Stop button shown in Figure 5.18.
Figure 5.18. Stopping debug mode
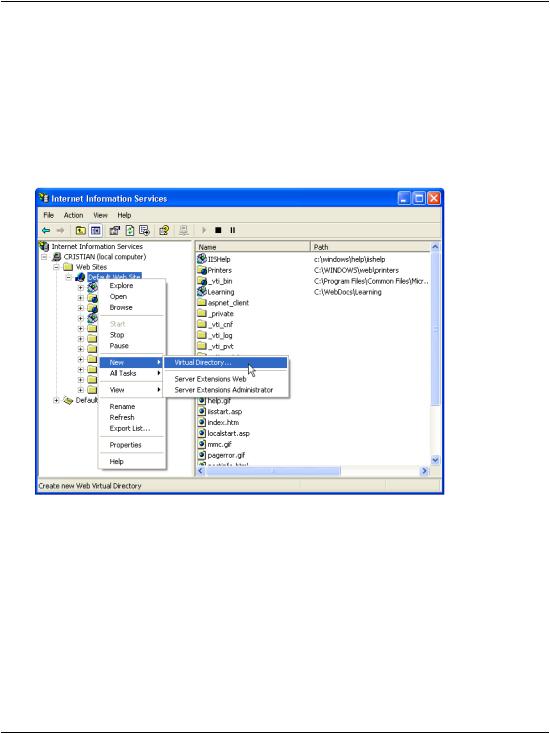
To change the browser that’s used to execute your web applications, first make sure that none of your projects are running. Then, right-click the root node in
Solution Explorer, and select Browse With to display the dialog shown in Figure 5.19. Select Internet Explorer, click Set as Default, and click Browse.
Figure 5.19. Setting the default browser in Visual Web Developer
Using IIS
You can continue your journey through this book using Visual Web Developer’s integrated web server, or you can make use of IIS. Although Microsoft recommends that we stick with Visual Web Developer for learning purposes, it’s very easy to use IIS. Even if you develop your application using the integrated web server, it’s beneficial to test your application using IIS as well, because when it’s shipped to production, your application will end up running on an IIS server anyway.
To run your web application using IIS, you’ll need to create an IIS virtual directory and make it point to the project’s physical folder on the disk. We’ll create a vir-
160
Using IIS
tual directory named Dorknozzle, so the URL of your web application will be http://localhost/Dorknozzle.
Start by opening the Internet Services Manager by selecting Start > All Programs
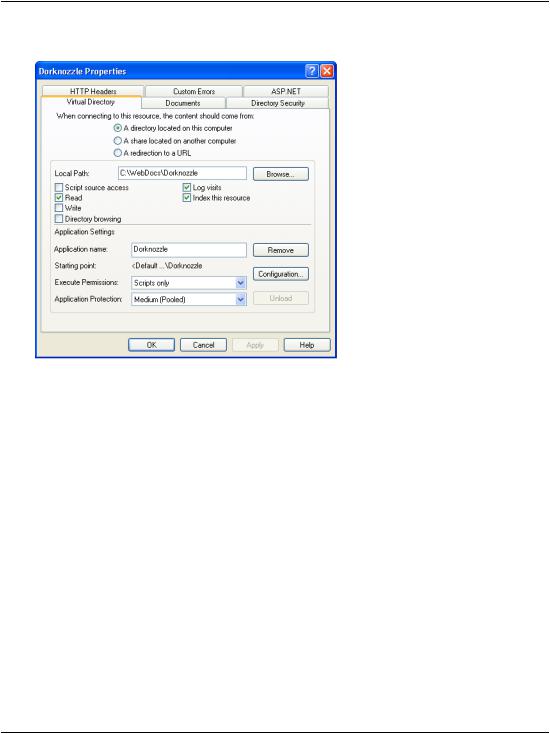
> Administrative Tools > Internet Information Services. In the tree in the left-hand pane, right-click the Default Web Site node, and choose New > Virtual Directory from the context menu, as shown in Figure 5.20.
Figure 5.20. Creating a new virtual directory
The Virtual Directory Creation Wizard will appear and, in its second screen, will ask you to specify an alias for your virtual directory. Choose Dorknozzle. The next screen will ask you for the path to this virtual folder—choose C:\WebDocs\Dorknozzle (or the folder you’ve used). Leave all the other settings to their defaults. After the wizard closes, you’ll be able to see your new virtual folder as a child of the Default Web Site node.
Let’s spend some time learning about your new virtual directory. Right-click the
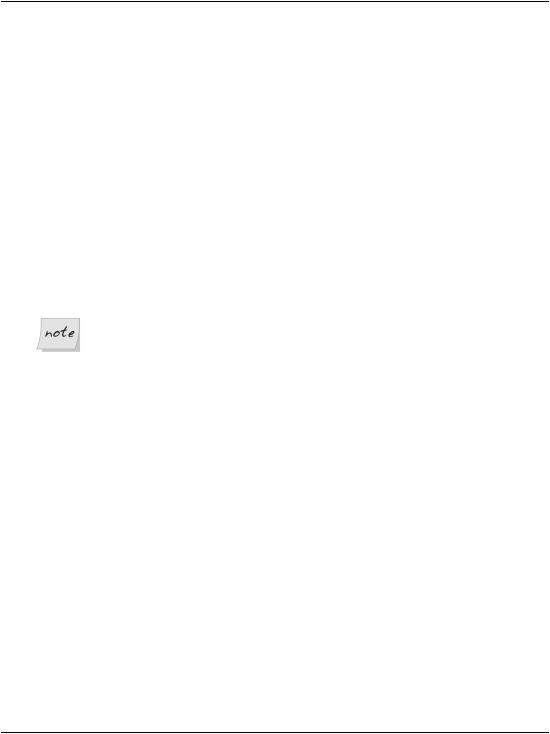
Dorknozzle node in the Internet Services Manager, and choose Properties. A dialog like the one shown in Figure 5.21 will open, allowing you to configure the virtual directory’s properties.
161
Chapter 5: Building Web Applications
Figure 5.21. Editing the virtual directory’s properties
The Virtual Directory tab shows the basic settings of your virtual directory. If you look below the Application Settings header, you can see that the virtual directory has been configured as an IIS Application. When a virtual directory is set as an IIS application, IIS takes special care of that location by isolating all of that directory’s pages and subdirectories into what’s called an application domain. This approach offers numerous benefits:
code isolation
Code that executes within one application can't access code in other applications. So even if we built an intranet web application for a company’s staff, then placed a separate application for external users on the same web server, code would never cross-reference or conflict between those two applications.
application stabilization
Each application is isolated from all others, so if one application crashes or stops running, it has no effect on other applications that might be running on the same web server.
162
Using IIS
application level security policies
You can set different permissions for the different applications on the server. What this means is that the credentials that are used to log into one application can be totally different from those used to access a second application on the same server. We’ll discuss this in detail in Chapter 13.
settings configuration on a per-application basis
You can affect numerous other configuration settings for each application through Internet Services Manager, or Global.asax and Web.config, which are two special files located in the root directory of the application.
The Global.asax file handles application-wide events and sets applicationwide directives, while the Web.config file specifies configuration settings for the application. In addition to these two special files, every ASP.NET web application can contain a number of special folders, such as App_Themes, App_Code or App_Data. We’ll talk more about these details a little later in this chapter.
Applications and Visual Web Developer’s Web Server
When you use Visual Web Developer’s integrated web server to run your project, the virtual directory it creates for you on the spot is also set as an application, so it, too, enjoys all the benefits mentioned above.
Select the Virtual Directory tab in the Dorknozzle Properties dialog. If you click the Remove button that appears next to the application name, be aware that the action won’t remove the virtual directory itself: it will remove that application’s IIS application properties. When you click Remove, the button will be replaced by a
Create button, which will reinstate the directory as an IIS application.
163
Chapter 5: Building Web Applications
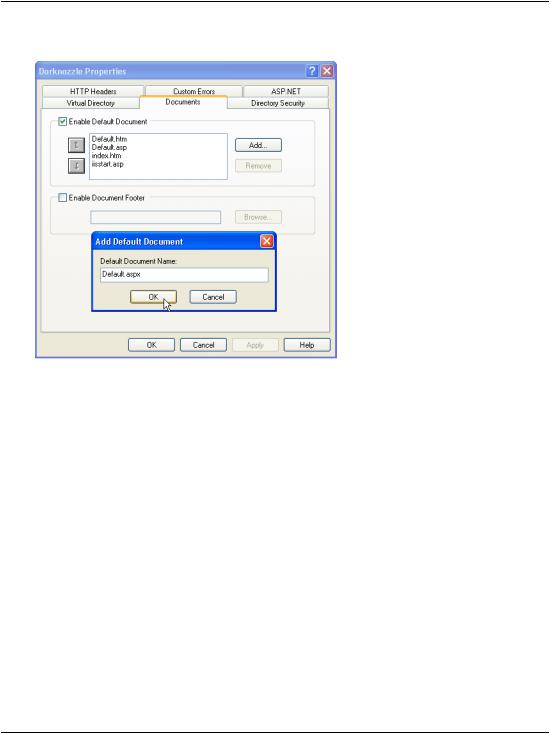
Figure 5.22. Adding a default name for the document
While you’re here, it’s a good idea to check that Default.aspx is included as a default file. If it is, then requesting http://localhost/Dorknozzle will load http://localhost/Dorknozzle/Default.aspx by default. To check this, click the Documents tab. If Default.aspx isn’t in the list, add it by clicking the Add… button and entering the filename, as shown in Figure 5.22.
Finally, click OK to close the Dorknozzle Properties window.
If no default document exists in the Dorknozzle folder, the web server will attempt to return a list of the files and folders inside the Dorknozzle folder—an operation that will only succeed if the Directory Browsing option shown in Figure 5.21 is enabled. If this option is left in its default, disabled state, this operation will result in an error.
Now, if you load http://localhost/Dorknozzle/ using any web browser, you should see a little magic (as Figure 5.23 reveals)!
164
