
- •Table of Contents
- •Preface
- •What is ASP.NET?
- •Installing the Required Software
- •Installing the Web Server
- •Installing Internet Information Services (IIS)
- •Installing Cassini
- •Installing the .NET Framework and the SDK
- •Installing the .NET Framework
- •Installing the SDK
- •Configuring the Web Server
- •Configuring IIS
- •Configuring Cassini
- •Where do I Put my Files?
- •Using localhost
- •Virtual Directories
- •Using Cassini
- •Installing SQL Server 2005 Express Edition
- •Installing SQL Server Management Studio Express
- •Installing Visual Web Developer 2005
- •Writing your First ASP.NET Page
- •Getting Help
- •Summary
- •ASP.NET Basics
- •ASP.NET Page Structure
- •Directives
- •Code Declaration Blocks
- •Comments in VB and C# Code
- •Code Render Blocks
- •ASP.NET Server Controls
- •Server-side Comments
- •Literal Text and HTML Tags
- •View State
- •Working with Directives
- •ASP.NET Languages
- •Visual Basic
- •Summary
- •VB and C# Programming Basics
- •Programming Basics
- •Control Events and Subroutines
- •Page Events
- •Variables and Variable Declaration
- •Arrays
- •Functions
- •Operators
- •Breaking Long Lines of Code
- •Conditional Logic
- •Loops
- •Object Oriented Programming Concepts
- •Objects and Classes
- •Properties
- •Methods
- •Classes
- •Constructors
- •Scope
- •Events
- •Understanding Inheritance
- •Objects In .NET
- •Namespaces
- •Using Code-behind Files
- •Summary
- •Constructing ASP.NET Web Pages
- •Web Forms
- •HTML Server Controls
- •Using the HTML Server Controls
- •Web Server Controls
- •Standard Web Server Controls
- •Label
- •Literal
- •TextBox
- •HiddenField
- •Button
- •ImageButton
- •LinkButton
- •HyperLink
- •CheckBox
- •RadioButton
- •Image
- •ImageMap
- •PlaceHolder
- •Panel
- •List Controls
- •DropDownList
- •ListBox
- •RadioButtonList
- •CheckBoxList
- •BulletedList
- •Advanced Controls
- •Calendar
- •AdRotator
- •TreeView
- •SiteMapPath
- •Menu
- •MultiView
- •Wizard
- •FileUpload
- •Web User Controls
- •Creating a Web User Control
- •Using the Web User Control
- •Master Pages
- •Using Cascading Style Sheets (CSS)
- •Types of Styles and Style Sheets
- •Style Properties
- •The CssClass Property
- •Summary
- •Building Web Applications
- •Introducing the Dorknozzle Project
- •Using Visual Web Developer
- •Meeting the Features
- •The Solution Explorer
- •The Web Forms Designer
- •The Code Editor
- •IntelliSense
- •The Toolbox
- •The Properties Window
- •Executing your Project
- •Using Visual Web Developer’s Built-in Web Server
- •Using IIS
- •Using IIS with Visual Web Developer
- •Core Web Application Features
- •Web.config
- •Global.asax
- •Using Application State
- •Working with User Sessions
- •Using the Cache Object
- •Using Cookies
- •Starting the Dorknozzle Project
- •Preparing the Sitemap
- •Using Themes, Skins, and Styles
- •Creating a New Theme Folder
- •Creating a New Style Sheet
- •Styling Web Server Controls
- •Adding a Skin
- •Applying the Theme
- •Building the Master Page
- •Using the Master Page
- •Extending Dorknozzle
- •Debugging and Error Handling
- •Debugging with Visual Web Developer
- •Other Kinds of Errors
- •Custom Errors
- •Handling Exceptions Locally
- •Summary
- •Using the Validation Controls
- •Enforcing Validation on the Server
- •Using Validation Controls
- •RequiredFieldValidator
- •CompareValidator
- •RangeValidator
- •ValidationSummary
- •RegularExpressionValidator
- •Some Useful Regular Expressions
- •CustomValidator
- •Validation Groups
- •Updating Dorknozzle
- •Summary
- •What is a Database?
- •Creating your First Database
- •Creating a New Database Using Visual Web Developer
- •Creating Database Tables
- •Data Types
- •Column Properties
- •Primary Keys
- •Creating the Employees Table
- •Creating the Remaining Tables
- •Executing SQL Scripts
- •Populating the Data Tables
- •Relational Database Design Concepts
- •Foreign Keys
- •Using Database Diagrams
- •Diagrams and Table Relationships
- •One-to-one Relationships
- •One-to-many Relationships
- •Many-to-many Relationships
- •Summary
- •Speaking SQL
- •Reading Data from a Single Table
- •Using the SELECT Statement
- •Selecting Certain Fields
- •Selecting Unique Data with DISTINCT
- •Row Filtering with WHERE
- •Selecting Ranges of Values with BETWEEN
- •Matching Patterns with LIKE
- •Using the IN Operator
- •Sorting Results Using ORDER BY
- •Limiting the Number of Results with TOP
- •Reading Data from Multiple Tables
- •Subqueries
- •Table Joins
- •Expressions and Operators
- •Transact-SQL Functions
- •Arithmetic Functions
- •String Functions
- •Date and Time Functions
- •Working with Groups of Values
- •The COUNT Function
- •Grouping Records Using GROUP BY
- •Filtering Groups Using HAVING
- •The SUM, AVG, MIN, and MAX Functions
- •Updating Existing Data
- •The INSERT Statement
- •The UPDATE Statement
- •The DELETE Statement
- •Stored Procedures
- •Summary
- •Introducing ADO.NET
- •Importing the SqlClient Namespace
- •Defining the Database Connection
- •Preparing the Command
- •Executing the Command
- •Setting up Database Authentication
- •Reading the Data
- •Using Parameters with Queries
- •Bulletproofing Data Access Code
- •Using the Repeater Control
- •More Data Binding
- •Inserting Records
- •Updating Records
- •Deleting Records
- •Using Stored Procedures
- •Summary
- •DataList Basics
- •Handling DataList Events
- •Editing DataList Items and Using Templates
- •DataList and Visual Web Developer
- •Styling the DataList
- •Summary
- •Using the GridView Control
- •Customizing the GridView Columns
- •Styling the GridView with Templates, Skins, and CSS
- •Selecting Grid Records
- •Using the DetailsView Control
- •Styling the DetailsView
- •GridView and DetailsView Events
- •Entering Edit Mode
- •Using Templates
- •Updating DetailsView Records
- •Summary
- •Advanced Data Access
- •Using Data Source Controls
- •Binding the GridView to a SqlDataSource
- •Binding the DetailsView to a SqlDataSource
- •Displaying Lists in DetailsView
- •More on SqlDataSource
- •Working with Data Sets and Data Tables
- •What is a Data Set Made From?
- •Binding DataSets to Controls
- •Implementing Paging
- •Storing Data Sets in View State
- •Implementing Sorting
- •Filtering Data
- •Updating a Database from a Modified DataSet
- •Summary
- •Security and User Authentication
- •Basic Security Guidelines
- •Securing ASP.NET 2.0 Applications
- •Working with Forms Authentication
- •Authenticating Users
- •Working with Hard-coded User Accounts
- •Configuring Forms Authentication
- •Configuring Forms Authorization
- •Storing Users in Web.config
- •Hashing Passwords
- •Logging Users Out
- •ASP.NET 2.0 Memberships and Roles
- •Creating the Membership Data Structures
- •Using your Database to Store Membership Data
- •Using the ASP.NET Web Site Configuration Tool
- •Creating Users and Roles
- •Changing Password Strength Requirements
- •Securing your Web Application
- •Using the ASP.NET Login Controls
- •Authenticating Users
- •Customizing User Display
- •Summary
- •Working with Files and Email
- •Writing and Reading Text Files
- •Setting Up Security
- •Writing Content to a Text File
- •Reading Content from a Text File
- •Accessing Directories and Directory Information
- •Working with Directory and File Paths
- •Uploading Files
- •Sending Email with ASP.NET
- •Configuring the SMTP Server
- •Sending a Test Email
- •Creating the Company Newsletter Page
- •Summary
- •The WebControl Class
- •Properties
- •Methods
- •Standard Web Controls
- •AdRotator
- •Properties
- •Events
- •BulletedList
- •Properties
- •Events
- •Button
- •Properties
- •Events
- •Calendar
- •Properties
- •Events
- •CheckBox
- •Properties
- •Events
- •CheckBoxList
- •Properties
- •Events
- •DropDownList
- •Properties
- •Events
- •FileUpload
- •Properties
- •Methods
- •HiddenField
- •Properties
- •HyperLink
- •Properties
- •Image
- •Properties
- •ImageButton
- •Properties
- •Events
- •ImageMap
- •Properties
- •Events
- •Label
- •Properties
- •LinkButton
- •Properties
- •Events
- •ListBox
- •Properties
- •Events
- •Literal
- •Properties
- •MultiView
- •Properties
- •Methods
- •Events
- •Panel
- •Properties
- •PlaceHolder
- •Properties
- •RadioButton
- •Properties
- •Events
- •RadioButtonList
- •Properties
- •Events
- •TextBox
- •Properties
- •Events
- •Properties
- •Validation Controls
- •CompareValidator
- •Properties
- •Methods
- •CustomValidator
- •Methods
- •Events
- •RangeValidator
- •Properties
- •Methods
- •RegularExpressionValidator
- •Properties
- •Methods
- •RequiredFieldValidator
- •Properties
- •Methods
- •ValidationSummary
- •Properties
- •Navigation Web Controls
- •SiteMapPath
- •Properties
- •Methods
- •Events
- •Menu
- •Properties
- •Methods
- •Events
- •TreeView
- •Properties
- •Methods
- •Events
- •HTML Server Controls
- •HtmlAnchor Control
- •Properties
- •Events
- •HtmlButton Control
- •Properties
- •Events
- •HtmlForm Control
- •Properties
- •HtmlGeneric Control
- •Properties
- •HtmlImage Control
- •Properties
- •HtmlInputButton Control
- •Properties
- •Events
- •HtmlInputCheckBox Control
- •Properties
- •Events
- •HtmlInputFile Control
- •Properties
- •HtmlInputHidden Control
- •Properties
- •HtmlInputImage Control
- •Properties
- •Events
- •HtmlInputRadioButton Control
- •Properties
- •Events
- •HtmlInputText Control
- •Properties
- •Events
- •HtmlSelect Control
- •Properties
- •Events
- •HtmlTable Control
- •Properties
- •HtmlTableCell Control
- •Properties
- •HtmlTableRow Control
- •Properties
- •HtmlTextArea Control
- •Properties
- •Events
- •Index

Using the ASP.NET Login Controls
set permissions for individual files in your project, so you’ll either need to place all admin-related functionality into a separate folder (which would allow you to continue using the tool to configure security options), or modify Web.config by hand.
You can set individual access rules for files using the location element, which can contain a system.web sub-element, which, in turn, can contain settings customized for the location. Add this code to your Web.config file:
File: Web.config (excerpt)
<!-- Allow access to Images directory --> <location path="Images">
<system.web>
<authorization> <allow users="?"/>
</authorization>
</system.web>
</location>
<!-- Only administrators may access AdminTools.aspx --> <location path="AdminTools.aspx">
<system.web>
<authorization>
<allow roles="Administrators" /> <deny users="*" />
</authorization>
</system.web>
</location>
</configuration>
Now, administrators are allowed to access AdminTools.aspx, as this rule comes first under the authorization element. If you switched the order of the allow and deny elements, no one would be allowed to access AdminTools.aspx.
Now your site is accessible only to authenticated users, with the exception of the administration page, which is accessible only to users in the Administrators role. Now we just need to let users log in into the system.
Using the ASP.NET Login Controls
As we mentioned earlier in this chapter, ASP.NET 2.0 delivers a range of very useful controls related to managing users on your site:
561

Chapter 13: Security and User Authentication
Login
This control displays a login form that contains a User Name text box, a
Password text box, a Remember me next time checkbox, and a Log In button. It’s integrated with the membership API, and performs the login functionality without requiring you to write any code. The layout is customizable through templates and multiple properties.
LoginStatus
This is a simple yet useful control that displays a Login link if the user isn’t logged in; otherwise, it displays a Logout link. Again, this control requires no additional coding in order to work with your application’s membership data.
LoginView
This control contains templates that display different data depending on whether or not the user is logged in. It can also display different templates for authenticated users depending on their roles.
LoginName
This control displays the name of the logged-in user.
PasswordRecovery
If the user has provided an email address and a secret question and answer during registration, this control will use them to recover the user’s password.
ChangePassword
This control displays a form that requests the user’s existing password and a new password, and includes the functionality to change the user’s password automatically, without requiring you to write additional code.
CreateUserWizard
This control displays a wizard for creating a new user account.
Let’s see a few of these controls in action in our own application. In the following pages, we’ll undertake these tasks:
1.Use a Login control in the Login.aspx page to give users a means of logging in to our application.
2.Use LoginStatus and LoginView controls to display Login and Logout links, and ensure that the Admin Tools link is displayed only to site administrators.
562
Using the ASP.NET Login Controls
Authenticating Users
Earlier in this chapter, we created a web form based on the Dorknozzle.master master page, called Login.aspx. Remove the existing controls from the ContentPlaceHolder, and also remove the LoginUser method from the codebehind file.
Using the new ASP.NET 2.0 login controls, we can easily make the authentication work. If you’re using Visual Web Developer, simply drag a Login control from the Login section of the Toolbox to just below the Login header in Login.aspx. If you’d prefer to add the control manually, here’s the code:
File: Login.aspx (excerpt)
<asp:Content ID="Content1" ContentPlaceHolderID="ContentPlaceHolder1" Runat="Server">
<h1>Login</h1>
<asp:Login ID="Login1" runat="server"> </asp:Login>
</asp:Content>
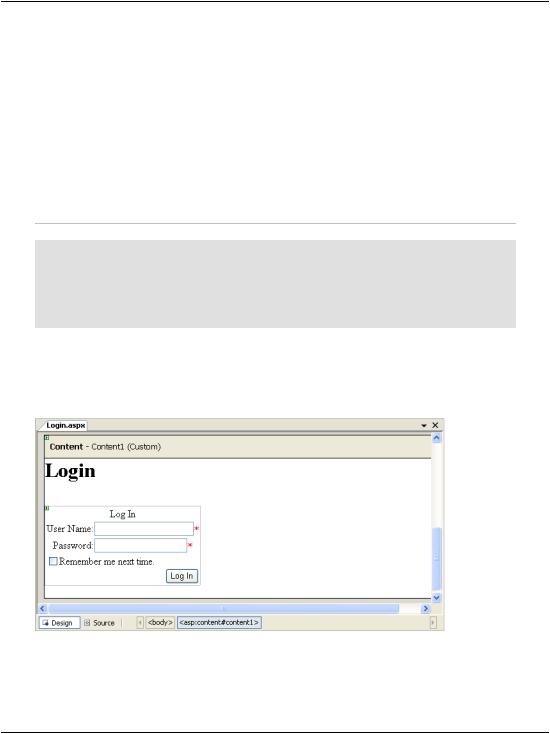
If you switch to Design View, you should see a display like the one depicted in Figure 13.15.
Figure 13.15. Using the Login control
Yes, that’s all you have to do! Start your project, and you’ll be sent to the Login page. First, log in with the regular user that you created earlier (not with the admin account), then browse through the links to see that they can indeed be accessed,
563
Chapter 13: Security and User Authentication
with the exception of the Admin Tools link. When you click Admin Tools, you should be sent back to the Login page. This time, log in with the admin user details, and voilà! You’ll gain access to the Admin Tools page as well.
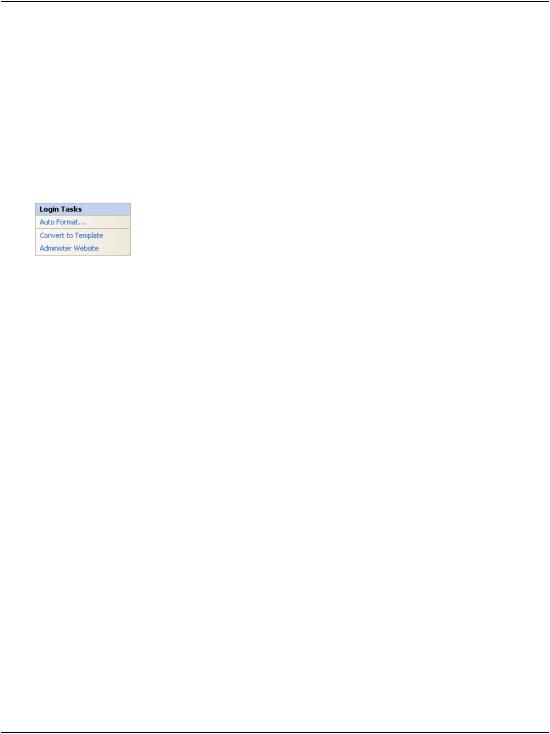
Let’s take a few moments to customize the look of your login controls. Stop the execution of the project, and switch back to Login.aspx in Design View. Select the Login control and click its smart tag to see the three very useful options shown in Figure 13.16.
Figure 13.16. Options for the Login control
The Administer Website link launches the ASP.NET Web Site Administration
Tool. The Convert to Template option transforms the current layout of your control into templates, which you can then customize down to the smallest detail. The
Auto Format… link lets you select a predefined style to apply to this control.
If you were working in a production scenario, I’d advise you to select Convert to Template and use CSS to fine-tune the appearance of your control, as we did with the GridView and DetailsView controls in Chapter 11. However, for the purposes of this exercise, let’s just set the BorderStyle property of the Login control to
Solid, and the BorderWidth property to 1px.
It was simple to add login functionality—we even changed its appearance with just a few mouse clicks! There are just one or two more things that we need to take care of before we can continue to add features to our site. First, let’s deal with personalization.
Customizing User Display
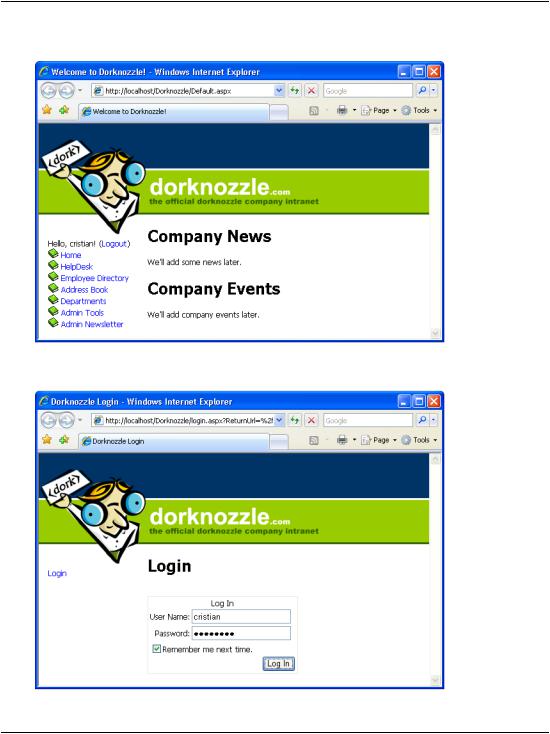
The next feature we want to implement is functionality that gives the user a way to log out of the application. After you perform the changes that we’re about to implement, logged-in users will have the option to log out, as Figure 13.17 illustrates.
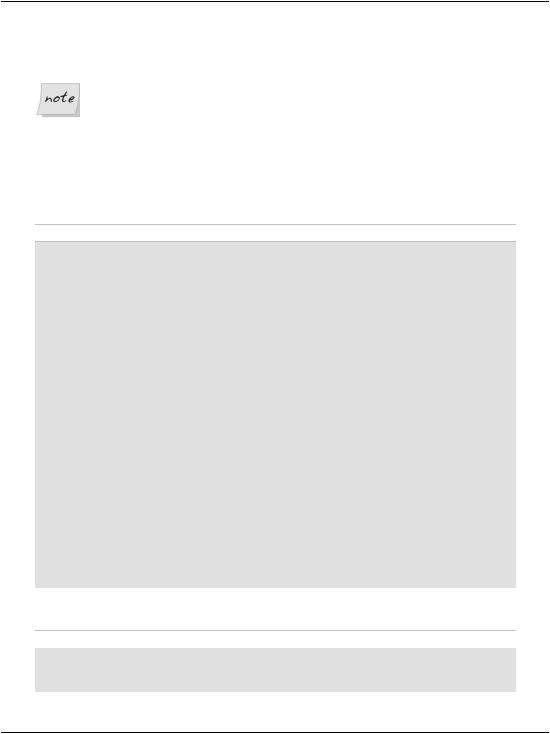
On the other hand, users that aren’t logged in won’t see the menu at all, as Figure 13.18 indicates.
564
Using the ASP.NET Login Controls
Figure 13.17. The view that the logged-in user sees
Figure 13.18. The Login page
565
Chapter 13: Security and User Authentication
To implement this functionality, we’ll need to modify the menu in the
Dorknozzle.master master page.
Using Master Pages
At this point, you should appreciate the extraordinary flexibility that master pages offer us. If you didn’t use master pages or web user controls, you’d have to modify all of the pages on your site to implement this new functionality.
Open Dorknozzle.master, and change the code between <!-- Menu --> and <!-- Content --> as indicated here:
File: Dorknozzle.master (excerpt)
<!-- Menu -->
<div class="Menu">
<asp:LoginView ID="loginView" runat="server"> <LoggedInTemplate>
<asp:LoginName ID="loginName" runat="server" FormatString="Hello, {0}!" />
(<asp:LoginStatus ID="loginStatus" runat="server" />)
<asp:SiteMapDataSource ID="dorknozzleSiteMap" runat="server" ShowStartingNode="false" />
<asp:Menu ID="dorknozzleMenu" runat="server" DataSourceID="dorknozzleSiteMap">
<StaticItemTemplate>
<img src="Images/book_closed.gif" border="0" width="16" height="16" alt="+" />
<%# Eval("Text") %> </StaticItemTemplate>
</asp:Menu>
</LoggedInTemplate>
<AnonymousTemplate>
<asp:LoginStatus ID="loginStatus" runat="server" /> </AnonymousTemplate>
</asp:LoginView>
</div>
<!-- Content -->
Also modify the Dorknozzle.css file to accommodate the new control:
File: Dorknozzle.css (excerpt)
.Menu
{
top: 180px;
566
Using the ASP.NET Login Controls
left: 15px; width: 195px;
position: absolute;
}
Don’t let this code scare you; it’s actually quite simple. The root control here is a LoginView control, which displays different templates depending on whether or not the user is logged in (it also knows how to display different templates depending on the roles of the user).
If the site is loaded by an anonymous (unauthenticated) user, we don’t want to display the navigation menu; we want to display only the Login link. The output that’s to be shown to anonymous users by the LoginView control is placed inside its AnonymousTemplate template. There, we use a LoginStatus control that displays a Login link for anonymous users, and a Logout link for logged-in users. Note that with the current Dorknozzle configuration, the contents of the AnonymousTemplate are never actually used—all anonymous users are simply redirected to the login page. However, it’s best to include the LoginStatus control here anyway, just in case we should ever reconfigure the site to include some pages that are accessible to anonymous users.
File: Dorknozzle.master (excerpt)
<AnonymousTemplate>
<asp:LoginStatus ID="loginStatus" runat="server" /> </AnonymousTemplate>
The output that will be displayed to authenticated users is placed inside the
LoggedInTemplate template of the LoginView control. The LoggedInTemplate starts by displaying a welcome message:
File: Dorknozzle.master (excerpt)
<LoggedInTemplate>
<asp:LoginName ID="loginName" runat="server" FormatString="Hello, {0}!" />
By default, the LoginName control displays just the username. However, you can customize it by setting its FormatString property to a custom string, where {0} is a placeholder for the username. Our FormatString value, Hello, {0}! will output “Hello, cristian!” if the user logged in is cristian.
Immediately after this welcome message, we have a Logout link generated by another LoginStatus control, which, as we discussed earlier, displays a Logout link to logged-in users:
567
Chapter 13: Security and User Authentication
File: Dorknozzle.master (excerpt)
(<asp:LoginStatus ID="loginStatus" runat="server" />)
Just below the welcome message and the Logout link sits our old friend, Menu, which displays the navigation menu. Since the Menu is now part of the LoggedInTemplate of the LoginView, it’s displayed only for logged-in users, as we planned.
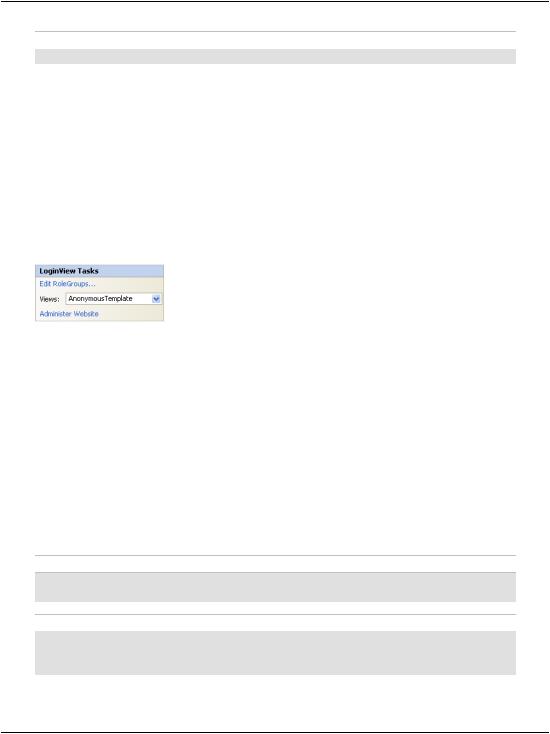
Finally, it’s worth noting that you can use Visual Web Developer to edit the various templates (and the controls they house). Open Dorknozzle.master in the designer, and click the smart tag of the LoginView control. The options that display, which are shown in Figure 13.19, are certainly interesting.
Figure 13.19. Viewing LoginView Tasks
The Edit RoleGroups… link lets you administer the templates that are shown to users who are assigned particular roles. This facility is useful when you want to display to users specific content that’s relevant to their roles. For example, if you wanted to display to administrators different menus from those that you show to regular users, you could create a group for users within the Users role, and another group for users in the Administrators role, then create different views for these groups using templates.
To check in your code whether or not the current user is authenticated (i.e. logged i n ) , y o u m u s t c h e c k t h e v a l u e o f
HttpContext.Current.User.Identity.IsAuthenticated. To check the role of the logged-in user, you must use the HttpContext.Current.User.IsInRole method, as shown here:
Visual Basic
If HttpContext.Current.User.IsInRole("Administrators") Then
C#
if (HttpContext.Current.User.IsInRole("Administrators"))
{
568
