
- •Table of Contents
- •Preface
- •What is ASP.NET?
- •Installing the Required Software
- •Installing the Web Server
- •Installing Internet Information Services (IIS)
- •Installing Cassini
- •Installing the .NET Framework and the SDK
- •Installing the .NET Framework
- •Installing the SDK
- •Configuring the Web Server
- •Configuring IIS
- •Configuring Cassini
- •Where do I Put my Files?
- •Using localhost
- •Virtual Directories
- •Using Cassini
- •Installing SQL Server 2005 Express Edition
- •Installing SQL Server Management Studio Express
- •Installing Visual Web Developer 2005
- •Writing your First ASP.NET Page
- •Getting Help
- •Summary
- •ASP.NET Basics
- •ASP.NET Page Structure
- •Directives
- •Code Declaration Blocks
- •Comments in VB and C# Code
- •Code Render Blocks
- •ASP.NET Server Controls
- •Server-side Comments
- •Literal Text and HTML Tags
- •View State
- •Working with Directives
- •ASP.NET Languages
- •Visual Basic
- •Summary
- •VB and C# Programming Basics
- •Programming Basics
- •Control Events and Subroutines
- •Page Events
- •Variables and Variable Declaration
- •Arrays
- •Functions
- •Operators
- •Breaking Long Lines of Code
- •Conditional Logic
- •Loops
- •Object Oriented Programming Concepts
- •Objects and Classes
- •Properties
- •Methods
- •Classes
- •Constructors
- •Scope
- •Events
- •Understanding Inheritance
- •Objects In .NET
- •Namespaces
- •Using Code-behind Files
- •Summary
- •Constructing ASP.NET Web Pages
- •Web Forms
- •HTML Server Controls
- •Using the HTML Server Controls
- •Web Server Controls
- •Standard Web Server Controls
- •Label
- •Literal
- •TextBox
- •HiddenField
- •Button
- •ImageButton
- •LinkButton
- •HyperLink
- •CheckBox
- •RadioButton
- •Image
- •ImageMap
- •PlaceHolder
- •Panel
- •List Controls
- •DropDownList
- •ListBox
- •RadioButtonList
- •CheckBoxList
- •BulletedList
- •Advanced Controls
- •Calendar
- •AdRotator
- •TreeView
- •SiteMapPath
- •Menu
- •MultiView
- •Wizard
- •FileUpload
- •Web User Controls
- •Creating a Web User Control
- •Using the Web User Control
- •Master Pages
- •Using Cascading Style Sheets (CSS)
- •Types of Styles and Style Sheets
- •Style Properties
- •The CssClass Property
- •Summary
- •Building Web Applications
- •Introducing the Dorknozzle Project
- •Using Visual Web Developer
- •Meeting the Features
- •The Solution Explorer
- •The Web Forms Designer
- •The Code Editor
- •IntelliSense
- •The Toolbox
- •The Properties Window
- •Executing your Project
- •Using Visual Web Developer’s Built-in Web Server
- •Using IIS
- •Using IIS with Visual Web Developer
- •Core Web Application Features
- •Web.config
- •Global.asax
- •Using Application State
- •Working with User Sessions
- •Using the Cache Object
- •Using Cookies
- •Starting the Dorknozzle Project
- •Preparing the Sitemap
- •Using Themes, Skins, and Styles
- •Creating a New Theme Folder
- •Creating a New Style Sheet
- •Styling Web Server Controls
- •Adding a Skin
- •Applying the Theme
- •Building the Master Page
- •Using the Master Page
- •Extending Dorknozzle
- •Debugging and Error Handling
- •Debugging with Visual Web Developer
- •Other Kinds of Errors
- •Custom Errors
- •Handling Exceptions Locally
- •Summary
- •Using the Validation Controls
- •Enforcing Validation on the Server
- •Using Validation Controls
- •RequiredFieldValidator
- •CompareValidator
- •RangeValidator
- •ValidationSummary
- •RegularExpressionValidator
- •Some Useful Regular Expressions
- •CustomValidator
- •Validation Groups
- •Updating Dorknozzle
- •Summary
- •What is a Database?
- •Creating your First Database
- •Creating a New Database Using Visual Web Developer
- •Creating Database Tables
- •Data Types
- •Column Properties
- •Primary Keys
- •Creating the Employees Table
- •Creating the Remaining Tables
- •Executing SQL Scripts
- •Populating the Data Tables
- •Relational Database Design Concepts
- •Foreign Keys
- •Using Database Diagrams
- •Diagrams and Table Relationships
- •One-to-one Relationships
- •One-to-many Relationships
- •Many-to-many Relationships
- •Summary
- •Speaking SQL
- •Reading Data from a Single Table
- •Using the SELECT Statement
- •Selecting Certain Fields
- •Selecting Unique Data with DISTINCT
- •Row Filtering with WHERE
- •Selecting Ranges of Values with BETWEEN
- •Matching Patterns with LIKE
- •Using the IN Operator
- •Sorting Results Using ORDER BY
- •Limiting the Number of Results with TOP
- •Reading Data from Multiple Tables
- •Subqueries
- •Table Joins
- •Expressions and Operators
- •Transact-SQL Functions
- •Arithmetic Functions
- •String Functions
- •Date and Time Functions
- •Working with Groups of Values
- •The COUNT Function
- •Grouping Records Using GROUP BY
- •Filtering Groups Using HAVING
- •The SUM, AVG, MIN, and MAX Functions
- •Updating Existing Data
- •The INSERT Statement
- •The UPDATE Statement
- •The DELETE Statement
- •Stored Procedures
- •Summary
- •Introducing ADO.NET
- •Importing the SqlClient Namespace
- •Defining the Database Connection
- •Preparing the Command
- •Executing the Command
- •Setting up Database Authentication
- •Reading the Data
- •Using Parameters with Queries
- •Bulletproofing Data Access Code
- •Using the Repeater Control
- •More Data Binding
- •Inserting Records
- •Updating Records
- •Deleting Records
- •Using Stored Procedures
- •Summary
- •DataList Basics
- •Handling DataList Events
- •Editing DataList Items and Using Templates
- •DataList and Visual Web Developer
- •Styling the DataList
- •Summary
- •Using the GridView Control
- •Customizing the GridView Columns
- •Styling the GridView with Templates, Skins, and CSS
- •Selecting Grid Records
- •Using the DetailsView Control
- •Styling the DetailsView
- •GridView and DetailsView Events
- •Entering Edit Mode
- •Using Templates
- •Updating DetailsView Records
- •Summary
- •Advanced Data Access
- •Using Data Source Controls
- •Binding the GridView to a SqlDataSource
- •Binding the DetailsView to a SqlDataSource
- •Displaying Lists in DetailsView
- •More on SqlDataSource
- •Working with Data Sets and Data Tables
- •What is a Data Set Made From?
- •Binding DataSets to Controls
- •Implementing Paging
- •Storing Data Sets in View State
- •Implementing Sorting
- •Filtering Data
- •Updating a Database from a Modified DataSet
- •Summary
- •Security and User Authentication
- •Basic Security Guidelines
- •Securing ASP.NET 2.0 Applications
- •Working with Forms Authentication
- •Authenticating Users
- •Working with Hard-coded User Accounts
- •Configuring Forms Authentication
- •Configuring Forms Authorization
- •Storing Users in Web.config
- •Hashing Passwords
- •Logging Users Out
- •ASP.NET 2.0 Memberships and Roles
- •Creating the Membership Data Structures
- •Using your Database to Store Membership Data
- •Using the ASP.NET Web Site Configuration Tool
- •Creating Users and Roles
- •Changing Password Strength Requirements
- •Securing your Web Application
- •Using the ASP.NET Login Controls
- •Authenticating Users
- •Customizing User Display
- •Summary
- •Working with Files and Email
- •Writing and Reading Text Files
- •Setting Up Security
- •Writing Content to a Text File
- •Reading Content from a Text File
- •Accessing Directories and Directory Information
- •Working with Directory and File Paths
- •Uploading Files
- •Sending Email with ASP.NET
- •Configuring the SMTP Server
- •Sending a Test Email
- •Creating the Company Newsletter Page
- •Summary
- •The WebControl Class
- •Properties
- •Methods
- •Standard Web Controls
- •AdRotator
- •Properties
- •Events
- •BulletedList
- •Properties
- •Events
- •Button
- •Properties
- •Events
- •Calendar
- •Properties
- •Events
- •CheckBox
- •Properties
- •Events
- •CheckBoxList
- •Properties
- •Events
- •DropDownList
- •Properties
- •Events
- •FileUpload
- •Properties
- •Methods
- •HiddenField
- •Properties
- •HyperLink
- •Properties
- •Image
- •Properties
- •ImageButton
- •Properties
- •Events
- •ImageMap
- •Properties
- •Events
- •Label
- •Properties
- •LinkButton
- •Properties
- •Events
- •ListBox
- •Properties
- •Events
- •Literal
- •Properties
- •MultiView
- •Properties
- •Methods
- •Events
- •Panel
- •Properties
- •PlaceHolder
- •Properties
- •RadioButton
- •Properties
- •Events
- •RadioButtonList
- •Properties
- •Events
- •TextBox
- •Properties
- •Events
- •Properties
- •Validation Controls
- •CompareValidator
- •Properties
- •Methods
- •CustomValidator
- •Methods
- •Events
- •RangeValidator
- •Properties
- •Methods
- •RegularExpressionValidator
- •Properties
- •Methods
- •RequiredFieldValidator
- •Properties
- •Methods
- •ValidationSummary
- •Properties
- •Navigation Web Controls
- •SiteMapPath
- •Properties
- •Methods
- •Events
- •Menu
- •Properties
- •Methods
- •Events
- •TreeView
- •Properties
- •Methods
- •Events
- •HTML Server Controls
- •HtmlAnchor Control
- •Properties
- •Events
- •HtmlButton Control
- •Properties
- •Events
- •HtmlForm Control
- •Properties
- •HtmlGeneric Control
- •Properties
- •HtmlImage Control
- •Properties
- •HtmlInputButton Control
- •Properties
- •Events
- •HtmlInputCheckBox Control
- •Properties
- •Events
- •HtmlInputFile Control
- •Properties
- •HtmlInputHidden Control
- •Properties
- •HtmlInputImage Control
- •Properties
- •Events
- •HtmlInputRadioButton Control
- •Properties
- •Events
- •HtmlInputText Control
- •Properties
- •Events
- •HtmlSelect Control
- •Properties
- •Events
- •HtmlTable Control
- •Properties
- •HtmlTableCell Control
- •Properties
- •HtmlTableRow Control
- •Properties
- •HtmlTextArea Control
- •Properties
- •Events
- •Index
Binding the DetailsView to a SqlDataSource
Binding the DetailsView to a SqlDataSource
Here, our aim is to replicate the functionality the DetailsView gave us in Chapter 11, and to add functionality that will allow users to add and delete employees’ records.
Let’s start by adding another SqlDataSource control, either next to or below the existing one, in AddressBook.aspx. Give the new SqlDataSource the name employeeDataSource. Click its smart tag, and select Configure Data Source. The Configure Data Source wizard will appear again.
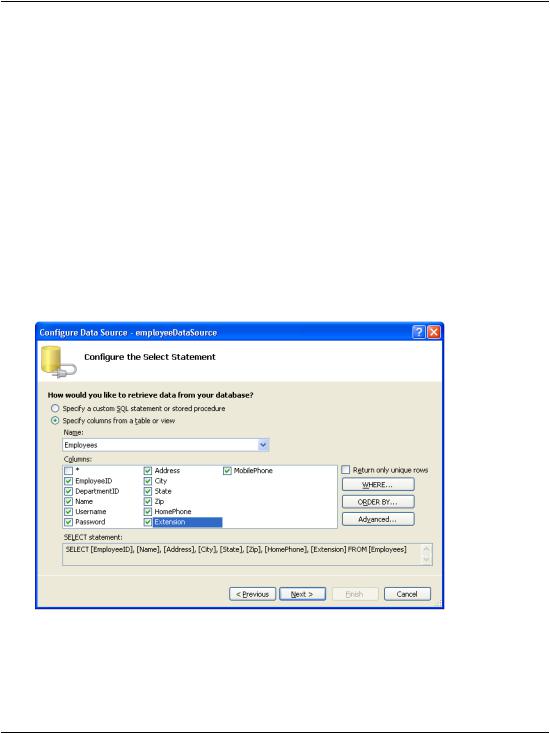
In the first screen, choose the Dorknozzle connection string. Click Next, and you’ll be taken to the second screen, where there’s a bit more work to do. Start by specifying the Employees table and checking all of its columns, as shown in Figure 12.9.
Figure 12.9. Choosing fields
479
Chapter 12: Advanced Data Access
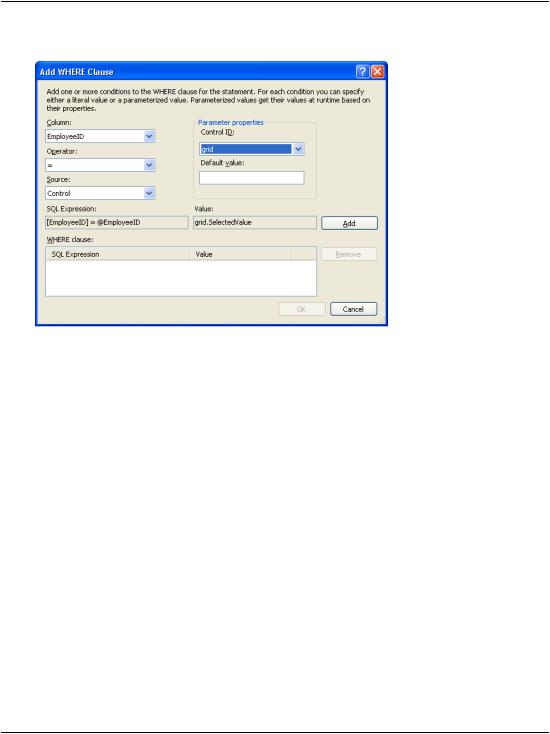
Figure 12.10. Creating a new condition
Next, click the WHERE… button. In the dialog that opens, select the EmployeeID column, specify the = operator, and select Control in the Source field. For the
Control ID select grid, and leave the default value empty, as Figure 12.10 shows.
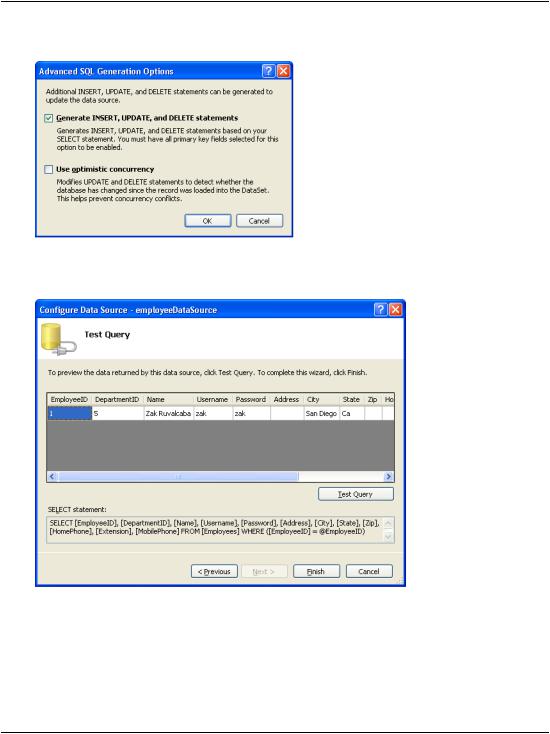
Finally, click Add, and the expression will be added to the WHERE clause list. The SQL expression that’s generated will filter the results on the basis of the value selected in the GridView control. Click OK to close the dialog, then click the Advanced… button. Check the Generate INSERT, UPDATE, and DELETE statements checkbox, as shown in Figure 12.11.
Click OK to exit the Advanced SQL Generation Options dialog, then click Next.
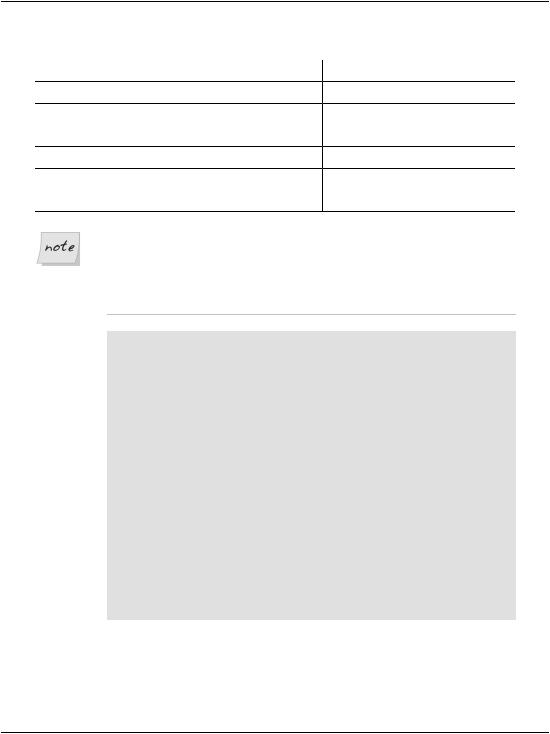
In the next screen, feel free to click on Test Query to ensure everything’s working as expected. If you click Test Query, you’ll be asked for the Employee ID’s type and value. Enter 1 for the value, leave the type as Int32, then click OK. The row should display as shown in Figure 12.12.
Click Finish.
Congratulations! Your new SqlDataSource is ready to fill your DetailsView.
Next, we need to tie this SqlDataSource to the DetailsView and specify how we want the DetailsView to behave. Open AddressBooks.aspx, locate the DetailsView control and set the properties as outlined in Table 12.2.
480
Binding the DetailsView to a SqlDataSource
Figure 12.11. Generating INSERT, UPDATE, and DELETE statements
Figure 12.12. Testing the query generated for our data source
481
Chapter 12: Advanced Data Access
Table 12.2. Properties to set for the DetailsView control
Property |
Value |
AutoGenerateDeleteButton |
True |
AutoGenerateEditButton |
True |
AutoGenerateInsertButton |
True |
AllowPaging |
False |
DataSourceID |
employeeDataSource |
DataKeyNames |
EmployeeID |
Recreating the Columns
If you’re using Design View, make sure you choose Yes when you’re asked about recreating the DetailsView rows and data keys. If you’re not using Design View, set the columns as shown here:
File: AddressBook.aspx (excerpt)
<Fields>
<asp:BoundField DataField="EmployeeID" HeaderText="EmployeeID" InsertVisible="False" ReadOnly="True" SortExpression="EmployeeID" />
<asp:BoundField DataField="DepartmentID" HeaderText="DepartmentID" SortExpression="DepartmentID" />
<asp:BoundField DataField="Name" HeaderText="Name" SortExpression="Name" />
<asp:BoundField DataField="Username" HeaderText="Username" SortExpression="Username" />
<asp:BoundField DataField="Password" HeaderText="Password"
SortExpression="Password" />
<asp:BoundField DataField="MobilePhone" HeaderText="MobilePhone" SortExpression="MobilePhone" />
</Fields>
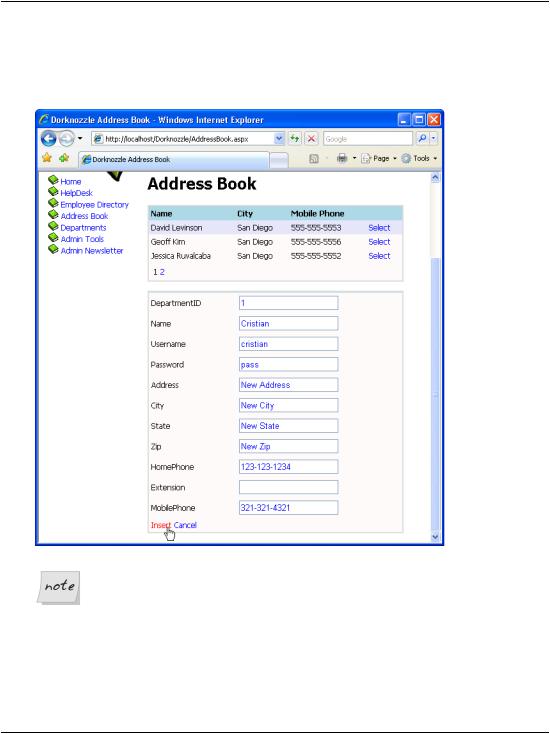
You’re ready! Execute the project, and enjoy the new functionality that you implemented without writing a single line of code! Take it for a quick spin to ensure that the features for editing and deleting users are perfectly functional!
482
Binding the DetailsView to a SqlDataSource
Right now, when we add a new employee, the form looks like the one shown in Figure 12.13.
Figure 12.13. Adding a new employee
Adding Users the Easy Way
If you want to be able to add new employees through this form, the easiest way to do so is to leave in all the required columns; otherwise, you’ll get an error when you try to add a new employee without specifying values for the NOT NULL columns. If you don’t need inserting features, and you want to keep the list of details short, you can simply remove the unwanted columns from the list.
483
Chapter 12: Advanced Data Access
Before we discuss exactly what’s happening here, and how the functionality works, let’s implement a few small improvements.
If you agreed to let Visual Web Developer generate the DetailsView columns for you, it will automatically have rewritten the templates we developed in the last chapter, and added BoundField controls for each of the columns you’re reading from the data source.
The HeaderTemplate is still intact, but we want to update it to show a different display when we’re inserting details for a new employee. Currently, the header is set to display the Name field of the selected employee, which means it will be empty when we insert a new employee (as you could see in Figure 12.13). To change this, modify the HeaderTemplate of your DetailsView as follows:
Visual Basic |
File: AddressBook.aspx (excerpt) |
<HeaderTemplate>
<%#IIf(Eval("Name") = Nothing, "Adding New Employee", _ Eval("Name"))%>
</HeaderTemplate>
C# |
File: AddressBook.aspx (excerpt) |
<HeaderTemplate>
<%#Eval("Name") == null ? "Adding New Employee" : Eval("Name")%>
</HeaderTemplate>
IIf and the Ternary Operator
IIf (in VB) and the ternary operator (in C#) receive as parameters one conditional expression (which returns True or False), and two values. If the condition is True, the first value is returned, and if the condition is False, the second value is returned.
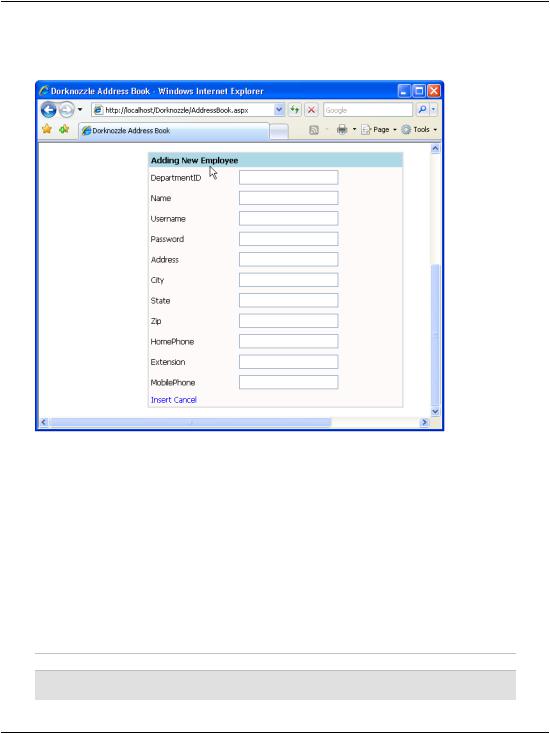
In our case, the conditional expression verifies whether the Name field is empty, which will be the case if we’re inserting a new row. So, when we’re inserting a new row, we display “Adding New Employee” in the DetailsView’s header; otherwise, we display the name of the employee whose details are being edited.
Now, when we insert a new employee record, DetailsView will display “Adding
New Employee” in its header; when we’re editing or displaying an existing employee’s details, it will display the name of that employee, as Figure 12.14 shows.
484
Binding the DetailsView to a SqlDataSource
Figure 12.14. Adding a new employee, and displaying the new header
One minor hitch with this solution is that the GridView isn’t instantly updated when we make a change using the DetailsView control. Try modifying the name of a user; even after you press the Update link in the DetailsView, the GridView will still show the old value. Only after you reload the page will the data be displayed correctly by the GridView.
This issue occurs because the GridView is populated before the DetailsView updates the database. To avoid this problem, we could use a simple workaround that forces the GridView to update itself in response to the occurrence of certain events raised by the DetailsView control. These events are ItemUpdated, ItemDeleted, and ItemInserted. Use Visual Web Developer to generate the event handlers for these events, and update the code like this:
Visual Basic |
File: AddressBook.aspx.vb (excerpt) |
Protected Sub employeeDetails_ItemUpdated( _
ByVal sender As Object, ByVal e As _
485

Chapter 12: Advanced Data Access
System.Web.UI.WebControls.DetailsViewUpdatedEventArgs) _ Handles employeeDetails.ItemUpdated
grid.DataBind()
End Sub
Protected Sub employeeDetails_ItemDeleted( _ ByVal sender As Object, ByVal e As _
System.Web.UI.WebControls.DetailsViewDeletedEventArgs) _ Handles employeeDetails.ItemDeleted
grid.DataBind()
End Sub
Protected Sub employeeDetails_ItemInserted( _ ByVal sender As Object, ByVal e As _
System.Web.UI.WebControls.DetailsViewInsertedEventArgs) _ Handles employeeDetails.ItemInserted
grid.DataBind() |
|
End Sub |
|
C# |
File: AddressBook.aspx.cs (excerpt) |
protected void employeeDetails_ItemUpdated(object sender, DetailsViewUpdatedEventArgs e)
{
grid.DataBind();
}
protected void employeeDetails_ItemDeleted(object sender, DetailsViewDeletedEventArgs e)
{
grid.DataBind();
}
protected void employeeDetails_ItemInserted(object sender, DetailsViewInsertedEventArgs e)
{
grid.DataBind();
}
Now your GridView and DetailsView controls will be permanently synchronized.
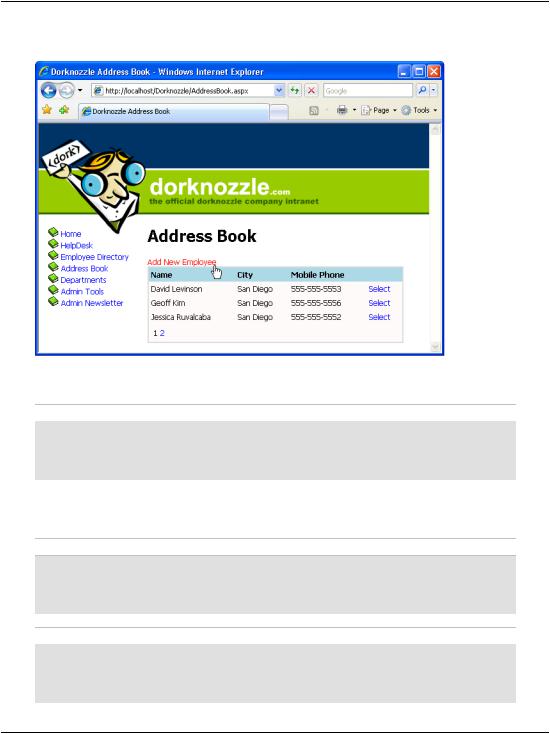
The last improvement we’ll make is to add an Add New Employee button to the page. Right now, we can only add new employees if we select an employee from the GridView, but this isn’t exactly an intuitive way to work! Let’s add a button that will make the DetailsView control display in insert mode when it’s clicked by a user.
486
Binding the DetailsView to a SqlDataSource
Figure 12.15. The Add New Employee button
Add the new button above the grid like this:
File: AddressBook.aspx (excerpt)
<h1>Address Book</h1>
<asp:LinkButton id="addEmployeeButton" runat="server" Text="Add New Employee" /><br />
<asp:GridView id="grid" runat="server" …
Double-click the button in Design View, and fill in its Click event handler like this:
Visual Basic |
File: AddressBook.aspx.vb (excerpt) |
Protected Sub addEmployeeButton_Click(ByVal sender As Object, _ ByVal e As System.EventArgs) Handles addEmployeeButton.Click
employeeDetails.ChangeMode(DetailsViewMode.Insert) End Sub
C# |
File: AddressBook.aspx.cs (excerpt) |
protected void addEmployeeButton_Click(object sender, EventArgs e)
{
employeeDetails.ChangeMode(DetailsViewMode.Insert);
}
487

Chapter 12: Advanced Data Access
Our new button (shown in Figure 12.15) will cause the DetailsView to display in insert mode when clicked.
Your Address Book is now fully featured, and ready for production!
What’s really interesting about the code that was generated for us in this section is the definition of the employeeDataSource. Since this data source needs to store the details of selecting, deleting, updating, and inserting rows, it looks significantly bigger than the employeesDataSource:
File: AddressBook.aspx (excerpt)
<asp:SqlDataSource ID="employeeDataSource" runat="server" ConnectionString="<%$ ConnectionStrings:Dorknozzle %>" DeleteCommand="DELETE FROM [Employees]
WHERE [EmployeeID] = @EmployeeID" InsertCommand="INSERT INTO [Employees] ([DepartmentID],
[Name], [Username], [Password], [Address], [City], [State], [Zip], [HomePhone], [Extension], [MobilePhone]) VALUES (@DepartmentID, @Name, @Username, @Password, @Address, @City, @State, @Zip, @HomePhone, @Extension, @MobilePhone)"
SelectCommand="SELECT [EmployeeID], [DepartmentID], [Name], [Username], [Password], [Address], [City], [State], [Zip], [HomePhone], [Extension], [MobilePhone]
FROM [Employees]
WHERE ([EmployeeID] = @EmployeeID)" UpdateCommand="UPDATE [Employees]
SET [DepartmentID] = @DepartmentID, [Name] = @Name, [Username] = @Username, [Password] = @Password, [Address] = @Address, [City] = @City, [State] = @State, [Zip] = @Zip, [HomePhone] = @HomePhone,
[Extension] = @Extension, [MobilePhone] = @MobilePhone WHERE [EmployeeID] = @EmployeeID">
<DeleteParameters>
<asp:Parameter Name="EmployeeID" Type="Int32" /> </DeleteParameters>
<UpdateParameters>
<asp:Parameter Name="DepartmentID" Type="Int32" /> <asp:Parameter Name="Name" Type="String" /> <asp:Parameter Name="Username" Type="String" /> <asp:Parameter Name="Password" Type="String" /> <asp:Parameter Name="Address" Type="String" /> <asp:Parameter Name="City" Type="String" /> <asp:Parameter Name="State" Type="String" /> <asp:Parameter Name="Zip" Type="String" />
488
