

Chapter 1: Introducing ASP.NET and the .NET Platform
Notepad, but you’ll gradually learn how to use Visual Web Developer to ease some of the tasks we’ll tackle.
So let’s install this tool to make sure we’ll have it ready when we need it.
1.Go to http://msdn.microsoft.com/vstudio/express/vwd/ and click the Download link.
2.Execute the downloaded file.
3.Accept the default options. At one point, you’ll be asked about installing Microsoft MSDN 2005 Express Edition, which is the product’s documentation. It wouldn’t hurt to install it, but you need to be patient, because it’s quite big. (Note that you’ve already installed the .NET Framework 2.0 documentation, together with the SDK.)
Bonus!
If you’ve already installed the .NET Framework 2.0 SDK, you’ve already installed Microsoft MSDN 2005 Express Edition.
In this book, we’ll start using Visual Web Developer to build real web applications in Chapter 5. Until then, we’ll create examples using Notepad (or another simple text editor) so you’re prepared to take full advantage of the features offered by Visual Web Developer when the time comes to use it.
Writing your First ASP.NET Page
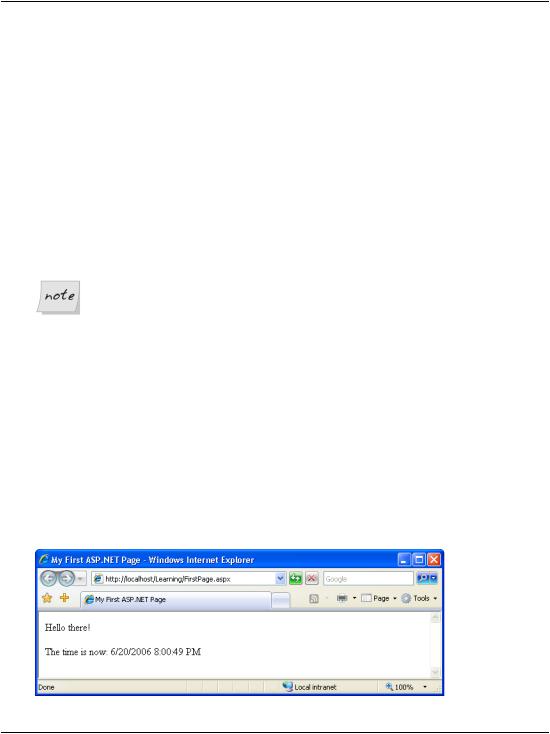
For your first ASP.NET exercise, we’ll create the simple example shown in Figure 1.15.
Figure 1.15. Your first ASP.NET page
26
Writing your First ASP.NET Page
Let’s get started! Open your text editor (Notepad is fine). If you have software that creates ASP.NET pages automatically, such as Visual Studio .NET or Visual Web Developer 2005 Express Edition, please don’t use it yet—while these are great tools that allow you to get up and running quickly, they do assume that you already understand how ASP.NET works.
So, open your text editor, and create a new file named FirstPage.aspx in the Learning folder you created earlier. Start editing FirstPage.aspx by entering the HTML for our page, shown below:
File: FirstPage.aspx (excerpt)
<!DOCTYPE html PUBLIC "-//W3C//DTD XHTML 1.0 Strict//EN" "http://www.w3.org/TR/xhtml1/DTD/xhtml1-strict.dtd">
<html>
<head>
<title>My First ASP.NET 2.0 Page</title> </head>
<body>
<p>Hello there!</p> <p>The time is now: </p>
</body>
</html>
So far, so good, right? Now, let’s add some ASP.NET code that will create the dynamic elements of the page, starting with the time.
File: FirstPage.aspx (excerpt)
<!DOCTYPE html PUBLIC "-//W3C//DTD XHTML 1.0 Strict//EN" "http://www.w3.org/TR/xhtml1/DTD/xhtml1-strict.dtd">
<html>
<head>
<title>My First ASP.NET 2.0 Page</title> </head>
<body>
<p>Hello there!</p> <p>The time is now:
<asp:Label runat="server" id="timeLabel" /></p> </body>
</html>
We’ve added an <asp:Label/> tag to the document. This is a special tag that lets us insert dynamic content into the page. The asp: part of the tag name identifies it as a built-in ASP.NET tag. ASP.NET comes with numerous built-in tags; <asp:Label/> is one of the simplest.
27
Chapter 1: Introducing ASP.NET and the .NET Platform
The runat="server" attribute identifies the tag as something that needs to be handled on the server. In other words, the web browser will never see the <asp:Label/> tag; when the page is requested by the client, ASP.NET sees it and converts it to regular HTML tags before the page is sent to the browser. It’s up to us to write the code that will tell ASP.NET to replace this particular tag with the current time.
To do this, we must add some script to our page. ASP.NET gives you the choice of a number of different languages to use in your scripts. The two most common languages are VB and C#. Let’s take a look at examples using both. Here’s a version of the page in VB:
Visual Basic File: FirstPage.aspx (excerpt)
<!DOCTYPE html PUBLIC "-//W3C//DTD XHTML 1.0 Strict//EN" "http://www.w3.org/TR/xhtml1/DTD/xhtml1-strict.dtd">
<html>
<head>
<title>My First ASP.NET Page</title>
<script runat="server" language="VB">
Sub Page_Load(sender As Object, e As EventArgs) timeLabel.Text = DateTime.Now.ToString()
End Sub </script>
</head>
<body>
<p>Hello there!</p> <p>The time is now:
<asp:Label runat="server" id="timeLabel" /></p> </body>
</html>
Here’s the same page written in C#:
C# |
File: FirstPage.aspx (excerpt) |
<!DOCTYPE html PUBLIC "-//W3C//DTD XHTML 1.0 Strict//EN" "http://www.w3.org/TR/xhtml1/DTD/xhtml1-strict.dtd">
<html>
<head>
<title>My First ASP.NET Page</title>
<script runat="server" language="C#">
protected void Page_Load(object sender, EventArgs e)
{
timeLabel.Text = DateTime.Now.ToString();
}
</script>
28
Writing your First ASP.NET Page
</head>
<body>
<p>Hello there!</p> <p>The time is now:
<asp:Label runat="server" id="timeLabel" /></p> </body>
</html>
Clues for Case Sensitivity
Note that C#, unlike VB, is case-sensitive. If you type the case of a letter incorrectly, the page won’t load. If these languages look complicated, don’t worry: you’ll learn more about them in Chapter 3.
Both versions of the page achieve exactly the same thing. You can even save them both, giving each a different filename, and test them separately. If you’ve never done any server-side programming before, the code may look a little scary. But before we analyze it in detail, let’s load the page and test that it works. Using your web browser, load http://localhost/Learning/FirstPage.aspx. Whether you load the C# version or the VB version, the output should look like Figure 1.15.
No Time?
If the time isn’t displayed in the page, chances are that you opened the file directly in your browser instead of loading it through your web server. Because ASP.NET is a server-side language, your web server needs to process the file before it’s sent to your browser for display. If it doesn’t get access to the file, the ASP.NET code is never converted into HTML that your browser can understand, so make sure you load the page by entering an actual HTTP URL (such as http://localhost/Learning/FirstPage.aspx), not a local path and filename (such as C:\WebDocs\Learning\FirstPage.aspx).
What happens there? Let’s break down the new elements of this page.
File: FirstPage.aspx (excerpt)
<script runat="server">
This tag marks the start of server-side code, or the code declaration block. Like the <asp:Label/> tag, this <script> tag uses the runat="server" attribute to let ASP.NET know that the tag should be processed before sending the page to the browser.
29

Chapter 1: Introducing ASP.NET and the .NET Platform
Visual Basic |
File: FirstPage.aspx (excerpt) |
|
|
Sub Page_Load(sender As Object, |
e As EventArgs) |
|
|
C# |
File: FirstPage.aspx (excerpt) |
|
|
protected void Page_Load(object |
sender, EventArgs e) |
{ |
|
I won’t go into too much detail here. For now, all you need to know is that you can write script fragments that are run in response to different events, such as a button being clicked or an item being selected from a drop-down list. What the first line of code basically says is, “execute the following script whenever the page is loaded.” Note that C# groups code into blocks with curly braces ({ and }), while Visual Basic uses statements such as End Sub to mark the end of a particular sequence. So, the curly brace in the C# code above ({) marks the start of the script that will be executed when the page loads for the first time.
Finally, here’s the line that actually displays the time on the page:
Visual Basic |
File: FirstPage.aspx (excerpt) |
timeLabel.Text = DateTime.Now.ToString() |
|
|
|
C# |
File: FirstPage.aspx (excerpt) |
|
|
timeLabel.Text = DateTime.Now.ToString(); |
|
As you can see, these .NET languages have much in common, because they’re both built on the .NET Framework. In fact, the only difference between the ways the two languages handle the above line is that C# ends lines of code with a semicolon (;). In plain English, here’s what this line says:
Set the Text of timeLabel to the current date and time, expressed as text.
Note that timeLabel is the value we gave for the id attribute of the <asp:Label/> tag where we want to show the time. So, timeLabel.Text, or the Text property of timeLabel, refers to the text that will be displayed by the tag. DateTime is a class that’s built into the .NET Framework; it lets you perform all sorts of useful functions with dates and times. The .NET Framework has thousands of these classes, which do countless handy things. The classes are collectively known as the .NET Framework Class Library.
The DateTime class has a property called Now, which returns the current date and time. This Now property has a method called ToString, which expresses that date and time as text (a segment of text is called a string in programming circles).
30

Writing your First ASP.NET Page
Classes, properties, and methods: these are all important words in the vocabulary of any programmer, and we’ll discuss them in more detail a little later in the book. For now, all you need to take away from this discussion is that DateTime.Now.ToString() will give you the current date and time as a text string, which you can then tell your <asp:Label/> tag to display. The rest of the script block simply ties up loose ends:
Visual Basic File: FirstPage.aspx (excerpt)
End Sub </script>
C# File: FirstPage.aspx (excerpt)
}
</script>
The End Sub in the VB code, and the } in the C# code, mark the end of the script that’s to be run when the page is loaded, and the </script> tag marks the end of the script block.
One final thing that’s worth investigating is the code that ASP.NET generated for you. It’s clear by now that your web browser receives only HTML (no serverside code!), so what kind of HTML was generated for that label? The answer is easy to find! With the page displayed in your browser, you can use the browser’s View Source feature to view the page’s HTML code. Here’s what you’ll see:
<!DOCTYPE html PUBLIC "-//W3C//DTD XHTML 1.0 Strict//EN" "http://www.w3.org/TR/xhtml1/DTD/xhtml1-strict.dtd">
<html>
<head>
<title>My First ASP.NET Page</title> </head>
<body>
<p>Hello there!</p> <p>The time is now:
<span id="timeLabel">6/20/2006 8:00:49 PM</span></p> </body>
</html>
Notice that all the ASP.NET code has gone! Even the script block has been completely removed, and the <asp:Label/> tag has been replaced by a <span> tag (which has the same id attribute as the <asp:Label/> tag we used) that contains the date and time.
31