

Beginning Visual C++ 2005 (2006) [eng]-1
.pdfConnecting to Data Sources
class CProductSet : public CRecordset
{
public:
CProductSet(CDatabase* pDatabase = NULL); DECLARE_DYNAMIC(CProductSet)
//Field/Param Data
//The string types below (if present) reflect the actual data type of the
//database field - CStringA for ANSI datatypes and CStringW for Unicode
//datatypes. This is to prevent the ODBC driver from performing
//potentially unnecessary conversions.
//If you wish, you may change these members to
//CString types and the ODBC driver will perform all necessary
//conversions.
//(Note: You must use an ODBC driver version that is version 3.5 or
//greater to support both Unicode and these conversions).
long m_ProductID; |
// Number automatically assigned to new product. |
|
CStringW m_ProductName; |
|
|
long m_SupplierID; |
|
// Same entry as in Suppliers table. |
long m_CategoryID; |
|
// Same entry as in Categories table. |
CStringW m_QuantityPerUnit; |
// (e.g., 24-count case, 1-liter bottle). |
|
double m_UnitPrice; |
|
|
int m_UnitsInStock; |
|
|
int m_UnitsOnOrder; |
|
|
int m_ReorderLevel; |
|
// Minimum units to maintain in stock. |
BOOL m_Discontinued; |
|
// Yes means item is no longer available. |
//Overrides
//Wizard generated virtual function overrides public:
virtual CString GetDefaultConnect(); // Default connection string
virtual |
CString GetDefaultSQL(); |
// default SQL for Recordset |
virtual |
void DoFieldExchange(CFieldExchange* pFX); // RFX support |
|
// Implementation #ifdef _DEBUG
virtual void AssertValid() const;
virtual void Dump(CDumpContext& dc) const; #endif
};
The type of each data member is set to correspond with the field type for the corresponding field in the Products table. You may not want all these fields in practice, but you shouldn’t delete them willy-nilly in the class definition. As you will see shortly, they are referenced in other places, so you must ensure that all references to a field are deleted, too. A further caveat is that you must not delete primary keys. If you do, the recordset won’t work, so you need to be sure which fields are primary keys before chopping out what you don’t want.
Note that two of the fields have CStringW as the type. You haven’t seen this before, but the CStringW class type just encapsulates a Unicode string rather than an ASCII string. It is more convenient when
939

Chapter 19
you are accessing the fields to use type CString, so change the type of the m_ProductName and m_QuantityPerUnit members to CString. This allows the strings to be handled as ASCII strings in the example. Clearly, if you are writing internationalized database applications, you would need to maintain any CStringW fields as such because they may contain characters that are not within the ASCII character set.
The SQL operation that applies to the recordset to populate these data members is specified in the GetDefaultSQL() function. The implementation that the Application wizard has supplied for this is:
CString CProductSet::GetDefaultSQL()
{
return _T(“[Products]”);
}
The string returned is obviously created based on the table that you selected during the creation of the project. The square brackets have been included to provide for the possibility of the table name containing spaces. If you had selected several tables in the project creation process, they would all be inserted here, separated by commas, with each table name enclosed within square brackets.
The GetDefaultSQL() function is called by the MFC framework when it constructs the SQL statement to be applied for the recordset. The framework slots the string returned by this function into a skeleton SQL statement with the form:
SELECT * FROM < String returned by GetDefaultSQL() >;
This looks simplistic, and indeed it is, but you can add WHERE and ORDER BY clauses to the operation, as you’ll see later.
Data Transfer between the Database and the Recordset
The transfer of data from the database to the recordset, and vice versa, is accomplished by the DoFieldExchange() member of the CProductSet class. The implementation of this function is:
void CProductSet::DoFieldExchange(CFieldExchange* pFX)
{
pFX->SetFieldType(CFieldExchange::outputColumn);
//Macros such as RFX_Text() and RFX_Int() are dependent on the
//type of the member variable, not the type of the field in the database.
//ODBC will try to automatically convert the column value to the requested
//type
RFX_Long(pFX, _T(“[ProductID]”), m_ProductID); RFX_Text(pFX, _T(“[ProductName]”), m_ProductName); RFX_Long(pFX, _T(“[SupplierID]”), m_SupplierID); RFX_Long(pFX, _T(“[CategoryID]”), m_CategoryID); RFX_Text(pFX, _T(“[QuantityPerUnit]”), m_QuantityPerUnit); RFX_Double(pFX, _T(“[UnitPrice]”), m_UnitPrice); RFX_Int(pFX, _T(“[UnitsInStock]”), m_UnitsInStock); RFX_Int(pFX, _T(“[UnitsOnOrder]”), m_UnitsOnOrder); RFX_Int(pFX, _T(“[ReorderLevel]”), m_ReorderLevel); RFX_Bool(pFX, _T(“[Discontinued]”), m_Discontinued);
}
940

Connecting to Data Sources
This function is called automatically by the MFC framework to store data in and retrieve data from the database. It works in a similar fashion to the DoDataExchange() function you have seen with dialog controls in that the pFX parameter determines whether the operation is a read or a write. Each time it’s called, it moves a single record to or from the recordset object.
The first function called is SetFieldType(), which sets a mode for the RFX_() function calls that follow. In this case, the mode is specified as outputColumn, which indicates that data is to be exchanged between the database field and the corresponding argument specified in each of the following RFX_() function calls.
There is a whole range of RFX_() functions for various types of database field. The function call for a particular field corresponds with the data type applicable to that field. The first argument to an RFX_() function call is the pFX object that determines the direction of data movement. The second argument is the table field name and the third is the data member that is to store that field for the current record.
Understanding the Record View
The purpose of the view class is to display information from the recordset object in the application window, so you need to understand how this works. The bits of the CProductView class definition that are of primary interest are shown shaded:
class CProductView : public CRecordView
{
protected: // create from serialization only CProductView(); DECLARE_DYNCREATE(CProductView)
public:
enum{ IDD = IDD_DBSAMPLE_FORM }; CProductSet* m_pSet;
//Attributes public:
CDBSampleDoc* GetDocument();
//Operations
public:
//Overrides public:
virtual CRecordset* OnGetRecordset();
virtual BOOL PreCreateWindow(CREATESTRUCT& cs); protected:
virtual void DoDataExchange(CDataExchange* pDX); // DDX/DDV support virtual void OnInitialUpdate(); // called first time after construct virtual BOOL OnPreparePrinting(CPrintInfo* pInfo);
virtual void OnBeginPrinting(CDC* pDC, CPrintInfo* pInfo); virtual void OnEndPrinting(CDC* pDC, CPrintInfo* pInfo);
// Implementation public:
941

Chapter 19
virtual ~CProductView(); #ifdef _DEBUG
virtual void AssertValid() const;
virtual void Dump(CDumpContext& dc) const; #endif
protected:
// Generated message map functions protected:
DECLARE_MESSAGE_MAP()
};
The view class for a recordset always needs to be derived because the class has to be customized to display the particular fields from the recordset that you want. The base class, CRecordView, includes all the functionality required to manage communications with the recordset. All you need to do is to tailor the record view class to suit your application. I’ll get to that in a moment.
Note that the constructor is protected. This is because objects of this class are expected to be created from serialization, which is a default assumption for record view classes. When you add further record view classes to the application, you’ll need to change the default access for their constructors to public because you’ll be creating the views yourself.
In the first public block in the class, the enumeration adds the ID IDD_DBSAMPLE_FORM as a member the class. This is the ID for a blank dialog that the Application Wizard has included in the program. You’ll add controls to this dialog to display the database fields from the Products table that you want displayed. The dialog ID is passed to the base class, CRecordView, in the initialization list of the constructor for the view class:
CProductView::CProductView() : CRecordView(CProductView::IDD)
{
m_pSet = NULL;
// TODO: add construction code here
}
This action links the view class to the dialog box, which is necessary to enable the mechanism that transfers data between the recordset object and the view object to work.
There is also a pointer to a CProductSet object, m_pSet, in the class definition, which is initialized to NULL in the constructor. A more useful value for this pointer is set in the OnInitialUpdate() member of the class, which has been implemented as:
void CProductView::OnInitialUpdate()
{
m_pSet = &GetDocument()->m_DBSampleSet; CRecordView::OnInitialUpdate();
}
This function is called when the record view object is created and sets the value of m_pSet to be the address of the m_DBSampleSet member of the document, thus tying the view to the product set object.
942

Connecting to Data Sources
Figure 19-14 shows how data from the database ultimately gets to be displayed by the view.
Database Table |
View Object |
|
DoFieldExchange() member |
DoDataExchange() |
||||
|
member of the view |
|||||
|
of the Recordset object |
|||||
|
object transfers data |
|||||
|
transfers data between the |
|||||
|
between the recordset |
|||||
|
DB and the recordset |
|||||
|
and the view. |
|||||
|
|
|
|
|
|
|
|
|
|
|
|
|
|
|
|
|
|
|
|
|
|
|
|
|
|
|
|
|
|
|
|
|
|
|
|
RecordSet Object |
|
||||
Figure 19-14 |
|
|||||
The transfer of data between the data members in the CProductSet object that correspond to fields in the Products table and the controls in the dialog box associated with the CProductView object is managed by the DoDataExchange() member of CProductView. The code in this function to do this is not in place yet because you first need to add the controls to the dialog that are going to display the data and then link the controls to the recordset data members. You will do that next.
Creating the View Dialog
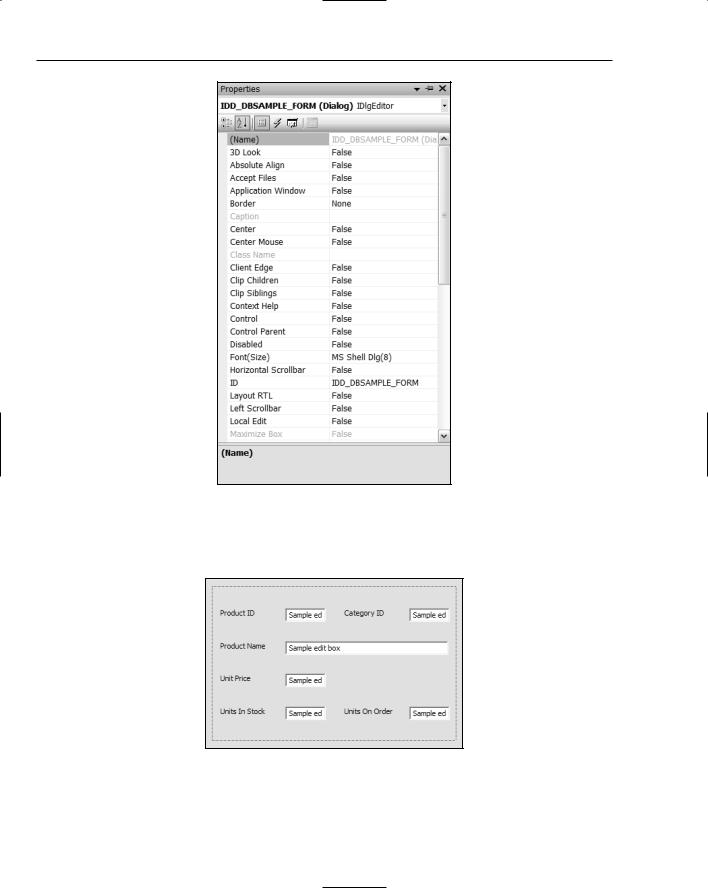
The first step is to place the controls on the dialog box, so go to Resource View, expand the list of dialog resources, and double-click Idd_Dbsample_Form. You can delete the static text object with the TODO message from the dialog. If you right-click the dialog box, you can choose to view its properties, as shown in Figure 19-15.
If you scroll down through the properties you’ll see that the Style property has been set to Child because the dialog box is going to be a child window and will fill the client area. The Border property has been set to None because if the dialog box is to fill the client area, it won’t need a border.
You’ll add a static text control to identify each field from the recordset that you want to display, plus an edit control to display it.
943
Chapter 19
Figure 19-15
You can enlarge the dialog if necessary by dragging its borders. Then, place controls on the dialog as shown in Figure 19-16.
Figure 19-16
944

Connecting to Data Sources
You can add the text to each static control by just typing it as soon as the control has been placed on the dialog. As you see, I have entered the text for each static control so that it corresponds to the field name in the database. It’s a good idea to make sure that all the edit controls have sensible and different IDs, so right-click each of them in turn to display and modify their properties. Figure 19-17 shows the properties for the control corresponding to Product ID.
Figure 19-17
It’s helpful to use the field name as part of the control ID as this indicates what the control display. Figure 19-17 shows the ID for the first edit control in the title bar of the properties window after I have modified it. You can change the IDs for the other edit controls similarly. Because you are not intending to update the database in this example, you should make sure that the data displayed by each edit box cannot be modified from the keyboard. You can do that by setting the Read Only property for of each of the edit controls as True. The background to the edit boxes will then have a different color to signal that they cannot be altered, as shown in Figure 19-18.
You can add other fields to the dialog box, if you want. The one that is most important for the rest of our example is the Product ID, so you must include that. Save the dialog and then move on to the last step: linking the controls to the variables in the recordset class.
945

Chapter 19
Figure 19-18
Linking the Controls to the Recordset
As you saw earlier in Figure 19-14, getting the data from the recordset displayed by the appropriate control is the job of the DoDataExchange() function in the CProductView class. The m_pSet member provides a means of accessing the members of the CProductSet object that contains the fields retrieved from the database, so linking the controls to the data members of CProductSet is easy. MFC defines a range of DDX_Field functions at global scope that are specifically for exchanging data between a view and a recordset. In particular, the DDX_FieldText() function has overloaded versions that transfers a variety of types of data between a recordset field and an edit box in a CRecordView object. The types that can be exchanged by the DDX_FieldText() function are:
short |
int |
UINT |
long |
DWORD |
float |
double |
CString |
COleDateTime |
COleCurrency |
When you call the DDX_FieldText() function you must supply four arguments:
A CDataExchange object that determines the direction of data transfer — whether the data is to be transferred to or from the recordset. You just supply the pointer that is passed as the argument to the DoDataExchange() function.
The ID of the control that is the source or destination of the data.
A reference to a field data member in the CRecordset object that is the source or destination of the data.
A pointer to the CRecordset object with which data is to be exchanged.
So to implement the transfer of data between the recordset and the control for the Product ID field, insert the following call of the DDX_FieldText() function in the body of the DoDataExchange() function:
DDX_FieldText(pDX, IDC_PRODUCTID, m_pSet->m_ProductID, m_pSet);
The first argument is the pDX argument that is passed to the DoDataExchange() function. The second argument is the ID for the first edit control in the dialog box for the view, the third argument uses the m_pSet member of the CProductView class to access the m_ProductID member of the recordset object, and the last argument is the pointer to the recordset object.
946

Connecting to Data Sources
You can therefore fill out the code for the DoDataExchange() function in the CProductView class like this:
void CProductView::DoDataExchange(CDataExchange* pDX)
{
CRecordView::DoDataExchange(pDX);
DDX_FieldText(pDX, IDC_PRODUCTID, m_pSet->m_ProductID, m_pSet); DDX_FieldText(pDX, IDC_PRODUCTNAME, m_pSet->m_ProductName, m_pSet); DDX_FieldText(pDX, IDC_UNITPRICE, m_pSet->m_UnitPrice, m_pSet);
DDX_FieldText(pDX, IDC_UNITSINSTOCK, m_pSet->m_UnitsInStock, m_pSet); DDX_FieldText(pDX, IDC_CATEGORYID, m_pSet->m_CategoryID, m_pSet); DDX_FieldText(pDX, IDC_UNITSONORDER, m_pSet->m_UnitsOnOrder, m_pSet);
}
The programming mechanism for data transfer between the database and the dialog box owned by the CProductView object is illustrated in Figure 19-19.
U |
P |
ni |
|
t |
roduct |
s |
|
i |
|
n |
|
|
N |
Stoc |
|
|
ame |
k |
|
Pr
o d u
c t
I
D
Products Table
in Sample Data
RFX calls in
DoFieldExchange()
CProductSet
 m_ProductID
 m_ProductName
 m_UnitslnStock
Figure 19-19
DDX calls in DoDataExchange()
947

Chapter 19
The recordset class and the record view class cooperate to enable data to be transferred between the database and the controls in the dialog box. The CProductSet class handles transfers between the database and its data members and CProductView deals with transfers between the data members of CProductSet and the controls in the dialog.
Exercising the Example
Believe it or not you can now run the example. Just build it in the normal way and then execute it. The application should display a window similar to the one shown in Figure 19-20.
Figure 19-20
The CRecordView base class automatically implements toolbar buttons that step from one record in the recordset to the next or to the previous record. There are also toolbar buttons to move directly to the first or last record in the recordset. Of course, the products are displayed in a default sequence. It would be nice to have them sorted in categories and in product ID sequence within each category. Next, you’ll see how you can do that.
Sor ting a Recordset
As you saw earlier, the data is retrieved from the database by the recordset, using an SQL SELECT statement that is generated by the framework using the GetDefaultSQL() member. You can add an ORDER BY clause to the statement generated by setting a value in the m_strSort member of CProductSet, which is inherited from CRecordSet. This causes the output table from the query to be sorted, based on the string stored in m_strSort. You need to set only the m_strSort member to a string that contains the field name or names that you want to sort on; the framework provides the ORDER BY keywords. Where you have multiple names, you separate them by commas. But where should you add the code to do this?
948