

Beginning Visual C++ 2005 (2006) [eng]-1
.pdfWorking with Dialogs and Controls
encapsulates each of the Windows common controls — the one for the common status bar control is CStatusBarCtrl. However, using this directly involves quite a bit of work to integrate it with the other MFC classes, as the raw Windows control doesn’t connect to MFC. Using CStatusBar in our Sketcher program is easier and safer. The GetStatusBarCtrl() function returns a reference to a CStatusBarCtrl object that provides all the functionality of the common control, and the CStatusBar object takes care of the communications to the rest of the MFC.
The first step to utilizing it is to add a data member for the status bar to the definition of CChildFrame, which is the frame window for a view, so add the following declaration to the public section of the class:
CStatusBar m_StatusBar; |
// Status bar object |
A little clarification may be required at this point. Status bars should be part of the frame, not part of the view. You don’t want to be able to scroll the status bars or draw over them. They should just remain anchored to the bottom of the window. If you added a status bar to the view, it would appear inside the scrollbars and would be scrolled whenever you scrolled the view. Any drawing over the part of the view containing the status bar would cause the bar to be redrawn, leading to an annoying flicker. Having the status bar as part of the frame avoids these problems.
You should initialize the m_StatusBar data member just before the visible view window is displayed. So, using the Properties window for the CChildFrame class, add a function to the class that is called in response to the WM_CREATE message that is sent to the application when the window is to be created.
Add the following code to the OnCreate() handler:
int CChildFrame::OnCreate(LPCREATESTRUCT lpCreateStruct)
{
if(CMDIChildWnd::OnCreate(lpCreateStruct) == -1) return -1;
//Create the status bar m_StatusBar.Create(this);
//Work out the width of the text we want to display CRect textRect;
CClientDC aDC(&m_StatusBar); aDC.SelectObject(m_StatusBar.GetFont());
aDC.DrawText(_T(“View Scale:99”), -1, textRect, DT_SINGLELINE|DT_CALCRECT);
//Setup a part big enough to take the text
int width = textRect.Width(); m_StatusBar.GetStatusBarCtrl().SetParts(1, &width);
// Initialize the text for the status bar m_StatusBar.GetStatusBarCtrl().SetText(_T(“View Scale:1”), 0, 0); return 0;
}
The generated code isn’t shaded. There’s a call to the base class version of the OnCreate() function, which takes care of creating the definition of the view window. It’s important not to delete this function call; otherwise, the window is not created.
849

Chapter 16
The Create() function in the CStatusBar object creates the status bar. The this pointer for the current CChildFrame object is passed to the Create() function, setting up a connection between the status bar and the window that owns it. Take a look at what’s happening in the code that you have added to the
OnCreate() function.
Defining the Status Bar Parts
A CStatusBar object has an associated CStatusBarCtrl object with one or more parts. Parts and panes in the context of status bars are equivalent terms — CStatusBar refers to panes and CStatusBarCtrl refers to parts. You can display a separate item of information in each part.
You can define the number of parts and their widths by a call to the SetParts() member of the CStatusBarCtrl object. This function requires two arguments. The first argument is the number of parts in the status bar, and the second is an array specifying the right edge of each part in client coordinates. If you omit the call to SetParts(), the status bar has one part by default, which stretches across the whole bar; you could use this, but it looks untidy. A better approach is to size the part so that the text to be displayed fits nicely, and this is what you will do in Sketcher.
The first thing you do in the OnCreate() function is to create a temporary CRect object in which you’ll store the enclosing rectangle for the text that you want to display. You then create a CClientDC object which contains a device context with the same extent as the status bar. This is possible because the status bar, like all other controls, is just a window.
Next, the font used in the status bar (set up as part of the desktop properties) is selected into the device context by calling the SelectObject() function. The GetFont() member of m_StatusBar returns a pointer to a CFont object that represents the current font. Obviously, the particular font used determines how much space the text that you want to display takes up.
You call the DrawText() member of the CClientDC object to calculate the enclosing rectangle for the text you want to display. This function has four arguments:
The text string you need to drawn. You have passed a string containing the maximum number of characters you would ever want to display, “View Scale:99”.
The count of the number of characters in the string. You have specified this as –1, which indicates you are supplying a null-terminated string. In this case the function works out the character count.
Your rectangle, textRect. The enclosing rectangle for the text is stored here in logical coordinates.
One or more flags controlling the operation of the function.
You have specified a combination of two flags; DT_SINGLELINE specifies that the text is to be on a single line, and DT_CALCRECT specifies that you want the function to calculate the size of the rectangle required to display the string and store it in the rectangle pointed to by the third argument. The DrawText() function is normally used to output text, but in this instance the DT_CALCRECT flag stops the function from actually drawing the string. There are a number of other flags that you can use with this function; you can find details about them by looking up this function with Help.
850

Working with Dialogs and Controls
The next statement sets up the parts for the status bar:
m_StatusBar.GetStatusBarCtrl().SetParts(1, &width);
The expression m_StatusBar.GetStatusBarCtrl() returns a reference to the CStatusBarCtrl object that belongs to m_StatusBar. The reference returned is used to call the SetParts() function for the object. The first argument to SetParts() defines the number of parts for the status bar — which is 1 in this case. The second argument is typically the address of an array of type int containing the x coordinate of the right hand edge of each part in client coordinates. The array has one element for each part in the status bar. Because you have only one part, you pass the address of the single variable, width, which contains the width of the rectangle you stored in textRect. This is in client coordinates because the device context uses MM_TEXT by default.
Finally, you set the initial text in the status bar with a call to the SetText() member of CStatusBarCtrl. The first argument is the written text string, the second is the index position of the part which contains the text string, and the third argument specifies the appearance of the part on the screen. The third argument can be any of the following:
Style Code |
Appearance |
|
|
|
|
0 |
The text has a border that appears |
recessed into the |
|
status bar. |
|
SBT_NOBORDERS |
The text is drawn without borders. |
|
SBT_OWNERDRAW |
The text is drawn by the parent window. |
|
SBT_POPOUT |
The text has a border that appears |
to stand out from the |
|
status bar. |
|
|
|
|
In your code, you specify the text with a border so that it appears recessed into the status bar. You could try the other options to see how they look.
Updating the Status Bar
If you build and run the code now, the status bars appears, but they show only a scale factor of 1, no matter what scale factor is actually being used — __not very useful. What you need to do is to add code somewhere that changes the text each time a different scale is chosen. This means modifying the OnViewScale() handler in CSketcherView to change the status bar for the frame. Only four additional lines of code are required:
void CSketcherView::OnViewScale() |
|
{ |
|
CScaleDialog aDlg; |
// Create a dialog object |
aDlg.m_Scale = m_Scale; |
// Pass the view scale to the dialog |
if(aDlg.DoModal() == IDOK) |
|
{ |
|
m_Scale = aDlg.m_Scale; |
// Get the new scale |
// Get the frame window for this view
CChildFrame* viewFrame = static_cast<CChildFrame*>(GetParentFrame());
// Build the message string
851

Chapter 16
CString StatusMsg(“View Scale:”);
StatusMsg += static_cast<char>(‘0’ + m_Scale);
// Write the string to the status bar viewFrame->m_StatusBar.GetStatusBarCtrl().SetText(StatusMsg, 0, 0);
ResetScrollSizes(); |
// |
Adjust scrolling to the new scale |
InvalidateRect(0); |
// |
Invalidate the whole window |
}
}
Because you refer to the CChildFrame object here, you must add an #include directive for ChildFrm.h to the beginning of SketcherView.cpp after the existing #include directives.
The first line calls the GetParentFrame() member of CSketcherView that’s inherited from the CScrollView class. This returns a pointer to a CFrameWnd object to correspond to the frame window, so it has to be cast to CChildFrame* for it to be of any use to you.
The next two lines build the message that displays in the status bar. The CString class is used simply because it is more flexible than using a char array. I will discuss CString objects in greater depth a bit later when you add a new element type to Sketcher. You get the character for the scale value by adding the value of m_Scale (which will be from 1 to 8) to the character ‘0’. This generates a character from
‘1’ to ‘8’.
Finally, you use the pointer to the child frame to get at the m_StatusBar member that you added earlier. You can then get its status bar control and use the SetText() member of the control to change the text that it displays. The rest of the OnViewScale() function remains unchanged.
That’s all you need for the status bar. If you build Sketcher again, you should have multiple, scrolled windows, each at different scales, with the scale displayed in a status bar in each view.
Using a List Box
Of course, you don’t have to use a spin button to set the scale. You could also use a list box, for example. The logic for handling a scale factor would be exactly the same, and only the dialog box and the code to extract the value for the scale factor from it would change. If you want to try this out without messing up the development of the Sketcher program, you can copy the complete Sketcher project to another folder and make the modifications to the copy. Deleting part of a Class wizard managed program can be a bit messy, so it’s useful experience for when you really need to do it.
Removing the Scale Dialog
You first need to delete the definition and implementation of CScaleDialog from the new Sketcher project, as well as the resource for the scale dialog. To do this, go to the Solution Explorer pane, select ScaleDialog.cpp and press Delete; then select ScaleDialog.h and press Delete to remove them from the project. In each instance you’ll see a dialog that gives you the option of just removing the files from the project or permanently deleting the files; click on the Delete button in the dialog to do that unless you’ want to keep the code. Then go to Resource View, expand the Dialog folder, click on
IDD_SCALE_DLG and press the Delete key to remove the dialog resource. Delete the #include directive
852
Working with Dialogs and Controls
for ScaleDialog.h from SketcherView.cpp. At this stage, all references to the original dialog class have been removed from the project. Are you all done yet? Almost. The IDs for the resources should have been deleted for you. To verify this, right-click Sketcher.rc in Resource View and select the Resource Symbols menu item from the pop-up; you can check that IDC_SCALE and IDC_SPIN_SCALE are no longer in the list. Of course, the OnViewScale() handler in the CSketcherView class still refers too CScaleDialog, so the Sketcher project won’t compile yet. You’ll fix that when you have added the list box control.
Select the Build > Clean Solution menu item to remove any intermediate files from the project that may contain references to CScaleDialog. After that’s done, you can start by recreating the dialog resource for entering a scale value.
Creating a List Box Control
Right-click Dialog in Resource View and add a new dialog with a suitable ID and caption. You could use the same ID as before, IDD_SCALE_DLG.
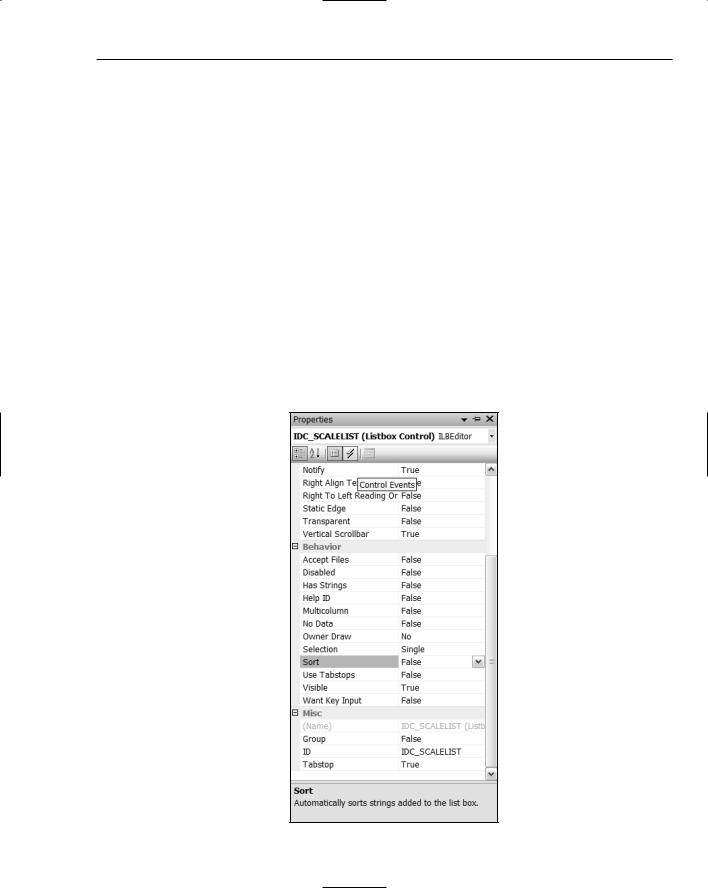
Select the list box button in the list of controls and click on where you want the list box positioned in the dialog box. You can enlarge the list box and adjust its position in the dialog by dragging it appropriately. Right-click the list box and select Properties from the pop-up. You can set the ID to something suitable, such as IDC_SCALELIST as shown in Figure 16-18.
Figure 16-18
853

Chapter 16
The Sort property will be True by default, so make sure you set it to False. This means that strings that you add to the list box are not automatically sorted. Instead, they’re appended to the end of the list in the box, and are displayed in the sequence in which you enter them. Because you will be using the position in the list of the selected item to indicate the scale, it’s important not to have the sequence changed. The list box has a vertical scrollbar for the list entries by default, and you can accept the defaults for the other properties. If you want to look into the effects of the other properties, you can click on each of them in turn to display text in the bottom of the Properties window explaining what the property does.
Now that the dialog is complete, you can save it and you’re ready to create the class for the dialog.
Creating the Dialog Class
Right-click the dialog and select Add Class from the pop-up. Again, you’ll be taken to the dialog to create a new class. Give the class an appropriate name, such as the one you used before, CScaleDialog, and select CDialog as the base class. If, when you click Finish, you get a message box displayed saying that ScaleDialog.cpp already exists, you forget to explicitly delete the .h and .cpp files. Go back and do that now. Everything should then work as it’s supposed to. After you’ve completed that, all you need to do is add a public control variable called m_Scale to the class, corresponding to the list box ID, IDC_SCALELIST. The type should be type int and the limits should be 0 and 7. Don’t forget to set the Category as Value; otherwise, you won’t be able to enter the limits. Because you have created it as a control variable, DDX is implemented for the m_Scale data member and you use the variable to store a zero-based index to one of the eight entries in the list box.
You need to initialize the list box in the OnInitDialog() handler CScaleDialog, so add an override for this function using the Properties window for the class. Add code as follows:
BOOL CScaleDialog::OnInitDialog()
{
CDialog::OnInitDialog();
CListBox* pListBox = static_cast<CListBox*>(GetDlgItem(IDC_SCALELIST)); pListBox->AddString(_T(“Scale 1”));
pListBox->AddString(_T(“Scale 2”)); pListBox->AddString(_T(“Scale 3”)); pListBox->AddString(_T(“Scale 4”));
pListBox->AddString(_T(“Scale 5”)); pListBox->AddString(_T(“Scale 6”)); pListBox->AddString(_T(“Scale 7”)); pListBox->AddString(_T(“Scale 8”)); pListBox->SetCurSel(m_Scale-1);
return TRUE; // return TRUE unless you set the focus to a control // EXCEPTION: OCX Property Pages should return FALSE
}
The first line that you have added obtains a pointer to the list box control by calling the GetDlgItem() member of the dialog class. This is inherited from the MFC class, CWnd. It returns a pointer of type CWnd*, so you cast this to the type CListBox*, which is a pointer to the MFC class defining a list box.
854

Working with Dialogs and Controls
Using the pointer to the dialog’s CListBox object, you then use the AddString() member repeatedly to add the lines defining the list of scale factors. These appear in the list box in the order that you enter them, so that the dialog is displayed as shown in Figure 16-19.
Figure 16-19
Each entry in the list is associated with a zero-based index value that is automatically stored in the m_Scale member of CScaleDialog through the DDX mechanism. Thus, if you select the third entry in the list, m_Scale is set to 2.
Displaying the Dialog
The dialog is displayed by the OnViewScale() handler that you added to CSketcherView in the previous version of Sketcher. You just need to amend this to deal with the new dialog using a list box. The code for it is as follows:
void CSketcherView::OnViewScale() |
|
{ |
|
CScaleDialog aDlg; |
// Create a dialog object |
aDlg.m_Scale = m_Scale; |
// Pass the view scale to the dialog |
if(aDlg.DoModal() == IDOK) |
|
{ |
|
m_Scale = 1 + aDlg.m_Scale; |
// Get the new scale |
// Get the frame that wraps this view
CChildFrame* childFrame = static_cast<CChildFrame*>(GetParentFrame());
//Build the message string CString StatusMsg(“View Scale:”);
StatusMsg += static_cast<char>(‘1’ + m_Scale - 1);
//Set the status bar
childFrame->m_StatusBar.GetStatusBarCtrl().SetText(StatusMsg, 0, 0);
ResetScrollSizes(); |
// |
Adjust scrolling to the new scale |
InvalidateRect(0); |
// |
Invalidate the whole window |
}
}
Because the index value for the entry selected from the list is zero-based, you just need to add 1 to it to get the actual scale value to be stored in the view. The code to display this value in the view’s status bar is exactly as before. The rest of the code to handle scale factors is already complete and requires no changes. After you’ve added back the #include directive for ScaleDialog.h, you can build and execute this version of Sketcher to see the list box in action.
855

Chapter 16
Using an Edit Box Control
You could use an edit box control to add annotations in Sketcher. You’ll need a new element type, CText, that corresponds to a text string, and an extra menu item to set a TEXT mode for creating elements. Because a text element needs only one reference point, you can create it in the OnLButtonDown() handler in the view class. You’ll also need a new item in the Element menu to set TEXT mode. You’ll add this text capability to Sketcher in the following sequence:
1.
2.
3.
4.
Create the dialog box resource and its associated class.
Add the new menu item.
Add the code to open the dialog for creating an element.
Add the support for a CText class.
Creating an Edit Box Resource
Create a new dialog resource in Resource View by right-clicking the Dialog folder and selecting Insert Dialog from the pop-up. Change the ID for the new dialog to IDD_TEXT_DLG and the caption text to
Enter Text.
To add an edit box, select the edit box icon from the list of controls palette and then click the position in the dialog where you want to place it. You can adjust the size of the edit box by dragging its borders, and you can alter its position in the dialog by dragging the whole thing around. You can display the properties for the edit box by right-clicking it and selecting Properties from the pop-up. You could first change its ID to IDC_EDITTEXT, as shown in Figure 16-20.
Some of the properties for this control are of interest at this point. First, select the Multiline property. Setting the value for this as True creates a multiline edit box where the text you enter can span more than one line. This enables you to enter a long line of text and still remain visible in its entirety in the edit box.
The Align text property determines how the text is to be positioned in the multiline edit box. The value Left is fine here because you’ll be displaying the text as a single line anyway, but you also have the options for Center and Right.
If you were to change the value for the Want return property to True, pressing Enter on the keyboard while entering the text in the control inserts a return character the text string. This allows you to analyze the string if you wanted to break it into multiple lines for display. You don’t want this effect, so leave the property value as False. In this state, pressing Enter has the effect of the default control (which is the OK button) being selected, so pressing Enter closes the dialog.
If you set the value of the Auto HScroll property as False, there is an automatic spill to the next line in the edit box when you reach the edge of the control while entering text. However, this is just for visibility in the edit box — it has no effect on the contents of the string. You could also change the value of the Auto VScroll property to True to allow text to continue beyond the number of lines that are visible in the control.
856

Working with Dialogs and Controls
Figure 16-20
When you’ve finished setting the properties for the edit box, close its Properties window. Make sure that the edit box is first in the tab order by selecting the Format > Tab Order menu item or by pressing Ctrl+D. You can then test the dialog by selecting the Test Dialog menu item or by pressing Ctrl+T. The dialog is shown in Figure 16-21.
Figure 16-21
You can even enter text into the dialog in test mode to see how it works. Clicking the OK or Cancel buttons close the dialog.
857

Chapter 16
Creating the Dialog Class
After saving the dialog resource, you can create a suitable dialog class corresponding to the resource, which you could call CTextDialog. Right-click the dialog in Resource View and select Add Class from the pop-up to do this. The base class should be CDialog. Next you can add a control variable by rightclicking the class name in Class View and selecting Add > Add Variable from the pop-up. Select IDC_EDITTEXT as the control ID and the category as Value. Call the new variable m_TextString and leave its type as CString — you’ll take a look at this class after you’ve finished the dialog class. You can also specify a maximum length for it in the Max chars: edit box, as shown in Figure 16-22.
Figure 16-22
A length of 100 is more than adequate for your needs. The variable that you have added here is automatically updated from the data entered into the control by the DDX mechanism. You can click Finish to create the variable in the CTextDialog class and close the Add Member Variable wizard.
The CString Class
The CString class provides a very convenient and easy-to-use mechanism for handling strings that you can use just about anywhere a string is required. To be more precise, you can use a CString object in place of strings of type const char*, which is the usual type for a character string in native C++, or of type LPCTSTR, which is a type that comes up frequently in Windows API functions.
The CString class provides several overloaded operators which make it easy to process strings:
858