

Beginning Visual C++ 2005 (2006) [eng]-1
.pdfWorking with Dialogs and Controls
Figure 16-10
The implementation for the new version of OnInitDialog() is:
BOOL CPenDialog::OnInitDialog()
{
CDialog::OnInitDialog();
// Check the radio button corresponding to the pen width switch(m_PenWidth)
{
case 1: CheckDlgButton(IDC_PENWIDTH1,1); break;
case 2: CheckDlgButton(IDC_PENWIDTH2,1); break;
case 3: CheckDlgButton(IDC_PENWIDTH3,1); break;
case 4: CheckDlgButton(IDC_PENWIDTH4,1); break;
829
Chapter 16
case 5: CheckDlgButton(IDC_PENWIDTH5,1); break;
default: CheckDlgButton(IDC_PENWIDTH0,1);
}
return TRUE; // return TRUE unless you set the focus to a control // EXCEPTION: OCX Property Pages should return FALSE
}
You should leave the call to the base class function there because it does some essential setup for the dialog. The switch statement checks one of the radio buttons, depending on the value set in the
m_PenWidth data member. This implies that you must arrange to set m_PenWidth to a suitable value before you execute DoModal() because the DoModal() function causes the WM_INITDIALOG message to be sent, resulting in your version of OnInitDialog()called.
The CheckDlgButton() function is inherited indirectly from CWnd through CDialog. If the second argument is 1, it checks the button corresponding to the ID specified in the first argument. If the second argument is 0, the button is unchecked. This works with both checkboxes and radio buttons.
Handling Radio Button Messages
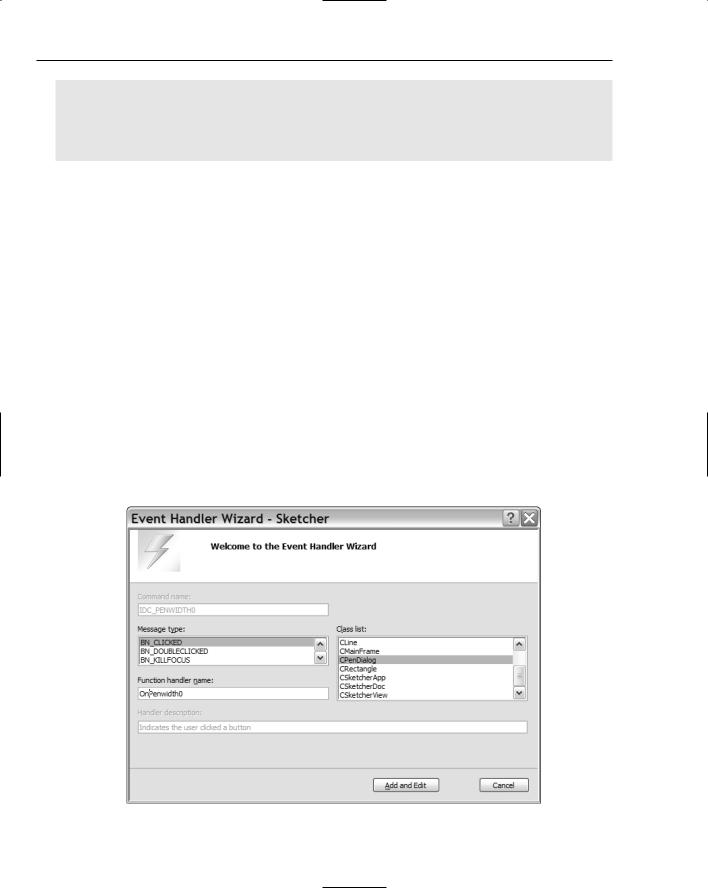
After the dialog box is displayed, every time you click on one of the radio buttons a message is generated and sent to the application. To deal with these messages, you can add handlers to the CPenDialog class. Right-click each of the radio buttons in turn and select Add Event Handler from the pop-up to create a handler for the BN_CLICKED message. Figure 16-11 shows the event handler dialog window for the button that has IDC_PENWIDTH0 as its ID. Note that I have edited the name of the handler as the default name was a little cumbersome.
Figure 16-11
830

Working with Dialogs and Controls
The implementations of the BN_CLICKED event handlers for all of these radio buttons are similar because they each just set the pen width in the dialog object. As an example, the handler for IDC_PENWIDTH0 is:
void CPenDialog::OnPenwidth0()
{
m_PenWidth = 0;
}
You need to add the code for all six handlers to the CPenDialog class implementation, setting m_PenWidth to 1 in OnPenWidth1(), to 2 in OnPenWidth2(), and so on.
Completing Dialog Operations
You must now modify the OnPenwidth() handler in CSketcherDoc to make the dialog effective. Add the following code to the function:
// Handler for the pen width menu item void CSketcherDoc::OnPenwidth()
{
CPenDialog aDlg; |
// Create a local dialog object |
//Set the pen width in the dialog to that stored in the document aDlg.m_PenWidth = m_PenWidth;
//Display the dialog as modal
//When closed with OK, get the pen width
if(aDlg.DoModal() == IDOK) m_PenWidth = aDlg.m_PenWidth;
}
The m_PenWidth member of the aDlg object is passed a pen width stored in the m_PenWidth member of the document; you’ve still got to add this member to CSketcherDoc. The call of the DoModal() function now occurs in the condition of the if statement, which is TRUE if the DoModal() function returns IDOK.
In this case, you retrieve the pen width stored in the aDlg object and store it in the m_PenWidth member of the document. If the dialog box is closed using the Cancel button or the close icon, IDOK won’t be returned by DoModal() and the value of m_PenWidth in the document is not changed.
Note that even though the dialog box is closed when DoModal() returns a value, the aDlg object still exists, so you can call its member functions without any problem. The aDlg object is destroyed automatically on return from OnPenwidth().
All that remains to do to support variable pen widths in your application is to update the affected classes: CSketcherDoc, CElement, and the four shape classes derived from CElement.
831

Chapter 16
Adding Pen Widths to the Document
You need to add the m_PenWidth member to the document class, and the GetPenWidth() function to allow external access to the value stored. You should add the following shaded statements to the CSketcherDoc class definition:
class CSketcherDoc : public CDocument
{
// the rest as before...
protected: |
|
// the rest as before... |
|
int m_PenWidth; |
// Current pen width |
//Operations public:
//the rest as before...
int GetPenWidth() |
// Get the current pen width |
{return m_PenWidth; }
//the rest as before...
};
Because it’s trivial, you can define the GetPenWidth() function in the definition of the class and gain the benefit of it being implicitly inline. You still need to add initialization for m_PenWidth to the constructor for CSketcherDoc, so modify the constructor in SketcherDoc.cpp by adding the shaded line:
CSketcherDoc::CSketcherDoc() |
|
: m_Element(LINE), m_Color(BLACK) |
|
,m_PenWidth(0) |
// 1 pixel pen |
{ |
|
// TODO: add one-time construction code here
}
Adding Pen Widths to the Elements
You have a little more to do to the CElement class and the shape classes that are derived from it. You already have a member m_Pen in CElement to store the width to be used when drawing an element, and you must extend each of the constructors for elements to accept a pen width as an argument, and set
the member in the class accordingly. The GetBoundRect() function in CElement must be altered to deal with a pen width of zero. You can deal with the CElement class first. The new version of the
GetBoundRect() function in the CElement class is:
// Get the bounding rectangle for an element CRect CElement::GetBoundRect()
{
CRect BoundingRect; |
// |
Object to store |
the |
bounding rectangle |
BoundingRect = m_EnclosingRect; |
// |
Initialize with |
the |
enclosing rectangle |
//Increase bounding rectangle by the pen width
int Offset = m_Pen == 0? 1:m_Pen; // Width must be at least 1
BoundingRect.InflateRect(Offset, Offset);
832

Working with Dialogs and Controls
return BoundingRect;
}
You use the local variable Offset to ensure that you pass the InflateRect() function a value of 1 if the pen width is zero (a pen width of 0 is always draw a line one pixel wide), and pass the actual pen width in all other cases.
Each of the constructors for CLine, CRectangle, CCircle and CCurve must be modified to accept a pen width as an argument, and to store it in the inherited m_Pen member of the class. The declaration for the constructor in each class definition needs to be modified to add the extra parameter. For example, in the CLine class, the constructor declaration becomes:
CLine(CPoint Start, CPoint End, COLORREF aColor, int PenWidth);
and the constructor implementation should be modified to:
CLine::CLine(CPoint Start, CPoint End, COLORREF aColor, int PenWidth) :m_EndPoint(CPoint(0,0))
{
m_StartPoint |
= Start; |
// Set line start point |
m_EndPoint = |
End; |
// Set line end point |
m_Color = aColor; |
// Set line color |
|
m_Pen = PenWidth; |
// Set pen width |
|
// Define the enclosing rectangle m_EnclosingRect = CRect(Start, End); m_EnclosingRect.NormalizeRect();
}
You should modify each of the class definitions and constructors for the shapes in the same way so that they each initialize m_Pen with the value passed as the last argument.
Creating Elements in the View
The last change you need to make is to the CreateElement() member of CSketcherView. Because you have added the pen width as an argument to the constructors for each of the shapes, you must update the calls to the constructors to reflect this. Change the definition of CSketcherView::CreateElement() to:
CElement* CSketcherView::CreateElement()
{
// Get a pointer to the document for this view
CSketcherDoc* pDoc = GetDocument(); |
|
ASSERT_VALID(pDoc); |
// Verify the pointer is good |
// Now select the element using the type stored in the document switch(pDoc->GetElementType())
{
case RECTANGLE:
return new CRectangle(m_FirstPoint, m_SecondPoint,
pDoc->GetElementColor(), pDoc->GetPenWidth());
833

Chapter 16
case CIRCLE:
return new CCircle(m_FirstPoint, m_SecondPoint,
pDoc->GetElementColor(), pDoc->GetPenWidth());
case CURVE:
return new CCurve(m_FirstPoint, m_SecondPoint,
|
pDoc->GetElementColor(), pDoc->GetPenWidth()); |
case LINE: |
// Always default to a line |
return new CLine(m_FirstPoint, m_SecondPoint, |
|
|
pDoc->GetElementColor(), pDoc->GetPenWidth()); |
default: |
// Something’s gone wrong |
AfxMessageBox(“Bad Element code”, MB_OK); AfxAbort();
}
}
Each constructor call now passes the pen width as an argument. This is retrieved from the document using the GetPenWidth() function that you added to the document class.
Exercising the Dialog
You can now build and run the latest version of Sketcher to see how the pen dialog works out. Selecting the Pen > Width menu option or the associated Toolbar button displays the dialog box so that you can select the pen width. The screen shown in Figure 16-12 is typical of what you might see when the Sketcher program is executing.
Figure 16-12
834

Working with Dialogs and Controls
Note that the dialog box is a completely separate window. You can drag it around to position it where you want. You can even drag it outside the Sketcher application window.
Using a Spin Button Control
Now you can move on to looking at how the spin button can help in the Sketcher application. The spin button is particularly useful when you want to constrain an input within a given integer range. It’s normally used in association with another control, called a buddy control, that displays the value that the spin button modifies. The associated control is usually an edit control, but it doesn’t have to be.
It would be nice to be able to draw at different scales in Sketcher. If you had a way to change the drawing scale, you could scale up whenever you wanted to fill in the fine detail in your masterpiece and scale down again when working across the whole vista. You could apply the spin control to managing scaling in a document view. A drawing scale would be a view-specific property, and you would want the element drawing functions to take account of the current scale for a view. Altering the existing code to deal with view scaling requires rather more work than setting up the control, so first look at how you create a spin button and make it work.
Adding the Scale Menu Item and Toolbar Button
Begin by providing a means of displaying the scale dialog. Go to Resource View and open the IDR_ SketcherTYPE menu. You are going to add a Scale menu item to the end of the View menu. Enter the caption for the unused menu item as Scale.... This item brings up the scale dialog, so you end the caption with an ellipsis (three periods) to indicate that it displays a dialog. Next you can add a separator preceding the new menu item by right-clicking it and selecting Insert Separator from the pop-up. You can then verify that the properties for the menu item are as shown in Figure 16-13.
You can also add a Toolbar button for this menu item. All you need to do is make sure that the ID for the button is also set to ID_VIEW_SCALE.
Creating the Spin Button
You’ve got the menu item; you’d better have a dialog to go with it. In Resource View, add a new dialog by right-clicking the Dialog folder on the tree and selecting Insert Dialog from the pop-up. Change the ID to IDD_SCALE_DLG and the caption in the title bar to Set Drawing Scale.
Click the spin control in the palette and then click on the position in the dialog where you want it to be placed. Next, right-click the spin control to display its properties. Change its ID to something more meaningful than the default, such as IDC_SPIN_SCALE. Now take at look at the properties for the spin button. They are shown in Figure 16-15.
The menu should now look as shown in Figure 16-14.
835

Chapter 16
Figure 16-13
836 |
Figure 16-14 |

Working with Dialogs and Controls
Figure 16-15
The Arrow Keys property is already set as True, enabling you to operate the spin button by using arrow keys on the keyboard. You should also set the value for the Set buddy integer property which specifies the buddy control value as an integer to True, and the Auto buddy which provides for automatic selection of the buddy control to True. The effect of this is that the control selected as the buddy is automatically the previous control defined in the dialog. At the moment, this is the Cancel button, which is not exactly ideal, but you’ll see how to change this in a moment. The Alignment property determines how the spin button is displayed in relation to its buddy. You should set this to Right Align so that the spin button is attached to the right edge of its buddy control.
Next, add an edit control at the side of the spin button by selecting the edit control from the list in the Toolbox pane and clicking in the dialog where you want it positioned. Change the ID for the edit control to IDC_SCALE.
To make the contents of the edit control quite clear, you could add a static control just to the left of the edit control in the palette and enter View Scale: as the caption. You can select all three controls by clicking on them while holding down the Shift key. Pressing the F9 function key aligns the controls tidily, or you can use the Format menu.
837

Chapter 16
The Controls’ Tab Sequence
Controls in a dialog have what is called a tab sequence. This is the sequence in which the focus shifts from one control to the next, determined initially by the sequence in which controls are added to the dialog. You can see the tab sequence for the current dialog box by selecting Format > Tab Order from the main menu, or by pressing Ctrl+D; the dialog is annotated as shown in Figure 16-16.
Figure 16-16
The tab order is indicated by the sequence of numbers in Figure 16-16. Because the Cancel button immediately precedes the spin button in sequence, the Auto Buddy property for the spin button selects it as the buddy control. You really want the edit control to precede the spin button in the tab sequence, so you need to select the controls by clicking on them in the sequence: OK button; Cancel button; edit control; spin button; and finally the static control. Now the edit control is selected as the buddy to the spin button.
Generating the Scale Dialog Class
After saving the resource file, you can right-click the dialog and select Add Class from the pop-up at the cursor. You’ll then be able to define the new class associated with the dialog resource that you have created. You should name the class CScaleDialog and select the base class as CDialog. Clicking the Finish button adds the class to the Sketcher project.
You need to add a variable to the dialog class that stores the value returned from the edit control, so click the CScaleDialog class name in the Class View and select Add > Add Variable from the pop-up. The new data member of the class is a special kind, called a control variable, so first check the Control variable box in the window for the Add Member Variable wizard. Select IDC_SCALE as the ID from the Control ID: drop-down list and Value from the Category: list box. Enter the variable name as m_Scale. You’ll be storing an integer scale value, so select int as the variable type. The Add Member Variable wizard displays edit boxes where you can enter maximum and minimum values for the variable m_Scale. For our application, a minimum of 1 and a maximum of 8 would be good values. Note that this constraint only applies to the edit box; the spin control is independent of it. Figure 16-17 shows how the window for the Add Member wizard should look when you are done.
838