
Creating the Document and Improving the View
CPoint |
m_FirstPoint; |
// First point recorded for an element |
CPoint m_SecondPoint; |
// Second point recorded for an element |
CElement* m_pTempElement; |
// Pointer to temporary element |
CElement* m_pSelected; |
// Currently selected element |
BOOL m_MoveMode; |
// Move element flag |
CPoint m_CursorPos; |
// Cursor position |
CPoint m_FirstPos; |
// Original position in a move |
// Rest of the class as before... |
}; |
|
|
These must also be initialized in the constructor for CSketcherView so modify it to:
CSketcherView::CSketcherView() : m_FirstPoint(CPoint(0,0))
, m_SecondPoint(CPoint(0,0)) , m_pTempElement(NULL)
, m_pSelected(NULL) , m_MoveMode(FALSE)
, m_CursorPos(CPoint(0,0)) , m_FirstPos(CPoint(0,0))
{
// TODO: add construction code here
}
The element move process starts when the Move menu item from the context menu is selected. Now you can add the code to the message handler for the Move menu item to set up the conditions necessary for the operation:
void CSketcherView::OnElementMove() |
|
{ |
|
CClientDC aDC(this); |
|
OnPrepareDC(&aDC); |
// Set up the device context |
GetCursorPos(&m_CursorPos); |
// Get cursor position in screen coords |
ScreenToClient(&m_CursorPos); |
// Convert to client coords |
aDC.DPtoLP(&m_CursorPos); |
// Convert to logical |
m_FirstPos = m_CursorPos; |
// Remember first position |
m_MoveMode = TRUE; |
// Start move mode |
} |
|
You are doing four things in this handler: |
|
1.Getting the coordinate of the current position of the cursor because the move operation starts from this reference point.
2.Converting the cursor position to logical coordinates because your elements are defined in logical coordinates.
3.Remembering the initial cursor position in case the user wants to abort the move later.
4.Setting the move mode on as a flag for the OnMouseMove() handler to recognize.

Chapter 15
The GetCursorPos() function is a Windows API function that stores the current cursor position in m_CursorPos. Note that you pass a pointer to this function. The cursor position is in screen coordinates (that is, coordinates relative to the upper-left corner of the screen). All operations with the cursor are in screen coordinates. You want the position in logical coordinates, so you must do the conversion in two steps. The ScreentoClient() function (which is an inherited member of the view class) converts from screen to client coordinates, and then you apply the DPtoLP() function member of the aDC object to the result to convert to logical coordinates.
After saving the initial cursor position in m_FirstPos, set m_MoveMode to TRUE so that the OnMouseMove() handler can deal with moving the element.
Now you have set the move mode flag, it’s time to update the mouse move message handler to deal with moving an element.
Modifying the WM_MOUSEMOVE Handler
Moving an element only occurs when move mode is on and the cursor is being moved. Therefore, all you need to do in OnMouseMove() is to add code to handle moving an element in a block that only gets executed when m_MoveMode is TRUE. The new code to do this is as follows:
void CSketcherView::OnMouseMove(UINT nFlags, CPoint point)
{
CClientDC aDC(this); |
// |
DC is for this view |
OnPrepareDC(&aDC); |
// |
Get origin adjusted |
// If we are in move mode, move the selected element and return if(m_MoveMode)
{
aDC.DPtoLP(&point); |
// Convert to logical coordinatess |
MoveElement(aDC, point); |
// Move the element |
return; |
|
}
// Rest of the mouse move handler as before...
}
This addition doesn’t need much explaining really, does it? The if statement verifies that you’re in move mode and then calls a function MoveElement(), which does what is necessary for the move. All you have to do now is implement this function.
Add the declaration for MoveElement() as a protected member of the CSketcherView class by adding the following at the appropriate point in the class definition:
void MoveElement(CClientDC& aDC, CPoint& point); // Move an element
As always, you can also right-click the class name in Class View to do this, if you want to. The function needs access to the object encapsulating a device context for the view, aDC, and the current cursor position, point, so both of these are reference parameters. The implementation of the function in the
SketcherView.cpp file is:

Creating the Document and Improving the View
void CSketcherView::MoveElement(CClientDC& aDC, CPoint& point)
{
CSize Distance = point - m_CursorPos; |
// |
Get |
move distance |
m_CursorPos = point; |
// |
Set |
current point as 1st for next time |
// If there is an element, selected, move it if(m_pSelected)
{
aDC.SetROP2(R2_NOTXORPEN);
m_pSelected->Draw(&aDC,m_pSelected); // Draw the element to erase it m_pSelected->Move(Distance); // Now move the element m_pSelected->Draw(&aDC,m_pSelected); // Draw the moved element
}
}
The distance to move the element currently selected is stored locally as a CSize object, Distance. The CSize class is specifically designed to represent a relative coordinate position and has two public data members, cx and cy, which correspond to the x and y increments. These are calculated as the difference between the current cursor position, stored in point, and the previous cursor position saved in m_CursorPos. This uses the(operator, which is overloaded in the CPoint class. The version you are using here returns a CSize object, but there is also a version which returns a CPoint object. You can usually operate on CSize and CPoint objects combined. You save the current cursor position in m_CursorPos for use the next time this function is called, which occurs if there is a further mouse move message during the current move operation.
You are going to implement moving an element in the view using the R2_NOTXORPEN drawing mode, because it’s easy and fast. This is exactly the same as what you have been using during the creation of an element. You redraw the selected element in its current color (the selected color) to reset it to the background color, and then call the function Move() to relocate the element by the distance specified by Distance. We’ll add this function to the element classes in a moment. When the element has moved itself, you simply use the Draw() function once more to display it highlighted at the new position. The color of the element will revert to normal when the move operation ends, as the OnLButtonUp() handler will redraw all the windows normally by calling UpdateAllViews().
Getting the Elements to Move Themselves
Add the Move() function as a virtual member of the base class, CElement. Modify the class definition to:
class CElement:public CObject |
|
{ |
|
protected: |
|
COLORREF m_Color; |
// Color of an element |
CRect m_EnclosingRect; |
// Rectangle enclosing an element |
int m_Pen; |
// Pen width |
public: |
|
virtual ~CElement(void); |
// Virtual destructor |
// Virtual draw operation
virtual void Draw(CDC* pDC, BOOL Select=FALSE){} virtual void Move(CSize& aSize){} // Move an element

Chapter 15
CRect GetBoundRect(); |
// Get the bounding rectangle for an element |
protected: |
|
CElement(void); |
// Here to prevent it being called |
}; |
|
As discussed earlier in relation to the Draw() member, although an implementation of the Move() function here has no meaning, you can’t make it a pure virtual function because of the requirements of serialization.
You can now add a declaration for the Move() function as a public member of each of the classes derived from CElement. It is the same in each:
// Function to move an element
virtual void Move(CSize& aSize);
Next you can implement the Move() function in the CLine class:
void CLine::Move(CSize& aSize) |
|
{ |
|
m_StartPoint += aSize; |
// Move the start point |
m_EndPoint += aSize; |
// and the end point |
m_EnclosingRect += aSize; |
// Move the enclosing rectangle |
} |
|
|
|
This is easy because of the overloaded += operators in the CPoint and CRect classes. They all work with CSize objects, so you just add the relative distance specified by aSize to the start and end points for the line and to the enclosing rectangle.
Moving a CRectangle object is even easier:
void CRectangle::Move(CSize& aSize)
{
m_EnclosingRect+= aSize; |
// Move the rectangle |
} |
|
Because the rectangle is defined by the m_EnclosingRect member, that’s all you need to move it.
The Move() member of the CCircle class is identical:
void CCircle::Move(CSize& aSize)
{
m_EnclosingRect+= aSize; |
// Move rectangle defining the circle |
} |
|
Moving a CCurve object is a little more complicated because it’s defined by an arbitrary number of points. You can implement the function as follows:
void CCurve::Move(CSize& aSize) |
|
{ |
|
m_EnclosingRect += aSize; |
// Move the rectangle |
// Get the 1st element position |
|
|
|

Creating the Document and Improving the View
POSITION aPosition = m_PointList.GetHeadPosition();
while(aPosition)
m_PointList.GetNext(aPosition) += aSize; // Move each pt in the list
}
There’s still not a lot to it. You first move the enclosing rectangle stored in m_EnclosingRect, using the overloaded += operator for CRect objects. You then iterate through all the points defining the curve, moving each one in turn with the overloaded += operator in CPoint.
Dropping the Element
All that remains now is to drop the element in position once the user has finished moving it, or to abort the whole move. To drop the element in its new position, the user clicks the left mouse button, so you can manage this operation in the OnLButtonDown() handler. To abort the operation, the user clicks the right mouse button — so you can add a handler for OnRButtonDown() to deal with this.
Take care of the left mouse button first. You’ll have to provide for this as a special action when move mode is on. The changes are highlighted in the following:
void CSketcherView::OnLButtonDown(UINT nFlags, CPoint point)
{
CClientDC aDC(this); |
// Create a device context |
OnPrepareDC(&aDC); |
// Get origin adjusted |
aDC.DPtoLP(&point); |
// convert point to Logical |
if(m_MoveMode)
{
// In moving mode, so drop the element
m_MoveMode = FALSE; |
// Kill move mode |
m_pSelected = 0; |
// De-select the element |
GetDocument()->UpdateAllViews(0); |
// Redraw all the views |
} |
|
else |
|
{ |
|
m_FirstPoint = point; |
// Record the cursor position |
SetCapture(); |
// Capture subsequent mouse messages |
} |
|
|
|
}
The code is pretty simple. You first make sure that you’re in move mode. If this is the case, you just set the move mode flag back to FALSE and then de-select the element. This is all that’s required because you’ve been tracking the element with the mouse, so it’s already in the right place. Finally, to tidy up all the views of the document, you call the document’s UpdateAllViews() function, causing all the views to be redrawn.
Add a handler for the WM_RBUTTONDOWN message to CSketcherView using the Properties window for the class. The implementation for this must do two things: move the element back to where it was and the turn off move mode. The code to do this is:

Chapter 15
void CSketcherView::OnRButtonDown(UINT nFlags, CPoint point)
{
if(m_MoveMode)
{
// In moving mode, so drop element back in original position
CClientDC aDC(this); |
|
OnPrepareDC(&aDC); |
// Get origin adjusted |
MoveElement(aDC, m_FirstPos); |
// Move element to orig position |
m_MoveMode = FALSE; |
// Kill move mode |
m_pSelected = 0; |
// De-select element |
GetDocument()->UpdateAllViews(0); |
// Redraw all the views |
return; |
// We are done |
}
}
You first create a CClientDC object for use in the MoveElement() function. You then call the MoveElement() function to move the currently selected element the distance from the current cursor position to the original cursor position that we saved in m_FirstPos. After the element has been repositioned, you just turn off move mode, deselect the element, and get all the views redrawn.
Exercising the Application
Everything is now complete for the context pop-ups to work. If you build Sketcher, you can select the element type and color from one context menu, or if you are over an element, you can then move or delete that element from the other context menu.
Dealing with Masked Elements
There’s still a limitation that you might want to get over. If the element you want to move or delete is enclosed by the rectangle of another element that is drawn after the element you want, you won’t be able to highlight it because Sketcher always finds the outer element first. The outer element completely masks the element it encloses. This is a result of the sequence of elements in the list. You could fix this by adding a Send to Back item to the context menu that would move an element to the beginning of the list.
Add a separator and a menu item to the element drop-down in the IDR_CURSOR_MENU resource as shown in Figure 15-15.
Figure 15-15

Creating the Document and Improving the View
You can add a handler for the item to the view class through the Properties window for the CSketcherView class. It’s best to handle it in the view because that’s where you record the selected element. Select the Messages toolbar button in the Properties window for the class and double-click the message ID ID_ELEMENT_SENDTOBACK. You’ll then be able to select COMMAND below and <Add> OnElementSendtoback in the right column. You can implement the handler as:
void CSketcherView:: OnElementSendtoback() |
|
{ |
|
GetDocument()->SendToBack(m_pSelected); |
// Move element in list |
} |
|
You’ll get the document to do the work by passing the currently selected element pointer to a public function SendToBack() that you implement in the CSketcherDoc class. Add it to the class definition with a void return type, and a parameter of type CElement*. You can implement this function as:
void CSketcherDoc::SendToBack(CElement* pElement)
{
if(pElement)
{
//If the element pointer is valid,
//find the pointer in the list and remove the element POSITION aPosition = m_ElementList.Find(pElement); m_ElementList.RemoveAt(aPosition);
m_ElementList.AddTail(pElement); // Put it back to the end of the list
}
}
After you have the POSITION value corresponding to the element, you remove the element from the list by calling RemoveAt(). Of course, this does not delete the element from memory; it just removes the pointer to it from the list. You then add the element pointer back at the end of the list using the
AddTail() function.
With the element moved to the end of the list, it cannot mask any of the others because you search from the beginning. You will always find one of the other elements first if the applicable bounding rectangle encloses the current cursor position. The Send to Back menu option is always able to resolve any element masking problem in the view.
Summar y
In this chapter, you’ve seen how to apply MFC collection classes to the problems of managing objects and managing pointers to objects. Collections are a real asset in programming for Windows because the application data that you store in a document often originates in an unstructured and unpredictable way, and you need to be able traverse the data whenever a view needs to be updated.
You have also seen how to create document data and manage it in a pointer list in the document, and in the context of the Sketcher application, how the views and the document communicate with each other.

Chapter 15
You have improved the view capability in Sketcher in several ways. You’ve added scrolling to the views using the MFC class CScrollView, and you’ve introduced a pop-up at the cursor for moving and deleting elements. You have also implemented an element highlighting feature to provide the user with feedback when moving or deleting elements.
You have covered quite a lot of ground in this chapter, and some of the important points you need to keep in mind are:
If you need a collection class to manage your objects or pointers, the best choice is one of the template-based collection classes because they provide type-safe operation in most cases.
When you draw in a device context, coordinates are in logical units that depend on the mapping mode set. Points in a window that are supplied along with Windows mouse messages are in client coordinates. The two coordinate systems are usually not the same.
Coordinates that define the position of the cursor are in screen coordinates that are measured in pixels relative to the upperleft corner of the screen.
Functions to convert between client coordinates and logical coordinates are available in the CDC class.
Windows requests that a view is redrawn by sending a WM_PAINT message to your application. This causes the OnDraw() member of the affected view to be called.
You should always do any permanent drawing of a document in the OnDraw() member of the view class. This ensures that the window is drawn properly when required by Windows.
You can make your OnDraw() implementation more efficient by calling the RectVisible() member of the CDC class to check whether an entity needs to be drawn.
To get multiple views updated when you change the document contents, you can call the UpdateAllViews() member of the document object. This causes the OnUpdate() member of each view to be called.
You can pass information to the UpdateAllViews() function to indicate which area in the view needs to be redrawn. This makes redrawing the views faster.
You can display a context menu at the cursor position in response to a right mouse click. This menu is created as a normal pop-up.
Exercises
You can download the source code for the examples in the book and the solutions to the following exercises from http://www.wrox.com.
1.Implement the CCurve class so that points are added to the head of the list instead of the tail.
2.Implement the CCurve class in the Sketcher program using a typed pointer list, instead of a list of objects to represent a curve.
3.Look up the CArray template collection class in Help, and use it to store points in the CCurve class in the Sketcher program.
16
Working with Dialogs and Controls
Dialogs and controls are basic tools for user communications in the Windows environment. In this chapter, you’ll learn how to implement dialogs and controls by applying them to extend the Sketcher program. As you do so, you’ll learn about:
Dialogs and how you can create dialog resources
Controls are and how to add them to a dialog
Basic varieties of controls available to you
How to create a dialog class to manage a dialog
How to program the creation of a dialog box and how to get information back from the controls in it
Modal and modeless dialogs
How to implement and use direct data exchange and validation with controls
How to implement view scaling
How you can add a status bar to an application
Understanding Dialogs
Of course, dialog boxes are not new to you. Most Windows programs of consequence use dialogs to manage some of their data input. You click a menu item and up pops a dialog box with various controls that you use for entering information. Just about everything that appears in a dialog box is a control. A dialog box is actually a window and, in fact, each of the controls in a dialog is also a specialized window. Come to think of it, most things you see on the screen under Windows are windows.
Chapter 16
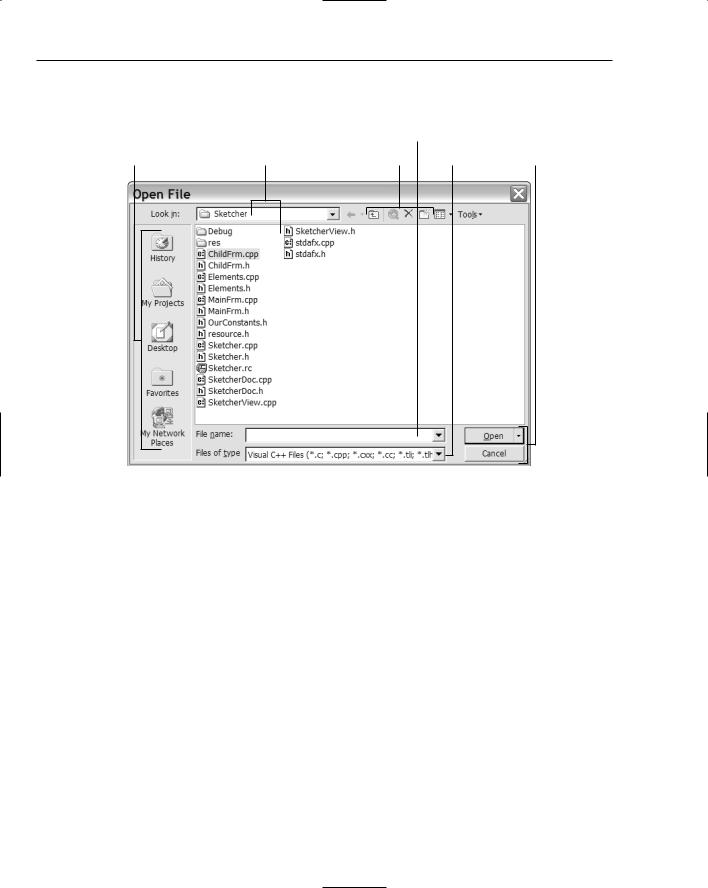
Although controls have a particular association with dialog boxes, you can also create and use them in other windows if you want to. A typical dialog box is illustrated in Figure 16-1.
Combo Box
Buttons |
List Boxes |
Toolbar buttons |
List Box |
Buttons |
Figure 16-1
This is the File > Open > File dialog in Visual C++ 2005. The annotations show the variety of controls used that combine to provide an intuitive interface for selecting a file to be opened. This makes the dialog easy to use, even though there’s a whole range of possibilities here.
There are two things needed to create and display a dialog box in an MFC program: the physical appearance of the dialog box, which is defined in a resource file, and a dialog class object used to manage the operation of the dialog and its controls. MFC provides a class called CDialog for you to use after you have defined your dialog resource.
Understanding Controls
There are many different controls available to you in Windows, and in most cases there’s flexibility in how they look and operate. Most of them fall into one of the following six categories:


