

Beginning Visual C++ 2005 (2006) [eng]-1
.pdfAccessing Data Sources in a Windows Forms Application
Suppose, for example, that in Ex22_02 you wanted to set the background color of cells in the Date column to red if the date is before the year 2000. Recall from the discussion of events in Chapter 9 that to register a handler for an event you add an instance of the delegate to the event. The delegate for the
CellFormatting event is of type DataGridViewCellFormattingEventHandler, and it expects two parameters: the first parameter is of type Object^ and identifies the source of the event and the second parameter is a handle to an object of type DataGridViewCellFormattingEventArgs.
The second argument passed to a handler for the CellFormatting event provides additional information about the event through the following properties:
Property |
Description |
|
|
Value |
The value is a handle to the contents of the cell that is being formatted. |
DesiredType |
The value is handle to an object of type Type that identifies the type of |
|
the contents off the cell being formatted. |
CellStyle |
Gets or sets the cell style of the cell that is associated with the format- |
|
ting event so the value is a handle to an object of type DataGrid |
|
ViewCellStyle. |
ColumnIndex |
The value is the column index for the cell that is being formatted. |
RowIndex |
The value is the row index for the cell that is being formatted. |
FormattingApplied |
The value, true or false, indicates whether formatting of the cell |
|
contents has been applied. |
|
|
These properties enable you to find out all you need to know about the cell being formatted — the row and column for the cell, the current style in effect, and the contents of the cell.
The first step in handling the CellFormatting event is to define a handler function for it. The handler code needs to be as short and efficient as possible because the function is called for every cell in the control whenever the cell needs to be formatted. You could add the following function to the Form1 class that is a handler function for the CellFormatting event:
private:
void OnCellFormatting(Object^ sender, DataGridViewCellFormattingEventArgs^ e)
{
// Check if it’s the date column if(dataGridView->Columns[e->ColumnIndex]->Name == L”Date”)
{
//If the cell content is not null and the year is less than 2000
//Set the background to red
if(e->Value != nullptr && safe_cast<DateTime^>(e->Value)->Year < 2000)
{
e->CellStyle->BackColor = Color::Red; |
|
e->FormattingApplied = false; |
// We did not format the data |
}
}
}
1109
Chapter 22
You first check whether the current column is the Date column because you are interested only in modifying cells in that column. For cells in the Date column you check if the cell contents actually exist, and if there is a DateTime object present, that the year is less than 2000. In this case you set the BackColor property for the object returned by the CellStyle property to Color::Red. You set the FormattingApplied property to false to indicate that you have not formatted the contents. This is not strictly necessary because the value starts out as false. You would set it to true if you were taking care of formatting the contents in the handler and this would prevent subsequent formatting using the value of the Format property.
To register this function as a handler for the CellFormatting event, add the following statement to the end of the Form1 class constructor:
dataGridView->CellFormatting +=
gcnew DataGridViewCellFormattingEventHandler(this, &Form1::OnCellFormatting);
The first argument to the delegate is the handle to the object containing the handler function and is the current Form1 object. The second argument is the address of the function that is the new handler for the event. If you recompile the example and execute it once again, you should see that all the cells in the Date column that contain a date prior to the year 2000 have the background color red.
The DataGridView control defines CellMouseEnter and CellMouseLeave events that fire when the mouse cursor enters or leaves a cell. You could implement handlers for these events to highlight the cell that the mouse cursor is over by changing its background color. You could set new background and foreground colors in the handler for the CellMouseEnter event and restore the original colors in the handler for the CellMouseLeave event. There are a few tricky aspects to this, so it’s worth looking into specifically.
Try It Out |
Highlighting the Cell under the Mouse Cursor |
This will be an extension to Ex22_02 including the latest addition of the CellFormatting event handler rather than a new example from scratch. You’ll need to store the old background and foreground colors somewhere, so add the following private data members to the Form1 class:
//Stores for old cell colors in mouse enter event handler
//for restoring later in mouse leave event handler private: Color oldCellBackColor;
private: Color oldCellForeColor;
You should initialize both of these to Color::Empty in the Form1 class constructor.
The first parameter to the delegate for either the CellMouseEnter or CellMouseLeave events is a handle to the object originating the event, which is the DataGridView control. The second parameter to both delegates is a handle to an object of type DataGridViewCellEventsArg that provides additional information about the event. This object has RowIndex and ColumnIndex properties, and the values of these properties enable you to locate the cell the mouse is entering or leaving; you can use the former to index the Rows property to select the row that contains the cell and the latter to index the Cells property to select the cell itself within the row. There’s one thing to note — the value of the RowIndex property is -1 when the mouse cursor is in the column header row and the ColumnIndex property value is -1 when the mouse cursor is over one of the row headers. You’ll need to check for these possibilities because attempting to use a negative index with the Rows property value causes an exception to be thrown, as does indexing the Cells property for a row with a negative value.
1110

Accessing Data Sources in a Windows Forms Application
You can now define a private handler function in the Form1 class for the CellMouseEnter event like this:
private:
void OnCellMouseEnter(Object^ sender, DataGridViewCellEventArgs^ e)
{
if(e->ColumnIndex >= 0 && e->RowIndex >= 0) |
// Verify indexes non-negative |
{ |
|
// Identify the cell we have entered DataGridViewCell^ cell =
dataGridView->Rows[e->RowIndex]->Cells[e->ColumnIndex];
//Save any old colors that are set oldCellBackColor = cell->Style->BackColor; oldCellForeColor = cell->Style->ForeColor;
//Set highlight colors
cell->Style->BackColor = Color::White; cell->Style->ForeColor = Color::Black;
}
}
After establishing that both index values are non-negative, you obtain the handle for the cell that the mouse cursor entered. You do this by first selecting the row by indexing the value of the Rows property for the control with the RowIndex property value for the parameter e; you then index the Cells property of the row using the ColumnIndex property of e to select the cell within the row.
After you have the cell handle, it’s easy to save the values of the BackColor and ForeColor properties from the Style property of the cell and set new colors to display the cell as black text on a white background. The Style property may not have been set, in which case accessing the property value creates a new DataGridViewCellStyle object as the value that has BackColor and ForeColor property values as Color::Empty. If the Style property for the cell has been set, you’ll get the object containing whatever properties have been set for it.
The handler function for the CellMouseEnter event has to restore the color back to what is was. You can implement this handler function like this:
private:
void OnCellMouseLeave(Object^ sender, DataGridViewCellEventArgs^ e)
{
if(e->ColumnIndex >=0 && e->RowIndex >=0)
{
// Identify the cell we are leaving DataGridViewCell^ cell =
dataGridView->Rows[e->RowIndex]->Cells[e->ColumnIndex];
// Restore the saved color values cell->Style->BackColor = oldCellBackColor; cell->Style->ForeColor = oldCellForeColor;
// Reset save stores to no color
oldCellForeColor = oldCellBackColor = Color::Empty;
}
}
1111
Chapter 22
Again you check that the index values are non-negative before doing anything. After identifying the cell as in the previous handler, you restore the saved colors in the Style property for the cell. The way in which the foreground and background colors for a cell are determined is by the priority list you saw earlier. If the Style property had not been set for the cell, the values you restore are Color::Empty and this is ignored when the colors for the cells are determined. Thus, the original color applies. If the Style property had been defined with ForeColor and BackColor properties set, these are the values you restore, and they determine the cell formatting colors.
To register the function handlers, add the following statements to the end of the Form1 class constructor:
dataGridView->CellMouseEnter +=
gcnew DataGridViewCellEventHandler(this, &Form1::OnCellMouseEnter);
dataGridView->CellMouseLeave +=
gcnew DataGridViewCellEventHandler(this, &Form1::OnCellMouseLeave);
The same delegate applies to all cell events, so you register both handlers using the
DataGridViewCellEventHandler delegate.
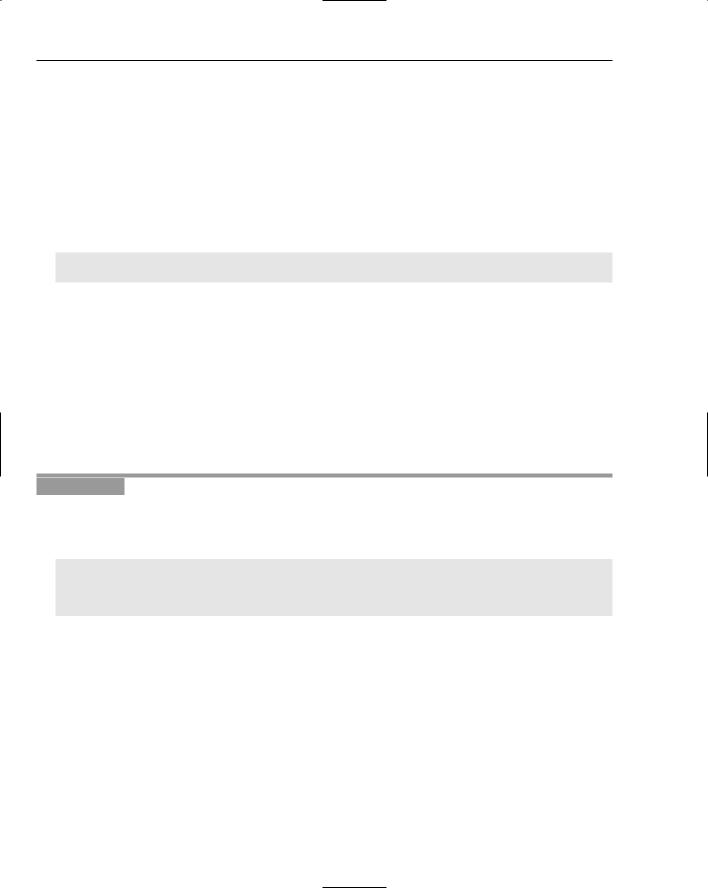
If you recompile the program a run it once again, you should see highlighting of cells in action, as illustrated in Figure 22-11.
Figure 22-11
Well, it certainly works — at least most of the time. However, the red cells in the Date column aren’t highlighted, so what’s going on?
The sequence of events is at the root of the problem. The CellFormatting event is triggered after the CellMouseEnter event, so the handler function that sets the background color to red has the last word and overrides the effect of the handler for the CellMouseEnter event. What you want to happen is that the CellFormatting event handler should recognize that the cell is highlighted and do nothing when this is the case. You could provide for this by adding another member to the Form1 class that stores the handle to the cell that is currently highlighted:
private: DataGridViewCell^ highlightedCell; |
// The currently highlighted cell |
You should also initialize this new member to nullptr in the Form1 class constructor.
1112

Accessing Data Sources in a Windows Forms Application
You now need to amend the handler for the CellMouseEnter event to store the handle for the highlighted cell in the new member:
void OnCellMouseEnter(Object^ sender, DataGridViewCellEventArgs^ e)
{
if(e->ColumnIndex >= 0 && e->RowIndex >= 0) |
// Verify indexes non-negative |
{ |
|
// Identify the cell we have entered
highlightedCell = dataGridView->Rows[e->RowIndex]->Cells[e->ColumnIndex];
// Save any old colors that are set
oldCellBackColor = highlightedCell->Style->BackColor; oldCellForeColor = highlightedCell->Style->ForeColor;
// Set highlight colors hightLightedCell->Style->BackColor = Color::White; highlightedCell->Style->ForeColor = Color::Black;
}
}
You can change the implementation of the handler for the CellMouseLeave event to the following:
void OnCellMouseLeave(Object^ sender, DataGridViewCellEventArgs^ e)
{
if(e->ColumnIndex >=0 && e->RowIndex >=0)
{
// Restore the saved color values highlightedCell->Style->BackColor = oldCellBackColor; highlightedCell->Style->ForeColor = oldCellForeColor;
// Reset save stores to no color
oldCellForeColor = oldCellBackColor = Color::Empty;
highlightedCell = nullptr; // Reset highlighted cell handle
}
}
You no longer need to determine the cell handle, as it’s available in the highlightedCell member of the Form1 class. You don’t even have to check it, because a CellMouseLeave event must always be preceded by a CellMouseEnter event. You reset the handle of the highlighted cell to null because it’s good practice to do so.
You can now amend the handler for the CellFormatting event:
void OnCellFormatting(Object^ sender, DataGridViewCellFormattingEventArgs^ e)
{
// Check whether the cell is highlighted if(dataGridView->Rows[e->RowIndex]->Cells[e->ColumnIndex] == highlightedCell)
return;
// Check if it’s the date column if(dataGridView->Columns[e->ColumnIndex]->Name == L”Date”)
{
1113

Chapter 22
//If the cell content is not null and the year is less than 2000
//Set the background to red
if(e->Value != nullptr && safe_cast<DateTime^>(e->Value)->Year < 2000)
{
e->CellStyle->BackColor = Color::Red; |
|
e->FormattingApplied = false; |
// We did not format the data |
}
}
}
If you rebuild the example, you should now see all the cells highlighted.
You should now have a good idea of how you can implement event handler for a DataGridView control. There are a multitude of other events, so you have huge scope for doing many more things dynamically to customize the control to your application needs.
Using Bound Mode
In bound mode, the source of the data that a DataGridView control displays is specified by the value of its DataSource property, which in general you can set to be any ref class object of a type that implements any of the following interfaces:
Interface |
Description |
|
|
System::Collections::Ilist |
A class that implements this interface represents |
|
a collection of objects that can be accessed |
|
through a single index. All C++/CLI one- |
|
dimensional arrays implement this interface, |
|
so a DataGridView object can use any one- |
|
dimensional array as the source of the data that |
|
is displayed. The IList interface inherits the |
|
members of the ICollection and IEnumerable |
|
interface classes that are defined in the |
|
System::Collections namespace. |
System::ComponentModel::IListSource |
A class that implements this interface makes the |
|
data available as a list that is an IList object. |
|
The list can contain objects that also implement |
|
the IList interface. |
System::ComponentModel::IBindingList |
This interface class extends the IList interface |
|
class to allow more complex data binding situa- |
|
tions to be accommodated. |
System::ComponentModel:: |
Adds sorting and filtering capabilities to the |
IBindingListView |
IBindingList interface. |
|
The BindingSource class that you’ll meet a lit- |
|
tle later in this chapter defines a control that |
|
implements this interface. |
|
|
1114

Accessing Data Sources in a Windows Forms Application
You can obviously design your own classes so that that implement one or other of these interfaces, and then you’ll be able to use them as a data source for a DataGridView control in bound mode. Most of the time, though, you’ll want to access an existing data source without having to go to the trouble of creating your own classes to access the data in which case the BindingSource component is likely to be your first choice.
The BindingSource Component
You use the BindingSource component as an intermediary between controls on a form and a table in a data source. You have the option of binding the component to a DataGridView control that displays the contents of the table, or to a set of individual controls where each displays a column from the table. You can also add data programmatically to a BindingSource component, in which case it acts as the data source and behaves essentially as a list.
You’ll first look at how you use a BindingSource component as the data source for a DataGridView control. There is a high degree of automation possible in creating a program that uses a BindingSource component, but to get an idea of how the component hooks up with the control, you’ll assemble the components on the form manually in the first instance. To make a BindingSource component the data source for a DataGridView control, you set the value of the DataSource property for the control to be the handle that references the BindingSource component.
Try It Out |
Using a BindingSource Component |
Here you’ll put together a simple program to view a database table. I’ll describe the process assuming you are using the Northwind database that you used back when you were working with the MFC, but you can use any database you have available on your system.
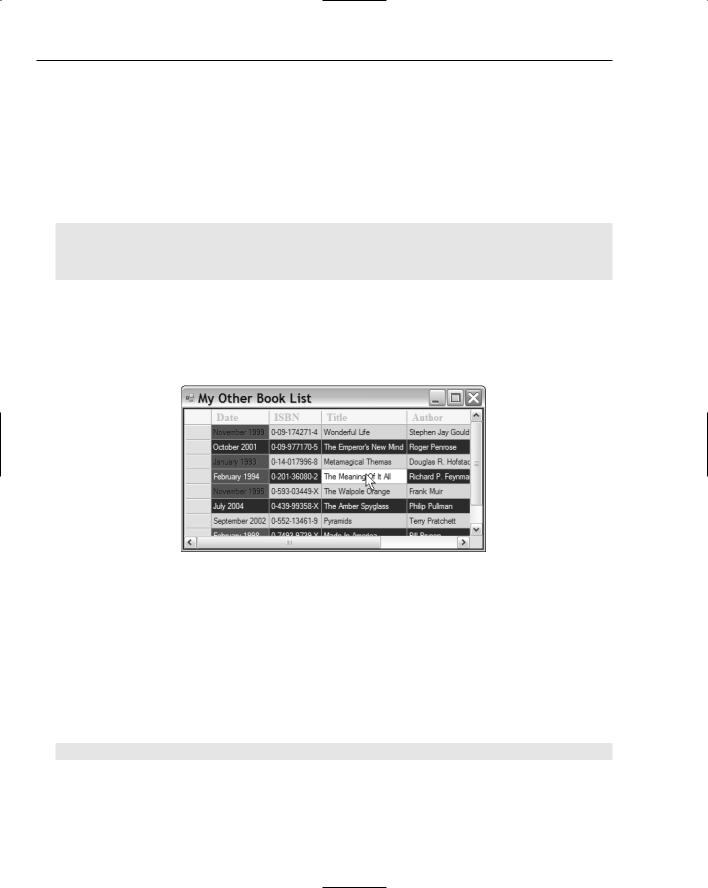
Create a new Windows Forms project with the name Ex22_03 and change the Text property for the form to something helpful such as “Using a Binding Source Component.” Add a DataGridView control to the client area of the form and change its Name property to dataGridView. You can also set the Dock property value for the control to FILL. At the moment, the DataGridView control is unbound, so you need to add a data source to the project that you can bind to the control, and this process will create the BindingSource component along the way. Click the small arrow at the top right of the control to display its menu, click the arrow for the list box adjacent to the Choose Data Source menu item, and click the Add Project Data Source link. This displays the dialog box shown in Figure 22-12.
The same dialog box is displayed if you select the Data→ Add New Data Source menu item from the main menu, but this only adds the data source to the project — it does not associate it with a control. As you see, you have a choice of two locations for the data source, but here you want to click the Database option. The second option allows you to specify an object that provides the data source defined either within the project or within some other assembly that you have created.
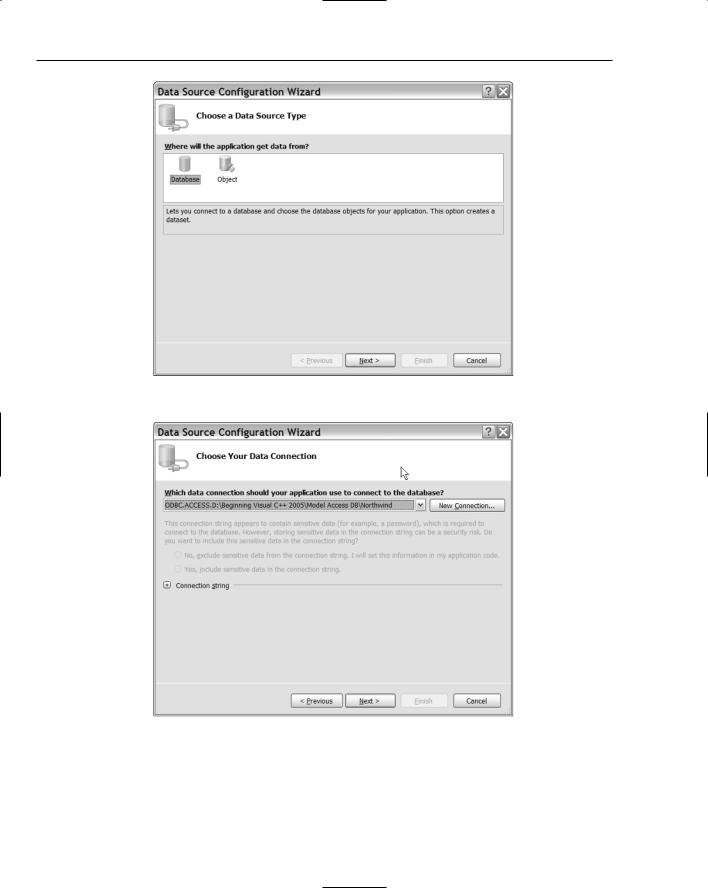
After selecting the Database option and clicking the Next button, you’ll see the dialog box shown in Figure 22-13.
1115
Chapter 22
Figure 22-12
Figure 22-13
The existing data connections that you have set up appear in the drop-down list, and you can choose one of those. You can also click the New Connection button to set up a new connection to a data source. This displays the Add Connection dialog box shown in Figure 22-14.
1116

Accessing Data Sources in a Windows Forms Application
Figure 22-14
Here you can enter the data source specification as a name, or you can enter a connection string for the data source by clicking the second radio button. After you have entered any necessary login information, you can test that the connection really does work by clicking the Test Connection button. On my system, the ODBC source is preselected, but if you don’t want the default that you see displayed, you can click the Change button to display the Change Data Source dialog box shown in Figure 22-15.
Figure 22-15
1117

Chapter 22
The dialog box displays the types of data sources that you have available, and you choose the type of data source that you want to work with and click the OK button. You’ll then return to the dialog box shown in Figure 22-14 where you can complete the identification and verification of the data source before clicking the OK button to return to the dialog shown in Figure 22-13. When you click the Next button, you are likely to see a message box asking if you want to add the data source to the project; clicking the Yes button then displays the dialog box shown in Figure 22-16 where you can choose the objects in the database that you want to work with.
Figure 22-16
Here you can choose which database objects you want added to the project. You do this by expanding the tree so you can select the individual tables you want to work with, or even individual fields within a table. For this example, you can keep it simple and choose just the Customers table. You can also change the name of the dataset — I changed it to Customers. When you click the Finish button, the wizard creates the code that you need to access the database.
The database is encapsulated in a class derived from the DataSet class. Each database table that you select results in a class derived from the DataTable class being defined as an inner class to the DataSet class. There is also a table adapter class for each DataTable in the DataSet class that has the job of establishing the connection to the database and loading the data from the database table into the corresponding DataTable member of the DataSet object. This results in a considerable amount of code being generated; with just the Customers table in the Northwind database selected you get nearly 2000 lines of code. It also adds a BindingSource component to the project that provides the interface between the Customers table in the Northwind database and the DataGridView control. The Design tab in the editing window should look like Figure 22-17.
1118