

Beginning Visual C++ 2005 (2006) [eng]-1
.pdfApplications Using Windows Forms
void SetList(ListBox^ listBox, int min, int max, int selected)
{
listBox->BeginUpdate(); |
// Suppress drawing the listbox |
for(int n = min ; n <= max ; n++) |
|
listBox->Items->Add(n); |
|
listBox->EndUpdate(); |
// Resume drawing the list box |
listBox->SelectedItem = Int32(selected);
}
The arguments to the SetList() function are the list box for which the list is to be added, the minimum and maximum integers in the range to be added, and the integer that is to be selected in the list box. The function adds integers from min to max inclusive to the list box using the Add() function for the collection object that is returned by the Items property for the ListBox object. It also sets the selected value as the item that is initially selected in the list when the list box is displayed by setting it as the value for the SelectedItem property for the list box.
When the user selects a limit in the dialog box, you’ll need somewhere to put the value so that it can be accessed from a function belonging to the Form1 object; the event handler for the menu items have responsibility for retrieving the limit value and storing it in the Form1 object. One way to do this is to add a couple of private members to the LottoLimitsDialog class to store the upper and lower limit values and then add public properties to the class to make the values available externally. Adding the following code to the LottoLimitsDialog class definition does that:
private: |
|
int lowerLimit; |
// Lower limit from control |
int upperLimit; |
// upper limit from control |
public: |
|
property int LowerLimit |
// Property accessing lower limit |
{ |
|
int get(){ return lowerLimit; |
} |
void set(int limit)
{
lowerLimit = limit; lottoLowerList->SelectedItem = Int32(limit);
}
} |
|
property int UpperLimit |
// Property accessing upper limit |
{ |
|
int get(){ return upperLimit; |
} |
void set(int limit)
{
upperLimit = limit; lottoUpperList->SelectedItem = Int32(limit);
}
}
1059

Chapter 21
You need to be able to update the properties because the Click event handler for the Limits > Reset menu item changes the limits, and you want the ListBox objects to have whatever is the current upper or lower limit selected. As well as storing the value in the class object, you also update the ListBox objects to reflect the new limits.
You can now create two public member functions in the LottoLimitsDialog class that sets up the two ListBox controls:
public:
void SetLowerLimitsList(int min, int max, int selected)
{
SetList(lottoLowerList, min, max, selected); lowerLimit = selected;
}
void SetUpperLimitsList(int min, int max, int selected)
{
SetList(lottoUpperList, min, max, selected); upperLimit = selected;
}
Each function uses the SetList() function to set the range of values in the corresponding ListBox object and then sets the selected value in the member for storing the limit.
Handling the Dialog Button Events
Add an event handler function for the Click event for the OK Button object, so return to the Design tab for the LottoLimitsDialog form and double-click the OK button to add the skeleton code.
You don’t need to add a handler for the Click event for the Cancel button. The effect of clicking the button is to close the dialog box and no further action is required.
You can implement the handler for the Click event for the OK button like this:
System::Void lottoOK_Click(System::Object^ sender, System::EventArgs^ e)
{
//If there’s a currently selected upper limit item, save it if(lottoUpperList->SelectedItem != nullptr)
upperLimit = safe_cast<Int32>(lottoUpperList->SelectedItem);
//If there’s a currently selected lower limit item, save it if(lottoLowerList->SelectedItem != nullptr)
lowerLimit = safe_cast<Int32>(lottoLowerList->SelectedItem);
}
The function first stores the upper limit value from the lottoUpperList ListBox object in the member variable you added for that purpose. The SelectedItem property for a ListBox object makes the currently selected item available as a handle of type Object^ and as a precaution the code verifies that the handle returned is not null. Before storing the selected item you must cast it to its actual type—type Int32. Auto-unboxing then takes care of converting the object to an integer. The handler next stores the lower limit value from the other ListBox object in the same way. When the handler finishes executing, the dialog box is closed automatically.
1060

Applications Using Windows Forms
Controlling the State of the ListBox Objects
The same dialog object is used in the response to the Click events for both the Limits > Upper and Limits > Lower menu items, but you don’t want to allow both list boxes to be changed in either case. For the Upper menu item event you’ll want the selection of a lower limit to be inhibited, and for the Lower menu item you’ll want the list box for the upper limit to be inhibited. You could add a couple of public function members to the LottoLimitsDialog class to make this possible. Here’s the function to set the state of the ListBox objects for the Upper menu item:
void SetUpperEnabled() |
|
{ |
|
lottoUpperList->Enabled = true; |
// Enable upper list box |
lottoLowerList->Enabled = false; |
// Disable lower list box |
} |
|
|
|
You set the Enabled property for the lottoUpperList object to true to allow the user to interact with it. Setting the Enabled property for lottoLowerList to false makes it read-only.
For the Lower menu item you do the reverse:
void SetLowerEnabled()
{
lottoUpperList->Enabled = false; // Disable upper list box lottoLowerList->Enabled = true; // Enable lower list box
}
You have done a lot of work to get the dialog object to behave as you want in the application, but you don’t yet have a dialog object. The application window object takes care of that.
Creating the Dialog Object
The Form1 class constructor can create the dialog object. It can also initialize the ListBox objects in the dialog. Add a private member to the Form1 class that stores the handle to the dialog box:
private: LottoLimitsDialog^ lottoLimitsDialog;
Add the following lines of code to the body of the Form1 constructor:
lottoLimitsDialog = gcnew LottoLimitsDialog; lottoLimitsDialog->SetLowerLimitsList(1, lottoUpperLimit-lottoValuesCount+1,
lottoUserMinimum); lottoLimitsDialog->SetUpperLimitsList(lottoValuesCount, lottoUpperLimit,
lottoUserMaximum);
This code is very straightforward. The first statement creates the dialog object. The next two statements call the functions that initialize the lists in the ListBox objects. The maximum value in the ListBox object that sets the lower limit is calculated so that it permits the required number of values for an entry to be created. If the maximum value for a value is 49 and the number of values in an entry is 6, the maximum for the lower limit must be 44 — if it was any higher you could not create six different values. The same reason applies to the minimum value for the upper limit; it cannot be less than the number of values in an entry. The selected item for the list boxes are the lottoUserMinimum and lottoUserMaximum values.
1061

Chapter 21
Because you refer to the LottoLimitsDialog class name in the Form1 class constructor, you’ll need to add an #include directive for the class definition to Form1.h:
#include “LottoLimitsDialog.h”
Using the Dialog Box
You’ll put the dialog box into operation in the code for the Click event handlers for the Upper and Lower menu items in the Limits menu. To display a dialog box as a modal dialog box, you call the ShowDialog() function for the dialog object. Optionally you can pass the handle to the parent form as the argument to the ShowDialog() function. You can implement the Click event handler functions like this:
System::Void lowerMenuItem_Click(System::Object^ sender, System::EventArgs^ e)
{
if(lottoTab->Visible)
{
lottoLimitsDialog->SetLowerEnabled();
::DialogResult result = lottoLimitsDialog->ShowDialog(this);
if(result == ::DialogResult::OK)
{
// Update user limits from dialog properties lottoUserMaximum = lottoLimitsDialog->UpperLimit; lottoUserMinimum = lottoLimitsDialog->LowerLimit;
}
}
}
System::Void upperMenuItem_Click(System::Object^ sender, System::EventArgs^ e)
{
if(lottoTab->Visible)
{
lottoLimitsDialog->SetUpperEnabled();
::DialogResult result = lottoLimitsDialog->ShowDialog(this);
if(result == ::DialogResult::OK)
{
// Update user limits from dialog properties lottoUserMaximum = lottoLimitsDialog->UpperLimit; lottoUserMinimum = lottoLimitsDialog->LowerLimit;
}
}
}
These two functions both work in the same way; they call the function to set the list box states and then display the dialog box as a modal dialog box by calling the ShowDialog() function for the dialog object. If you wanted to display the dialog box as a modeless dialog box, you call the Show() function for the dialog object instead.
When you call the ShowDialog() function, it does not return until the dialog box closes. This means that the code to update the limits is not executed until the new limits have been recorded in the dialog
1062

Applications Using Windows Forms
object by the Click event handler for the lottoOK button. When you display a dialog box as modeless by calling the Show() function, the function returns immediately. Thus if you need to be able to access data that might have been changed in the dialog box, you need another way to do it. Adding a handler function for the Closing event for the dialog form is one possibility; another would be to deal with transferring the data in the handler for the button that closes the dialog box.
The ShowDialog() function returns a value of the enumeration type DialogResult and you store this in the local variable, result. The return value from the ShowDialog() function indicates which button in the dialog was clicked, and if the value is the enumeration constant ::DialogResult::OK, it indicates that the OK button was clicked. Thus the code in each handler function updates only the lottoUserMaximum and LottoUserMinimum fields when the OK button was used to close the dialog.
Note the use of the :: operator in the type specification ::DialogReult and in the expression ::DialogResult::OK. The scope resolution operator is necessary preceding the DialogResult name to distinguish the name of the enumeration at global scope from the property with the same name that is a member of the Form1 class.
Of course, you could access the DialogResult property for the lottoLimitsDialog object directly, so you could write the if statement as:
if(lottoLimitsDialog->DialogResult == ::DialogResult::OK)
{
// Update user limits from dialog properties lottoUserMaximum = lottoLimitsDialog->UpperLimit; lottoUserMinimum = lottoLimitsDialog->LowerLimit;
}
The former version is better because it is obvious that you are checking the value returned by the
ShowDialog() function.
The complete set of constants that the DialogResult enumeration defines is as follows:
Yes |
No |
OK |
Cancel |
Retry |
Ignore |
None |
|
The DialogResult property value that is set for a dialog box determines whether or not the dialog box closes. If the value is set to None, the dialog box does not close. You can set the property to this value when you want to prevent the dialog box from closing for some reason — if the input is not valid, for instance.
At the moment, the Click event handler for the OK button does not validate the input values. It is currently quite possible to set the lower and upper limits to values that make it impossible to assign six unique values for the lottery entry. You can use the DialogResult property for the form to deal with the problem.
Validating the Input
The difference between the upper and lower limits that the user chooses must be greater than or equal to 5 if there are to be 6 unique values in a Lotto entry. You could modify the Click event handler for the OK button in the dialog class to check for this:
1063

Chapter 21
System::Void lottoOK_Click(System::Object^ sender, System::EventArgs^ e)
{
int upper = 0; int lower = 0;
//If there’s a currently selected upper limit item, save it if(lottoUpperList->SelectedItem != nullptr)
upper = safe_cast<Int32>(lottoUpperList->SelectedItem);
//If there’s a currently selected lower limit item, save it if(lottoLowerList->SelectedItem != nullptr)
lower = safe_cast<Int32>(lottoLowerList->SelectedItem);
if(upper - lower < 5)
{
MessageBox::Show(L”Upper limit: “ + upper + L” Lower limit: “ + lower + L”\nUpper limit must be at least 5 greater that the lower limit.” + L”\nTry Again.”,
L”Limits Invalid”, MessageBoxButtons::OK, MessageBoxIcon::Error);
DialogResult = ::DialogResult::None;
}
else
{
upperLimit = upper; lowerLimit = lower;
}
}
Now the function saves the values selected in the ListBox objects in the local variables lower and upper. If the values differ by less than 5, a message box is displayed and closing of the dialog box is inhibited by setting the value of the DialogResult property to None. The static Show() function in the MessageBox class displays a message box that is customized by the arguments to the function. This version of the Show() function used here accepts four arguments as follows:
Parameter Type |
Description |
|
|
String^ |
The text to be displayed in the message box. |
String^ |
The text to appear in the title bar of the message box. |
MessageBoxButtons |
An enumeration constant specifying the buttons to appear in the |
|
message box. The MessageBoxButtons enumeration defines the |
|
following values: |
|
OK, OKCancel, YesNo, YesNoCancel, RetryCancel, |
|
AbortRetryIgnore |
MessageBoxIcon |
An enumeration constant specifying the icon to appear in the message |
|
box. The MessageBoxIcon enumeration defines the following values: |
|
Asterisk, Exclamation, Error, Hand, Information, None, |
|
Question, Stop, Warning |
|
|
1064

Applications Using Windows Forms
There are a significant number of overloaded versions of the static Show() function that range from the very simple with a single parameter of type String^ to the rather more complicated with up to 10 parameters.
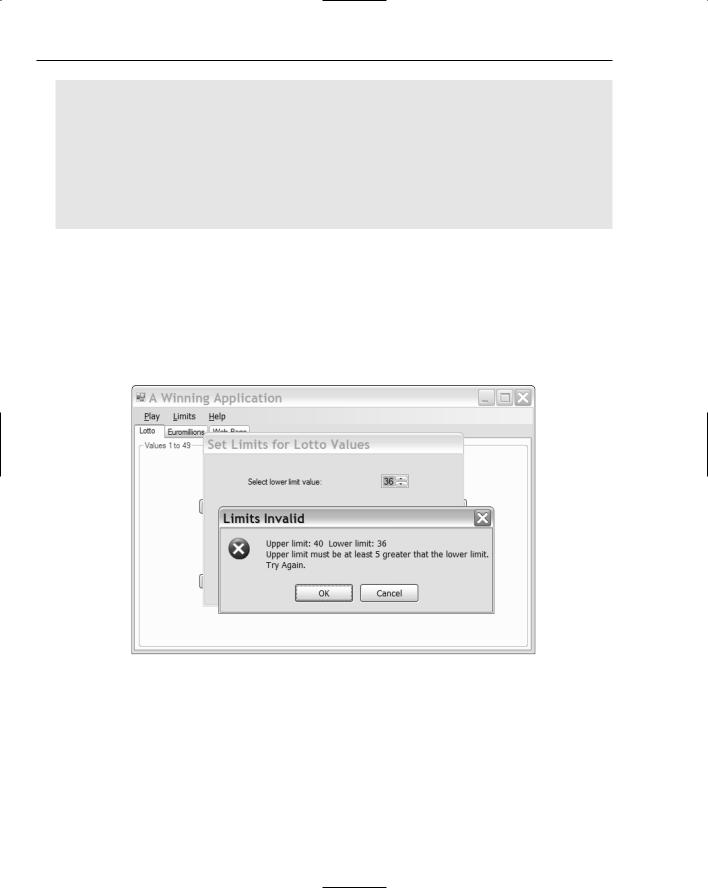
If you compile and execute the example and set the limits inappropriately, you’ll see a window similar to that shown in Figure 21-22.
Figure 21-22
The circular red icon with the white cross was specified by the fourth argument to the Show() function, and the single OK button is the result of the third argument.
The Show() function that you call to display a message box returns a value of type DialogResult that indicates which button was used to close the message box. You can use this return value to decide what to do after the message box closes. In the lottoOK_Click() handler for the OK button in the limits dialog box, you could decide whether or not to close the limits dialog box using the value returned by the Show() function for the message box:
System::Void lottoOK_Click(System::Object^ sender, System::EventArgs^ e)
{
int upper = 0; int lower = 0;
//If there’s a currently selected upper limit item, save it if(lottoUpperList->SelectedItem != nullptr)
upper = safe_cast<Int32>(lottoUpperList->SelectedItem);
//If there’s a currently selected lower limit item, save it if(lottoLowerList->SelectedItem != nullptr)
lower = safe_cast<Int32>(lottoLowerList->SelectedItem);
if(upper - lower < 5)
{
1065
Chapter 21
::DialogResult result =
MessageBox::Show(L”Upper limit: “ + upper + L” Lower limit: “ + lower + L”\nUpper limit must be at least 5 greater that the lower limit.” + L”\nTry Again.”,
L”Limits Invalid”, MessageBoxButtons::OKCancel, MessageBoxIcon::Error);
if(result == ::DialogResult::OK) DialogResult = ::DialogResult::None;
else
DialogResult = ::DialogResult::Cancel;
}
else
{
upperLimit = upper; lowerLimit = lower;
}
}
Because the third argument to the Show() function is MessageBoxButtons::OKCancel, the message box now has two buttons as shown in Figure 21-23.
Figure 21-23
In the Click event handler for the OK button in the limits dialog box you store the return value from the Show() function in result. The type for result has to be specified using the scope resolution operator. Otherwise, it is interpreted by the compiler as the DialogResult property for the lottoLimitsDialog object, and the code does not compile. If result contains the value ::DialogResult::OK, you set the
DialogResult property for the lottoLimitsDialog object to ::DialogResult::None, which prevents the dialog box from closing and allows the limit to be changed. Otherwise you set the DialogResult property for the dialog to ::Dialog::Cancel, which has the same effect as clicking the Cancel button for the dialog box so it closes.
1066

Applications Using Windows Forms
Handler the Reset Menu Item Event
You can implement the event handler for the Reset menu item like this:
System::Void resetMenuItem_Click(System::Object^ sender, System::EventArgs^ e)
{
if(lottoTab->Visible)
{
// Reset user limits for Lotto lottoUserMaximum = lottoUpperLimit; lottoUserMinimum = lottoLowerLimit;
lottoLimitsDialog->UpperLimit = lottoUpperLimit; lottoLimitsDialog->LowerLimit = lottoLowerLimit;
}
else if(euroTab->Visible)
{
//Reset user limits for Euromillions euroUserMaximum = euroUpperLimit; euroUserMinimum = euroLowerLimit; euroStarsUserMaximum = euroStarsUpperLimit; euroStarsUserMinimum = euroStarsLowerLimit;
//Code to update Euromillions limits dialog...
}
}
This just resets the limits in the fields in the Form1 object and then updates the properties in the dialog object accordingly. You still have to add code to this function to deal with resetting the dialog box to which you have yet added the application that will handle the input for the Euromillions lottery limits.
You can now recompile the program and try changing the limits for the Lotto entry. A typical application window is shown in Figure 21-24.
Figure 21-24
1067

Chapter 21
As you see, you automatically get a scrollbar for scrolling through the list of items in a list box. Note that scrolling to a given item does not select it. You must also click on the item to select it before clicking the OK button. Selecting the Limits > Reset menu item resets both limits to their original values.
Adding the Second Dialog
The second dialog box for setting limits for the Euromillions lottery is going to be easy; it’s the same process as for the first dialog box. Create a new form in the project by pressing Ctrl+Shift+A to display the Add New Item dialog box and select the UI category and the Windows Form template; the name should be EuroLimitsDialog. You can set property values for this dialog box in much the same way
as for the previous dialog.
Form Property |
Value to be Set |
|
|
FormBorderStyle |
FixedDialog |
ControlBox |
False |
MinimizeBox |
False |
MaximizeBox |
False |
Text |
Set Euromillions Limits |
|
|
You can add OK and Cancel buttons to the dialog form next. Set the Text property values for the buttons to “OK” and “Cancel” and the (Name) property values to euroOK and euroCancel, respectively. You should also set the DialogResult property values to OK and Cancel. With the buttons defined, you can return to the properties for the dialog form and set the AcceptButton and CancelButton property values to euroOK and euroCancel, respectively.
In the interests of getting experience of a wider range of controls, you’ll forego consistency in the application, and you won’t use ListBox controls to handle the input as you did in the first dialog box. In this dialog box you need to provide for the entry of upper and lower limits for the set of five values as well as the set of two stars. It won’t make for a very elegant implementation, but to maximize the variety of controls you work with you’ll use NumericUpDown controls for the former and ComboBox controls for the latter. You can add these controls together with associated Label controls to the dialog form with each group of controls placed within a GroupBox control, as illustrated in Figure 21-25. Obviously “you’ll need to add the GroupBox controls first and then place the other controls within them.
To identify the function of the controls within each group box, the value for the Text property for the upper group box has been set to “Set Values Limits” and that of the lower group box “Set Stars Limits”. You won’t be accessing the GroupBox objects in the code so the (Name) property values for these are of no importance. You can set the value of the Text property for each Label control as shown in Figure 21-25.
The values for the (Name) properties for the NumericUpDown controls in the upper group box should be set to lowerValuesLimits and upperValuesLimits. You can set the values that these controls display by setting values for the Maximum and Minimum properties. These values for the lowerValuesLimits control on the left should be 44 and 1 respectively, and the values for the Maximum and Minimum properties for the control to the right should be 49 and 6 respectively. You can set the value of the Value
1068