Beginning Visual C++ 2005 (2006) [eng]-1
.pdfConnecting to Data Sources
DECLARE_DYNCREATE(CCustomerView)
public:
enum { IDD = IDD_CUSTOMER_FORM }; CCustomerSet* m_pSet;
public:
CCustomerView(); CCustomerSet* GetRecordset();
virtual CRecordset* OnGetRecordset();
protected: |
|
virtual void DoDataExchange(CDataExchange* pDX); |
// DDX/DDV support |
virtual void OnInitialUpdate();
virtual void OnActivateView(BOOL bActivate, CView* pActivateView,
CView* pDeactiveView);
// Implementation protected:
virtual ~CCustomerView(){}
#ifdef _DEBUG
virtual void AssertValid() const;
virtual void Dump(CDumpContext& dc) const; #endif
};
The class has essentially the same members as the COrderView class.
You can add the following initial code to the CustomerView.cpp:
// CCustomerView implementation #include “stdafx.h”
#include “resource.h”
IMPLEMENT_DYNCREATE(CCustomerView, CRecordView)
CCustomerView::CCustomerView(): CRecordView(CCustomerView::IDD), m_pSet(NULL)
{
}
CCustomerSet* CCustomerView::GetRecordset()
{
ASSERT(m_pSet != NULL); return m_pSet;
}
CRecordset* CCustomerView::OnGetRecordset()
{
return m_pSet;
969

Chapter 19
}
// COrderView diagnostics
#ifdef _DEBUG
void CCustomerView::AssertValid() const
{
CRecordView::AssertValid();
}
void CCustomerView::Dump(CDumpContext& dc) const
{
CRecordView::Dump(dc);
}
#endif //_DEBUG
This is the same boilerplate code as in the COrderView class, and the functions are defined here as in the earlier class. The first #include directive is for the precompiled headers, and the second provides the definitions for the resource IDs.
You can process the button controls in the IDD_CUSTOMER_FORM dialog box in the same way as you did previously to add the OnOrders() and OnProducts() functions to the CCustomerView class; right-click each button and select the Add Event Handler from the pop-up. The code for these is similar to the corresponding functions in the other views. The code you need to add to OnOrders() in the
CustomerView.cpp file is:
void CCustomerView::OnOrders()
{
static_cast<CMainFrame*>(GetParentFrame())->SelectView(ORDER_VIEW);
}
You can add a similar line of code to the OnProducts() function:
void CCustomerView::OnProducts()
{
static_cast<CMainFrame*>(GetParentFrame())->SelectView(PRODUCT_VIEW);
}
You now need to add code to specify a filter for the customer recordset so that you get only the customer details displayed that correspond to the customer ID field from the current order in the COrderSet object.
Adding a Filter
You can define the filter in the OnInitialUpdate() member of CCustomerView. Because you anticipate only one record being returned corresponding to each customer ID, you don’t need to worry about sorting. The code for this function is as follows:
void CCustomerView::OnInitialUpdate()
{
BeginWaitCursor();
CDBSampleDoc* pDoc = static_cast<CDBSampleDoc*>(GetDocument());
970

|
Connecting to Data Sources |
|
|
m_pSet = &pDoc->m_CustomerSet; |
// Initialize the recordset pointer |
// Set the DB for the customer recordset m_pSet->m_pDatabase = pDoc->m_DBSampleSet.m_pDatabase;
// Set the current customer ID as the filter parameter value m_pSet->m_CustomerIDparam = pDoc->m_OrderSet.m_OrdersCustomerID; m_pSet->m_strFilter =”CustomerID = ?”; // Filter on CustomerID field
CRecordView::OnInitialUpdate();
if (m_pSet->IsOpen())
{
CString strTitle = m_pSet->m_pDatabase->GetDatabaseName(); CString strTable = m_pSet->GetTableName(); if(!strTable.IsEmpty())
strTitle += _T(“:”) + strTable; GetDocument()->SetTitle(strTitle);
}
EndWaitCursor();
}
After getting a pointer to the document, you store the address of the CCustomerSet object member of the document in the m_pSet member of the view. You know the database is already open, so you can set the database pointer in the customer recordset to that stored in the CProductSet object.
The parameter for the filter will be defined in the m_CustomerIDparam member of CCustomerSet. You’ll add this member to the class in a moment. It’s set to the current value of the m_CustomerID member of the COrderSet object owned by the document. You will define the filter in such a way that the customer recordset contains only the record with the same customer ID as that in the current order.
The OnActivateView() function handles activation of the customer view, and you can implement it in
CustomerView.cpp as follows:
void CCustomerView::OnActivateView(BOOL bActivate,
CView* pActivateView, CView* pDeactiveView)
{
if(bActivate)
{
if(!m_pSet->IsOpen()) return;
CDBSampleDoc* pDoc = static_cast<CDBSampleDoc*>(GetDocument());
// Set current customer ID as parameter
m_pSet->m_CustomerIDparam = pDoc->m_OrderSet.m_OrdersCustomerID; m_pSet->Requery(); // Get data from the DB CRecordView::OnInitialUpdate(); // Redraw the dialog
// Check for empty recordset if(m_pSet->IsEOF())
AfxMessageBox(L”No customer details for the current customer ID”);
CString strTitle = _T(“Table Name:”);
CString strTable = m_pSet->GetTableName();
971
Chapter 19
if(!strTable.IsEmpty()) strTitle += strTable;
else
strTitle += _T(“Multiple Tables”);
pDoc->SetTitle(strTitle);
}
CRecordView::OnActivateView(bActivate, pActivateView, pDeactiveView);
}
If this function is called because the view has been activated (rather than deactivated), bActivate has the value TRUE. In this case, you set the filter parameter from the order recordset and re-query the database.
The m_CustomerIDparam member for the CCustomerSet recordset object that is associated with this view object is set to the customer ID from the orders recordset object that is stored in the document. This will be the customer ID for the current order. The call to the Requery() function for the CCustomerSet object retrieves records from the database using the filter you have set up. The result are that the details for the customer for the current order are stored in the CCustomerSet object and then passed to the CCustomerView object for display in the dialog.
You will need to add the following #include statements to the beginning of the CustomerView.cpp file:
#include “ProductSet.h” #include “OrderSet.h” #include “CustomerSet.h”
#include “DBSampleDoc.h” #include “OurConstants.h” #include “MainFrm.h”
The first three are required because of classes used in the definition of the document class. You need
DBSampleDoc.h because of the CDBSampleDoc class reference in OnInitialUpdate(), and the remaining two .h files contain definitions that are referred to in the button handlers in the CCustomerView class.
Implementing the Filter Parameter
Add a public variable of type CString to the CCustomerSet class to correspond with the type of the m_CustomerID member of the recordset and give it the name m_CustomerIDparam. If you used the Add > Add Variable mechanism from Class View to do this, the new member will already be initialized in the constructor; otherwise, add the initialization as in the code that follows. You can set the parameter count in the CCustomerSet constructor as follows:
CCustomerSet::CCustomerSet(CDatabase* pdb) : CRecordset(pdb)
, m_CustomerIDparam(_T””))
{
m_CustomerID = _T(“”);
972
Connecting to Data Sources
m_CompanyName = _T(“”); m_ContactName = _T(“”); m_ContactTitle = _T(“”); m_Address = _T(“”); m_City = _T(“”); m_Region = _T(“”); m_PostalCode = _T(“”); m_Country = _T(“”); m_Phone = _T(“”);
m_Fax = _T(“”); m_nFields = 11;
m_nParams = 1; // Number of parameters m_nDefaultType = snapshot;
}
The m_CustomerIDparam member is initialized to an empty string and the parameter count in m_nParams is set to 1.
To set up the m_CustomerIDparam parameter, you add statements to the DoFieldExchange() member, as before:
void CCustomerSet::DoFieldExchange(CFieldExchange* pFX)
{
pFX->SetFieldType(CFieldExchange::outputColumn); RFX_Text(pFX, _T(“[CustomerID]”), m_CustomerID); RFX_Text(pFX, _T(“[CompanyName]”), m_CompanyName); RFX_Text(pFX, _T(“[ContactName]”), m_ContactName); RFX_Text(pFX, _T(“[ContactTitle]”), m_ContactTitle); RFX_Text(pFX, _T(“[Address]”), m_Address); RFX_Text(pFX, _T(“[City]”), m_City);
RFX_Text(pFX, _T(“[Region]”), m_Region); RFX_Text(pFX, _T(“[PostalCode]”), m_PostalCode); RFX_Text(pFX, _T(“[Country]”), m_Country); RFX_Text(pFX, _T(“[Phone]”), m_Phone); RFX_Text(pFX, _T(“[Fax]”), m_Fax);
pFX->SetFieldType(CFieldExchange::param); // Set parameter mode RFX_Text(pFX, _T(“CustomerIDParam”), m_CustomerIDparam);
}
I have omitted comment lines from the beginning of this function to save space. After setting the param mode by calling the SetFieldType() member of the pFX object, you call the RFX_Text() function to pass the parameter value for substitution in the filter. You use RFX_Text() because the parameter variable is of type CString. There are various RFX_() functions supporting a range of parameter types.
After you have completed this modification, you can save the CustomerSet.cpp file.
Linking the Order Dialog to the Customer Dialog
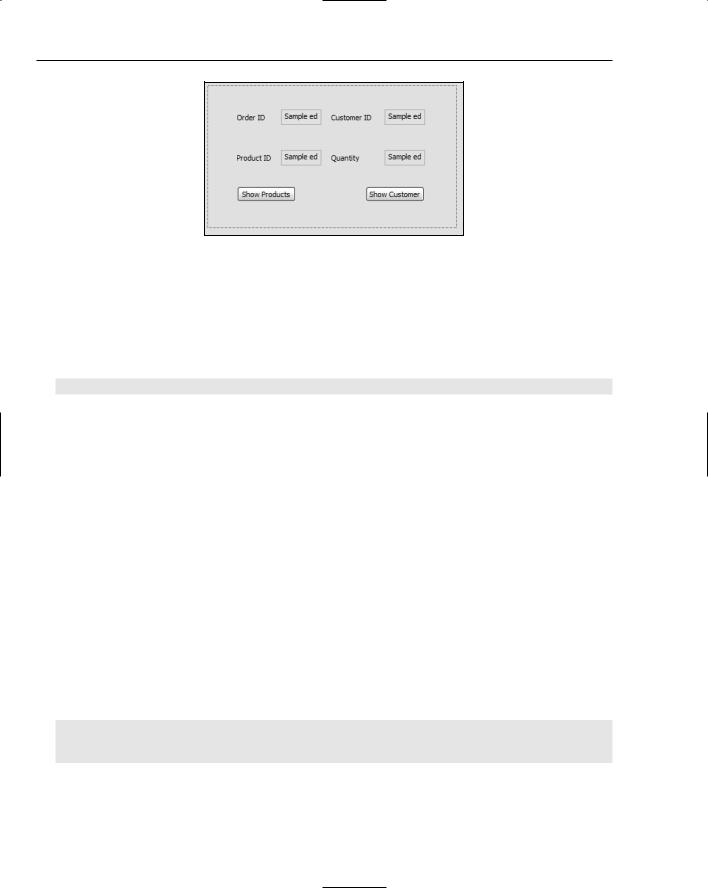
To permit a switch to the customer dialog, you require a button control on the IDD_ORDERS_FORM dialog, so open it in Resource View and add an extra button, as shown in Figure 19-30.
973
Chapter 19
Figure 19-30
I have rearranged the original controls a little — you can arrange them to please yourself. You can define the ID for the new button control as IDC_CUSTOMER. After you save the dialog, you can add a handler for the button by right-clicking it and select Add Event Handler from the pop-up. The handler requires only one line of code to be added to it, as follows:
void COrderView::OnCustomer()
{
static_cast<CMainFrame*>(GetParentFrame())->SelectView(CUSTOMER_VIEW);
}
This obtains the address of the frame window and uses it to call the SelectView() member of CMainFrame to switch to a customer view. The penultimate step to complete the program is to add the code to the SelectView() function that deals with the CUSTOMER_VIEW value being passed to it. This requires just three additional lines of code, as follows:
void CMainFrame::SelectView(UINT ViewID) |
|
{ |
|
CView* pOldActiveView = GetActiveView(); |
// Get current view |
//Get pointer to new view if it exists
//if it doesn’t the pointer will be null
CView* pNewActiveView = static_cast<CView*>(GetDlgItem(ViewID));
//If this is 1st time around for the new view,
//the new view won’t exist, so we must create it if (pNewActiveView == NULL)
{
switch(ViewID)
{
case ORDER_VIEW: // Create an Order view pNewActiveView = new COrderView;
break;
case CUSTOMER_VIEW: // Create a customer view pNewActiveView = new CCustomerView;
break;
default:
AfxMessageBox(“Invalid View ID”);
974
Connecting to Data Sources
return;
}
//Switching the views
//Obtain the current view context to apply to the new view CCreateContext context;
context.m_pCurrentDoc = pOldActiveView->GetDocument(); pNewActiveView->Create(NULL, NULL, 0L, CFrameWnd::rectDefault,
|
this, ViewID, &context); |
pNewActiveView->OnInitialUpdate(); |
|
} |
|
SetActiveView(pNewActiveView); |
// Activate the new view |
pOldActiveView->ShowWindow(SW_HIDE); |
// Hide the old view |
pNewActiveView->ShowWindow(SW_SHOW); |
// Show the new view |
pOldActiveView->SetDlgCtrlID(m_CurrentViewID); // Set the old view ID pNewActiveView->SetDlgCtrlID(AFX_IDW_PANE_FIRST);
m_CurrentViewID = ViewID; |
// Save the new view ID |
RecalcLayout(); |
|
}
The only change necessary is the addition of a case statement in the switch to create a CCustomerView object when one doesn’t exist. Each view object will be re-used next time around, so they get created only once. The code to switch between views works with any number of views, so if you want this function to handle more views, you just need to add another case in the switch for each new view that you want. Although you are creating view objects dynamically here, you don’t need to worry about deleting them. Because they are associated with a document object, they are deleted by the framework when the application closes.
Because you reference the CCustomerView class in the SelectView() function, you must add an #include statement for the CustomerView.h file to the block at the beginning of MainFrm.cpp.
To complete the application you can add the implementation of the DoDataExachange() function for the CCustomerView class to CustomerView.cpp:
void CCustomerView::DoDataExchange(CDataExchange* pDX)
{
CRecordView::DoDataExchange(pDX);
DDX_FieldText(pDX, IDC_ADDRESS,
m_pSet->m_Address, m_pSet); DDX_FieldText(pDX, IDC_CITY,
m_pSet->m_City, m_pSet);
DDX_FieldText(pDX, IDC_COMPANYNAME, m_pSet->m_CompanyName, m_pSet);
DDX_FieldText(pDX, IDC_PHONE,
m_pSet->m_Phone, m_pSet); DDX_FieldText(pDX, IDC_CUSTOMERID,
m_pSet->m_CustomerID, m_pSet);
}
This uses the DDX_ functions as before to transfer data from the edit controls to the members of the CCustomerView class. You must add an #include directive for the CustomerSet.h header file for this to compile correctly.
975
Chapter 19
Exercising the Database Viewer
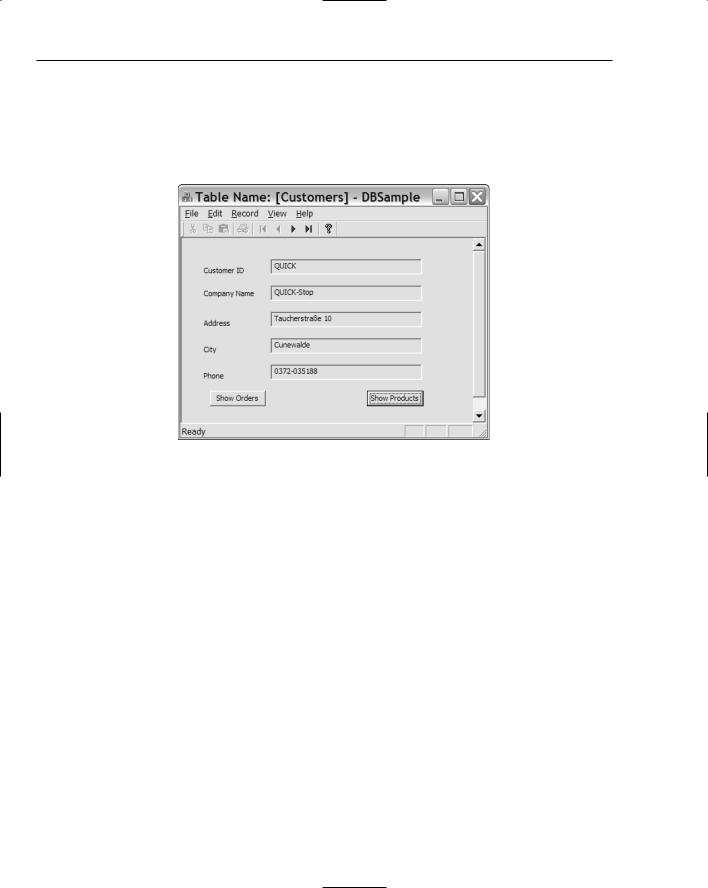
At this point, the program is complete. You can build the application and execute it. As before, the main view of the database is the products view. As before, clicking Orders takes you to the Orders view. The second button on this form should now be active, and clicking it takes you to the details of the customer for the current order, as Figure 19-31 illustrates.
Figure 19-31
The two buttons take you back to the Orders view or the Products view, respectively.
Summar y
You should now be comfortable with the basics of how MFC links to your database using ODBC.
The key points you have seen in this chapter are:
MFC provides OLE DB and ODBC support for accessing databases.
To use a database with ODBC the database must be registered.
A connection to a database is represented by a CDatabase or a CDaoDatabase object.
A recordset object represents an SQL SELECT statement applied to a defined set of tables. Where necessary, the framework will automatically create a database object representing a connection to a database when a recordset object is created.
A WHERE clause can be added for a recordset object through its m_strFilter data member.
An ORDER BY clause can be defined for a recordset through its m_strSort data member.
A record view object is used to display the contents of a recordset object.
976
Connecting to Data Sources
Exercises
You can download the source code for the examples in the book and the solutions to the following exercises from http://www.wrox.com.
1.Using the Products table again, add a “stock control” dialog box to the application. This should be reachable through a button on the products dialog box and must itself contain a button to go back to the products dialog. The fields it should display are the product ID, product name, reorder level, unit price, and units in stock. Don’t worry about filtering or sorting at the moment; just get the basic mechanism working.
2.Refine the preceding project so that the stock control dialog automatically displays information about the product that was being shown in the products dialog box when the button was clicked.
3.Implement a system whereby the user of the database is warned in the stock control dialog about the present stock being near or below the reorder level. You’ll have noticed by now that some of the stock reorder levels are set to zero; don’t display a warning in those cases.
977