

Beginning Visual C++ 2005 (2006) [eng]-1
.pdfConnecting to Data Sources
You can also leave it as a public member. You need to initialize this data member in the constructor and also set the parameter count. The application framework requires the count of the number of parameters in your recordset to be set to reflect the number of parameters you are using; otherwise, it won’t work correctly. Add the shaded code shown below to the COrderSet constructor definition:
COrderSet::COrderSet(CDatabase* pdb) : CRecordset(pdb)
{
m_OrderDetailsOrderID = 0; |
|
m_OrderDetailsProductID = 0; |
|
m_OrderDetailsQuantity = 0; |
|
m_OrdersOrderID = 0; |
|
m_OrdersCustomerID = L””; |
|
m_nFields = 5; |
|
m_ProductIDparam = 0L; |
// Set initial parameter value |
m_nParams = 1; |
// Set number of parameters |
m_nDefaultType = snapshot; |
|
} |
|
All of the unshaded code was supplied by Class wizard to initialize the data members corresponding to the fields in the recordset and to specify the type as snapshot. You should delete the initialization for the other fields in the recordset. The new code initializes the parameter to zero and sets the count of the number of parameters to 1. The m_nParams variable is inherited from the base class, CRecordSet. Because there is a parameter count, you can deduce that you can have more than one parameter in the filter for a recordset.
At this point you can also remove or comment out the members from the COrderSet class that store fields from the recordset that you won’t need. Remove or comment out the fields that are not required from the class definition, just leaving the following:
long m_OrderDetailsOrderID; |
// Same as Order ID in Orders table. |
long m_OrderDetailsProductID; |
// Same as Product ID in Products table. |
int m_OrderDetailsQuantity; |
|
long m_OrdersOrderID; |
// Unique order number. |
CString m_OrdersCustomerID; |
// Same entry as in Customers table. |
long m_ProductIDparam; |
|
|
|
To identify the m_ProductIDparam variable in the class as a parameter to be substituted in the filter for the COrderSet object, you must also add some code to the DoFieldExchange() member of the class:
void COrderSet::DoFieldExchange(CFieldExchange* pFX)
{
pFX->SetFieldType(CFieldExchange::outputColumn);
RFX_Long(pFX, _T(“[Order Details].[OrderID]”), m_OrderDetailsOrderID); RFX_Long(pFX, _T(“[Order Details].[ProductID]”),
m_OrderDetailsProductID); RFX_Int(pFX, _T(“[Order Details].[Quantity]”), m_OrderDetailsQuantity); RFX_Long(pFX, _T(“[Orders].[OrderID]”), m_OrdersOrderID); RFX_Text(pFX, _T(“[Orders].[CustomerID]”), m_OrdersCustomerID);
// Set the field type as parameter pFX->SetFieldType(CFieldExchange::param); RFX_Long(pFX,_T(“ProductIDParam”), m_ProductIDparam);
}
959

Chapter 19
The Class wizard provided code to transfer data between the database and the field variables it has added to the class. There will be one RFX_() function call for each data member of the recordset. You can delete those that are not required in this application, leaving just those shown in the preceding code.
The first new line of code calls the SetFieldType() member of the pFX object to set the mode for the following RFX_() call to param. The effect of this is to cause the third argument in any succeeding RFX_() calls to be interpreted as a parameter that is to replace a ? in the filter for the recordset. If you have more than one parameter, the parameters substitute for the question marks in the m_strFilter string in sequence from left to right, so it’s important to ensure that the RFX_() calls are in the right order when there are several. With the mode set to param, the second argument in the RFX_() call is ignored, so you could put NULL here or some other string if you want.
Initializing the Record View
You can now implement the override for the OnInitialUpdate() function in the COrderView class. This function is called by the MFC framework before the view is initially displayed, so you can put code in this function to do any one-time initialization that you need. In this case you will specify the filter for the recordset. Here’s the definition of the function to do this:
void COrderView::OnInitialUpdate()
{
BeginWaitCursor();
CDBSampleDoc* pDoc = static_cast<CDBSampleDoc*>(GetDocument());
m_pSet = &pDoc->m_OrderSet; // Get a pointer to the recordset
// Use the DB that is open for products recordset m_pSet->m_pDatabase = pDoc->m_DBSampleSet.m_pDatabase;
// Set the current product ID as parameter m_pSet->m_ProductIDparam = pDoc->m_DBSampleSet.m_ProductID;
// Set the filter as product ID field m_pSet->m_strFilter =
“[ProductID] = ? AND [Orders].[OrderID] = [Order Details].[OrderID]”;
CRecordView::OnInitialUpdate();
EndWaitCursor();
}
Add this function definition to OrderView.cpp. The version of the COrderSet class that was implemented by the Class wizard doesn’t override the GetDocument() member because it isn’t associated with the document class initially. As a result, you must cast the pointer from the base class GetDocument() member to a pointer to a CDBSampleDoc object. Alternatively, you could add an override version of GetDocument() to COrderSet to do the cast. Clearly, you need a pointer to the document object because you need to access the members of the object.
The BeginWaitCursor() call at the start of the OnInitialUpdate() function displays the hourglass cursor while this function is executing. The reason for this is that this function can take an appreciable time to execute, especially when multiple tables are involved. The processing of the query and the transfer of data to the recordset all takes place in here. The cursor is returned to normal by the EndWaitCursor() call at the end of the function.
960

Connecting to Data Sources
The first thing that the code does is to set the m_pDatabase member of the COrderSet object to the same as that for the CProductSet object. If you don’t do this, the framework re-opens the database when the orders recordset is opened. Because the database has already been opened for the products recordset, this wastes a lot of time.
Next, you set the value for the m_ProductIDparam parameter variable to the current value stored in the m_ProductID member of the products recordset. This value replaces the question mark in the filter when the orders recordset is opened, so select the records you want; then set the filter for the orders recordset to the string you saw earlier.
Accessing Multiple Table Views
Because you have implemented the program with the single document interface, the application has one document and one view. The availability of just one view might appear to be a problem, but it isn’t in practice. You can arrange for the frame window object in the application to create an instance of the COrderView class and switch the current window to that when the orders recordset is to be displayed.
You’ll need to keep track of what the current window is, which you can do by assigning a unique ID to each of the record view windows in the application. At the moment there are two views: the products view and the orders view. To define IDs for these, create a new file called OurConstants.h and add the following code to it:
//Definitions for our constants
#pragma once
//Arbitrary constants to identify record views const unsigned int PRODUCT_VIEW = 1;
const unsigned int ORDER_VIEW = 2;
You can now use one of these constants to identify each view and to record the ID of the current view in the frame window object. To record the current view ID, add a public data member to the CMainFrame class of type unsigned int and give it the name m_CurrentViewID. After you have done that, you can initialize it in the constructor for CMainFrame by adding code as follows:
CMainFrame::CMainFrame()
: m_CurrentViewID(PRODUCT_VIEW)
{
}
The application starts with the Product View initially, so you initialize m_CurrentViewID to be consistent with that. Now add an #include directive for OurConstants.h to the beginning of MainFrm.cpp so that the definition of PRODUCT_VIEW is accessible in the source file.
Switching Views
To enable the view switching mechanism, you add a public function member to the CMainFrame class with the name SelectView() with a parameter specifying a view ID. This function switches from the current view to whatever view is specified by the ID passed as an argument.
961

Chapter 19
Right-click CMainFrame and select Add > Add Function from the pop-up to add a new public member to the class. You can enter the return type as void and the function name as SelectView. The parameter name can be ViewID, and the type is unsigned int. You can implement the function as follows:
void CMainFrame::SelectView(unsigned int ViewID)
{
CView* pOldActiveView = GetActiveView(); |
// Get current view |
//Get pointer to new view if it exists
//if it doesn’t the pointer will be null
CView* pNewActiveView = static_cast<CView*>(GetDlgItem(ViewID));
//If this is 1st time around for the new view,
//the new view won’t exist, so we must create it if (pNewActiveView == NULL)
{
switch(ViewID)
{
case ORDER_VIEW: // Create an Order view pNewActiveView = new COrderView;
break;
default:
AfxMessageBox(L”Invalid View ID”); return;
}
//Switching the views
//Obtain the current view context to apply to the new view CCreateContext context;
context.m_pCurrentDoc = pOldActiveView->GetDocument(); pNewActiveView->Create(NULL, NULL, 0L, CFrameWnd::rectDefault,
|
this, ViewID, &context); |
pNewActiveView->OnInitialUpdate(); |
|
} |
|
SetActiveView(pNewActiveView); |
// Activate the new view |
pOldActiveView->ShowWindow(SW_HIDE); |
// Hide the old view |
pNewActiveView->ShowWindow(SW_SHOW); |
// Show the new view |
pOldActiveView->SetDlgCtrlID(m_CurrentViewID); // Set the old view ID pNewActiveView->SetDlgCtrlID(AFX_IDW_PANE_FIRST);
m_CurrentViewID = ViewID; |
// Save the new view ID |
RecalcLayout(); |
|
} |
|
The operation of the function falls into three distinct parts: |
|
1.
2.
3.
Getting pointers to the current view and the new view
Creating the new view if it doesn’t exist
Swapping to the new view in place of the current view
The address of the current active view is supplied by the GetActiveView() member of the CMainFrame object. To get a pointer to the new view, you call the GetDlgItem() member of the frame window
962

Connecting to Data Sources
object. If a view with the ID specified in the argument to the function exists, it returns the address of the view; otherwise, it returns NULL, and you need to create the new view.
After creating a view object, you define a CCreateContext object, context. A CCreateContext object is necessary only when you are creating a window for a view that is to be connected to a document. A CCreateContext object contains data members that can tie together a document, a frame window, and a view, and for MDI applications, a document template as well. When you switch between views, you will create a new window for the new view to be displayed. Each time you create a new view window, you use the CCreateContext object to establish a connection between the view and your document object. You need to store a pointer to the document object only in the m_pCurrentDoc member on context. In general, you may need to store additional data in the CCreateContext object before you create the view; it depends on the circumstances and what kind of window you are creating.
In the call to the Create() member of the view object that creates the window for the new view, you pass the context object as an argument. This establishes a proper relationship with your document and validates the document pointer. The argument this in the call to Create() specifies the current frame as the parent window, and the ViewID argument specifies the ID of the window. This ID enables the address of the window to be obtained with a subsequent call to the GetDlgItem() member of the parent window.
To make the new view the active view, you call the SetActiveView() member of CMainFrame. The new view then replaces the current active view. To remove the old view window, you call the ShowWindow() member of the view with the argument SW_HIDE using the pointer to the old view. To display the new view window, you call the same function with the argument SW_SHOW using the pointer to the new view.
SetActiveView(pNewActiveView); |
// Activate |
the new view |
|
pOldActiveView->ShowWindow(SW_HIDE); |
// |
Hide the |
old view |
pNewActiveView->ShowWindow(SW_SHOW); |
// |
Show the |
new view |
pOldActiveView->SetDlgCtrlID(m_CurrentViewID); // Set the old view ID pNewActiveView->SetDlgCtrlID(AFX_IDW_PANE_FIRST);
m_CurrentViewID = ViewID; // Save the new view ID
You restore the ID of the old active view to the ID value that you have defined for it in the m_CurrentViewID member of the CMainFrame class that you added earlier. You also set the ID of the new view to AFX_IDW_PANE_FIRST to identify it as the first window for the application. This is necessary because the application has only one view, so the first view is the only view. Lastly, you save the ID for the new window in the m_CurrentViewID member, so it’s available the next time the current view is replaced. The call to RecalculateLayout() causes the view to be redrawn when the new view is selected.
You must add a #include directive for the OrderView.h file to beginning of the MainFrm.cpp file so that the COrderView class definition is available here. After you save MainFrm.cpp, you can move on to adding a button control to the Products dialog to link to the Orders dialog. You’ll then be able to add handlers for this button and its partner on the Orders dialog to call the SelectView() member of
CMainFrame.
Enabling the Switching Operation
To implement the view switching mechanism, go back to Resource View and open the IDD_DBSAMPLE_ FORM dialog. You need to add a button control to the dialog box, as shown in Figure 19-27.
963
Chapter 19
Figure 19-27
You can set the ID for the button to IDC_ORDERS, consistent with the naming for the other controls in the dialog box.
After saving the resource, you can create a handler for the button by right-clicking it and selecting Add Event Handler from the pop-up. Use the Event Handler Wizard dialog box to add the function
OnOrders() to the CProductView class for the BN_CLICKED message type; this handler is called when the button is clicked. You need to add only one line of code to complete the handler:
void CProductView::OnOrders()
{
static_cast<CMainFrame*>(GetParentFrame())->SelectView(ORDER_VIEW);
}
The GetParentFrame() member of the view object is inherited from CWnd, which is an indirect base class of CMainFrame. This function returns a pointer to the parent frame window, and you use it to call the SelectView() function that you have just added to the CMainFrame class. The ORDER_VIEW argument value causes the frame window to switch to the Orders dialog window. If this is the first time this has occurred, it will create the view object and the window. On the second and subsequent occasions that a switch to the orders view is selected, the existing orders view are re-used.
You must add the following #include directives to the beginning of the ProductView.cpp file:
#include “OurConstants.h”
#include “MainFrm.h”
The next task is to add the handler for the button that you previously placed on the IDD_ORDERS_FORM dialog. From the Editor window showing this dialog box, use the same process to add the OnProducts() handler to the COrderView class and add a single line of code to its implementation:
void COrderView::OnProducts()
{
static_cast<CMainFrame*>(GetParentFrame())->SelectView(PRODUCT_VIEW);
}
This works in the same way as the previous button control handler. Again, you must add #include directives for the OurConstants.h and MainFrm.h files to the beginning of the OrderView.cpp file and then save it.
964

Connecting to Data Sources
Handling View Activation
When you switch to a view that already exists, you need to ensure that the recordset is refreshed and that the dialog is re-initialized so that the correct information is displayed. When an existing view is activated or deactivated, the framework calls the OnActivateView() member of the class, so this is a good place to take care of refreshing the recordset and the dialog box. You can override this function in each of the view classes. You can do this by selecting the Overrides button in the Properties window for a view class and selecting OnActivateView from the list. Make sure you add the override to both view classes.
You can add the following code to complete the implementation of the OnActivateView() function override for the COrderView class:
void COrderView::OnActivateView(BOOL bActivate,
CView* pActivateView, CView* pDeactiveView)
{
if(bActivate)
{
//Get a pointer to the document CDBSampleDoc* pDoc = GetDocument();
//Get a pointer to the frame window
CMainFrame* pMFrame = static_cast<CMainFrame*>(GetParentFrame());
//If the last view was the product view, we must re-query
//the recordset with the product ID from the product recordset if(pMFrame->m_CurrentViewID==PRODUCT_VIEW)
{
if(!m_pSet->IsOpen()) |
// Make sure the recordset is open |
return; |
|
// Set current product ID as parameter m_pSet->m_ProductIDparam = pDoc->m_DBSampleSet.m_ProductID; m_pSet->Requery(); // Get data from the DB
// If we are past the EOF there are no records if(m_pSet->IsEOF())
AfxMessageBox(L”No orders for the current product ID”);
}
// Set the window caption
CString strTitle = _T(“Table Name: “); CString strTable = m_pSet->GetTableName(); if(!strTable.IsEmpty())
strTitle += strTable; else
strTitle += _T(“Orders - Multiple Tables”); pDoc->SetTitle(strTitle); CRecordView::OnInitialUpdate();
}
CRecordView::OnActivateView(bActivate, pActivateView, pDeactiveView);
}
You execute the code only if the view is being activated, and when this is the case, the bActivate argument will be TRUE. After getting pointers to the document and the parent frame, you verify that the previous view was the Product View before re-querying the order set. This check is not necessary at
965

Chapter 19
present because the previous view is always the Product View, but when you add another view to the application, this will not always be true so you might as well put the code in now.
To re-query the database, you set the parameter member of COrderSet, m_ProductIDparam, to the current value of the m_ProductID member of the product recordset. This causes the orders for the current product to be selected. You don’t need to set the m_strFilter member of the recordset here because that was set in the OnInitialUpdate() function when the CRecordView object was first created. The IsEOF() function member of the COrderSet object is inherited from CRecordSet and returns TRUE if the recordset is empty when it is re-queried.
Ad the code for OnActivateView() function in the CProductView class as follows:
void CProductView::OnActivateView(BOOL bActivate,
CView* pActivateView, CView* pDeactiveView)
{
if(bActivate)
{
// Update the window caption CString strTitle = _T(“Table Name”);
CString strTable = m_pSet->GetTableName(); strTitle += _T(“: “) + strTable; GetDocument()->SetTitle(strTitle);
}
CRecordView::OnActivateView(bActivate, pActivateView, pDeactiveView);
}
In this case, all you need to do if the view has been activated is to update the window caption. Because the Product View is the driving view for the rest of the application, you always want to return the view to its state before it was deactivated. If you do nothing apart from updating the window caption, the view is displayed in its previous state.
Viewing Orders for a Product
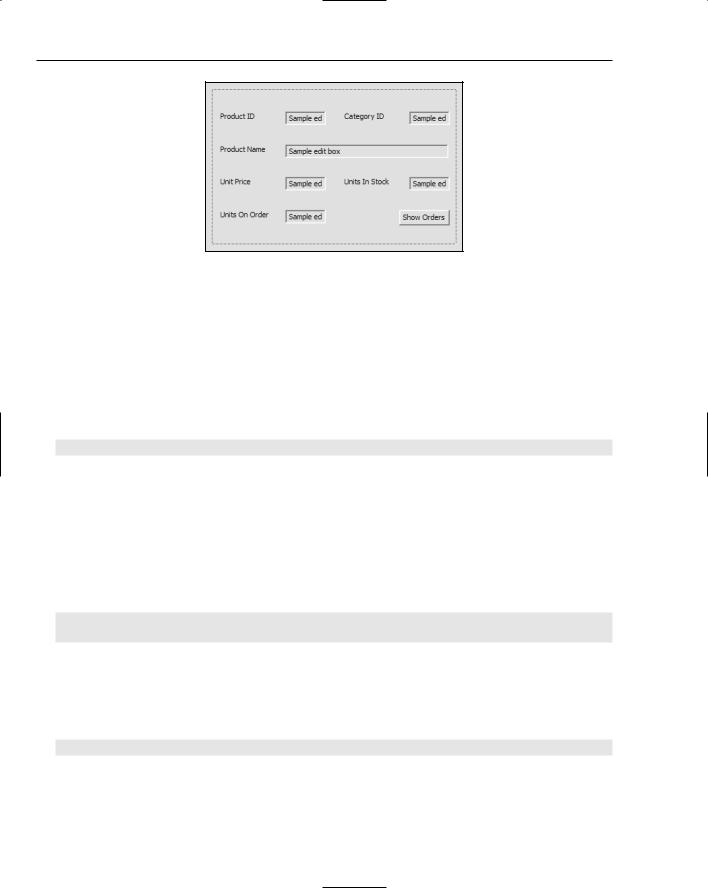
You are now ready to try to build the executable module for the new version of the example. When you run the example, you should be able to see the orders for any product just by clicking the Orders button on the products dialog box. A typical view of an order is shown in Figure 19-28.
Figure 19-28
966

Connecting to Data Sources
Clicking the Show Products button returns you to the products dialog box, so you can browse further through the products. In this dialog, you can use the toolbar buttons to browse all the orders for the current product. The Customer ID is a bit cryptic. You could add one more view to display the details of the customer’s name and address. It won’t be too difficult, because you have built already the mechanism to switch between views.
Viewing Customer Details
The basic mechanism that you’ll add will work through another button control on the order dialog that switches to a new dialog for customer data. As well as controls to display customer data, you’ll add two buttons to the customer dialog box: one to return to the Order View, and the other to return to the
Product View. You’ll need another view ID corresponding to the customer view, which you can add with the following line in the OurConstants.h file:
const unsigned int CUSTOMER_VIEW = 3;
Now you’ll add the recordset for the customer details.
Adding the Customer Recordset
The process is exactly the same as you followed for the COrderSet class. Use the Add >Class menu item from the context menu in Class View and use the MFC ODBC Consumer template to define the CCustomerSet class, with CRecordset specified as the base class. Select the database as Northwind as before and select the Customers table for the recordset. You can select snapshot as the type of access to the table. The class should then be created with the data members shown as follows:
CStringW m_CustomerID;
CStringW m_CompanyName;
CStringW m_ContactName;
CStringW m_ContactTitle;
CStringW m_Address;
CStringW m_City;
CStringW m_Region;
CStringW m_PostalCode;
CStringW m_Country;
CStringW m_Phone;
CStringW m_Fax;
Don’t forget to comment out the #error directive in the CustomerSet.cpp file. Change each of the CStringW types here to CString and then save the class file. At this point, you could add a CCustomerSet member to the document so that it is created when the document object is created. Right-click the CDBSampleDoc class name in Class View and add a variable of type CCustomerSet with the name m_CustomerSet. You can leave the access specifier as public.
You will find an #include directive for CustomerSet.h that has already been added to DBSampleDoc.h. After saving all the files you have modified, you can create the customer dialog resource.
967

Chapter 19
Creating the Customer Dialog Resource
This process is also exactly the same as the one you went through for the orders dialog. Change to Resource View and create a new dialog resource with the ID IDD_CUSTOMER_FORM, not forgetting to set the style to Child and the border to None in the Properties box for the dialog. After deleting the default buttons, add controls to the dialog box to correspond to the field names for the Customers table, as shown in Figure 19-29:
Figure 19-29
The two buttons enable you to switch to either the Orders dialog, which is how you got to this dialog, or directly back to the Products dialog. The size of the window for the application is determined by the size of the first dialog box displayed, so because the Customer dialog is a bit larger, resize the Products dialog box at least as large as this dialog box.
Specify the IDs for the controls using the field names as a basis. You can get help with this by expanding the list of members of CCustomerSet in Class View and keeping that visible while you work on the dialog. You can set the button IDs as IDC_ORDERS and IDC_PRODUCTS. After you save the dialog resource, you’re ready to create the view class for the recordset.
Creating the Customer View Class
You’ll create the view class for the customer recordset manually, just as you did for the COrderView class. Add CustomerView.h and CustomerView.cpp files to the project and insert the following code to define the class in the CustomerView.h file:
// CCustomerView record view #pragma once
class CCustomerSet;
class CDBSampleDoc;
class CCustomerView : public CRecordView
{
968