

Visual CSharp .NET Programming (2002) [eng]
.pdfWarning You’ll need to change the connection string used in the SqlConnection constructor to reflect your own circumstances—or, of course, this code will not run.
You’ll find the code for creating the DataSet and filling the ListBox, including basic exception handling, in Listing 12.17.
Listing 12.17: Creating a DataSet in Code
private void btnFillCode_Click(object sender, System.EventArgs e) { Cursor = Cursors.WaitCursor;
try {
string mySelectQuery = "SELECT * FROM Customers"; SqlConnection myConnection = new SqlConnection("data
source=SQLSERVER;" +
"initial catalog=Northwind;password=harold;user id=sa"); DataSet theData = new DataSet();
SqlDataAdapter theAdapter = new SqlDataAdapter(mySelectQuery, myConnection);
theAdapter.Fill(theData, "Customers"); listBox3.DataSource = theData.Tables["Customers"]; listBox3.DisplayMember = "CompanyName";
}
catch (System.Data.SqlClient.SqlException) {
MessageBox.Show ("Please check your SQL Server connection " + "and verify the connection string.");
}
catch (Exception excep){ MessageBox.Show (excep.Message);
}
finally {
Cursor = Cursors.Default;
}
}
If you run the project and click the Fill Code button, the customer names will appear in the ListBox (Figure 12.35).
Figure 12.35: It’ s possibly to manage data connectivity entirely programmatically.
Binding to a DataGrid and Updating a Database

DataGrids are wonderful controls for displaying tabular data and for allowing the user to interact with that data. In this section, I’ll show you how to bind a DataGrid to a DataSet, fill the DataSet (and thereby fill the grid), and update the database with changes that the user has made within the grid.
First, add a DataGrid control to the form. Then add two buttons: one to load the form and one to update the database.
Next, bind the DataGrid to the existing DataSet, which—as you’ll recall—contains the Northwind Products table. To do this, with the DataGrid selected, open the Properties window (Figure 12.36). Set the DataSource property of the DataGrid to dataSet1. Next, set the DataMember property to Products (the drop-down arrow will show you all the tables within the DataSet).
Figure 12.36: Bi nd the DataGrid to the DataSet by setting the appropriate properties of the DataGrid.
Warning Make sure the DataSource property is set to dataSet1 and not dataSet1.Products.
The DataGrid has now been bound to the DataSet, but the DataSet still needs to be filled. Within the Fill button’s Click procedure, add a line of code using the SqlDataAdapter’s Fill method to fill the DataSet:
private void btnFillGrid_Click(object sender, System.EventArgs e) { sqlDataAdapter1.Fill (dataSet1);
}
Run the project and click Fill. The grid will be populated with data from the Products table, as seen in Figure 12.37.

Figure 12.37: Our grid is populated with the contents of Products.
Note Of course, a variation on this would be to fill a grid automatically without user intervention— for example, in the form constructor.
I started this chapter by noting that a DataSet is a miniature database stored in memory. This being the case, the changes that a user makes within the grid only impact the DataSet—until the Update method of the DataAdapter is invoked. The Update method writes back and reconciles the changes that have been made in the DataSet to the database.
To set this up, add the code to the Update button’s Click event that writes any changes made by the user back to the database using the Update method of the SqlDataAdapter:
private void btnUpdate_Click(object sender, System.EventArgs e) { sqlDataAdapter1.Update (dataSet1, "Products");
}
Run the project again, load the data into the grid, and make some changes (for example, to the Product Name data). When you click Update, changes made in the grid are instantly reflected in controls that are bound to the same DataSet, for example, the ListBox in the upper left of the form. Figure 12.38 shows the addition of comments about Harold Davis and his liking for food added to the ProductName column. This happens without updating the database, since both the ListBox and the grid are taking their data from the same DataSet. However, these changes are also written to the database, as you can verify by taking the sample application down and up, and then re-filling the DataSet.
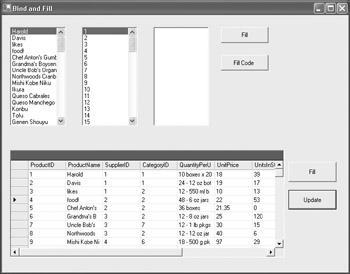
Figure 12.38: Changes made in the grid are instantly made to the DataSet and written to the database when the Update button is clicked.
Conclusion
This chapter has touched on some very big topics: XML in .NET and ADO.NET database connectivity. The bad news is that either topic alone—let alone both together—is way too vast to be covered in a single chapter. But no two applications are the same. The good news is the material in this chapter will help point you in the right directions for your own applications. You certainly need to know about connecting to databases. And the extensive and flexible use of XML both above and below the covers in .NET should certainly get you thinking creatively about how you can best use XML in your own applications.
This book started by showing you how to create relatively simple web services. At that point, no knowledge of C# or of the classes in the .NET Framework was assumed. Well, you’ve come a long way. The next—and final—chapter wraps it all up with an exploration of what you can do with web services now that you have a sophisticated understanding of .NET and a considerable amount of C# programming under your belt.
Chapter 13: Web Services as Architecture
Overview
•Managing session and state in a web service
•Exposing data and returning a DataSet from a web service
•Transaction management
•Exposing a message queue as a web service
•Using the TerraService web service to display aerial photos and topographic maps
This book started by showing you how easy it is to create ASP.NET web services—and to consume those services. I moved from there to the nuts and bolts of the C# language, and how to utilize many of the important classes of the .NET Framework.


Next, start adding the web methods. The first, StartMe, is shown in Listing 13.1. It checks that a name was passed in. Next, the application counter is started or incremented. Finally, the session counter is engaged and the session name saved.
Listing 13.1: Initializing Session and Application Tracking
[WebMethod (Description = "Starts the stateful service", EnableSession = true)]
public string StartMe(string theName) { if (theName == String.Empty) {
return "You must enter a name to start the service!";
}
else {
if (Application["totalUse"] == null){ Application["totalUse"] = 1;
}
else {
Application["totalUse"] = (int) Application["totalUse"] + 1;
}
Session["numSession"] = 1; Session["userName"] = theName;
return theName + ", your session has started!";
}
}
The next web service, GetSession, shown in Listing 13.2, verifies that the name passed in matches the name of the session. If it does, the application and session counters are incremented, and the session counter value is passed back.
Note The values contained in the Application and Session objects must be explicitly cast to string or integer (as appropriate).
Listing 13.2: Incrementing the Session and Application Counters
[WebMethod (Description = "Iterates the stateful service", EnableSession = true)]
public int GetSession (string theName) {
if (theName != (string) Session["userName"]){ return 0;
}
else {
if (Application["totalUse"] == null){ Application["totalUse"] = 1;
}
else {
Application["totalUse"] = (int) Application["totalUse"] + 1;
}
int numSession = (int) Session["numSession"]; numSession ++;
Session["numSession"] = numSession; return numSession;
}
}

It’s easy to use to get the total usage for the application by just returning the "totalUse" value stored in the Application object, cast to integer type (Listing 13.3).
Listing 13.3: Tracking Total Application Usage
[WebMethod (Description = "Tracks total service usage", EnableSession = true)]
public int GetTotalUsage () {
return (int) Application["totalUse"];
}
Resetting values to zero means simply assigning 0 to the "totalUse" value stored in the Application object and to the "numSession" value stored in a Session object (Listing 13.4).
Listing 13.4: Resetting Application Usage
[WebMethod (Description = "Reset Global", EnableSession = true)] public void ResetGlobal () {
Application["totalUse"] = 0;
Session["numSession"] = 0;
}
With the methods in place, run the project. Visual Studio will generate the “table of contents” WSDL page for the ASP.NET web service (Figure 13.1).
Figure 13.1: The service’s methods are listed in the generated pages.
You can click the StartMe link to see the generated test page for that particular method (Figure 13.2). Enter a name, and click Invoke to test the method.

Figure 13.2: You can test a service using the Invoke button.
As you can see in the XML returned by the method (shown in Figure 13.3), the method is at least nominally working—it has returned a string indicating it received a name as input.
Figure 13.3: The XML shows the return value from the tested method.
Consuming the Stateful Web Service
The rubber meets the road in the client applications that will use the stateful service. Figure 13.4 shows the demonstration client, a Windows forms application, which includes a TextBox for the name of each session, and buttons to start the session (and application), to increment the session counter, and to reset the application.
Figure 13.4: The service requires that the user input a name before session tracking begins.
Before you can get started coding the client, you need to add the Stateful Service as a web reference to the client project (Project →?Add Web Reference).?(You can change the name of

the web reference to anything you’d like, so I changed it to “StateService.”) You also need to add to the form a?using directive that includes the System.Net namespace:
using System.Net;
Next, in the form constructor, instantiate a StateService object and a CookieContainer, and connect the two:
ss = new StateService.Ss();
CookieContainer cookiePot = new CookieContainer(); ss.CookieContainer = cookiePot;
The StateService variable is declared at the form level so it is accessible to all the methods in the form class:
StateService.Ss ss;
To start the service, invoke the StartMe web service method:
this.Text = ss.StartMe(txtName.Text);
It’s likewise not very difficult to increment a session and display the session and application counts using the GetSession and GetTotalUsage web service methods:
private void btnAgain_Click(object sender, System.EventArgs e) { int numSessions = ss.GetSession (txtName.Text);
int numApps = ss.GetTotalUsage(); if (numSessions < 1){
this.Text = "Sorry, I don't recognize you, stranger!";
}
else {
this.Text = "Welcome back, " + txtName.Text + "!"; label1.Text = "Number of times for this named session is " +
numSessions.ToString();
label2.Text = "Total named usage of application is " + numApps.ToString();
}
}
The complete web service–related code for the form module is shown in Listing 13.5.
Listing 13.5: The Client Application Form Code
using System.Net;
...
public Form1() {
...
// in the form constructor ss = new StateService.Ss();
CookieContainer cookiePot = new CookieContainer(); ss.CookieContainer = cookiePot;
}
...
StateService.Ss ss;
private void btnStart_Click(object sender, System.EventArgs e) { this.Text = ss.StartMe(txtName.Text);