Professional Visual Studio 2005 (2006) [eng]
.pdf
Chapter 55
How Smart Tags Work
The functionality of a smart tag is divided into two distinct phases: recognition and action. The recognition phase is the background process that searches through your document looking for strings that match its search criteria.
The most basic smart tag doesn’t even need code, just a specially formatted list containing an array of strings, each one being equivalent to an individual term that should be recognized by the tag code. Code-based smart tags can use complex search criteria to determine what parts of a document should be recognized by the tag, including regular expressions and sourcing the term list from a Data Source.
Once the recognizer side of the smart tag determines that a section of the document should be recognized, it returns information to Word or Excel, which visually marks the range with a smart tag indicator (in Word this is a small purple, dotted line, whereas in Excel it’s a small purple triangle in one corner of the cell). When you hover your mouse pointer over the smart tag, an icon appears, enabling you to open a special smart tag menu.
This is where the second main phase of the smart tag code comes into play. The actions phase controls how this smart tag menu should look, specifying the menu commands (and a hierarchy of submenus if needed), and what action should be taken based on a user’s selection. Word and Excel pass information about the document to the smart tag DLL, which in turn performs whatever function is selected.
An example might be a customer smart tag that recognizes customer names. When you open the smart tag menu for a particular recognized customer, you could insert additional information about that customer into the document, such as their address or financial data.
Smart tag development required you to create a standalone DLL containing classes that implemented a series of interfaces for both the recognition phase and the action phase of a smart tag (if you’re not sure how smart tags work, take a look at the sidebar, “How Smart Tags Work”).
One problem with this implementation of smart tags was that once installed, smart tags were either active for all documents or inactive for the entire application. This resulted in unexpected behavior in Word and Excel, such as people’s initials being recognized by a financial stock smart tag, or ill-defined search terms of small words being located within a bigger word (an example of this might be having the word step marked as a recognized term when it was part of the full word footstep).
VSTO 2005 introduces a special type of smart tag that only exists for the specific document or template in which it’s created. This enables you to create search criteria that are much more general without worrying about false positives in other documents.
They are also integrated right into the programming mode of the VSTO applications, resulting in a much easier implementation. In fact, once a VSTO smart tag has been defined in the code, you need to write one statement to add it to the document’s smart tag collection:
Me.VstoSmartTags.Add(TheSmartTagObject)
786

Visual Studio Tools for Office
The SmartTag object is straightforward to use. First, you need to declare the SmartTag object and then populate the Terms or Expressions collection to specify the search criteria. Next, you need to create an Action object and assign it to the Actions collection. That’s all that is necessary, so the simplest code to achieve this would look like the following:
Dim TheSmartTagObject As New Microsoft.Office.Tools.Word.SmartTag( _ “www.parsonsdesigns.com/VSTO#MySmartTag”, “The VSTO Smart Tag”)
TheSmartTagObject.Terms.Add(“myTerm”)
Dim MyAction As Microsoft.Office.Tools.Word.Action = _
New Microsoft.Office.Tools.Word.Action(“My Action”)
TheSmartTagObject.Actions = New Microsoft.Office.Tools.Word.Action() { _
MyAction }
Me.VstoSmartTags.Add(TheSmartTagObject)
While this is technically correct, it does not achieve anything, because you need to be able to intercept the events of the Action object so you can act when a user selects the smart tag menu. The definition of the Action object needs to be moved to the module level, and a WithEvents keyword must be added so Visual Studio knows you need to intercept its events. Changing the code accordingly, the following listing is all you need to have a properly functioning and implemented smart tag:
WithEvents MyAction As Microsoft.Office.Tools.Word.Action
...
Dim TheSmartTagObject As New Microsoft.Office.Tools.Word.SmartTag( _ “www.parsonsdesigns.com/VSTO#MySmartTag”, “The VSTO Smart Tag”)
TheSmartTagObject.Terms.Add(“myTerm”)
MyAction = New Microsoft.Office.Tools.Word.Action(“My Action”)
TheSmartTagObject.Actions = New Microsoft.Office.Tools.Word.Action() { _
MyAction }
Me.VstoSmartTags.Add(TheSmartTagObject)
Microsoft Outlook Add-Ins
New to VSTO in 2005 is Outlook add-in support. Traditionally, Outlook add-ins used the IDTExtensibility2 interface when connecting to Outlook, but with VSTO 2005 the project template includes an implementation of the IStartup interface instead. This is a much simpler interface, requiring only that you handle the Startup and Shutdown events, similar to those for the Word and Excel project types.
VSTO 2005 has managed this difficult feat by wrapping the add-in with a preloader, which loads the
.NET CLR and then the VSTO runtime before finally running the assembly containing the add-in code. This ensures that Outlook can run the managed code routines within the add-in itself and enables your code to intercept events raised by Outlook and to write code that will automate Outlook through the object model. The events belong to the VSTO supplied classes in the Microsoft.Office.Tools
.Outlook namespace.
787

Chapter 55
The VSTO 2005 Sample Project
The best way to understand the power of the new features of Visual Studio Tools for Office is to walk through the creation of an application that takes advantage of them. The following pages take you through the process of creating a Word document project, designing the document layout, marking it up with Bookmark host controls, and adding some Windows Forms controls to the document as well. Then, multiple Actions Pane components are added to demonstrate how you can contextually change the Document Actions pane dynamically, and some smart tag processing is added to recognize and act on particular terms.
1.Before you begin this walk-through, first ensure that you have installed Visual Studio Tools for Office 2005 and have Microsoft Word 2003 set up with the Primary Interop Assemblies (PIAs). The PIAs are necessary for the integration of Word and .NET. To confirm that the PIAs are installed, run the setup for Microsoft Office, choose advanced customization, and ensure that the .NET Programmability Support component is installed.
2.Once you’re ready to create the project, start Visual Studio 2005 and use the File New Project command to display the New Project dialog. Select the Office templates group and locate and select the Word Document project template. Change the name of the project to “CoolVSTOFeatures” and click OK to create the project.
When Visual Studio 2005 prompts you to pick a document, accept the default selection of Create a New Document and leave the name as is (it will default to CoolVSTOFeatures to match the project name).
You may also be prompted to enable access to the Visual Basic for Applications engine (see Figure 55-2). If you don’t do this, you won’t be able to continue to create the project, so accept this change to Word’s options.
3.It’s time to create the skeleton Word document that will be used to show off the new features of Visual Studio Tools for Office. When Visual Studio creates the project, the document will be opened in the main workspace of the IDE in Design view. Type the text The Report Heading
and assign it the Heading 1 style. Remember that you have access to all of the Word toolbars for editing the document, so if you can’t see the Styles drop-down list, locate the toolbar command just as you would in Word.
4.Press Enter to go to a new line, and type the following(because you’re using Word, it automatically sets this new line’s style to Normal, as it is following the Word rules about styles):
The summary information for the report will go here.
5.Again, press Enter to go to a new line, this time adding a Word table. The table should be one row high and two columns wide. In the first cell of the table add the words Company Name, and in the second add the word Information. This table is automatically populated with company names based on the summary content.
So far, you’ve created a straightforward document with no VSTO features, so you’ll now add the VSTO controls to the document that will be used to interact with the user of the document.
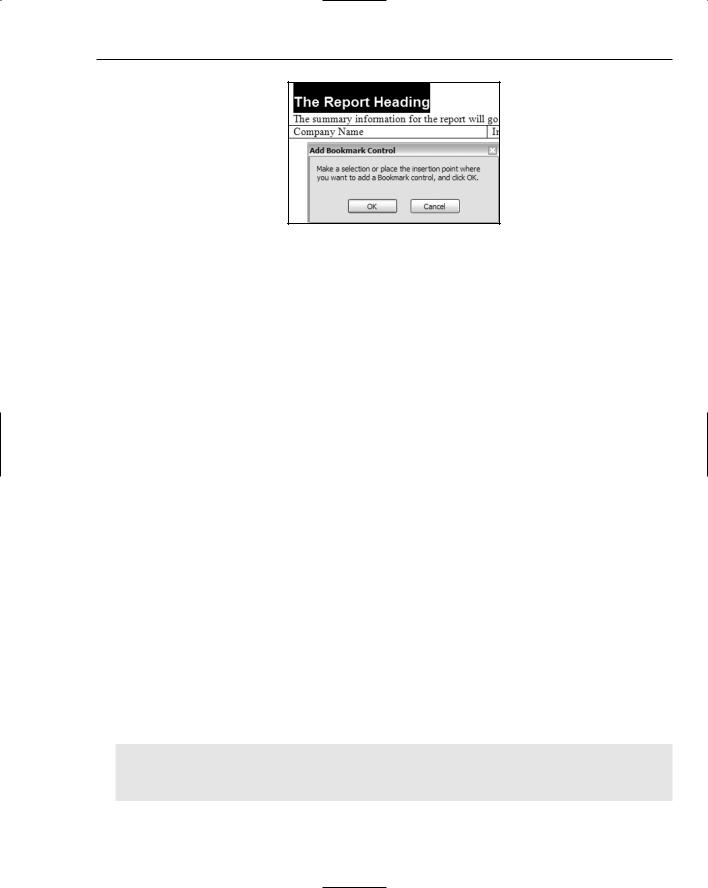
6.Add a Bookmark host control to the document by double-clicking its entry in the Word Controls group in the Toolbox. This displays a dialog box asking you to mark the section of the document for inclusion in the bookmarked region. Highlight the three words in the heading line and click OK (see Figure 55-12). Name the Bookmark DocumentHeading.
788

Visual Studio Tools for Office
Figure 55-12
7.Repeat this process to add a second Bookmark host control that contains the entire summary paragraph line, this time including the paragraph mark. Name this second Bookmark control DocumentSummary. Add a final Bookmark host control that encloses the table and set its Name property to TableArea. These three Bookmark controls are referred to in the code you’ll write in subsequent steps.
8.To illustrate how Windows Forms controls can be used in Office document solutions as well, add a TextBox and Button below the table. Notice how the controls follow the Word flow pattern of layout, appearing in a separate paragraph. Because the controls are set tightly against each other the design looks a little awkward, so add a couple of spaces between them. Set the following properties on the TextBox:
Name: DocAuthorName
Text: (null)
Width: 200
9.Set the following properties on the Button:
Name: SaveAuthorName
Text: Save Author Name
Width: 80
The document user interface design is now complete, so you can start adding code behind the document. The first task is to add a smart tag that recognizes a list of company names that can be used in other functionality in the document:
1.Open the ThisDocument.vb file that contains the code for the document by right-clicking its entry in the Solution Explorer and selecting the View Code menu command. At the top of the class definition and just before the ThisDocument_Startup method definition, add a subroutine that creates the smart tag, defines its recognizers, and hooks in two action objects. First, define the subroutine with a name of AddCompanySmartTag and add a statement to define and instantiate a new VSTO Word smart tag object named CompanyDetails:
Private Sub AddCompanySmartTag()
Dim CompanyDetails As New Microsoft.Office.Tools.Word.SmartTag( _
“www.wrox.com/CompanyDetails#CompanyDetailsSample”, “Company Details”)
End Sub
789

Chapter 55
The first parameter in the instantiation of the SmartTag object should be unique to your project, so feel free to change the URI to something you’ll recognize. The second parameter, CompanyDetails, will be the name of the smart tag displayed to the end user of the document.
2.Define a set of company names to look for. For this sample walk-through, you’ll just use a list of simple one-word names by adding to the Terms collection in the smart tag, but you could just as easily create search criteria using the Expressions collection and build a series of regular expressions. Use the Terms.Add method to add a number of company names. This sample adds five terms as follows:
Private Sub AddCompanySmartTag()
Dim CompanyDetails As New Microsoft.Office.Tools.Word.SmartTag( _
“www.test.com/CompanyDetails#CompanyDetailsSample”, “Company Details”)
CompanyDetails.Terms.Add(“Microsoft”)
CompanyDetails.Terms.Add(“ParsonsDesigns”)
CompanyDetails.Terms.Add(“AutumnCare”)
CompanyDetails.Terms.Add(“Wrox”)
CompanyDetails.Terms.Add(“Wiley”)
End Sub
3.The only thing left to do to prepare the smart tag in the document is to connect the smart tag action and recognizer. At the end of the subroutine, add the statement Me.VstoSmartTags
.Add(CompanyDetails). The VstoSmartTags collection object is used to store the SmartTag objects that are bound to a specific document or template solution.
4.The smart tag will now recognize the terms and mark them up in the Word document, but there are no Actions associated with the smart tag, so it’s pretty useless. The sample solution enables users to save company names to a list for later use and displays a small bit of information about the company. Define two smart tag Action objects at the top of the ThisDocument class. Because you want to be able to intercept some of the Action objects’ events, you need to define them WithEvents:
Private WithEvents SaveCompanyName As Microsoft.Office.Tools.Word.Action
Private WithEvents DisplayCompanyValue As Microsoft.Office.Tools.Word.Action
5.Now you can return to the AddCompanySmartTag subroutine and create new instances of the Action class for these objects. After you add the search criteria to the Terms collection, create the two new Actions like this:
SaveCompanyName = New Microsoft.Office.Tools.Word.Action(“Save Name”)
DisplayCompanyValue = New Microsoft.Office.Tools.Word.Action(“Show Details”)
The Action objects are now ready to be hooked up to the CompanyDetails SmartTag object. To do this, assign a new collection of Action objects to the Actions collection:
CompanyDetails.Actions = New Microsoft.Office.Tools.Word.Action() _
{SaveCompanyName, DisplayCompanyValue}
Make sure your final subroutine matches the following listing:
Private Sub AddCompanySmartTag()
Dim CompanyDetails As New Microsoft.Office.Tools.Word.SmartTag( _
“www.test.com/CompanyDetails#CompanyDetailsSample”, “Company Details”)
CompanyDetails.Terms.Add(“Microsoft”)
790

Visual Studio Tools for Office
CompanyDetails.Terms.Add(“ParsonsDesigns”)
CompanyDetails.Terms.Add(“AutumnCare”)
CompanyDetails.Terms.Add(“Wrox”)
CompanyDetails.Terms.Add(“Wiley”)
SaveCompanyName = New Microsoft.Office.Tools.Word.Action(“Save Name”)
DisplayCompanyValue = New Microsoft.Office.Tools.Word.Action(“Show Details”)
CompanyDetails.Actions = New Microsoft.Office.Tools.Word.Action() _
{SaveCompanyName, DisplayCompanyValue}
Me.VstoSmartTags.Add(CompanyDetails)
End Sub
6.Because they’re based on the Smart Tags 2.0 library, VSTO smart tag captions can be modified dynamically through the BeforeCaptionShow event. To demonstrate this in action, add the following two simple subroutines. Each one handles the BeforeCaptionShow and sets the Caption property to a value that includes the string recognized by the SmartTag object’s recognizer:
Sub SaveCompanyName_BeforeCaptionShow(ByVal sender As Object, _ ByVal e As Microsoft.Office.Tools.Word.ActionEventArgs) Handles _ SaveCompanyName.BeforeCaptionShow
SaveCompanyName.Caption = “Save “ & e.Text & “ to name list”
End Sub
Sub DisplayCompanyValue_BeforeCaptionShow(ByVal sender As Object, _ ByVal e As Microsoft.Office.Tools.Word.ActionEventArgs) Handles _ DisplayCompanyValue.BeforeCaptionShow
DisplayCompanyValue.Caption = “Display information about “ & e.Text End Sub
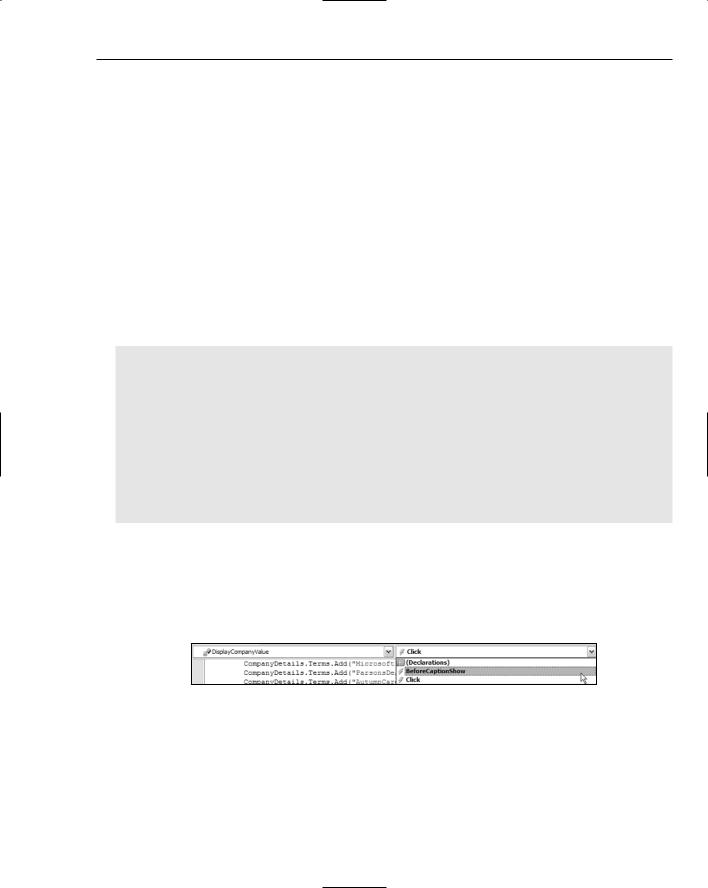
7.You’ll use the SaveCompanyName action in a later step, so for now create an event handler routine for the Click event of the DisplayCompanyValue action (see Figure 55-13). You can easily create event handler routines for both the Click and BeforeCaptionShow events by first selecting the specific object you want (for example, DisplayCompanyValue) in the Class Name drop-down list, and then selecting the event you need to handle from the Method dropdown list.
Figure 55-13
In a real-life situation, you might use the DisplayCompanyValue action to access the Internet or an internal company web site and download some useful financial information about the recognized company. However, for this example, simply display a message that contains the company name and a temporary value string to demonstrate how you can perform normal code. A sample Click event handler routine appears in the following listing:
791

Chapter 55
Sub DisplayCompanyValue_Click(ByVal sender As Object, _
ByVal e As Microsoft.Office.Tools.Word.ActionEventArgs) Handles _ DisplayCompanyValue.Click
Dim TempValue As String = vbNullString
Select Case e.Text
Case “Microsoft”
TempValue = “NO COMPLAINTS”
Case “ParsonsDesigns”
TempValue = “UH OH”
Case “AutumnCare”
TempValue = “COULD BE BETTER”
Case “Wrox”
TempValue = “SOLID GOLD”
Case “Wiley”
TempValue = “SKY HIGH”
End Select
MessageBox.Show(“The current value of “ & e.Text & “ is “ & TempValue) End Sub
8.You’ll need to call the AddCompanySmartTag subroutine in the Startup routine of the document. At the same time, call the Select method on the DocumentSummary Bookmark object so that when the document is first opened, the summary section is always selected, ready for users to begin adding their own entries:
Private Sub ThisDocument_Startup(ByVal sender As Object, _
ByVal e As System.EventArgs) Handles Me.Startup
AddCompanySmartTag()
DocumentSummary.Select()
End Sub
9.Before testing the document solution, you should also add some functionality to the Windows Forms Button control you added to the design. The simplest way to add the event handler is to return to the Design view of the document and double-click the SaveAuthorName button.
Visual Studio 2005 automatically creates the event handler stub for you. In this subroutine, add the following two statements:
Private Sub SaveAuthorName_Click(ByVal sender As System.Object, _
ByVal e As System.EventArgs) Handles SaveAuthorName.Click
Me.BuiltInDocumentProperties(“Author”).value = DocAuthorName.Text MessageBox.Show(“The Author Name property has been set to “ & _
DocAuthorName.Text & “. You can check by looking at File->Properties.”)
End Sub
The first statement uses the BuiltInDocumentProperties key-value pair collection of the Word Document object. This is just one of hundreds of properties exposed by Word through either the Application object or the Document object. This particular collection maintains the list of pre-defined properties pertaining to a particular document, including the Title, Author, and Subject, as well as other information.
792

Visual Studio Tools for Office
The code overwrites the Author value with whatever text is in the DocAuthorName TextBox situated in the document. The second statement simply shows a dialog informing the user of what action took place.
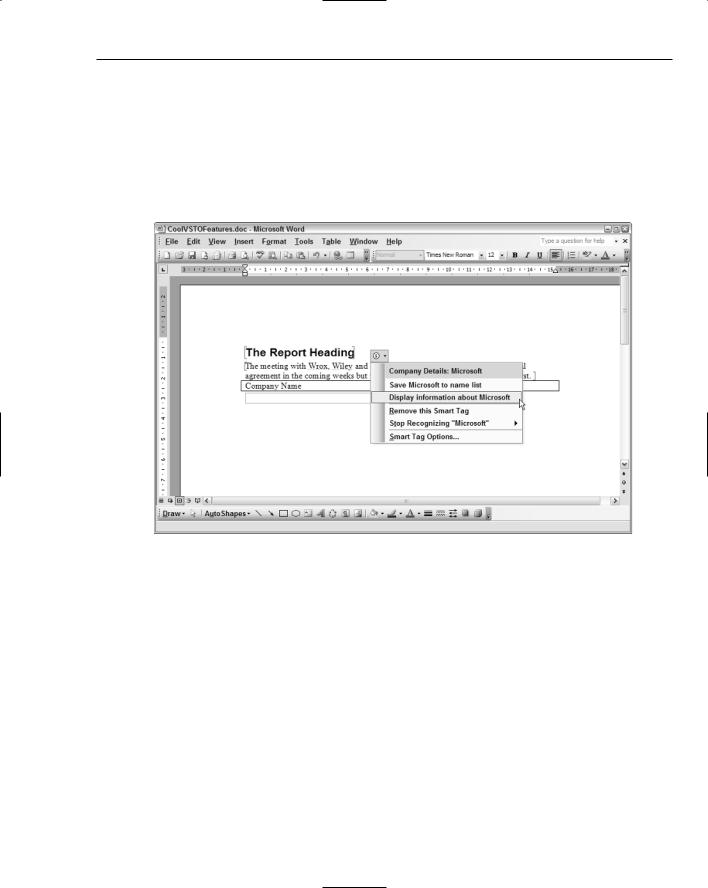
10.Run the document solution by pressing F5. This enables you to debug the code if anything goes wrong. After the project is compiled, Microsoft Word automatically starts and loads your document. Figure 55-14 shows the document after an end user types some information in the summary area, replacing the placeholder text. Note how several words have been recognized as smart tag terms, and how the user has selected one to perform an action.
Figure 55-14
Test the features you’ve added to the document so far by selecting the DisplayCompanyValue smart tag action for different recognized company names. In addition, try typing text in the textbox and clicking the Save Author Name button to save it to the built-in properties list of the document.
When you’re satisfied that the functionality is working as expected so far, close the document (without saving) and return to the Visual Studio 2005 IDE. The next stage of development is to add two Actions Pane controls to the project. One will be visible at all times and will provide some limited information, while the second component should only be shown when the end user is in the table area of the document. While this situation is forced, it demonstrates how to use both multiple and optional Actions Pane controls in a document solution.
1.Add the first Actions Pane control by right-clicking the project entry in the Solution Explorer and choosing the Add New Item from the context menu. Select the Actions Pane item template, name the control MainActions.vb, and click OK to add it to the project.
793

Chapter 55
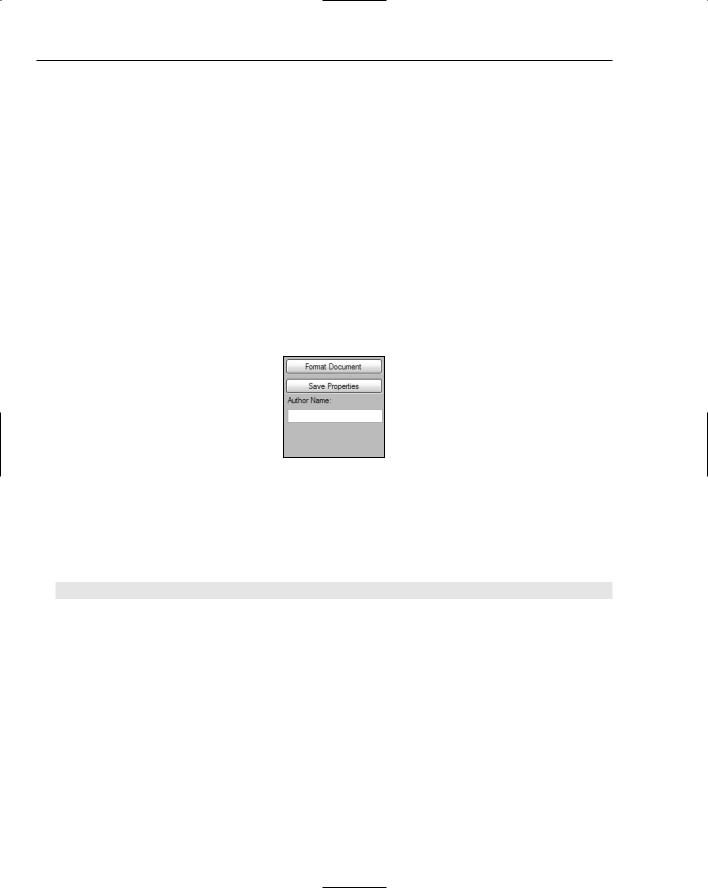
2.The design surface for an Actions Pane control is similar to a regular custom control, presenting a borderless form to work with. Add two Button controls, a Label control, and a TextBox control to the design with the following properties:
Button1.Name: FormatDocument
Button1.Text: Format Document
Button2.Name: SaveProperties
Button2.Text: Save Properties
Label1.Text: Author Name:
TextBox1.Name: PaneAuthorName
TextBox1.Text: (null)
3.To distinguish the areas of the two Actions Pane controls when they are displayed, change the BackColor property of the MainActions component to the web color SkyBlue. The final design should look like what is shown in Figure 55-15 (without color, of course).
Figure 55-15
4.To demonstrate how the objects of the main document can be passed around in code, take a reference to the DocumentHeading Bookmark control to this Actions Pane control. Open
MainActions.vb in Code view and define a public variable at the top of the class to contain the object reference (you could define a property to properly interface the Actions Pane to the document, but it’s simpler this way for the example):
Public HeadingAreaRef As Microsoft.Office.Tools.Word.Bookmark
You’ll connect this object to the Bookmark object in the document in a later step.
5.Add an event handler routine for the Click event of the FormatDocument button and write some code to format sections of the document based on different aspects of the information contained in the heading area. The following subroutine first formats the contents of the DocumentHeading bookmark itself with a built-in Word style. If the text contains the word Wrox, it will be styled using Heading 1; otherwise, it will be styled with Heading 2.
The other part of the listing sets a set of font properties in the table area of the document. Note how you can write code that references the objects in the Word document just like any other
.NET class. These properties vary depending on whether the length of the DocumentHeading bookmarked text is more or less than 10. Here’s the listing:
794

Visual Studio Tools for Office
Private Sub FormatDocument_Click(ByVal sender As System.Object, _ ByVal e As System.EventArgs) Handles FormatDocument.Click
If InStr(HeadingAreaRef.Range.Text, “Wrox”) > 0 Then
HeadingAreaRef.Style = “Heading 1”
Else
HeadingAreaRef.Style = “Heading 2”
End If
With Globals.ThisDocument.Tables(1).Rows(1)
If (HeadingAreaRef.End - HeadingAreaRef.Start) > 10 Then
.Range.Font.Bold = True
.Range.Font.Color = Word.WdColor.wdColorBlue
.Range.Font.Size = 16
Else
.Range.Font.Bold = False
.Range.Font.Color = Word.WdColor.wdColorDarkGreen
.Range.Font.Size = 24 End If
End With
End Sub
6.Add an event handler subroutine for the Click event of the SaveProperties button. The code for this subroutine is similar to the code you wrote for the Button control sited on the Word document itself, but this time you need to refer to the document using the Globals.ThisDocument object:
Private Sub SaveProperties_Click(ByVal sender As System.Object, _ ByVal e As System.EventArgs) Handles SaveProperties.Click
Globals.ThisDocument.BuiltInDocumentProperties(“Author”).Value = _
PaneAuthorName.Text
MessageBox.Show(“The Author Name property has been set to “ & _ PaneAuthorName.Text & “. You can check by looking at File->Properties.”)
End Sub
7.You can now hook up the first Actions Pane control to the document itself. Return to the ThisDocument.vb code module for the document and define an instance of the MainActions component at the top of the class. Because the pane doesn’t have any events, you can just define it normally, even including the instantiation at declaration time:
Private MainPane As New MainActions
8.Locate the document’s Startup event handler. Earlier you added code to this module to connect the SmartTag object and to select the contents of the DocumentSummary bookmark control. Below these statements, insert a statement to add the MainPane object you just defined to the ActionsPane.Controls collection of the document itself.
In addition, connect the DocumentHeading component to the MainPane HeadingAreaRef object so that the Actions Pane control will be able to use the contents of DocumentHeading. The Startup subroutine should now look like this:
795
